
Canvas Accessibility
General Course Accessibility
The Accessibility Checker can identify common issues in Canvas content. However, it is equally important to ensure uploaded files are accessible and that your online course is designed to be accessible and usable.
Well-designed online course material:
Making intentional choices with your online course material enhances the learner experience by promoting efficiency, fostering independence, reducing anxiety and confusion, and improving communication.
Consider the following best practices for accessible and user-friendly online course design:
Communication
Make anything you want to communicate to learners easy for them to find. Display it prominently on the course home page, in module overviews, and activity instructions. Ensure instructions come before an interaction, not after it.
Include clear, concise instructions about activities to help learners ensure they have completed all necessary steps. Clear, direct language helps learners to complete activities with maximum independence.
Use consistent language in instructions. For example, always use the same date format and the same terms for the same basic actions, such as “move to the next page.”
Clear communication, particularly instructions, help learners work through material and activities without having to repeatedly ask for clarification. Remember, your course may be only one of several a student is in. Unclear, vague, or otherwise confusing communications will only lead to additional overwhelm and less time for learning. Open SUNY Course Quality Review offers additional information about instructions.
Overviews
Use overviews to provide learners with context at the start of each module, learning activity, and assessment. Consider including:
- What will be covered in the module or assessment.
- The purpose of the learning activity or assessment.
- How the material connects to prior learning and the overall course.
- Any deliverables or activities due.
Overviews allow you to introduce material the same way you would explain a handout distributed in a physical classroom. Overviews reduce confusion, help reinforce expectations, and help with time management.
Signposts
Think of signposts as the ‘You are here’ indicators on a map. They help learners orient themselves in your course.
Signposts can be:
- Clear, descriptive labels for links, pages, and files.
- Cues to guide learners where to go next.
- Announcements and reminders about dates and deadlines.
To add an Announcement:
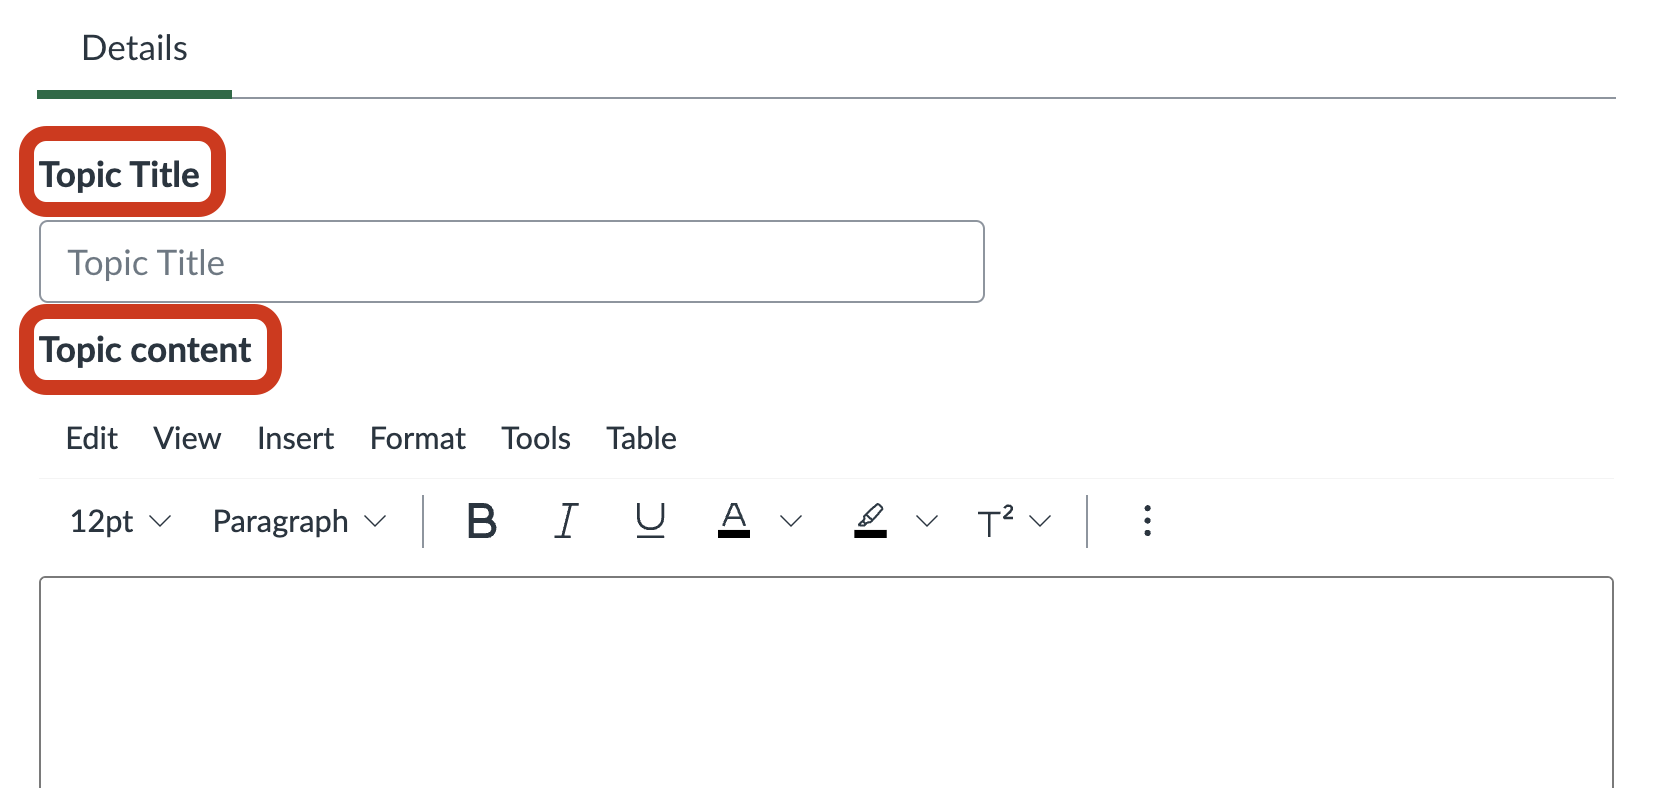
- Go to Announcements in your course navigation menu and select Add Announcement.

- Provide a brief, descriptive title in the Topic Title field and add your message and information in the Topic Content field. The content field allows for rich text formatting, including lists, images, links, and videos.
- When you are finished crafting your message, run the Accessibility Checker and select Publish. Your message will now appear on the Announcements page, and if enabled in your course Settings, on the course homepage.
For more information, consult Canvas’ announcements documentation.
Links and Multiple Ways
Providing multiple ways to navigate gives learners the opportunity to move between material and activities seamlessly. Consider this example:
‘Please review the Student Code of Conduct.’ Without a link or clarification about where to find the information, learners won’t be able to follow your instructions. As a better practice, add links, such as: ‘please review the Student Code of Conduct.’
When you mention something like a resource, reading, activity, assessment, etc. in an announcement, description, or content page, provide a link to that content. That saves learners time searching for what you mentioned. Don’t turn your course into a scavenger hunt.
To provide multiple ways:
Create Activities at the Module level
At the module level, select the Add Item button to create new Assignments, Discussions, Quizzes, and other activities.

Activities created this way automatically place activities in the flow of learning.
Add Existing Activities
At the module level, use the Add Item button to add an existing Assignment, Discussion, Quiz, or other Canvas activity.
Adding activities to the flow of content means learners don’t have to search for them.
Provide links in content
Within an Announcement or other Canvas content, use the Insert Link button to provide multiple ways.
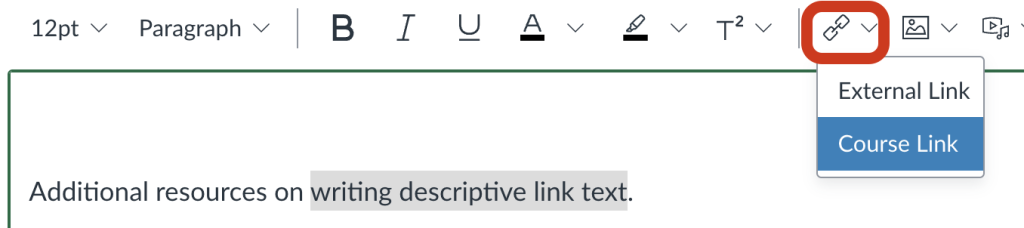
Internal course links are excellent navigational waypoints to help learners find content and engage with relevant material. Use the Insert Link tool and choose Course Link to activities and content within a Canvas course.
Use Course Link to create links to:
- Activities such as Assignments, Discussions, and Quizzes.
- Content such as other Canvas Pages.
- Files you have uploaded into your course, such as documents or videos.
Ensure the linked text is concise, unique, and descriptive.
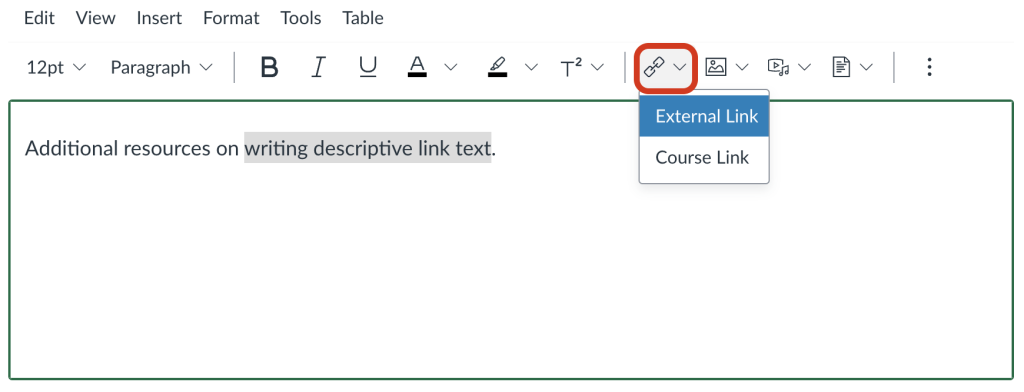
For external links:
- Write a brief description in the Text field. Ensure the text describes what will happen when the link is activated.
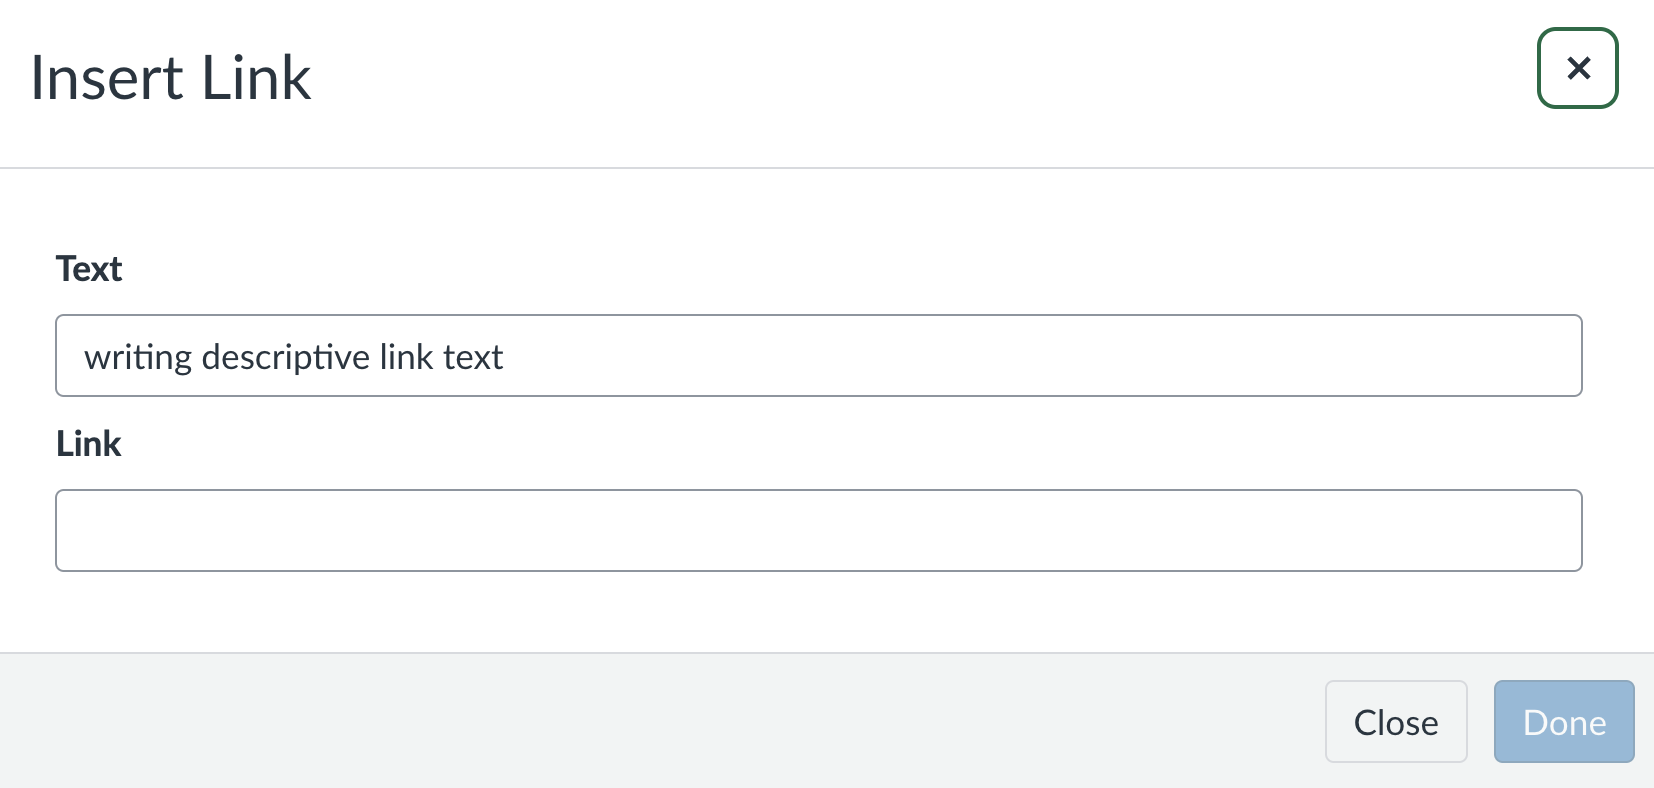
- Paste the URL in the Link field.
Use External Link to create links to:
- External content such as websites, library resources, and databases.
Do not modify the default appearance of links. Only use underlined text for links.
Include Reminders
In addition to providing links, consider including reminders about how to find tools and activities in Canvas. For example, in your assignment instructions, remind learners how to submit:
“When you are ready to submit your assignment, select the “Start Assignment” button.”
In general, use Canvas item names, but do not describe the location, because button and icon locations may vary when learners are using a Canvas mobile app instead of a computer.
Naming Convention
Use a consistent naming convention. All content such as links, files, activities, and pages should have easy-to-understand, self-describing, unique, and meaningful names. Be consistent when naming material, such as using the prefix “Topic n” for each module.
Weekly
Use a sequential structure to match the weeks of the semester. A weekly module structure creates a predictable rhythm students can count on and helps them match the course calendar to their personal calendars.
However, don’t just label modules Week 1, Week 2, etc. Why? Well, if your class is on Tuesday, but the first day of the semester is a Wednesday, the first time your class meets is in Week 2. That’s going to get confusing.
To create a strong weekly structure, consider the formula:
Sequence + Title + Timeframe.
For example, “1: Introduction to naming conventions (September 9-13)”, “2: Renaming Canvas files (September 16-20)”, etc.
Topic
If your Modules are not associated with a specific week of the semester, drop the date range from the previous example. But, to ensure progress and flow are explicitly indicated, use:
Sequence + Title
For example, “1: Introduction to naming conventions”, “2: Renaming Canvas files”, etc.
Deliverables
For courses built around major projects or assessments, create modules to group content related to each major artifact produced. Name Modules with:
Type + Sequence + Due Date
For example, “Project 1: Research Proposal (Sept 30)”, “Project 2: Literature Review (Oct 15)”, “Project 3: Final Report (Dec 6).”
Assessments
Consistently naming assessments helps you stay organized and reduces confusion by guiding students. Consider naming assessments with:
Type of assessment (i.e., Quiz, Essay, Presentation, etc.) + sequence, i.e., 1, 2, 3, etc. (where applicable) + informative name, title, or theme.
For example, “Reflection 1: First Impression”, “Reflection 2: Careful Exploration”, etc.
When learners can find information and activities easily, they can spend more time learning the material, not finding it. Easy-to-find material means you will receive fewer questions about where things can be found.
Content
To effectively name content such as documents, web pages, links, and other media, consider:
Title, theme, or topic + (file format).
For example:
- “Accessibility Handbook for Teaching and Learning (Ebook)“
- “Course Outline: Basket Weaving Spring 2025 (PDF)”
- “World’s Blankiest Blanks (Video, 0:55)”
(You might consider adding a prefix of “Required reading” or “Suggested viewing.”)
Naming content with informative titles tells students what to expect, draws connections between material, and offers an invitation to open the content.
Organization
The organization of your content is essential to student success. Making deliberate efforts to improve the organization of your Canvas content will help your learners:
- Find what they need.
- Understand what they find.
- Use what they learn.
Well-organized content allows learners to focus on the material you want them to learn, not spending excess time locating information or interpreting what they are supposed to do. Better organization is key to an accessible, inclusive, and useful online experience.
Structure
A Canvas course is typically organized into modules. Modules are like folders. The modules may be organized by weeks or topics covered in the course.
Modules are populated with material such as Canvas content pages, Assignments, Discussions, Quizzes, links to external resources, media, or documents.
Use clear and consistent navigation, including navigational cues such as announcements and links, to guide students. Make it easy for learners to find and engage with the materials you want them to focus on.
Consistency is essential to create an effective Canvas course. Consistent layout and patterns:
- Help students develop efficient, predictable routines to find material and activities.
- Reduces cognitive load through familiarity.
- Builds trust in your course as reliable.
- Allows learners to focus on learning the material, not constantly relearning the interface.
For example, post all your readings in the same location, such as the relevant module, every week.
Organize content in a logical sequence that scaffolds understanding.
Chunk content using
- Headings
- Lists
- Different pages or documents for different topics
Reduce visual distractions such as decorative images, colored backgrounds, and unnecessary graphics. While aesthetic design is important, excessive decoration will only distract learners from the material.
File Types
Canvas can host material in a variety of formats. Consider the following best practices:
Limit uploading documents that would function more efficiently as a Canvas page.
- Create Canvas pages directly within a Module or from the Pages Course Navigation item.
- Word Documents and PowerPoint Presentations can be added to Canvas via the Upload option on the Files Course Navigation item.
Avoid PDFs.
- PDFs are not designed to be read on screen.
- PDFs have significant accessibility and user experience concerns.
- The University of Washington Disabilities, Opportunities, Internetworking, and Technology Centre suggests avoiding PDFs and providing PDFs only as a secondary source of information.
Avoid uploading video and audio directly into modules.
- Host content on Kaltura or Panopto and embed media in Canvas web pages.
- Ensure videos have closed captions (and audio descriptions if necessary).
- Ensure audio files have text transcripts.
No matter the content type, ensure files have unique, descriptive titles.
Expertise
You don’t need to be an expert in accessibility or using Canvas. When you have a question, ask. Search the web for resources and engage with your educational technology or teaching and learning centers.
