Open Resources for Nursing (Open RN)
Now that we have reviewed the basic anatomy of the musculoskeletal system, let’s review common musculoskeletal conditions that a nurse may find on assessment.
Osteoporosis
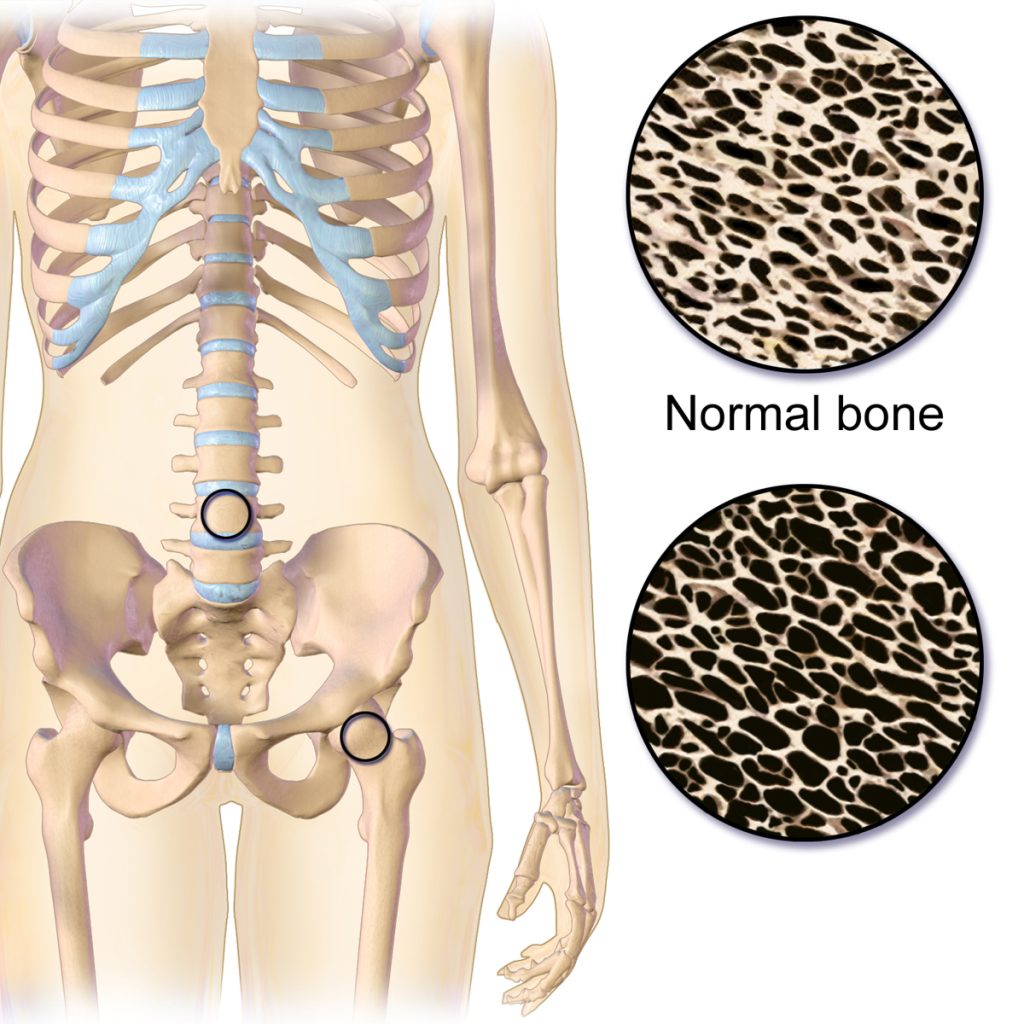
Osteoporosis is a disease that thins and weakens bones, causing them to become fragile and break easily. See Figure 13.11[1] for an illustration comparing the top right image of normal bone to the bottom right image of bone with osteoporosis. Osteoporosis is common in older women and often occurs in the hip, spine, and wrist. To keep bones strong, patients at risk are educated to eat a diet rich in calcium and vitamin D, participate in weight-bearing exercise, and avoid smoking. If needed, medications such as bisphosphonates and calcitonin are used to treat severe osteoporosis.[2]
Fracture
A fracture is the medical term for a broken bone. There are many different types of fractures commonly caused by sports injuries, falls, and car accidents. Additionally, people with osteoporosis are at higher risk for fractures from minor injuries due to weakening of the bones. See Figure 13.12[3] for an illustration of different types of fractures. For example, if the broken bone punctures the skin, it is called an open fracture. Symptoms of a fracture include the following:
- Intense pain
- Deformity (i.e., the limb looks out of place)
- Swelling, bruising, or tenderness around the injury
- Numbness and tingling of the extremity distal to the injury
- Difficulty moving a limb
A suspected fracture requires immediate medical attention and an X-ray to determine if the bone is broken. Treatment includes a cast or splint. In severe fractures, surgery is performed to place plates, pins, or screws in the bones to keep them in place as they heal.[4]

Hip Fracture
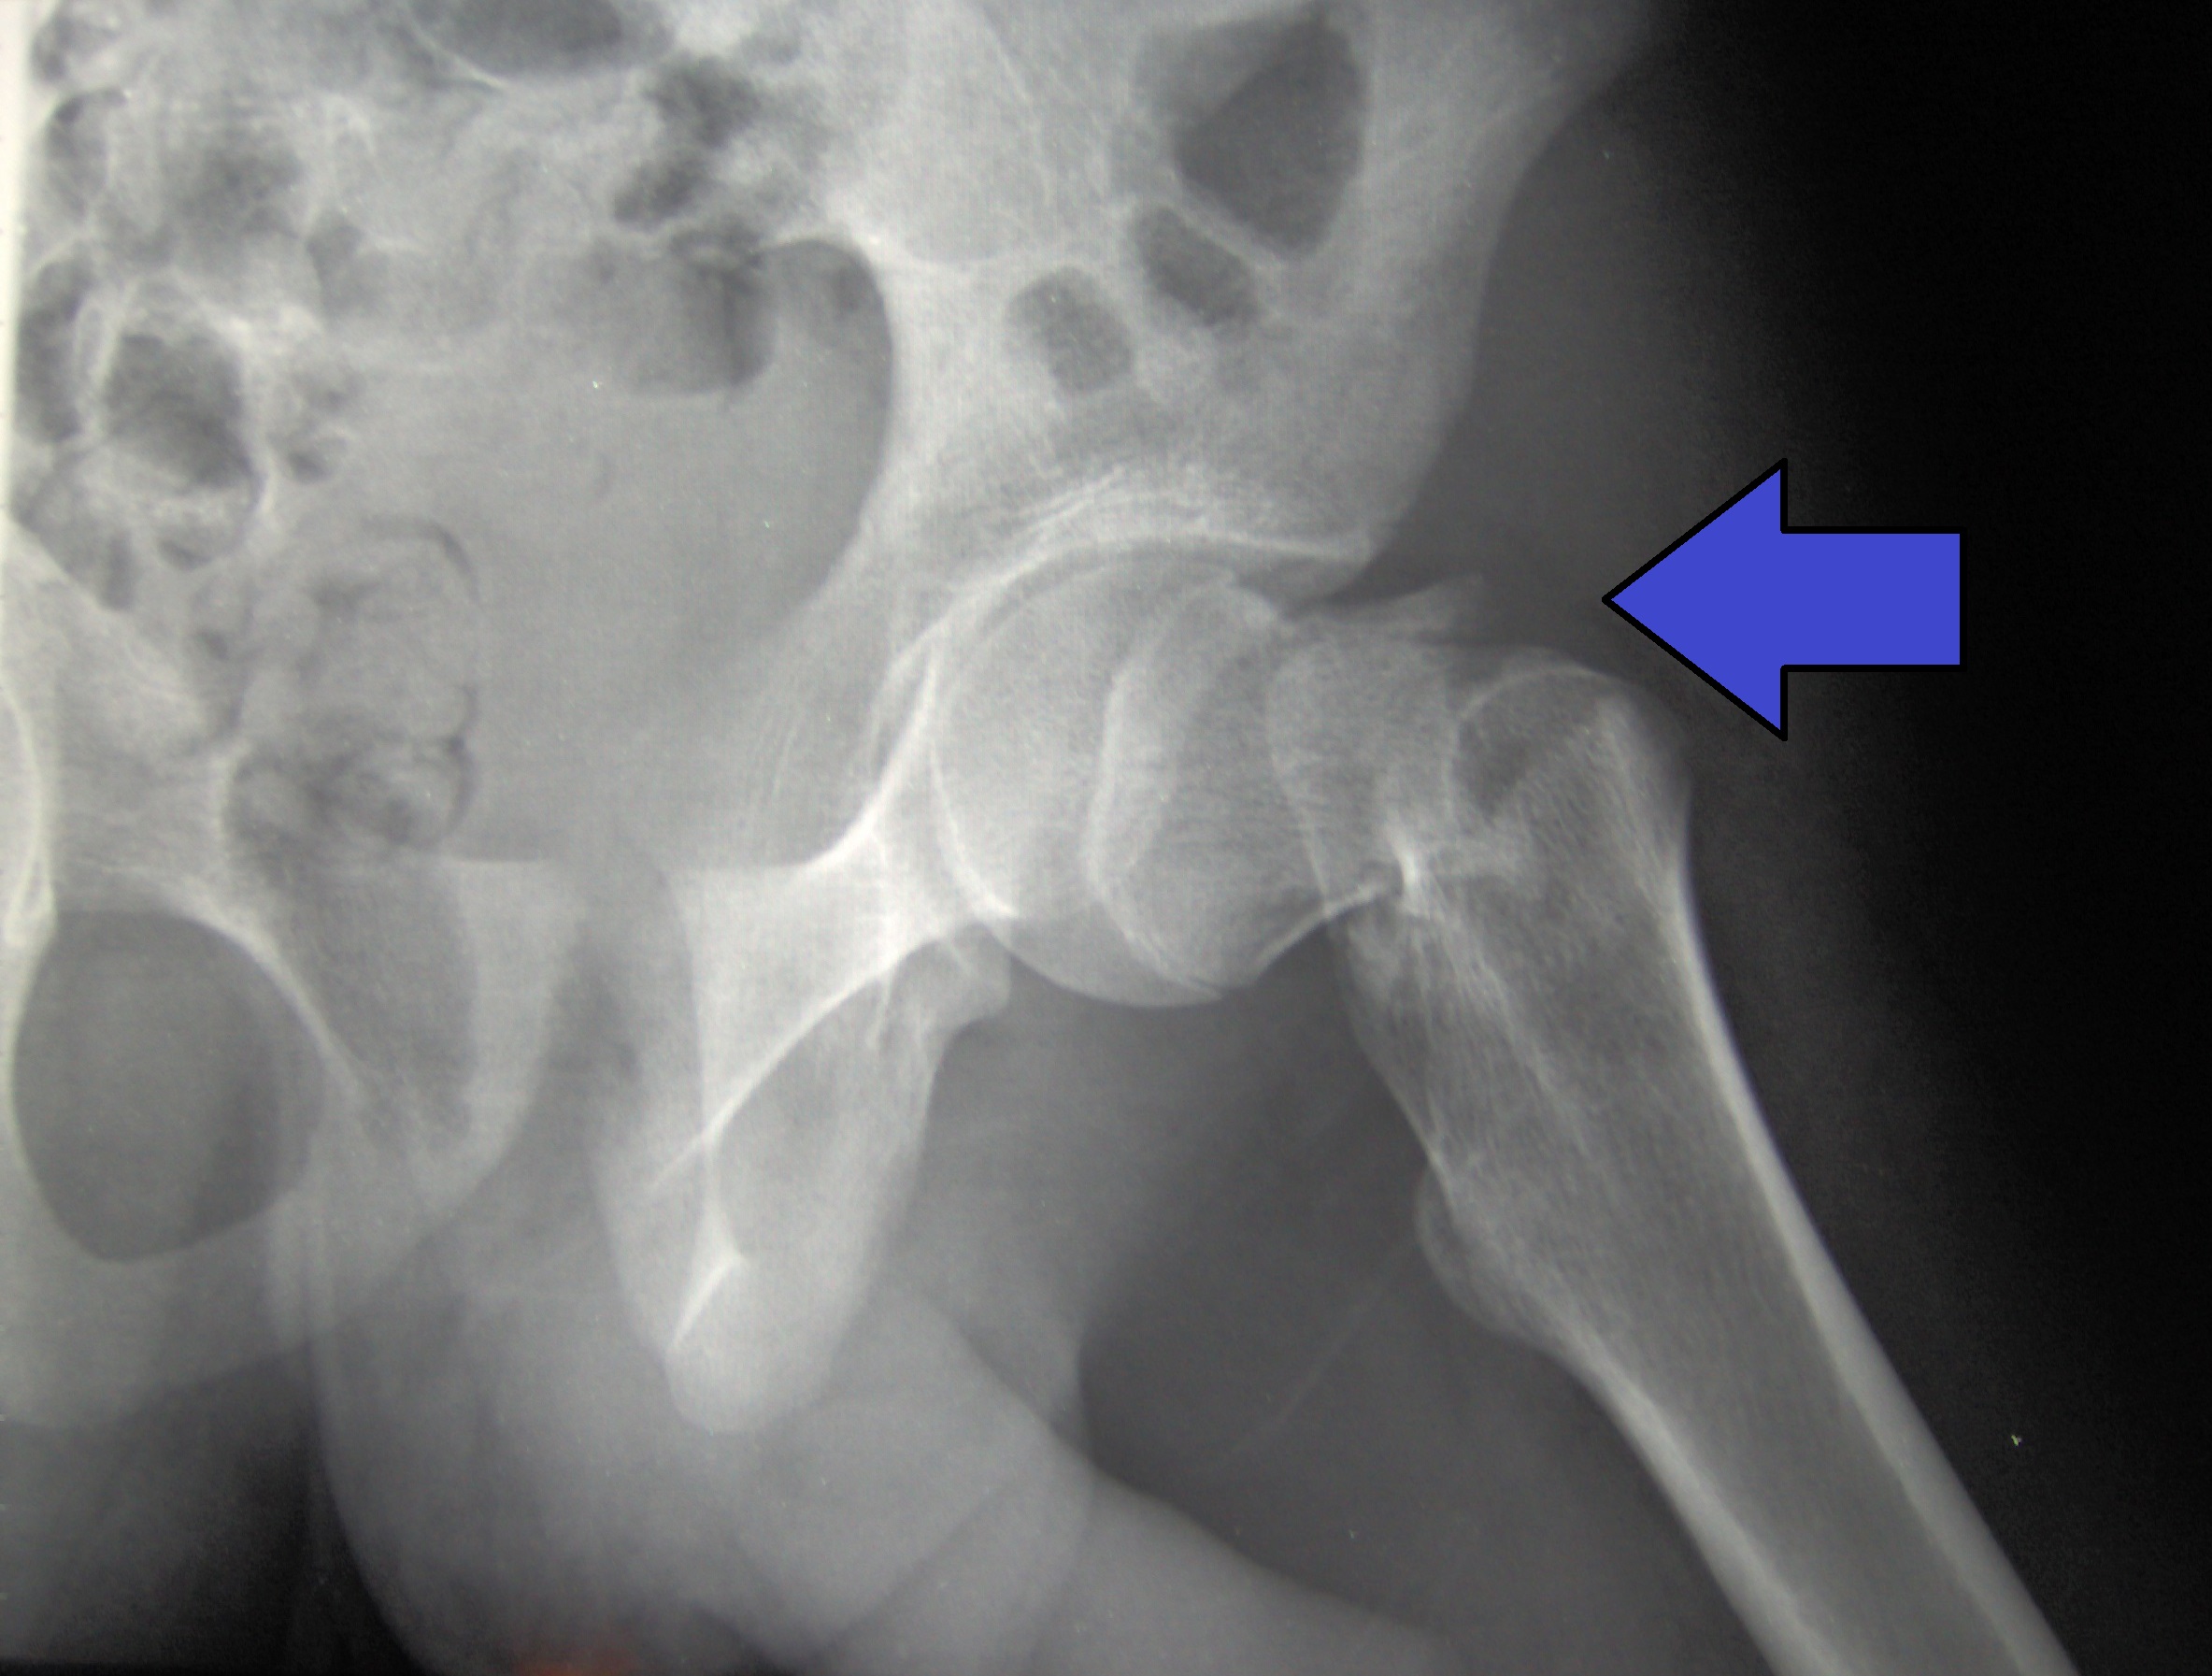
A hip fracture, commonly referred to as a “broken hip,” is actually a fracture of the femoral neck. See Figure 13.13[5] for an image of a hip fracture. Hip fractures are typically caused by a fall, especially in older adults with preexisting osteoporosis. Symptoms of a hip fracture after a fall include the following:
- Pain
- An inability to lift, move, or rotate the affected leg
- An inability to stand or put weight on the affected leg
- Bruising and swelling around the hip
- The injured leg appears shorter than the other leg
- The injured leg is rotated outwards[6]
Hip fractures typically require surgical repair within 48 hours of the injury. In approximately half of the cases of hip fractures, hip replacement is needed. See more information about hip replacement under the “Osteoarthritis” subsection below. In other cases, the fracture is fixed with surgery called Open Reduction Internal Fixation (ORIF) where the surgeon makes an incision to realign the bones, and then they are internally fixated (i.e., held together) with hardware like metal pins, plates, rods, or screws. After the bone heals, this hardware isn’t removed unless additional symptoms occur. After surgery, the patient will need mobility assistance for a prolonged period of time from family members or in a long-term care facility, and the reduced mobility can result in additional falls if protective measures are not put into place. Additionally, hip fractures are also associated with life-threatening complications, such as pneumonia, infected pressure injuries, and blood clots that can move to the lungs causing pulmonary embolism.[7]
Osteoarthritis
Osteoarthritis (OA) is the most common type of arthritis associated with aging and wear and tear of the articular cartilage that covers the surfaces of bones at a synovial joint. OA causes the cartilage to gradually become thinner, and as the cartilage layer wears down, more pressure is placed on the bones. The joint responds by increasing production of the synovial fluid for more lubrication, but this can cause swelling of the joint cavity. The bone tissue underlying the damaged articular cartilage also responds by thickening and causing the articulating surface of the bone to become rough or bumpy. As a result, joint movement results in pain and inflammation. In early stages of OA, symptoms may be resolved with mild activity that warms up the joint. However, in advanced OA, the affected joints become more painful and difficult to use, resulting in decreased mobility. There is no cure for osteoarthritis, but several treatments can help alleviate the pain. Treatments may include weight loss, low-impact exercise, and medications such as acetaminophen, nonsteroidal anti-inflammatory drugs (NSAIDs), and celecoxib. For severe cases of OA, joint replacement surgery may be required.[8]
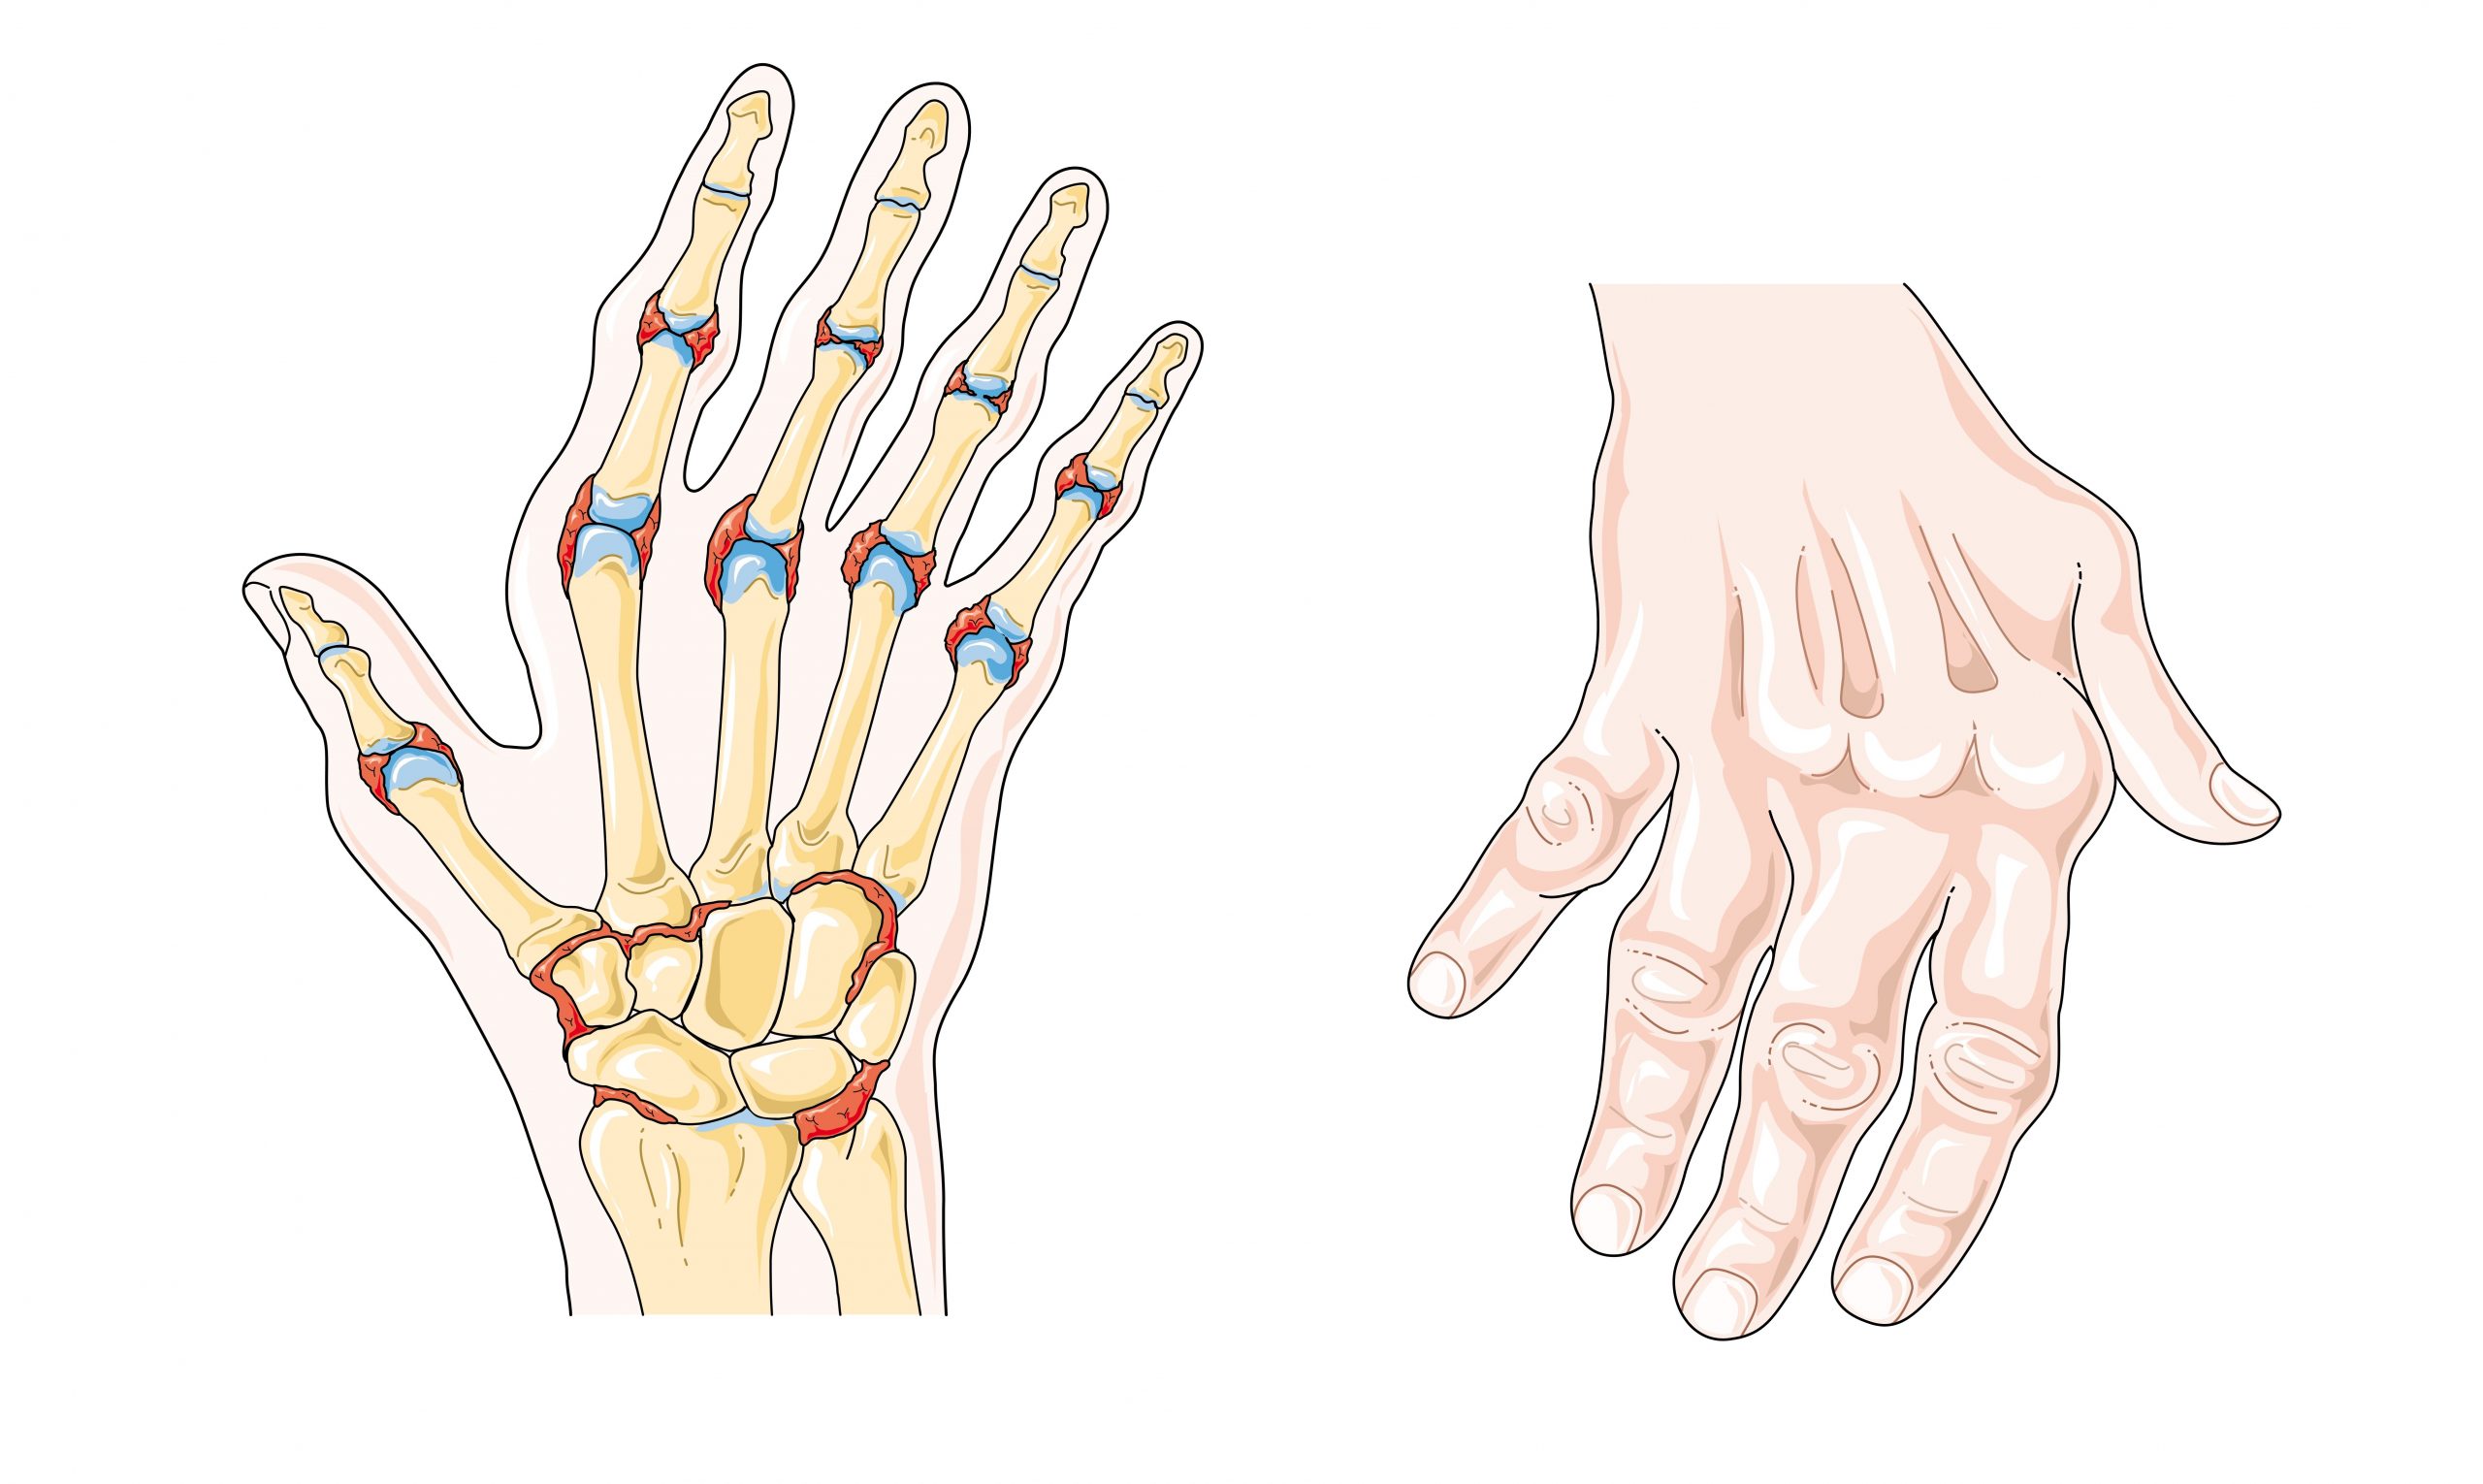
See Figure 13.14[9] for an image comparing a normal joint to one with osteoarthritis and another type of arthritis called rheumatoid arthritis. (Rheumatoid arthritis is further explained under the “Joint Replacement” subsection.)
For more information about medications used to treat osteoarthritis, visit the “Analgesic and Musculoskeletal Medications” chapter in Open RN Nursing Fundamentals.

Joint Replacement
Arthroplasty, the medical term for joint replacement surgery, is an invasive procedure requiring extended recovery time, so conservative treatments such as lifestyle changes and medications are attempted before surgery is performed. See Figure 13.15[10] for an illustration of joint replacement surgery. This type of surgery involves replacing the articular surfaces of the bones with prosthesis (artificial components). For example, in hip arthroplasty, the worn or damaged parts of the hip joint, including the head and neck of the femur and the acetabulum of the pelvis, are removed and replaced with artificial joint components. The replacement head for the femur consists of a rounded ball attached to the end of a shaft that is inserted inside the femur. The acetabulum of the pelvis is reshaped and a replacement socket is fitted into its place.[11]

Hip Replacement
Hip replacement is surgery for people with severe hip damage often caused by osteoarthritis or a hip fracture. During a hip replacement operation, the surgeon removes damaged cartilage and bone from the hip joint and replaces them with artificial parts.[12]
The most common complication after surgery is hip dislocation. Because a man-made hip is smaller than the original joint, the ball may easily come out of its socket. Some general rules of thumb when caring for patients during the recovery period are as follows:
- Patients should not cross their legs or ankles when they are sitting, standing, or lying down.
- Patients should not lean too far forward from their waist or pull their leg up past their waist. This bending is called hip flexion. Avoid hip flexion greater than 90 degrees.[13]
For more information about patient education after a hip replacement surgery, read the following article from Medline Plus: How to Take Care of Your New Hip Joint.
Rheumatoid Arthritis
Rheumatoid arthritis (RA) is a type of arthritis that causes pain, swelling, stiffness, and loss of function in joints due to inflammation caused by an autoimmune disease. See Figure 13.16[14] for an illustration of RA in the hands causing inflammation and a common deformity of the fingers. It often starts in middle age and is more common in women. RA is different from osteoarthritis because it is an autoimmune disease, meaning it is caused by the immune system attacking the body’s own tissues.[15] In rheumatoid arthritis, the joint capsule and synovial membrane become inflamed. As the disease progresses, the articular cartilage is severely damaged, resulting in joint deformation, loss of movement, and potentially severe disability. There is no known cure for RA, so treatments are aimed at alleviating symptoms. Medications like nonsteroidal anti-inflammatory drugs (NSAIDS), corticosteroids, and antirheumatic drugs such as methotrexate are commonly used to treat rheumatoid arthritis.[16]
Gout
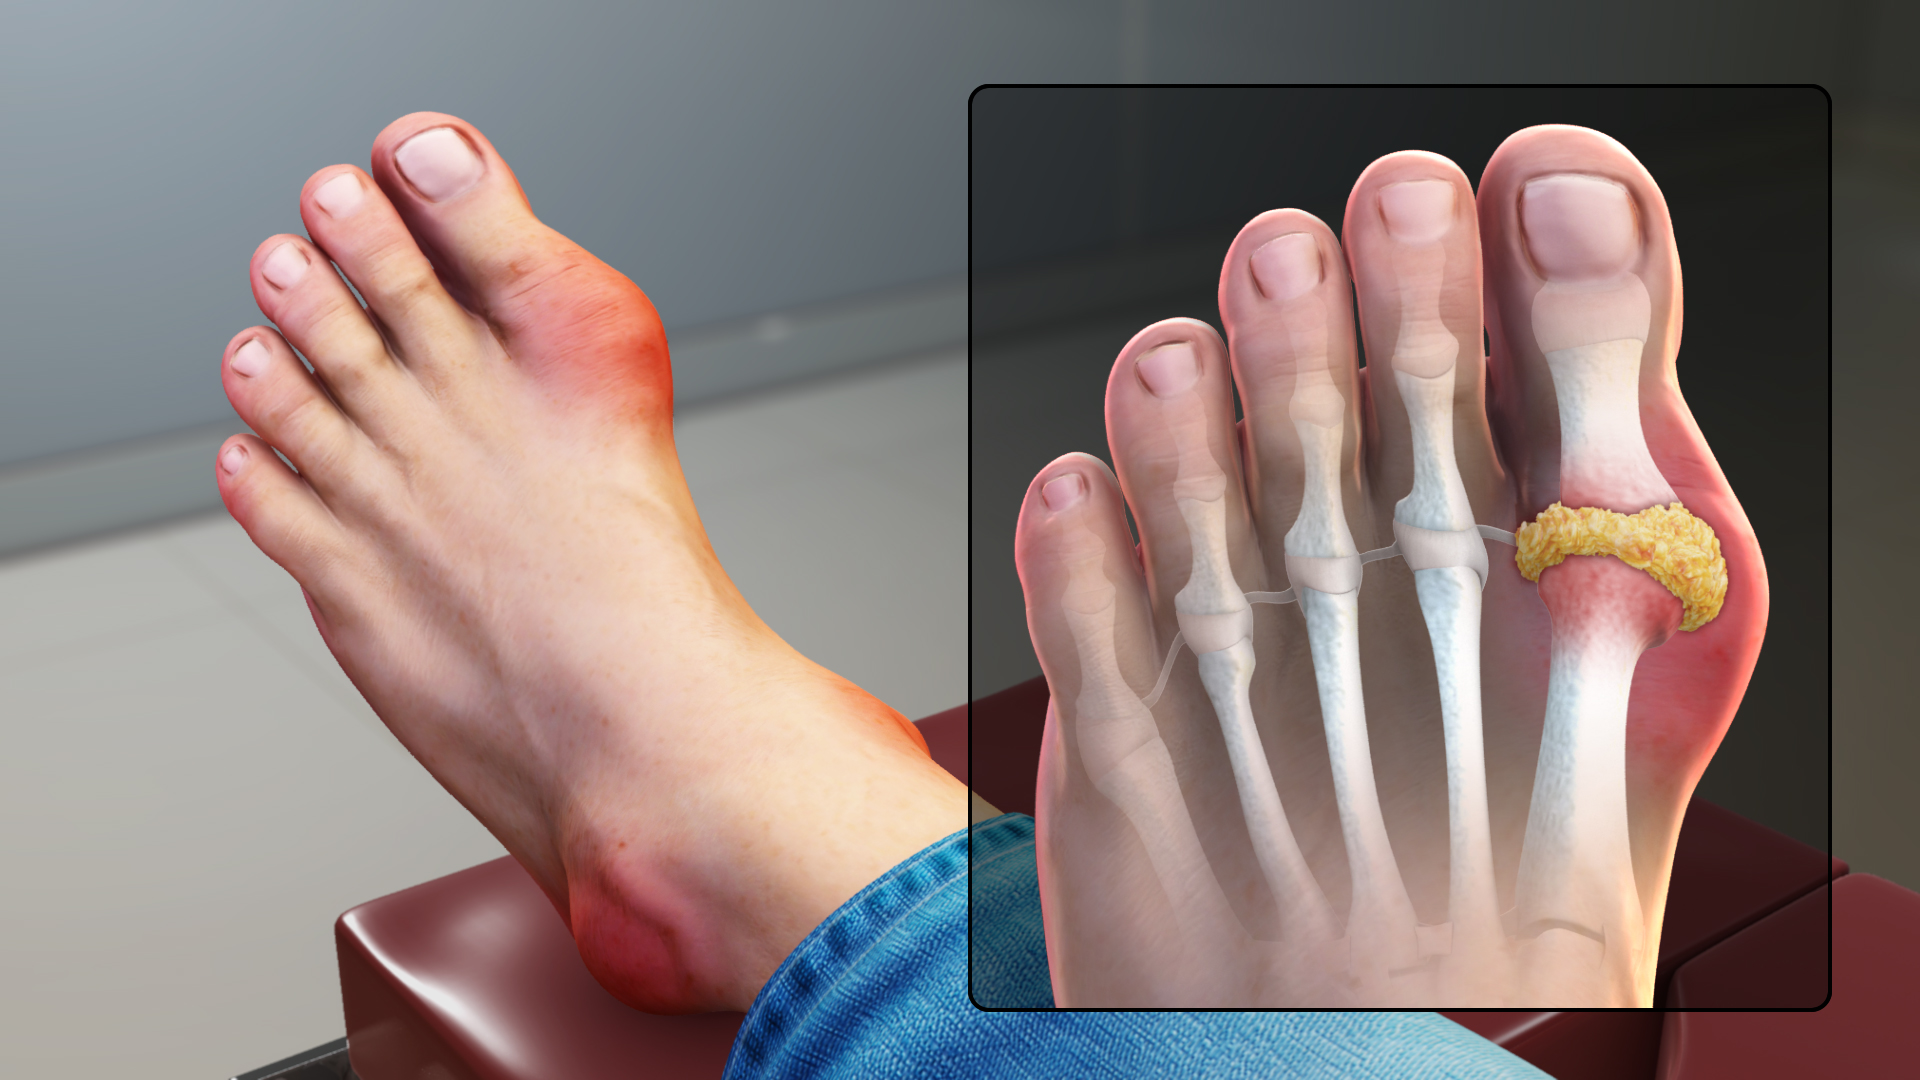
Gout is a type of arthritis that causes swollen, red, hot, and stiff joints due to the buildup of uric acid. It typically first attacks the big toe. See Figure 13.17[17] for an illustration of gout in the joint of the big toe. Uric acid usually dissolves in the blood, passes through the kidneys, and is eliminated in urine, but gout occurs when uric acid builds up in the body and forms painful, needle-like crystals in joints. Gout is treated with lifestyle changes such avoiding alcohol and food high in purines, as well as administering antigout medications, such as allopurinol and colchicine.[18]
Vertebral Disorders
The spine is composed of many vertebrae stacked on top of one another, forming the vertebral column. There are several disorders that can occur in the vertebral column causing curvature of the spine such as kyphosis, lordosis, and scoliosis. See Figure 13.18[19] for an illustration of kyphosis, lordosis, and scoliosis.
Kyphosis is a curving of the spine that causes a bowing or rounding of the back, often referred to as a “buffalo hump” that can lead to a hunchback or slouching posture. Kyphosis can be caused by osteoarthritis, osteoporosis, or other conditions. Pain in the middle or lower back is the most common symptom. Treatment depends upon the cause, the severity of pain, and the presence of any neurological symptoms.[20]
Lordosis is the inward curve of the lumbar spine just above the buttocks. A small degree of lordosis is normal, especially during the third trimester of pregnancy. Too much curving of the lower back is often called swayback. Most of the time, lordosis is not treated if the back is flexible because it is not likely to progress or cause problems.[21]
Scoliosis causes a sideways curve of the spine. It commonly develops in late childhood and the early teens when children grow quickly. Symptoms of scoliosis include leaning to one side and having uneven shoulders and hips. Treatment depends on the patient’s age, the amount of expected additional growth, the degree of curving, and whether the curve is temporary or permanent. Patients with mild scoliosis might only need checkups to monitor if the curve is getting worse, whereas others may require a brace or have surgery.[22]

Dislocation
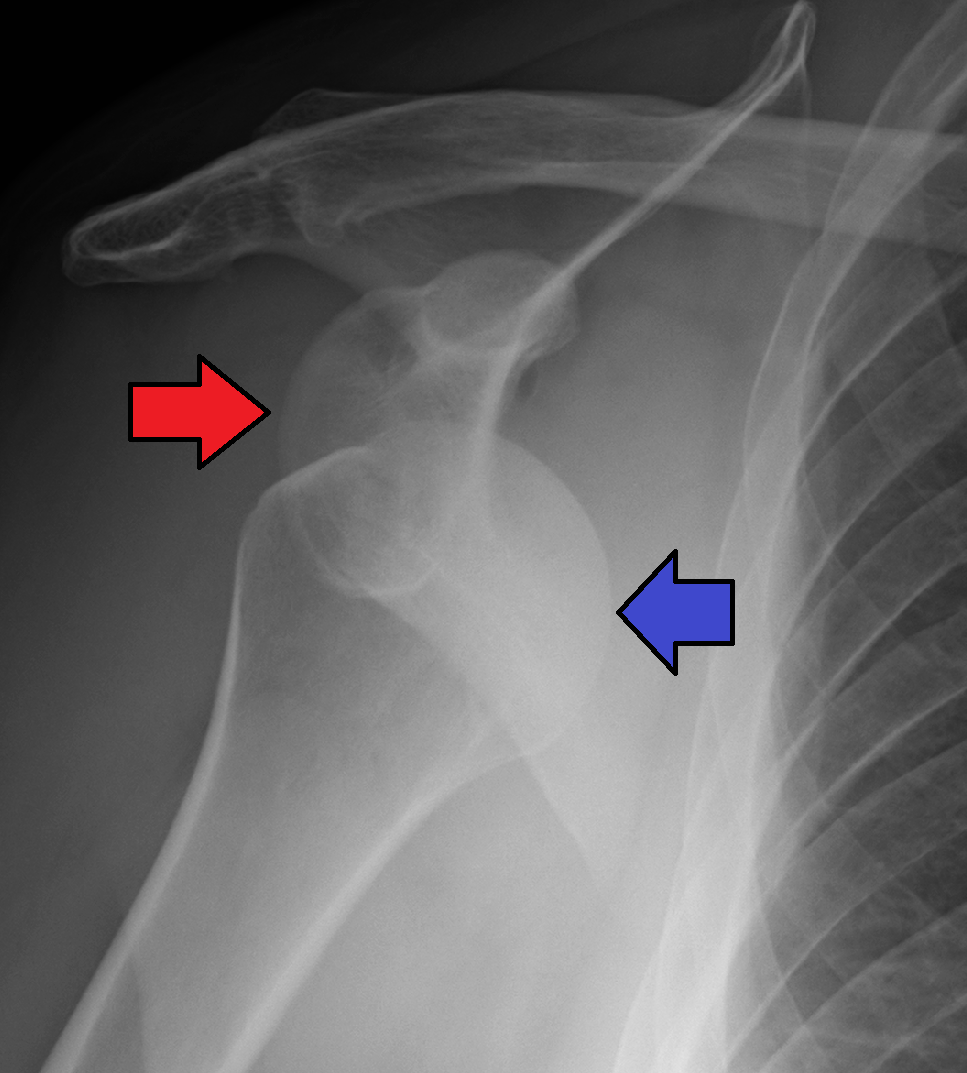
A dislocation is an injury, often caused by a fall or a blow to the joint, that forces the ends of bones out of position. Dislocated joints are typically very painful, swollen, and visibly out of place. The patient may not be able to move the affected extremity. See Figure 13.19[23] for an X-ray image of an anterior dislocation of the right shoulder where the ball (i.e., head of the humerus) has popped out of the socket (i.e., the glenoid cavity of the scapula). A dislocated joint requires immediate medical attention. Treatment depends on the joint and the severity of the injury and may include manipulation to reposition the bones, medication, a splint or sling, or rehabilitation. When properly repositioned, a joint will usually function and move normally again in a few weeks; however, once a joint is dislocated, it is more likely to become dislocated again. Instructing patients to wear protective gear during sports may help to prevent future dislocations.[24]
Clubfoot
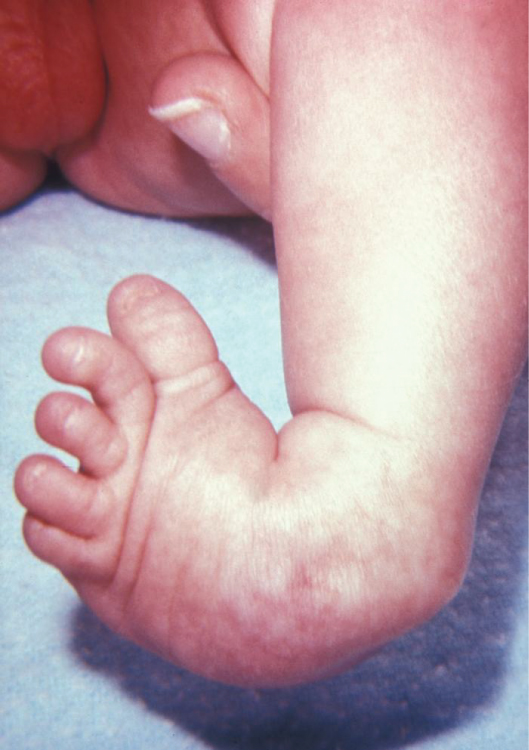
Clubfoot is a congenital condition that causes the foot and lower leg to turn inward and downward. A congenital condition means it is present at birth. See Figure 13.20[25] for an image of an infant with a clubfoot. It can range from mild and flexible to severe and rigid. Treatment by an orthopedic specialist involves using repeated applications of casts beginning soon after birth to gradually moving the foot into the correct position. Severe cases of clubfoot require surgery. After the foot is in the correct position, the child typically wears a special brace for up to three years.[26]
Sprains and Strains
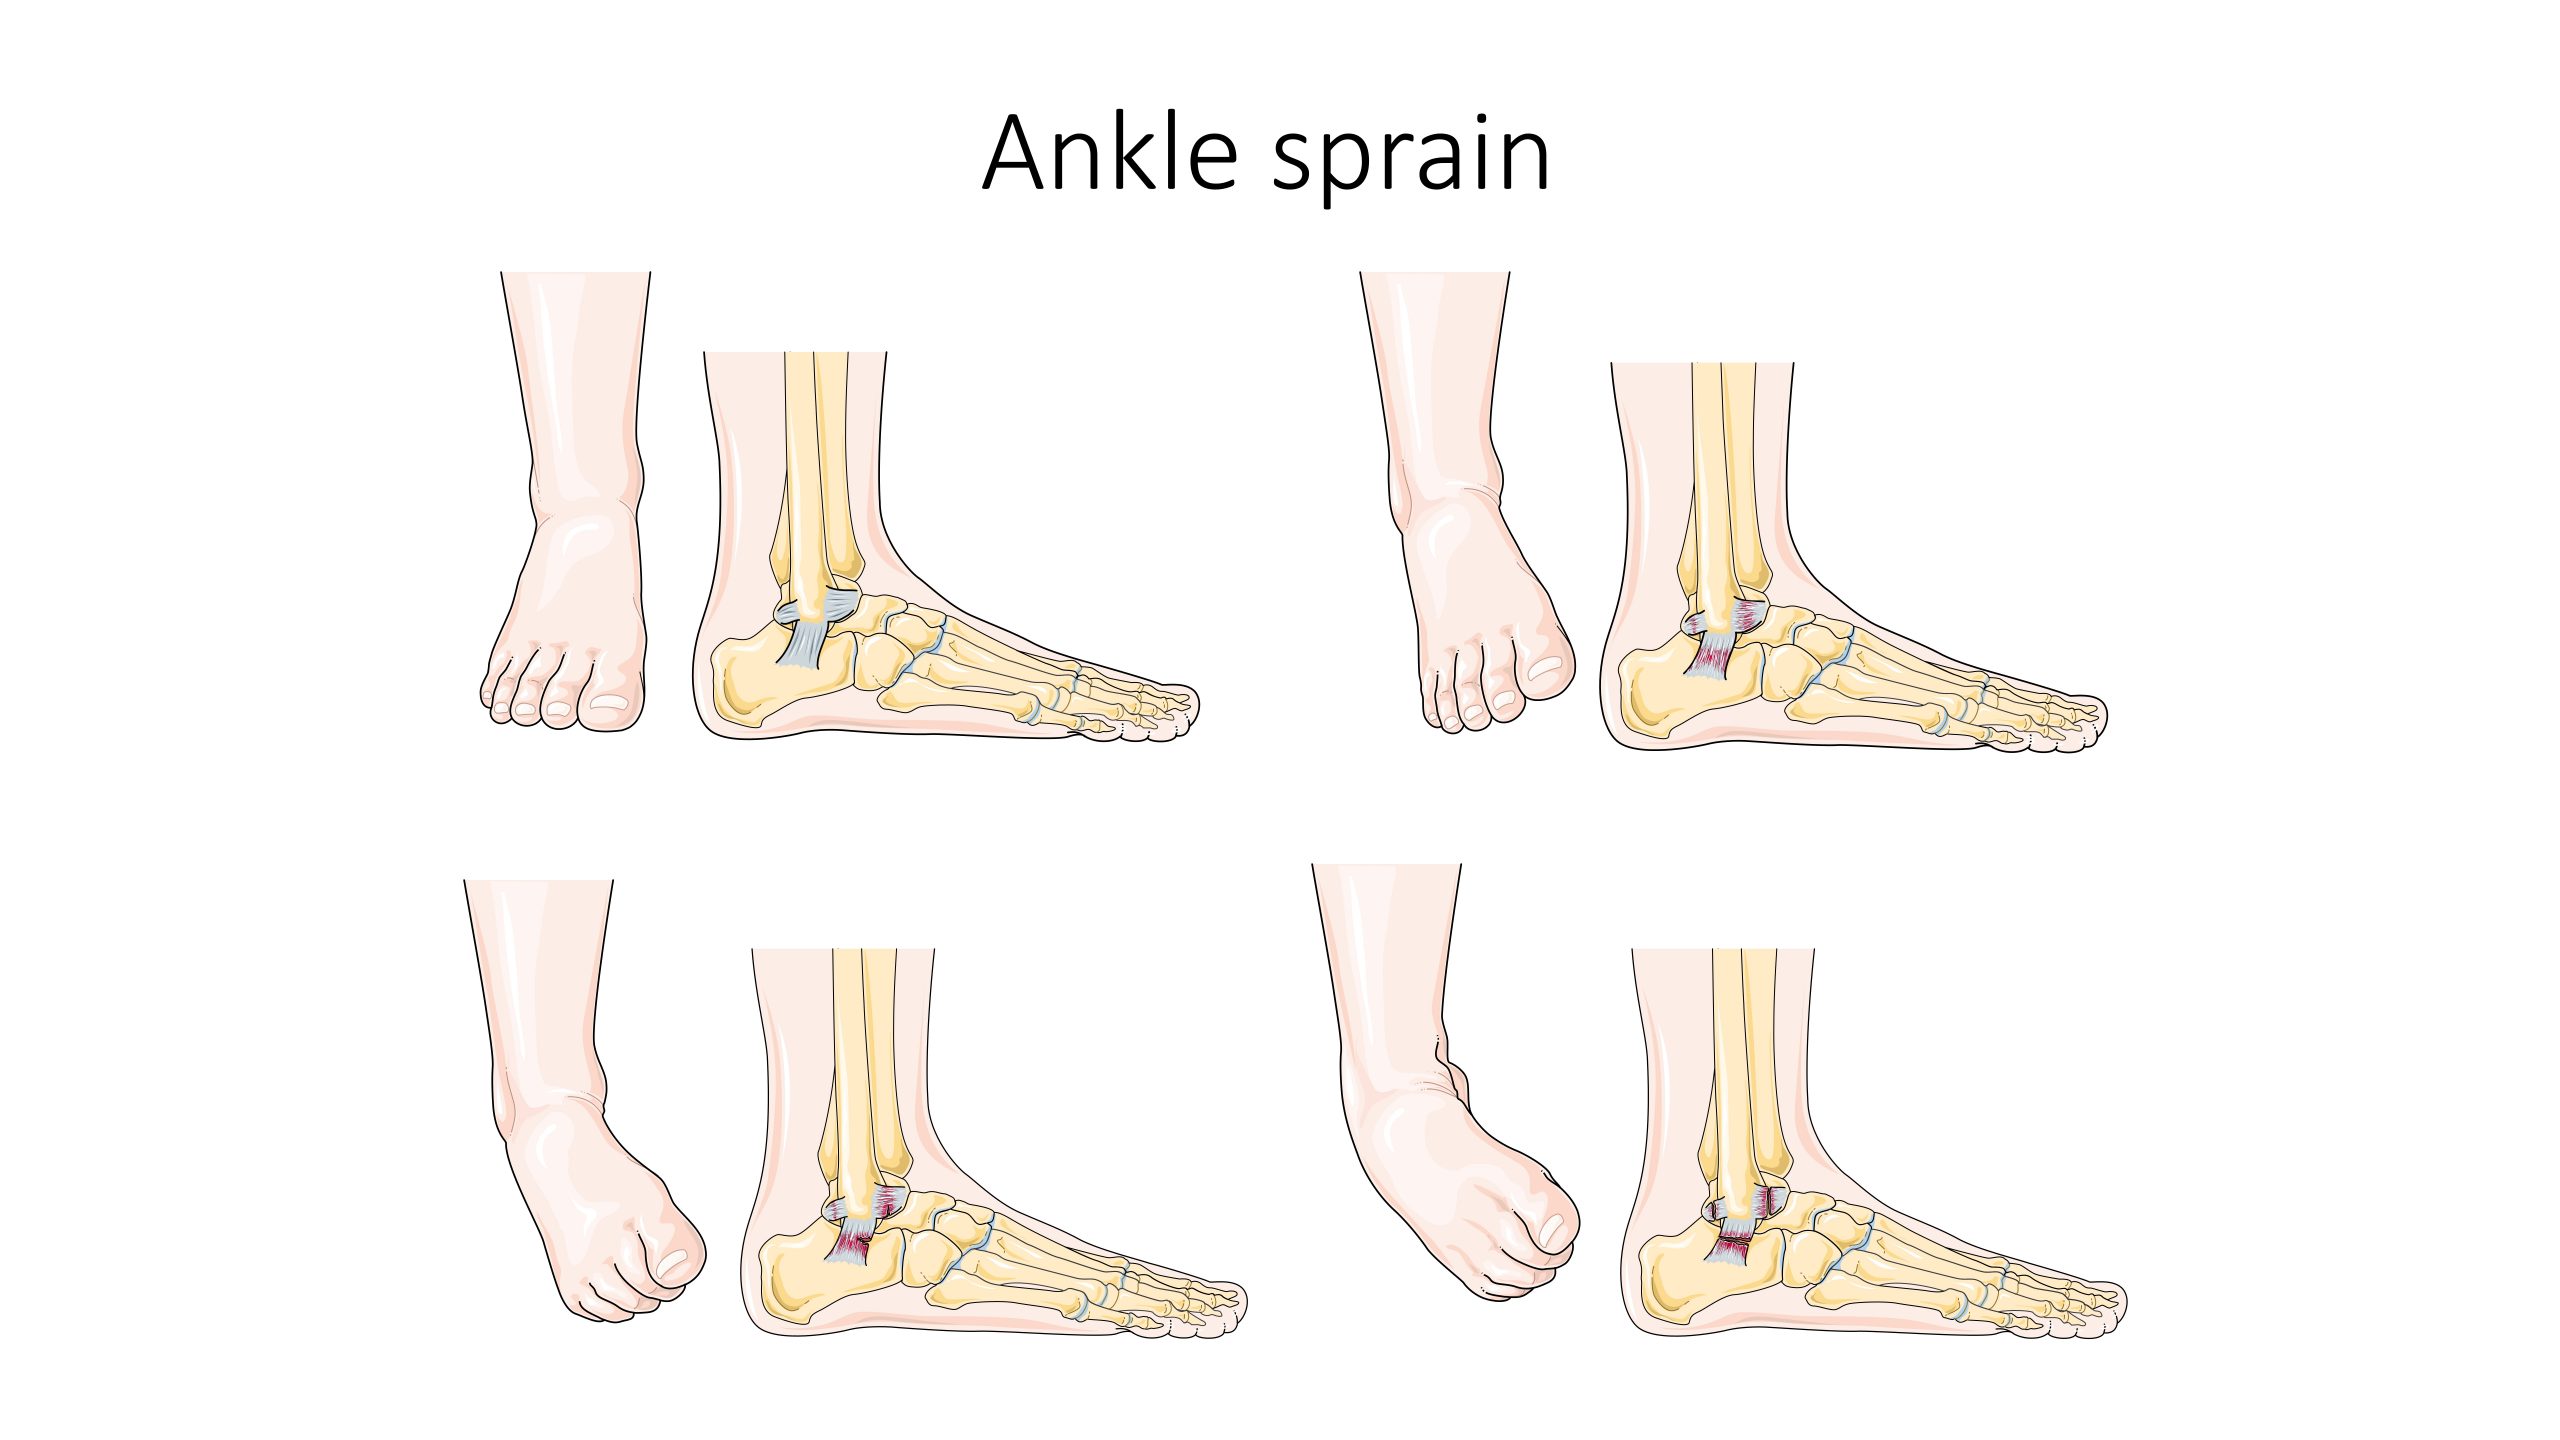
A sprain is a stretched or torn ligament caused by an injury. Ligaments are tissues that attach bones at a joint. Ankle and wrist sprains are very common, especially due to falls or participation in sports. See Figure 13.21[27] for an illustration of an ankle sprain caused by eversion or inversion of the ankle. Symptoms include pain, swelling, bruising, and the inability to move the joint. The patient may also report feeling a pop when the injury occurred.
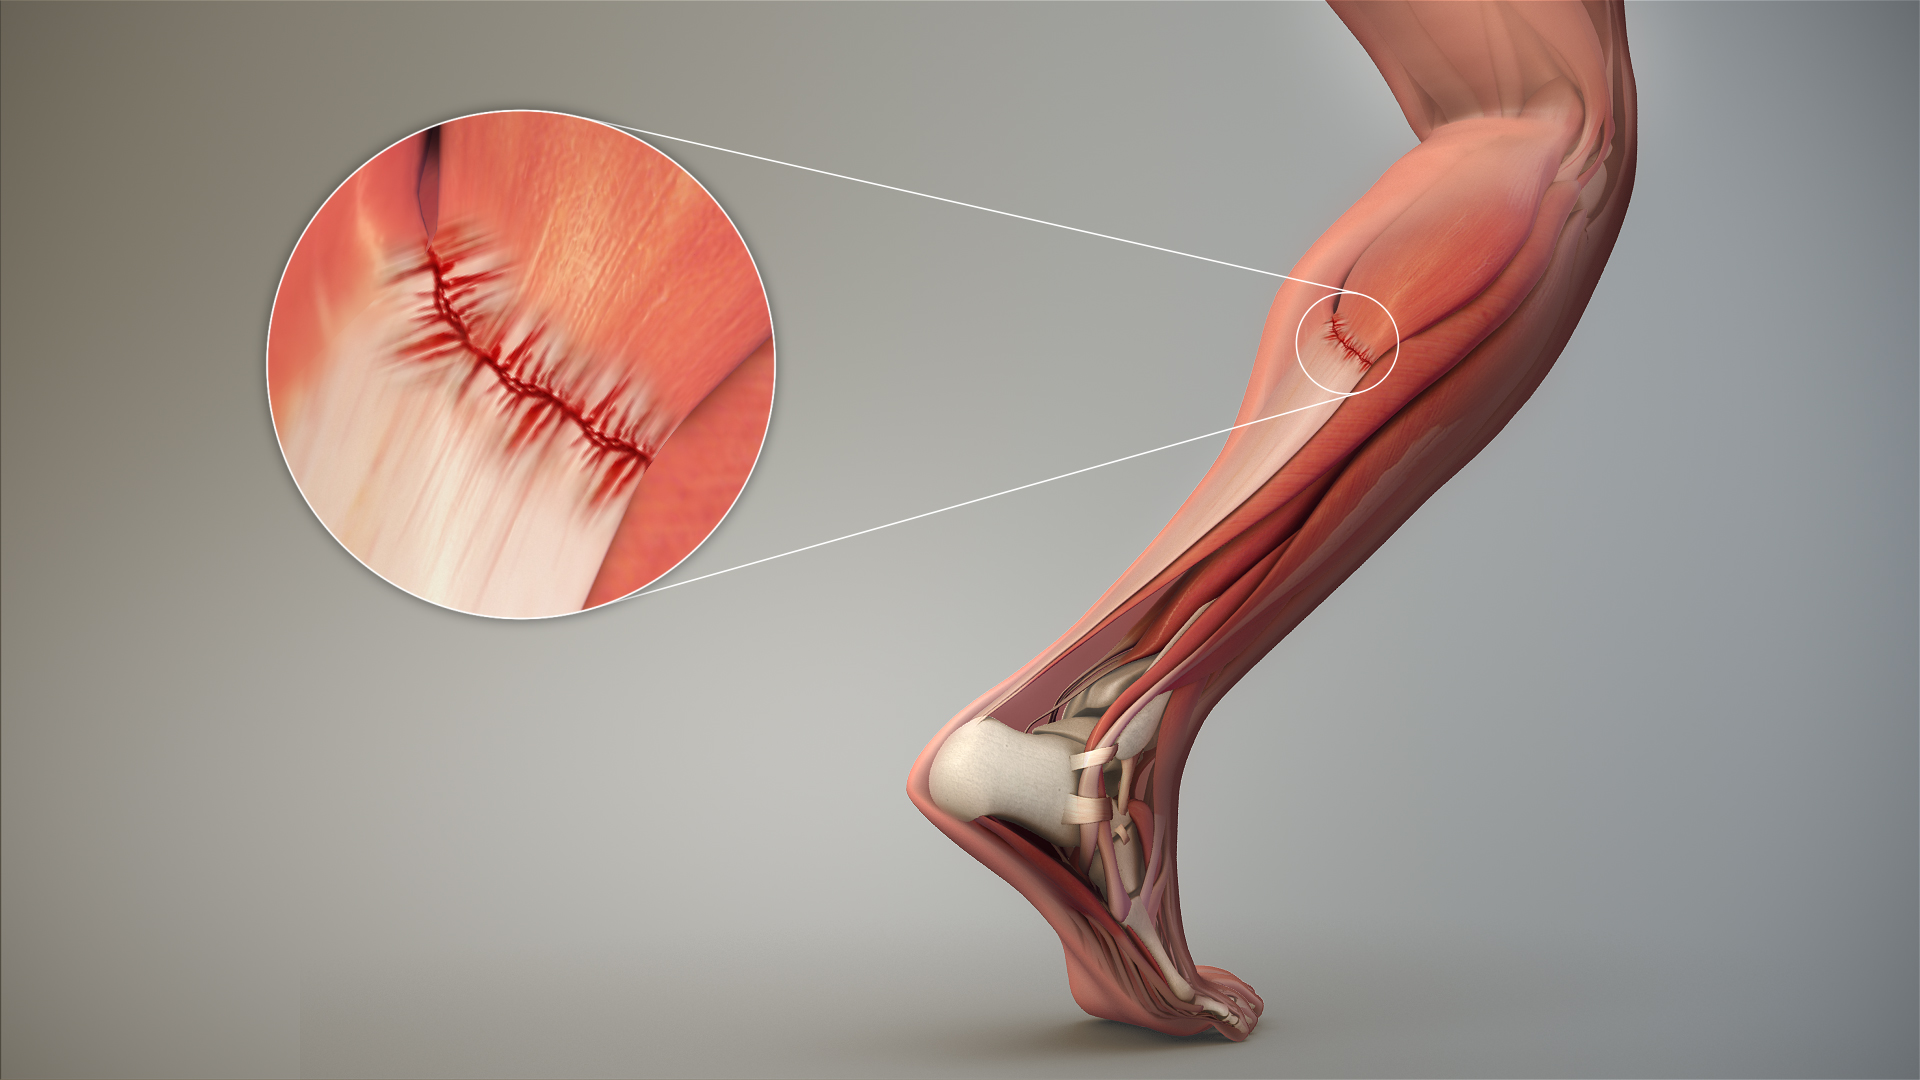
A strain is a stretched or torn muscle or tendon. Tendons are tissues that connect muscle to bone. See Figure 13.22[28] for an image of a strained tendon. Strains can happen suddenly from an injury or develop over time due to chronic overuse. Symptoms include pain, muscle spasms, swelling, and trouble moving the muscle.
Treatment of sprains and strains is often referred to with the mnemonic RICE that stands for Resting the injured area, Icing the area, Compressing the area with an ACE bandage or other device, and Elevating the affected limb. Medications such as acetaminophen or nonsteroidal anti-inflammatory drugs (NSAIDs) may also be used.[29]
Knee Injuries and Arthroscopic Surgery
Knee injuries are common. Because the knee joint is primarily supported by muscles and ligaments, injuries to any of these structures will result in pain or knee instability. Arthroscopic surgery has greatly improved the surgical treatment of knee injuries and reduced subsequent recovery times. This procedure involves a small incision and the insertion of an arthroscope, a pencil-thin instrument that allows for visualization of the joint interior. Small surgical instruments are inserted via additional incisions to remove or repair ligaments and other joint structures.[30]
Contracture
A contracture develops when the normally elastic tissues are replaced by inelastic, fiber-like tissue. This inelastic tissue makes it difficult to stretch the area and prevents normal movement.
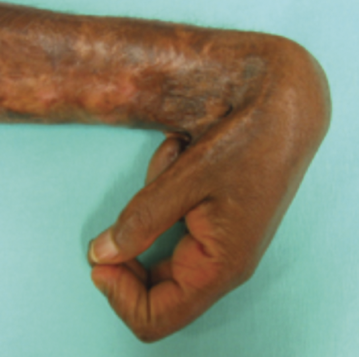
Contractures occur in the skin, the tissues underneath, and the muscles, tendons, and ligaments surrounding a joint. They affect the range of motion and function in a specific body part and can be painful. See Figure 13.23[31] for an image of severe contracture of the wrist that occurred after a burn injury.
Contracture can be caused by any of the following:
- Brain and nervous system disorders, such as cerebral palsy or stroke
- Inherited disorders, such as muscular dystrophy
- Nerve damage
- Reduced use (for example, from lack of mobility)
- Severe muscle and bone injuries
- Scarring after traumatic injury or burns
Treatments may include exercises, stretching, or applying braces and splints.[32]
Foot Drop
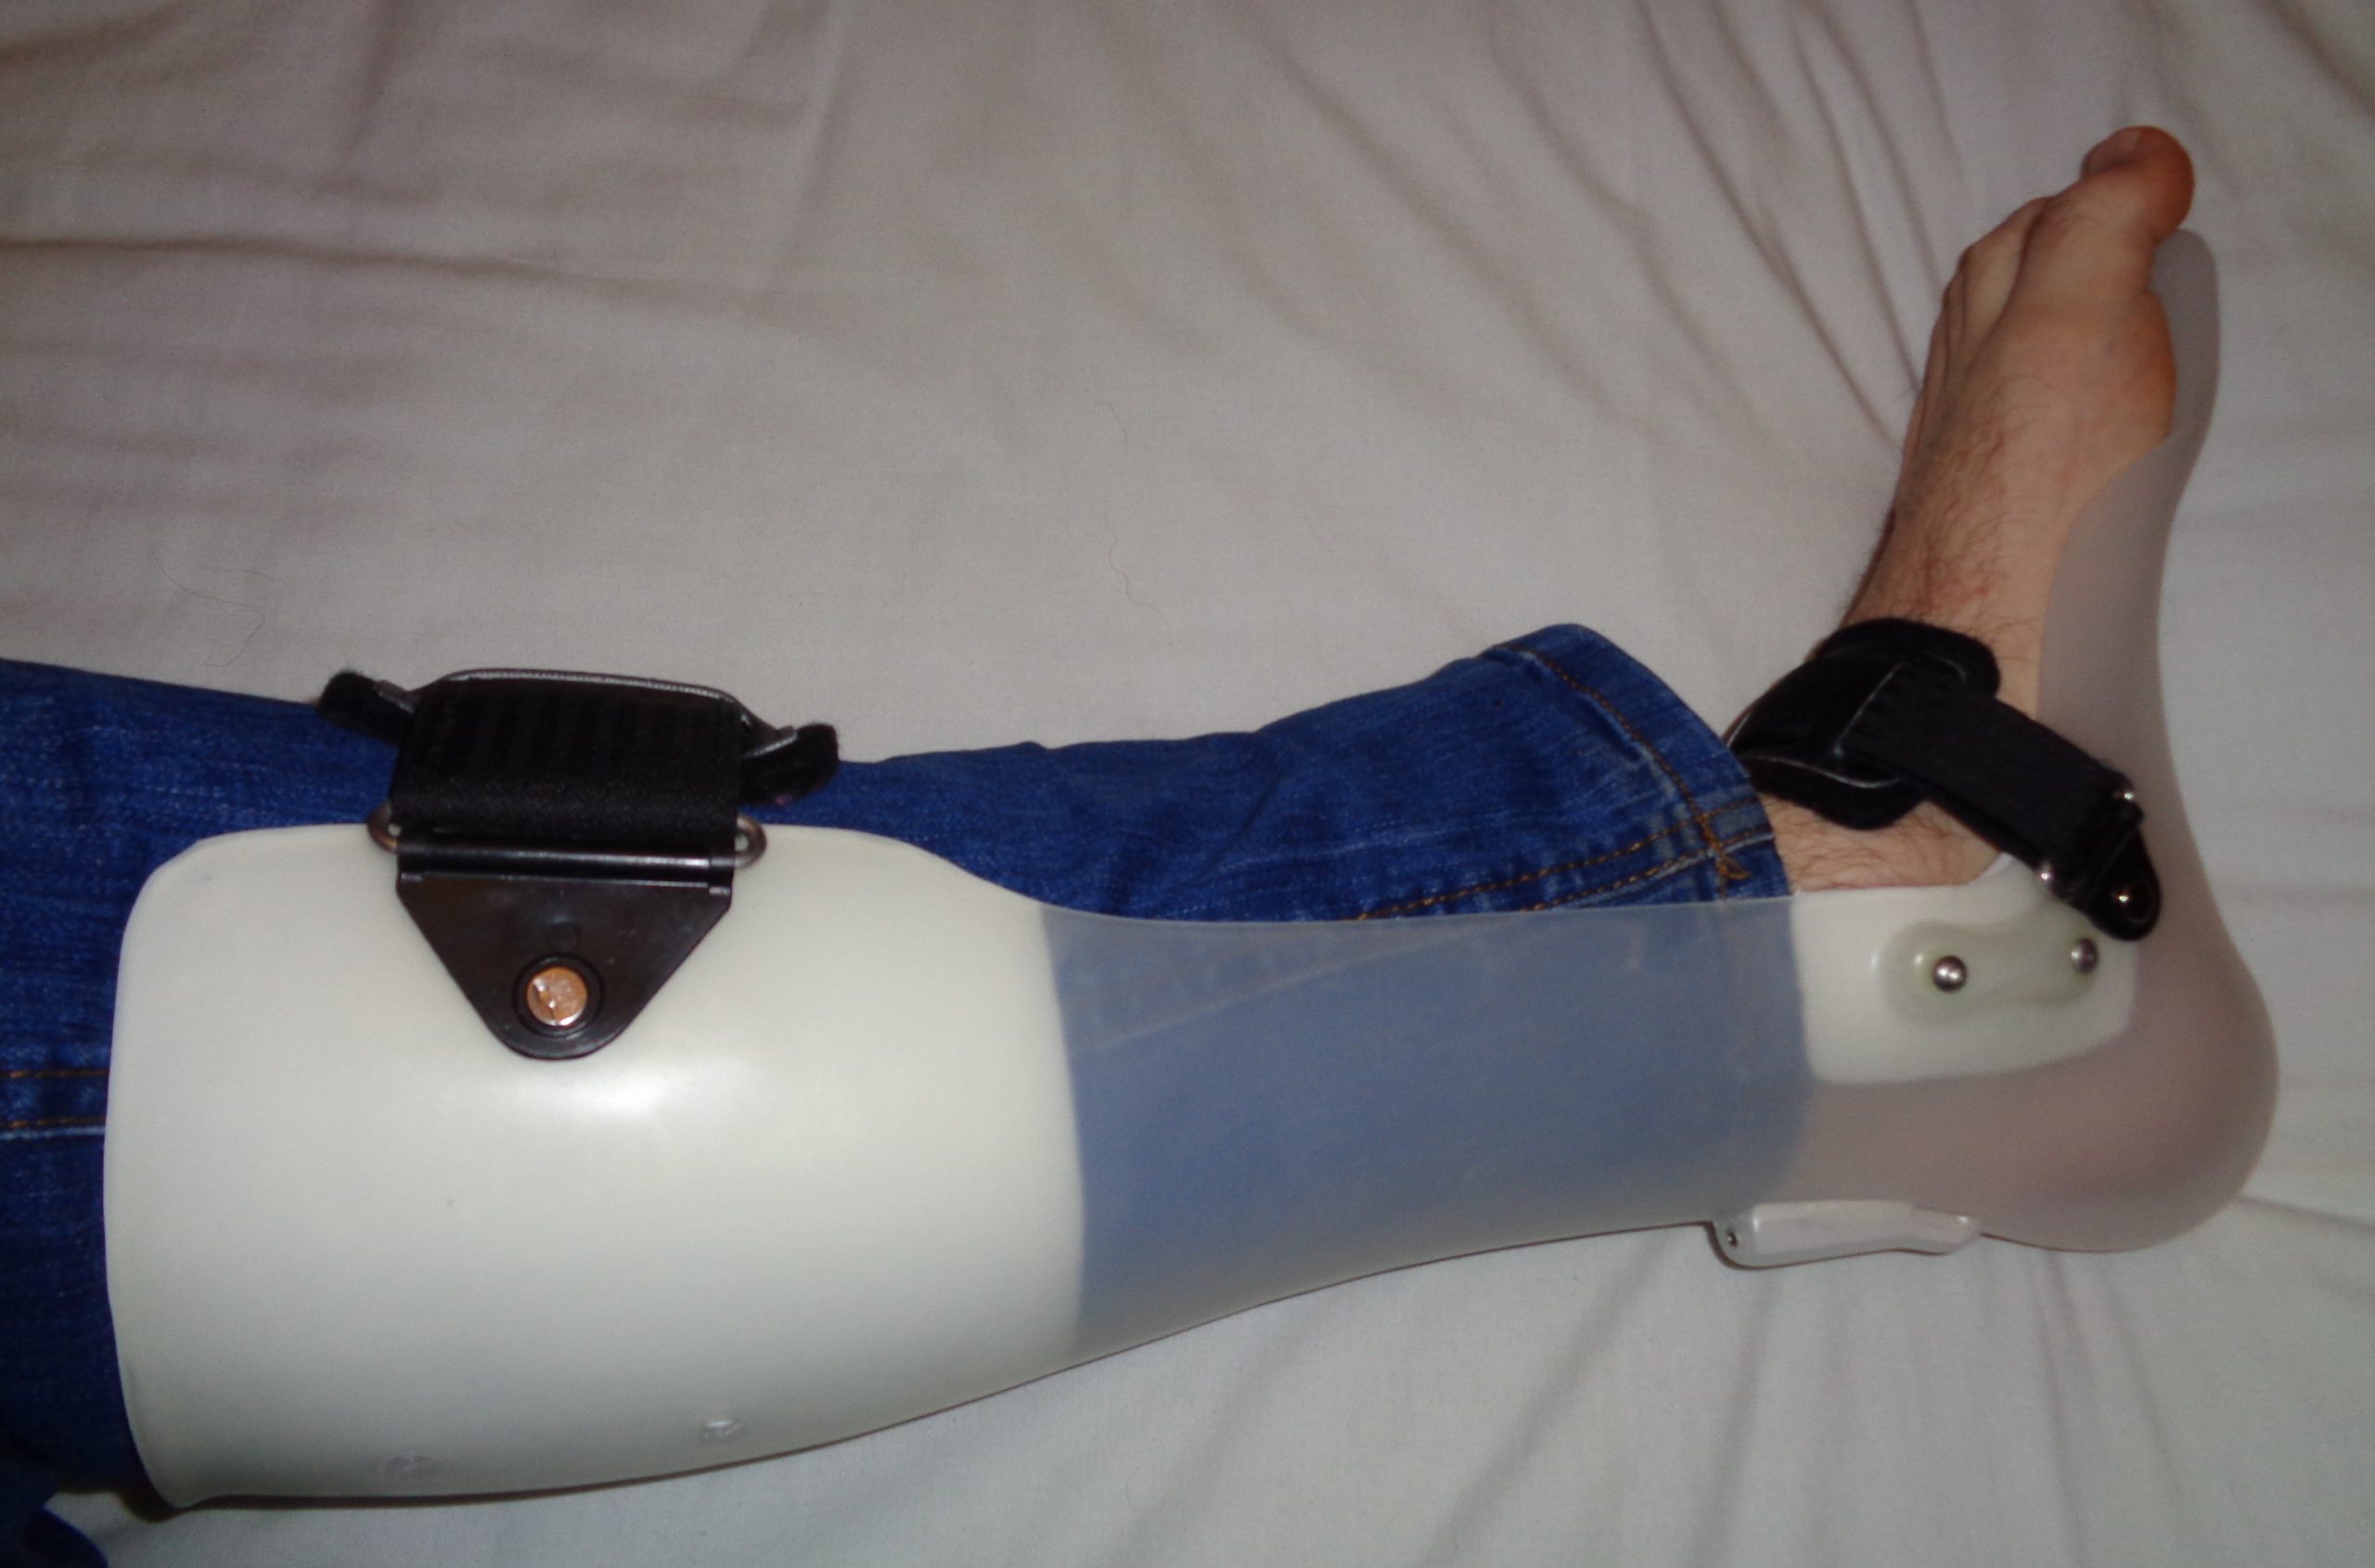
Foot drop is the inability to raise the front part of the foot due to weakness or paralysis of the muscles that lift the foot. As a result, individuals with foot drop often scuff their toes along the ground when walking or bend their knees to lift their foot higher than usual to avoid the scuffing. Foot drop is a symptom of an underlying problem and can be temporary or permanent, depending on the cause. The prognosis for foot drop depends on the cause. Foot drop caused by trauma or nerve damage usually shows partial or complete recovery, but in progressive neurological disorders, foot drop will be a symptom that is likely to continue as a lifelong disability. Treatment depends on the specific cause of foot drop. The most common treatment is to support the foot with lightweight leg braces. See Figure 13.24[33] for an image of a patient with foot drop treated with a leg brace. Exercise therapy to strengthen the muscles and maintain joint motion also helps to improve a patient’s gait.[34]
- “Osteoporosis Effect and Locations.jpg” by BruceBlaus is licensed under CC BY-SA 4.0 ↵
- MedlinePlus [Internet]. Bethesda (MD): National Library of Medicine (US); [updated 2020, Aug 14]. Osteoporosis; [reviewed 2017, Mar 15; cited 2020, Sep 18]. https://medlineplus.gov/osteoporosis.html ↵
- “612 Types of Fractures.jpg” by OpenStax is licensed under CC BY 4.0 ↵
- MedlinePlus [Internet]. Bethesda (MD): National Library of Medicine (US); [updated 2020, Apr 20]. Fractures; [reviewed 2016, Mar 15; cited 2020, Sep 18]. https://medlineplus.gov/fractures.html ↵
- “Cdm hip fracture 343.jpg” by Booyabazooka is licensed under CC BY-SA 3.0 ↵
- NHS (UK). (2019, October 3). Hip fracture. https://www.nhs.uk/conditions/hip-fracture/ ↵
- This work is a derivative of Anatomy & Physiology by OpenStax and is licensed under CC BY 4.0. Access for free at https://openstax.org/books/anatomy-and-physiology/pages/1-introduction ↵
- This work is a derivative of Anatomy & Physiology by OpenStax and is licensed under CC BY 4.0. Access for free at https://openstax.org/books/anatomy-and-physiology/pages/1-introduction ↵
- “Osteoarthritis and rheumatoid arthritis - Normal joint Osteoarthr -- Smart-Servier.jpg” by Laboratoires Servier is licensed under CC BY-SA 3.0 ↵
- “Replacement surgery - Shoulder total hip and total knee replacement -- Smart-Servier.jpg” by Laboratoires Servier is licensed under CC BY-SA 3.0 ↵
- This work is a derivative of Anatomy & Physiology by OpenStax and is licensed under CC BY 4.0. Access for free at https://openstax.org/books/anatomy-and-physiology/pages/1-introduction ↵
- MedlinePlus [Internet]. Bethesda (MD): National Library of Medicine (US); [updated 2020, Aug 21]. Hip replacement; [reviewed 2016, Aug 31; cited 2020, Sep 18]. https://medlineplus.gov/hipreplacement.html ↵
- A.D.A.M. Medical Encyclopedia [Internet]. Atlanta (GA): A.D.A.M., Inc.; c1997-2020. Taking care of your new hip joint; [updated 2020, Sep 16; cited 2020, Sep 18]. https://medlineplus.gov/ency/patientinstructions/000171.htm ↵
- “Rheumatoid arthritis -- Smart- Servier (cropped).jpg” by Laboratoires Servier is licensed under CC BY-SA 3.0 ↵
- MedlinePlus [Internet]. Bethesda (MD): National Library of Medicine (US); [updated 2020, Aug 14]. Rheumatoid arthritis; [reviewed 2018, May 2; cited 2020, Sep 18]. https://medlineplus.gov/rheumatoidarthritis.html ↵
- This work is a derivative of Anatomy & Physiology by OpenStax and is licensed under CC BY 4.0. Access for free at https://openstax.org/books/anatomy-and-physiology/pages/1-introduction ↵
- “Gout Signs and Symptoms.jpg” by www.scientificanimations.com/ is licensed under CC BY 4.0 ↵
- This work is a derivative of Anatomy and Physiology by Boundless.com and is licensed under CC BY-SA 4.0 ↵
- “Vertebral column disorders - Normal Scoliosis Lordosis Kyphosis -- Smart-Servier.jpg” by Laboratoires Servier is licensed under CC BY-SA 3.0 ↵
- A.D.A.M. Medical Encyclopedia [Internet]. Atlanta (GA): A.D.A.M., Inc.; c1997-2020. Kyphosis; [updated 2020, Sep 16; cited 2020, Sep 18]. https://medlineplus.gov/ency/article/001240.htm ↵
- A.D.A.M. Medical Encyclopedia [Internet]. Atlanta (GA): A.D.A.M., Inc.; c1997-2020. Lordosis - lumbar; [updated 2020, Sep 16; cited 2020, Sep 18]. https://medlineplus.gov/ency/article/003278.htm ↵
- MedlinePlus [Internet]. Bethesda (MD): National Library of Medicine (US); [updated 2020, Apr 29]. Scoliosis; [reviewed 2016, Oct 18; cited 2020, Sep 18]. https://medlineplus.gov/scoliosis.html ↵
- “AnterDisAPMark.png” by James Heilman, MD is licensed under CC BY-SA 4.0 ↵
- MedlinePlus [Internet]. Bethesda (MD): National Library of Medicine (US); [updated 2019, Feb 7]. Dislocations; [reviewed 2016, Oct 26; cited 2020, Sep 18]. https://medlineplus.gov/dislocations.html ↵
- “813 Clubfoot.jpg” by OpenStax is licensed under CC BY 3.0 ↵
- A.D.A.M. Medical Encyclopedia [Internet]. Atlanta (GA): A.D.A.M., Inc.; c1997-2020. Club foot; [updated 2020, Sep 16; cited 2020, Sep 18]. https://medlineplus.gov/ency/article/001228.htm ↵
- “Ankle sprain -- Smart-Servier.jpg” by Laboratoires Servier is licensed under CC BY-SA 3.0 ↵
- “3D Medical Animation Depicting Strain-Tendon.jpg” by https://www.scientificanimations.com is licensed under CC BY-SA 4.0 ↵
- A.D.A.M. Medical Encyclopedia [Internet]. Atlanta (GA): A.D.A.M., Inc.; c1997-2020. Sprains and strains; [updated 2020, Jun 17; reviewed 2017, Jan 3; cited 2020, Sep 18]. https://medlineplus.gov/sprainsandstrains.html ↵
- This work is a derivative of Anatomy & Physiology by OpenStax and is licensed under CC BY 4.0. Access for free at https://openstax.org/books/anatomy-and-physiology/pages/1-introduction ↵
- “Complications of Hypertrophic Scarring.png” by Aarabi, S., Longaker, M. T., & Gurtner, G. C. is licensed under CC BY 3.0 ↵
- A.D.A.M. Medical Encyclopedia [Internet]. Atlanta (GA): A.D.A.M., Inc.; c1997-2020. Contracture deformity; [updated 2020, Sep 16; cited 2020, Sep 18]. https://medlineplus.gov/ency/article/003185.htm ↵
- “AFO brace for foot drop.JPG” by Pagemaker787 is licensed under CC BY-SA 4.0 ↵
- National Institute of Neurological Disorders and Stroke. (2019, March 27). Foot drop information page. https://www.ninds.nih.gov/Disorders/All-Disorders/Foot-Drop-Information-Page ↵
Separation of the edges of a surgical wound.
Before discussing specific procedures related to facilitating bowel and bladder function, let’s review basic concepts related to urinary and bowel elimination. When facilitating alternative methods of elimination, it is important to understand the anatomy and physiology of the gastrointestinal and urinary systems, as well as the adverse effects of various conditions and medications on elimination. Use the information below to review information about these topics.
For more information about the anatomy and physiology of the gastrointestinal system and medications used to treat diarrhea and constipation, visit the "Gastrointestinal" chapter of the Open RN Nursing Pharmacology textbook.
For more information about the anatomy and physiology of the kidneys and diuretic medications used to treat fluid overload, visit the "Cardiovascular and Renal System" chapter in Open RN Nursing Pharmacology textbook.
For more information about applying the nursing process to facilitate elimination, visit the "Elimination" chapter in Open RN Nursing Fundamentals.
Urinary Elimination Devices
This section will focus on the devices used to facilitate urinary elimination. Urinary catheterization is the insertion of a catheter tube into the urethral opening and placing it in the neck of the urinary bladder to drain urine. There are several types of urinary elimination devices, such as indwelling catheters, intermittent catheters, suprapubic catheters, and external devices. Each of these types of devices is described in the following subsections.
Indwelling Catheter
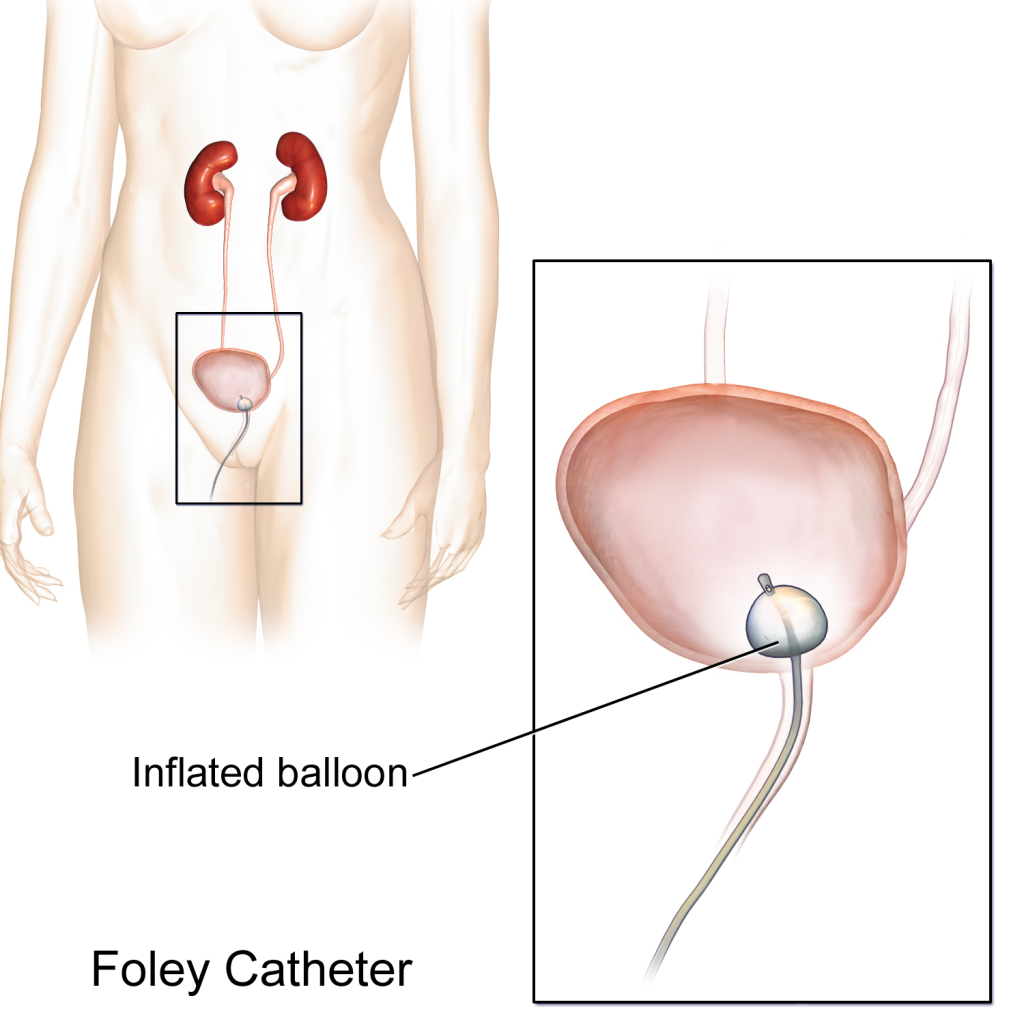
An indwelling catheter, often referred to as a “Foley catheter,” refers to a urinary catheter that remains in place after insertion into the bladder for the continual collection of urine. It has a balloon on the insertion tip to maintain placement in the neck of the bladder. The other end of the catheter is attached to a drainage bag for the collection of urine. See Figure 21.1[1] for an illustration of the anatomical placement of an indwelling catheter in the bladder neck.
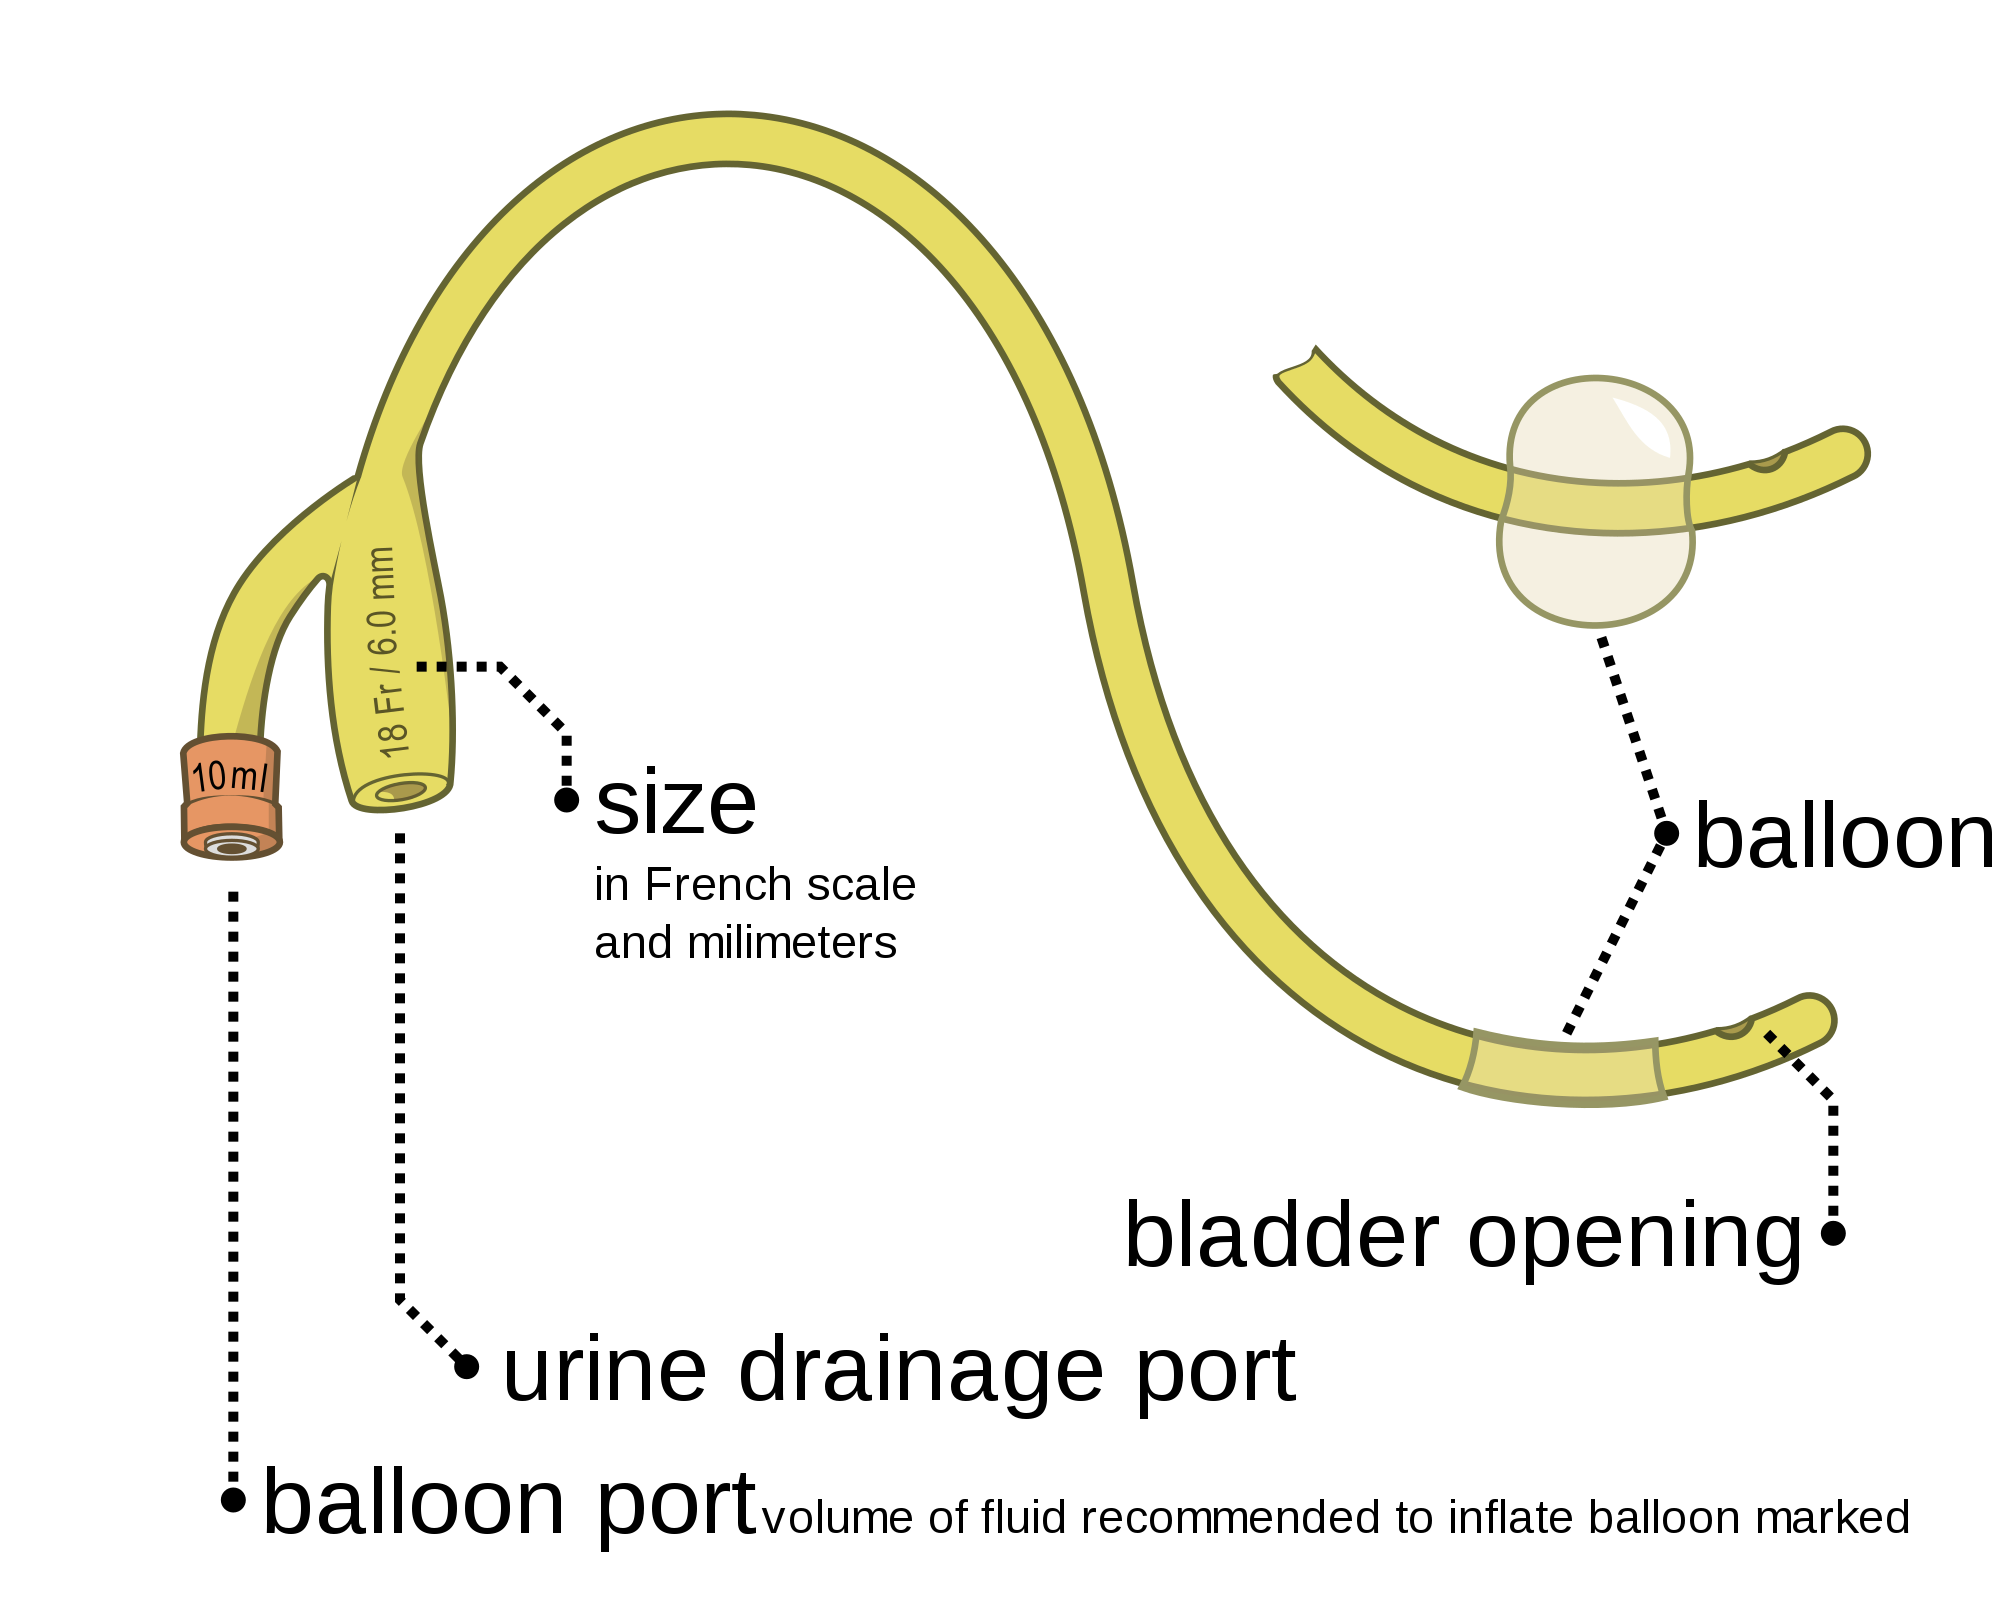
The distal end of an indwelling catheter has a urine drainage port that is connected to a drainage bag. The size of the catheter is marked at this end using the French catheter scale. A balloon port is also located at this end, where a syringe is inserted to inflate the balloon after it is inserted into the bladder. The balloon port is marked with the amount of fluid required to fill the balloon. See Figure 21.2[2] for an image of the parts of an indwelling catheter.
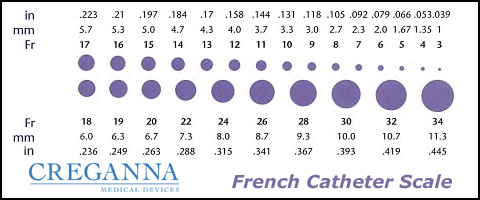
Catheters have different sizes, with the larger the number indicating a larger diameter of the catheter. See Figure 21.3[3] for an image of the French catheter scale.
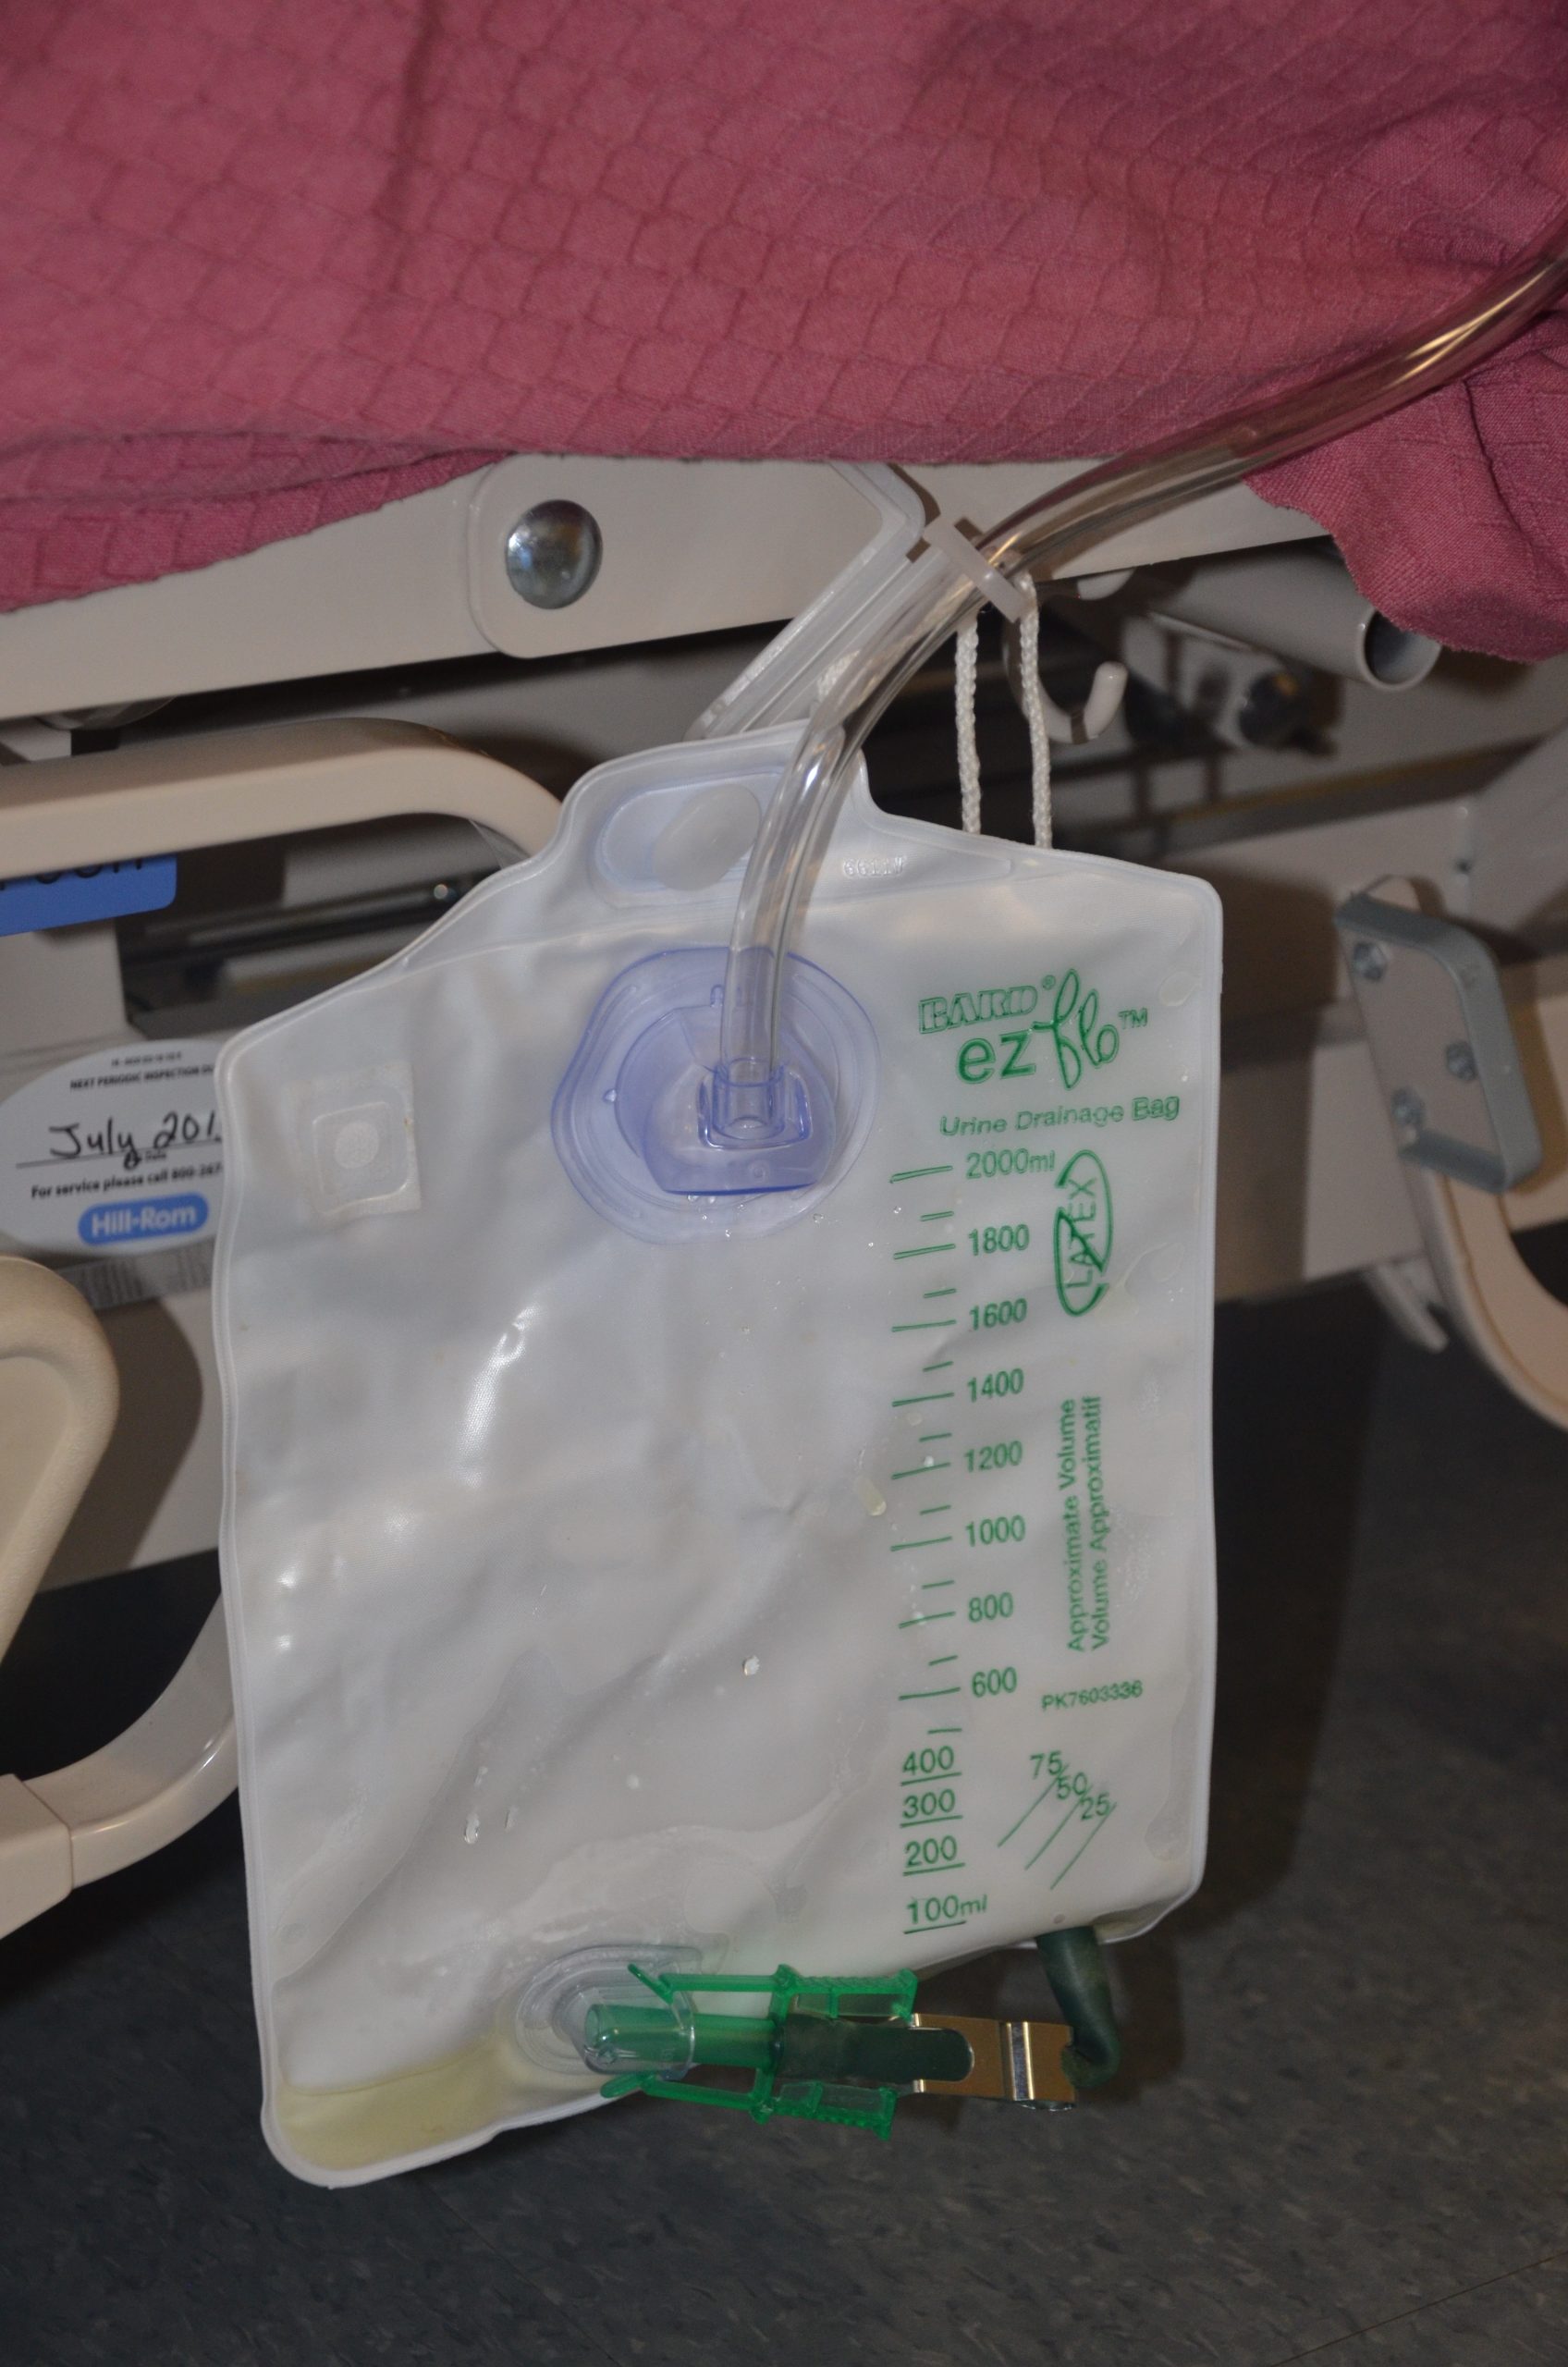
There are two common types of bags that may be attached to an indwelling catheter. During inpatient or long-term care, larger collection bags that can hold up to two liters of fluid are used. See Figure 21.4[4] for an image of a typical collection bag attached to an indwelling catheter. These bags should be emptied when they are half to two-thirds full to prevent traction on the urethra from the bag. Additionally, the collection bag should always be placed below the level of the patient’s bladder so that urine flows out of the bladder and urine does not inadvertently flow back into the bladder. Ensure the tubing is not coiled, kinked, or compressed so that urine can flow unobstructed into the bag. Slack should be maintained in the tubing to prevent injury to the patient's urethra. To prevent the development of a urinary tract infection, the bag should not be permitted to touch the floor.
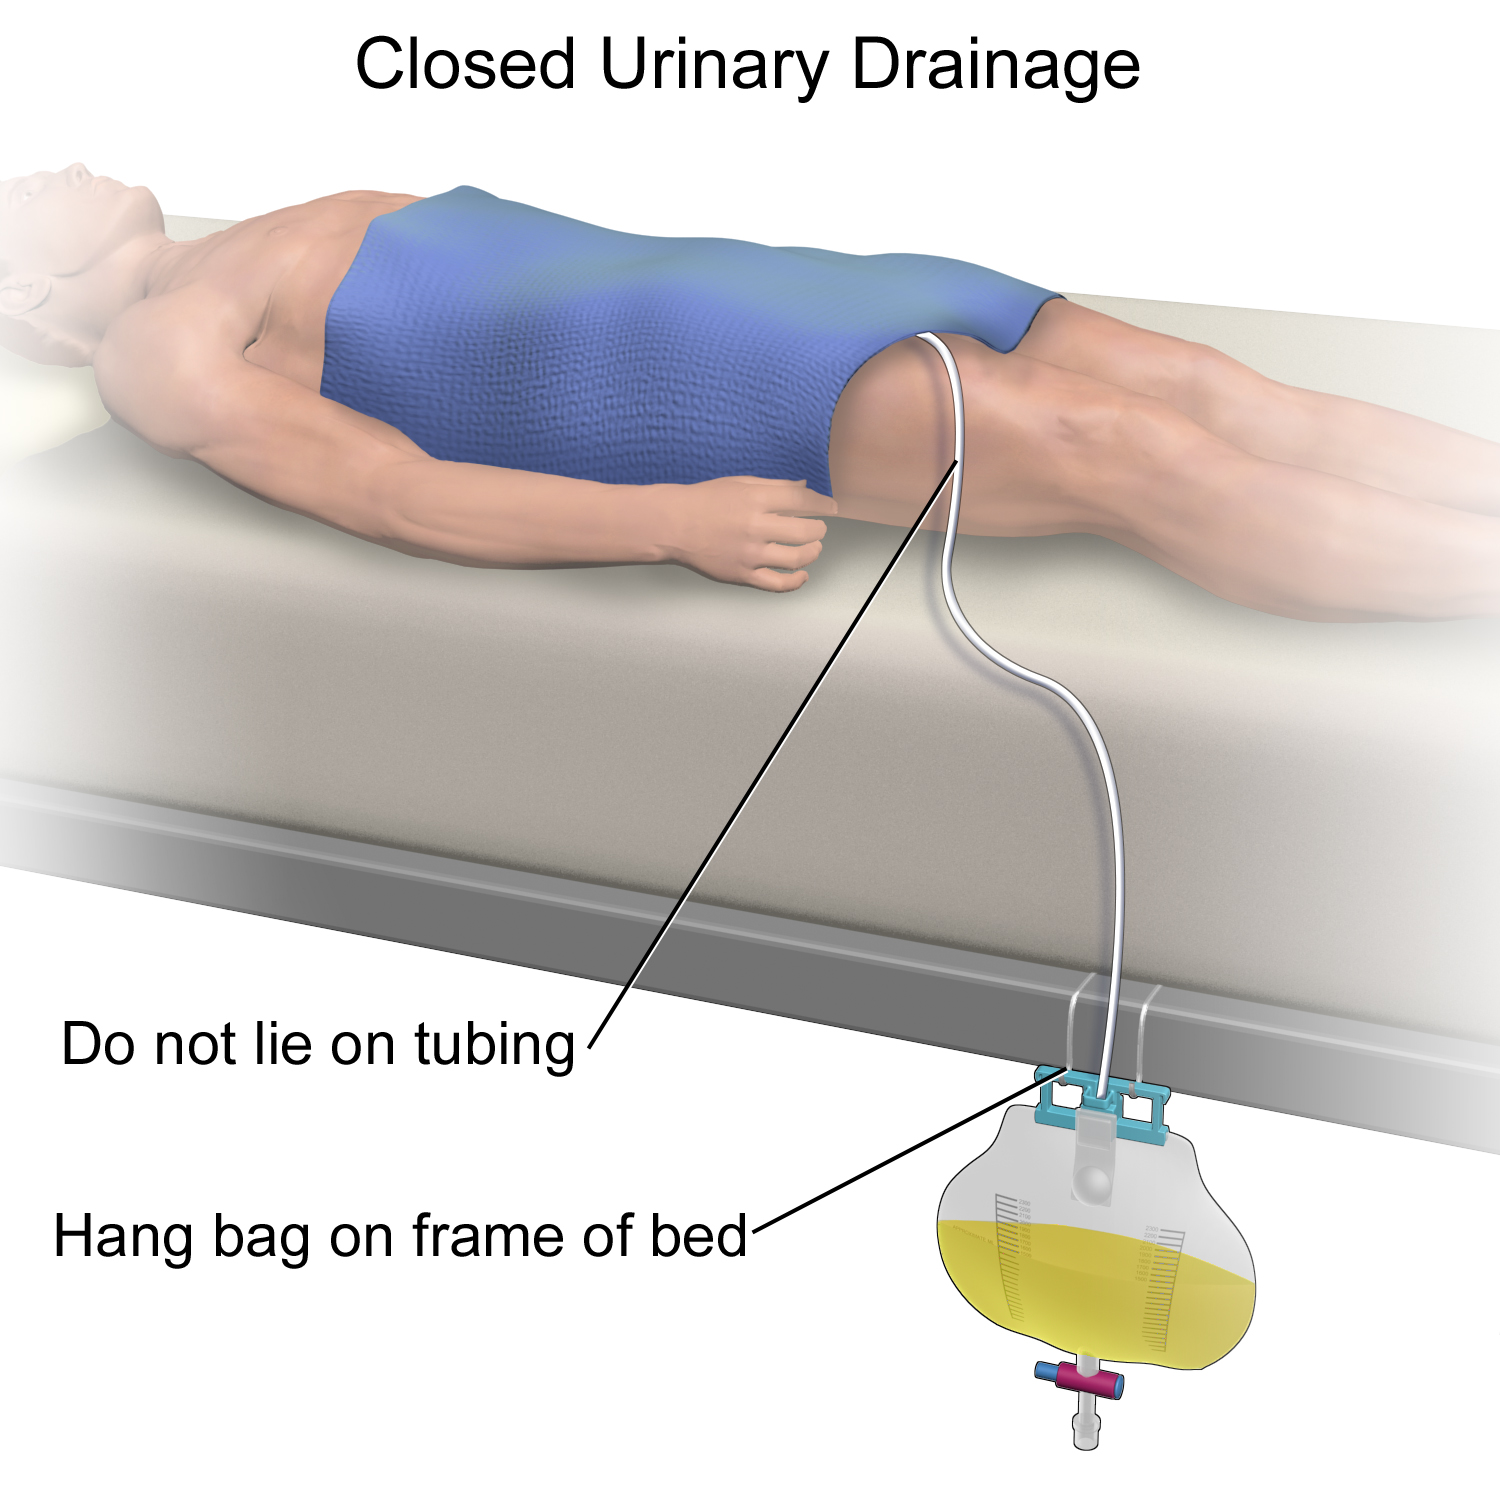
See Figure 21.5[5] for an illustration of the placement of the urine collection bag when the patient is lying in bed.
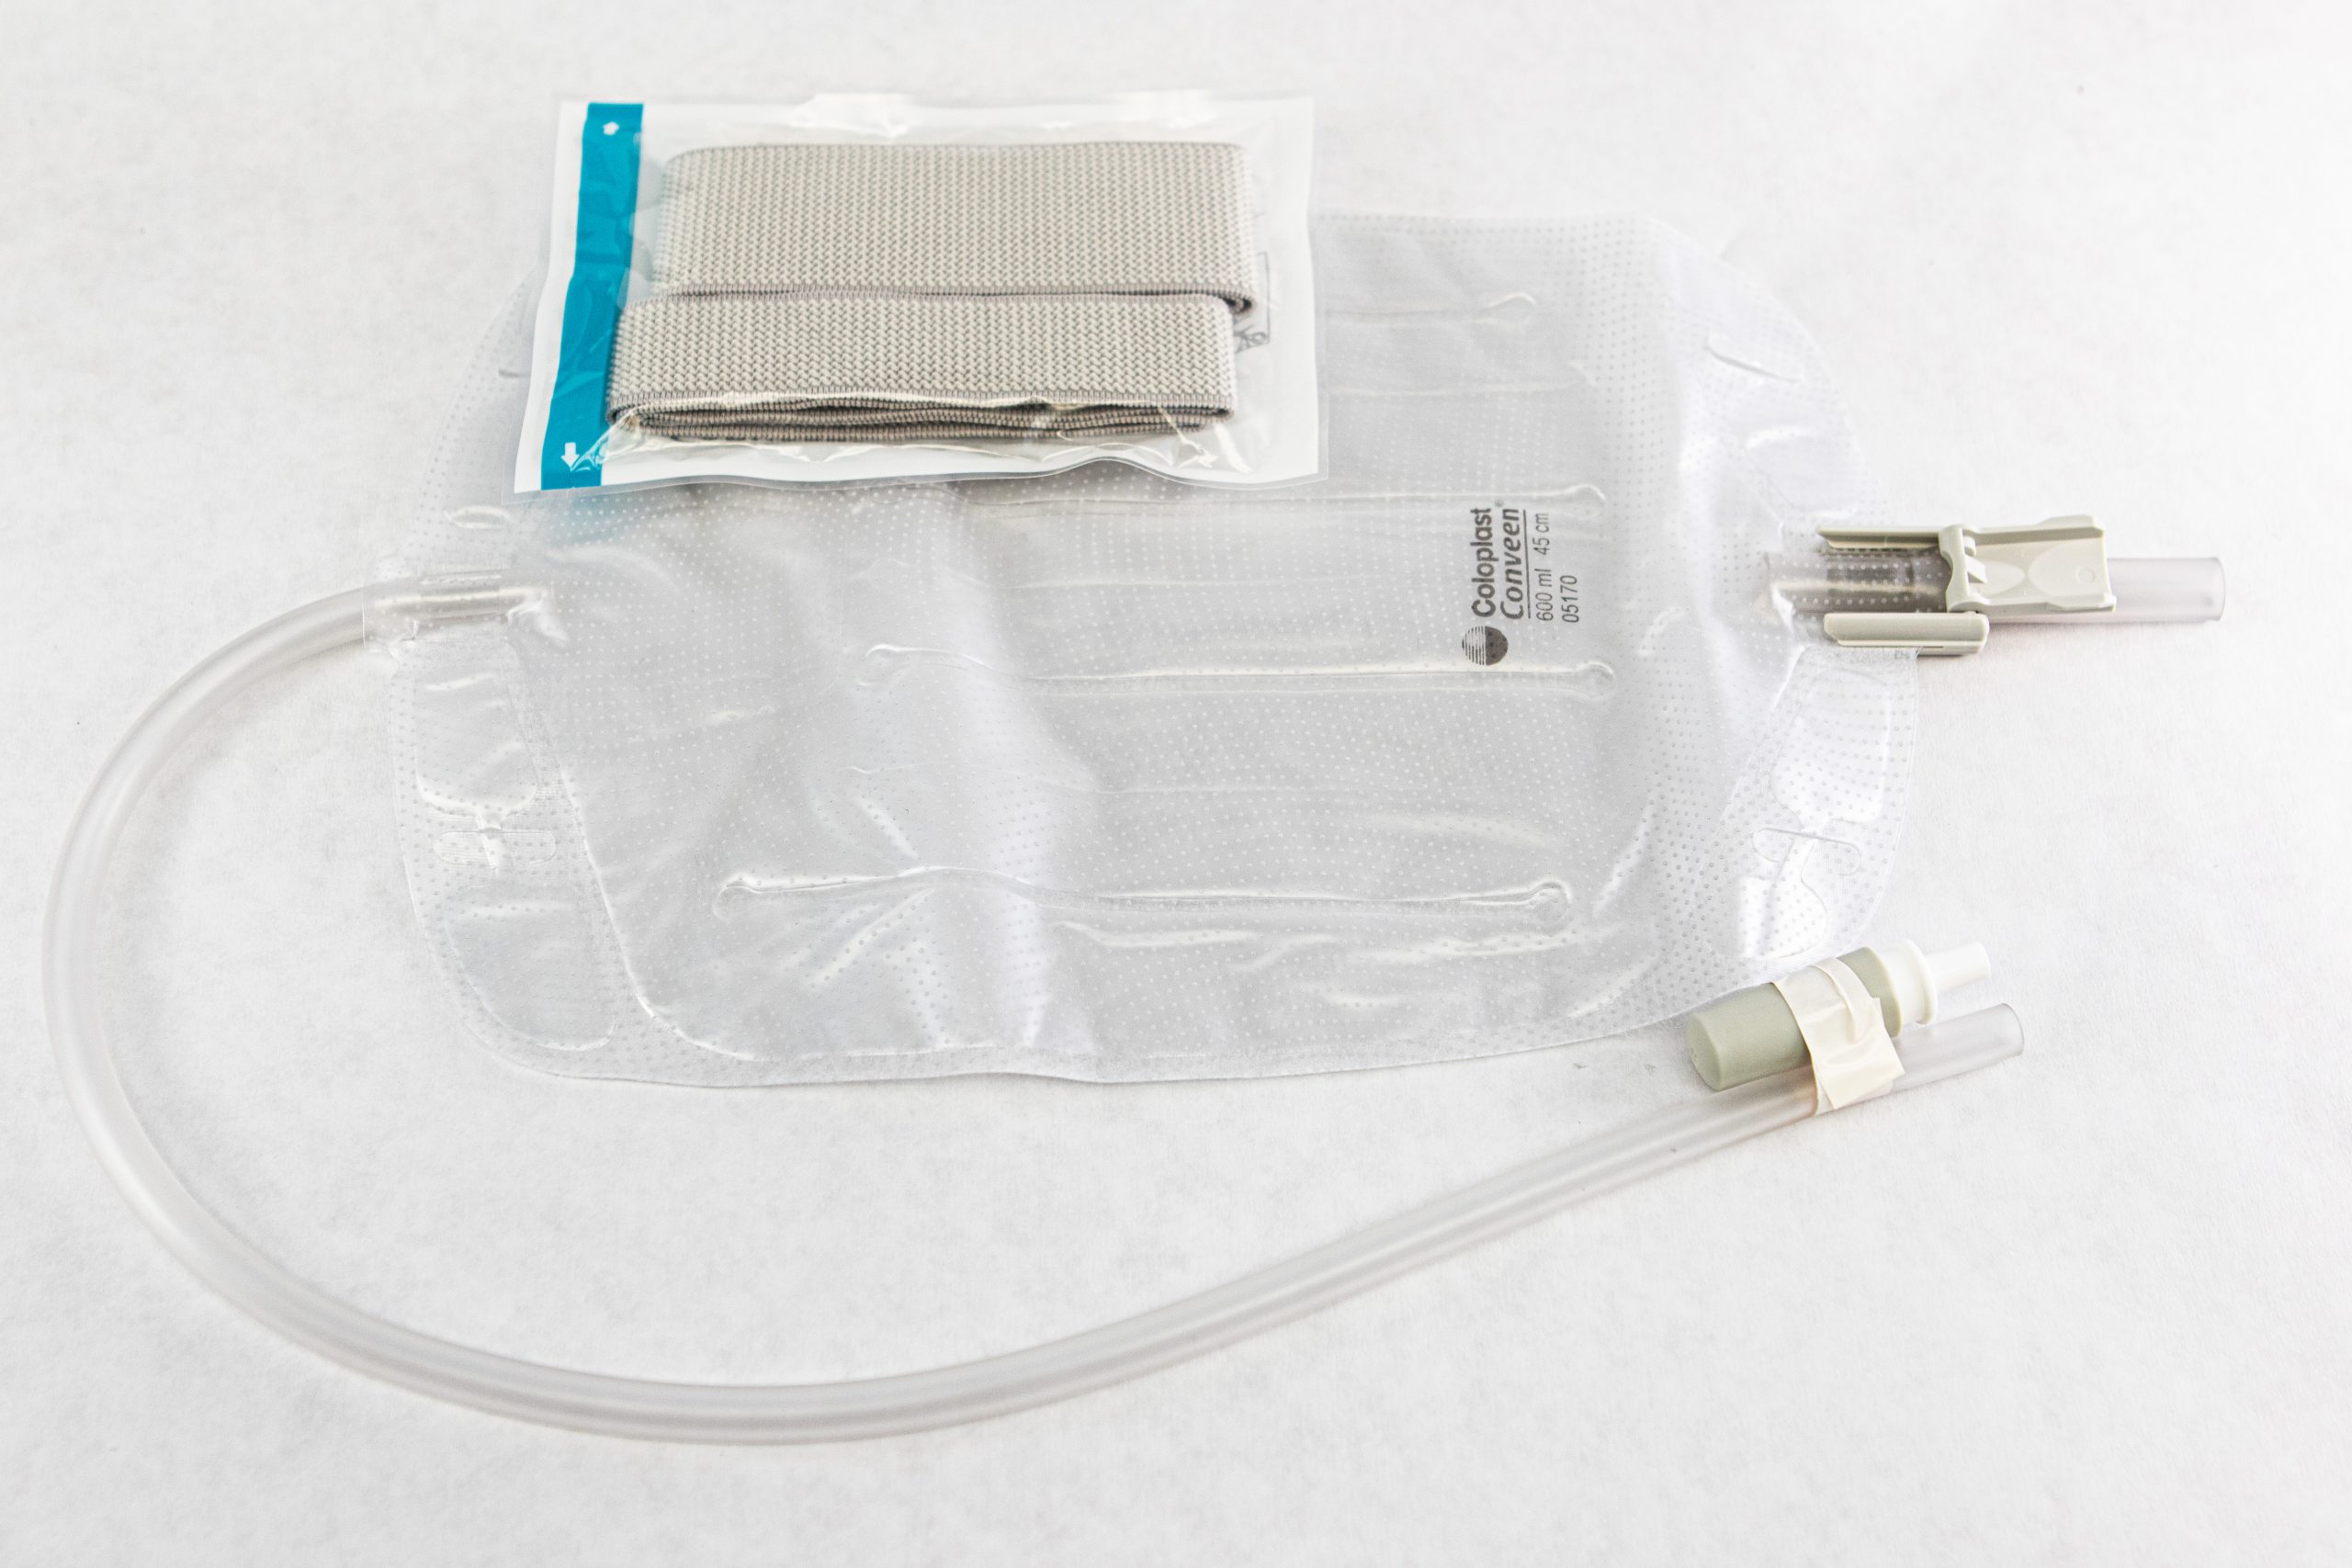
A second type of urine collection bag is a leg bag. Leg bags provide discretion when the patient is in public because they can be worn under clothing. However, leg bags are small and must be emptied more frequently than those used during inpatient care. Figure 21.6[6] for an image of leg bag and Figure 21.7[7] for an illustration of an indwelling catheter attached to a leg bag.
Straight Catheter
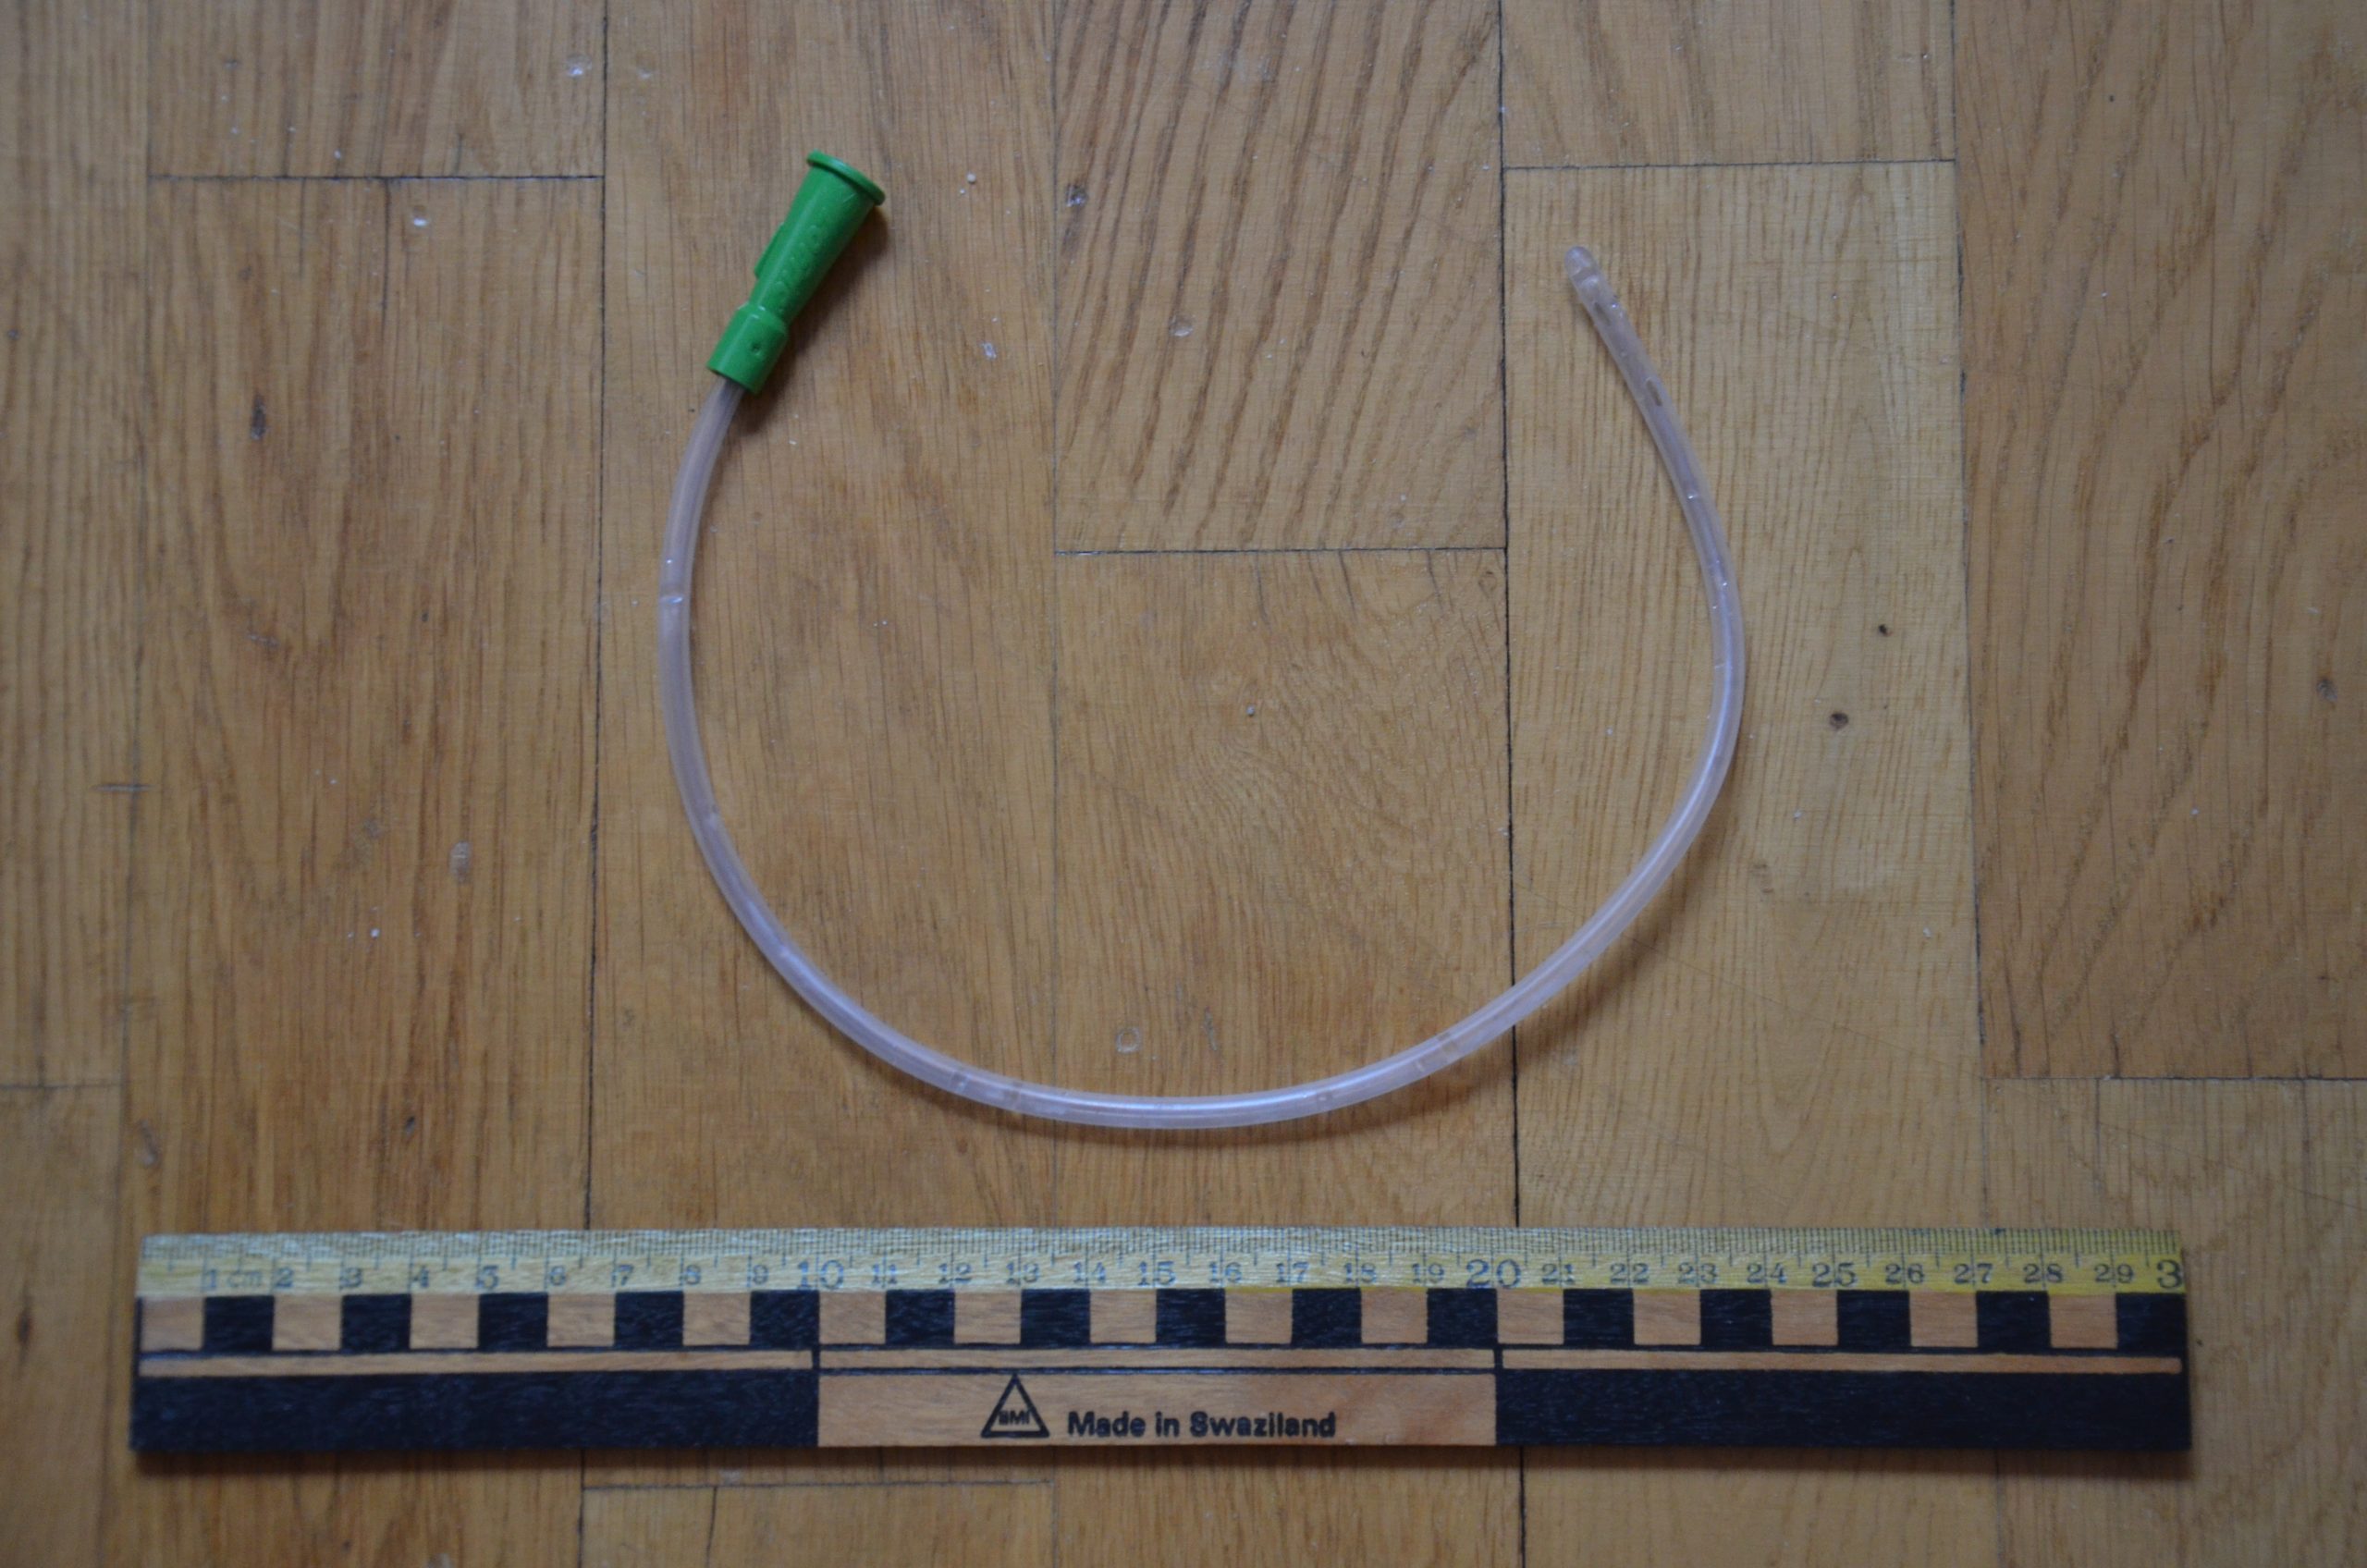
A straight catheter is used for intermittent urinary catheterization. The catheter is inserted to allow for the flow of urine and then immediately removed, so a balloon is not required at the insertion tip. See Figure 21.8[8] for an image of a straight catheter. Intermittent catheterization is used for the relief of urinary retention. It may be performed once, such as after surgery when a patient is experiencing urinary retention due to the effects of anesthesia, or performed several times a day to manage chronic urinary retention. Some patients may also independently perform self-catheterization at home to manage chronic urinary retention caused by various medical conditions. In some situations, a straight catheter is also used to obtain a sterile urine specimen for culture when a patient is unable to void into a sterile specimen cup. According to the Centers for Disease Control and Prevention (CDC), intermittent catheterization is preferred to indwelling urethral catheters whenever feasible because of decreased risk of developing a urinary tract infection.[9]
Other Types of Urinary Catheters
Coude Catheter Tip
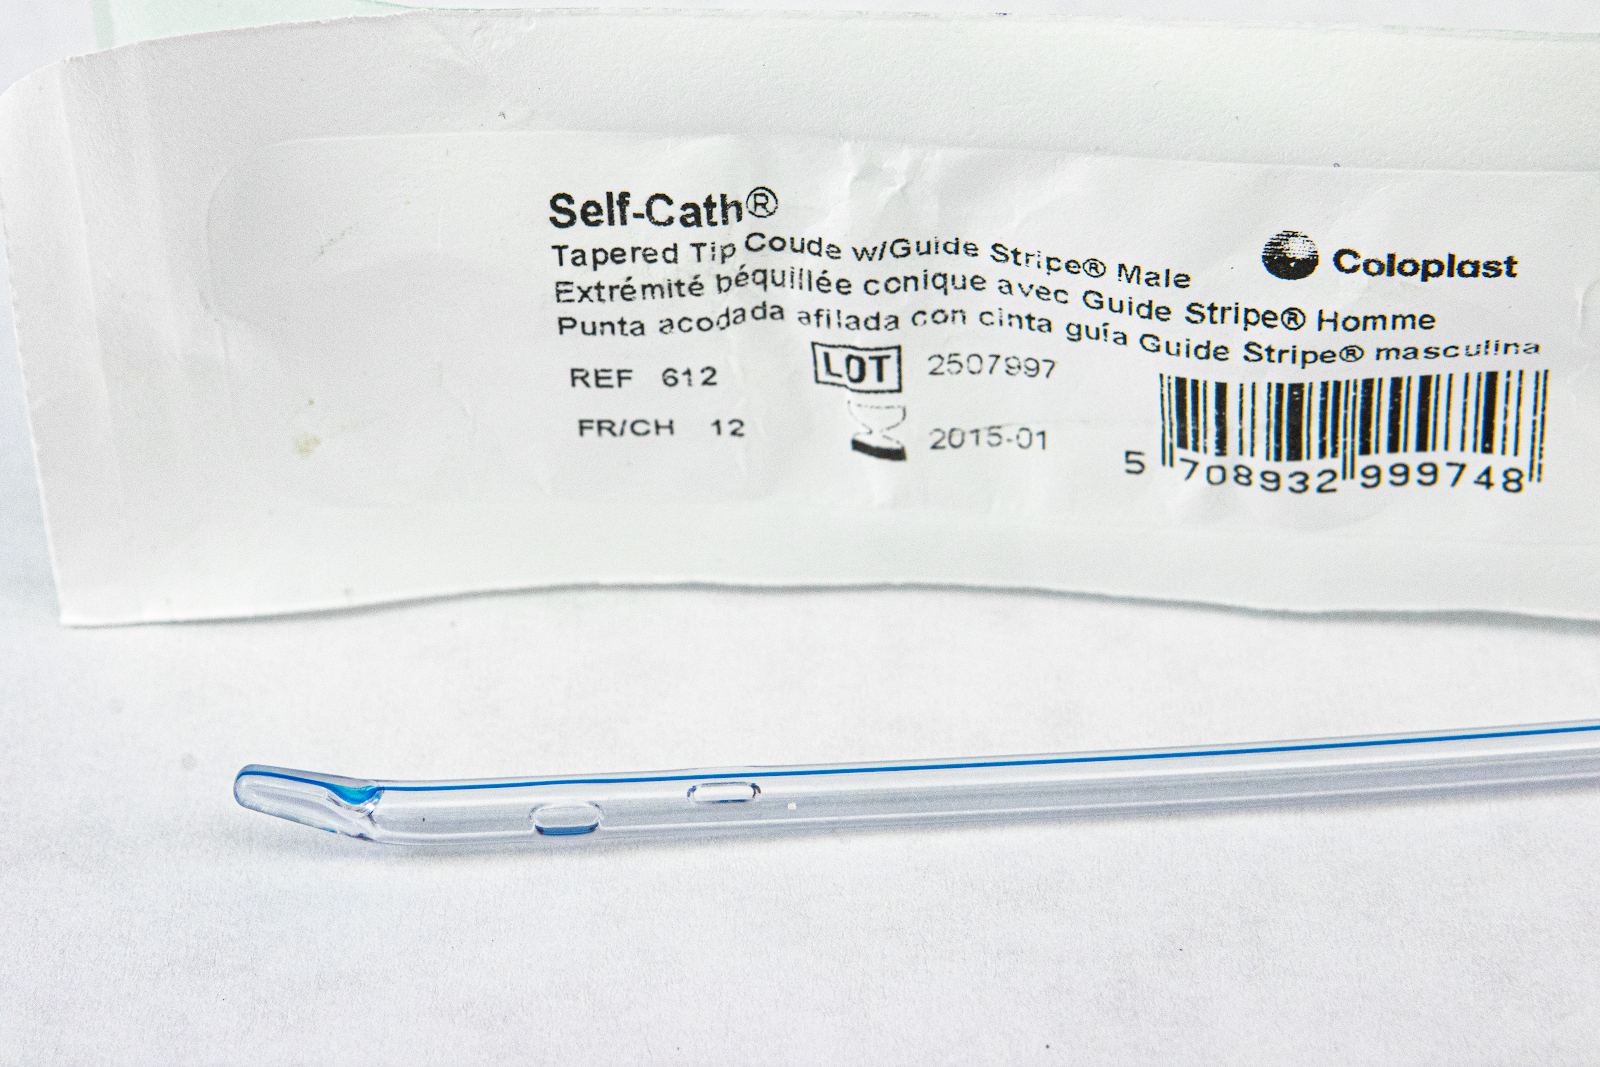
Coude catheter tips are curved to follow the natural curve of the urethra during catheterization. They are often used when catheterizing male patients with enlarged prostate glands. See Figure 21.9[10] for an example of a urinary catheter with a coude tip. During insertion, the tip of the coude catheter must be pointed anteriorly or it can cause damage to the urethra. A thin line embedded in the catheter provides information regarding orientation during the procedure; maintain the line upwards to keep it pointed anteriorly.
Irrigation Catheter
Irrigation catheters are typically used after prostate surgery to flush the surgical area. These catheters are larger in size to allow for irrigation of the bladder to help prevent the formation of blood clots and to flush them out. See Figure 21.10[11] for an image comparing a larger 20 French catheter (typically used for irrigation) to a 14 French catheter (typically used for indwelling catheters).

Suprapubic Catheters
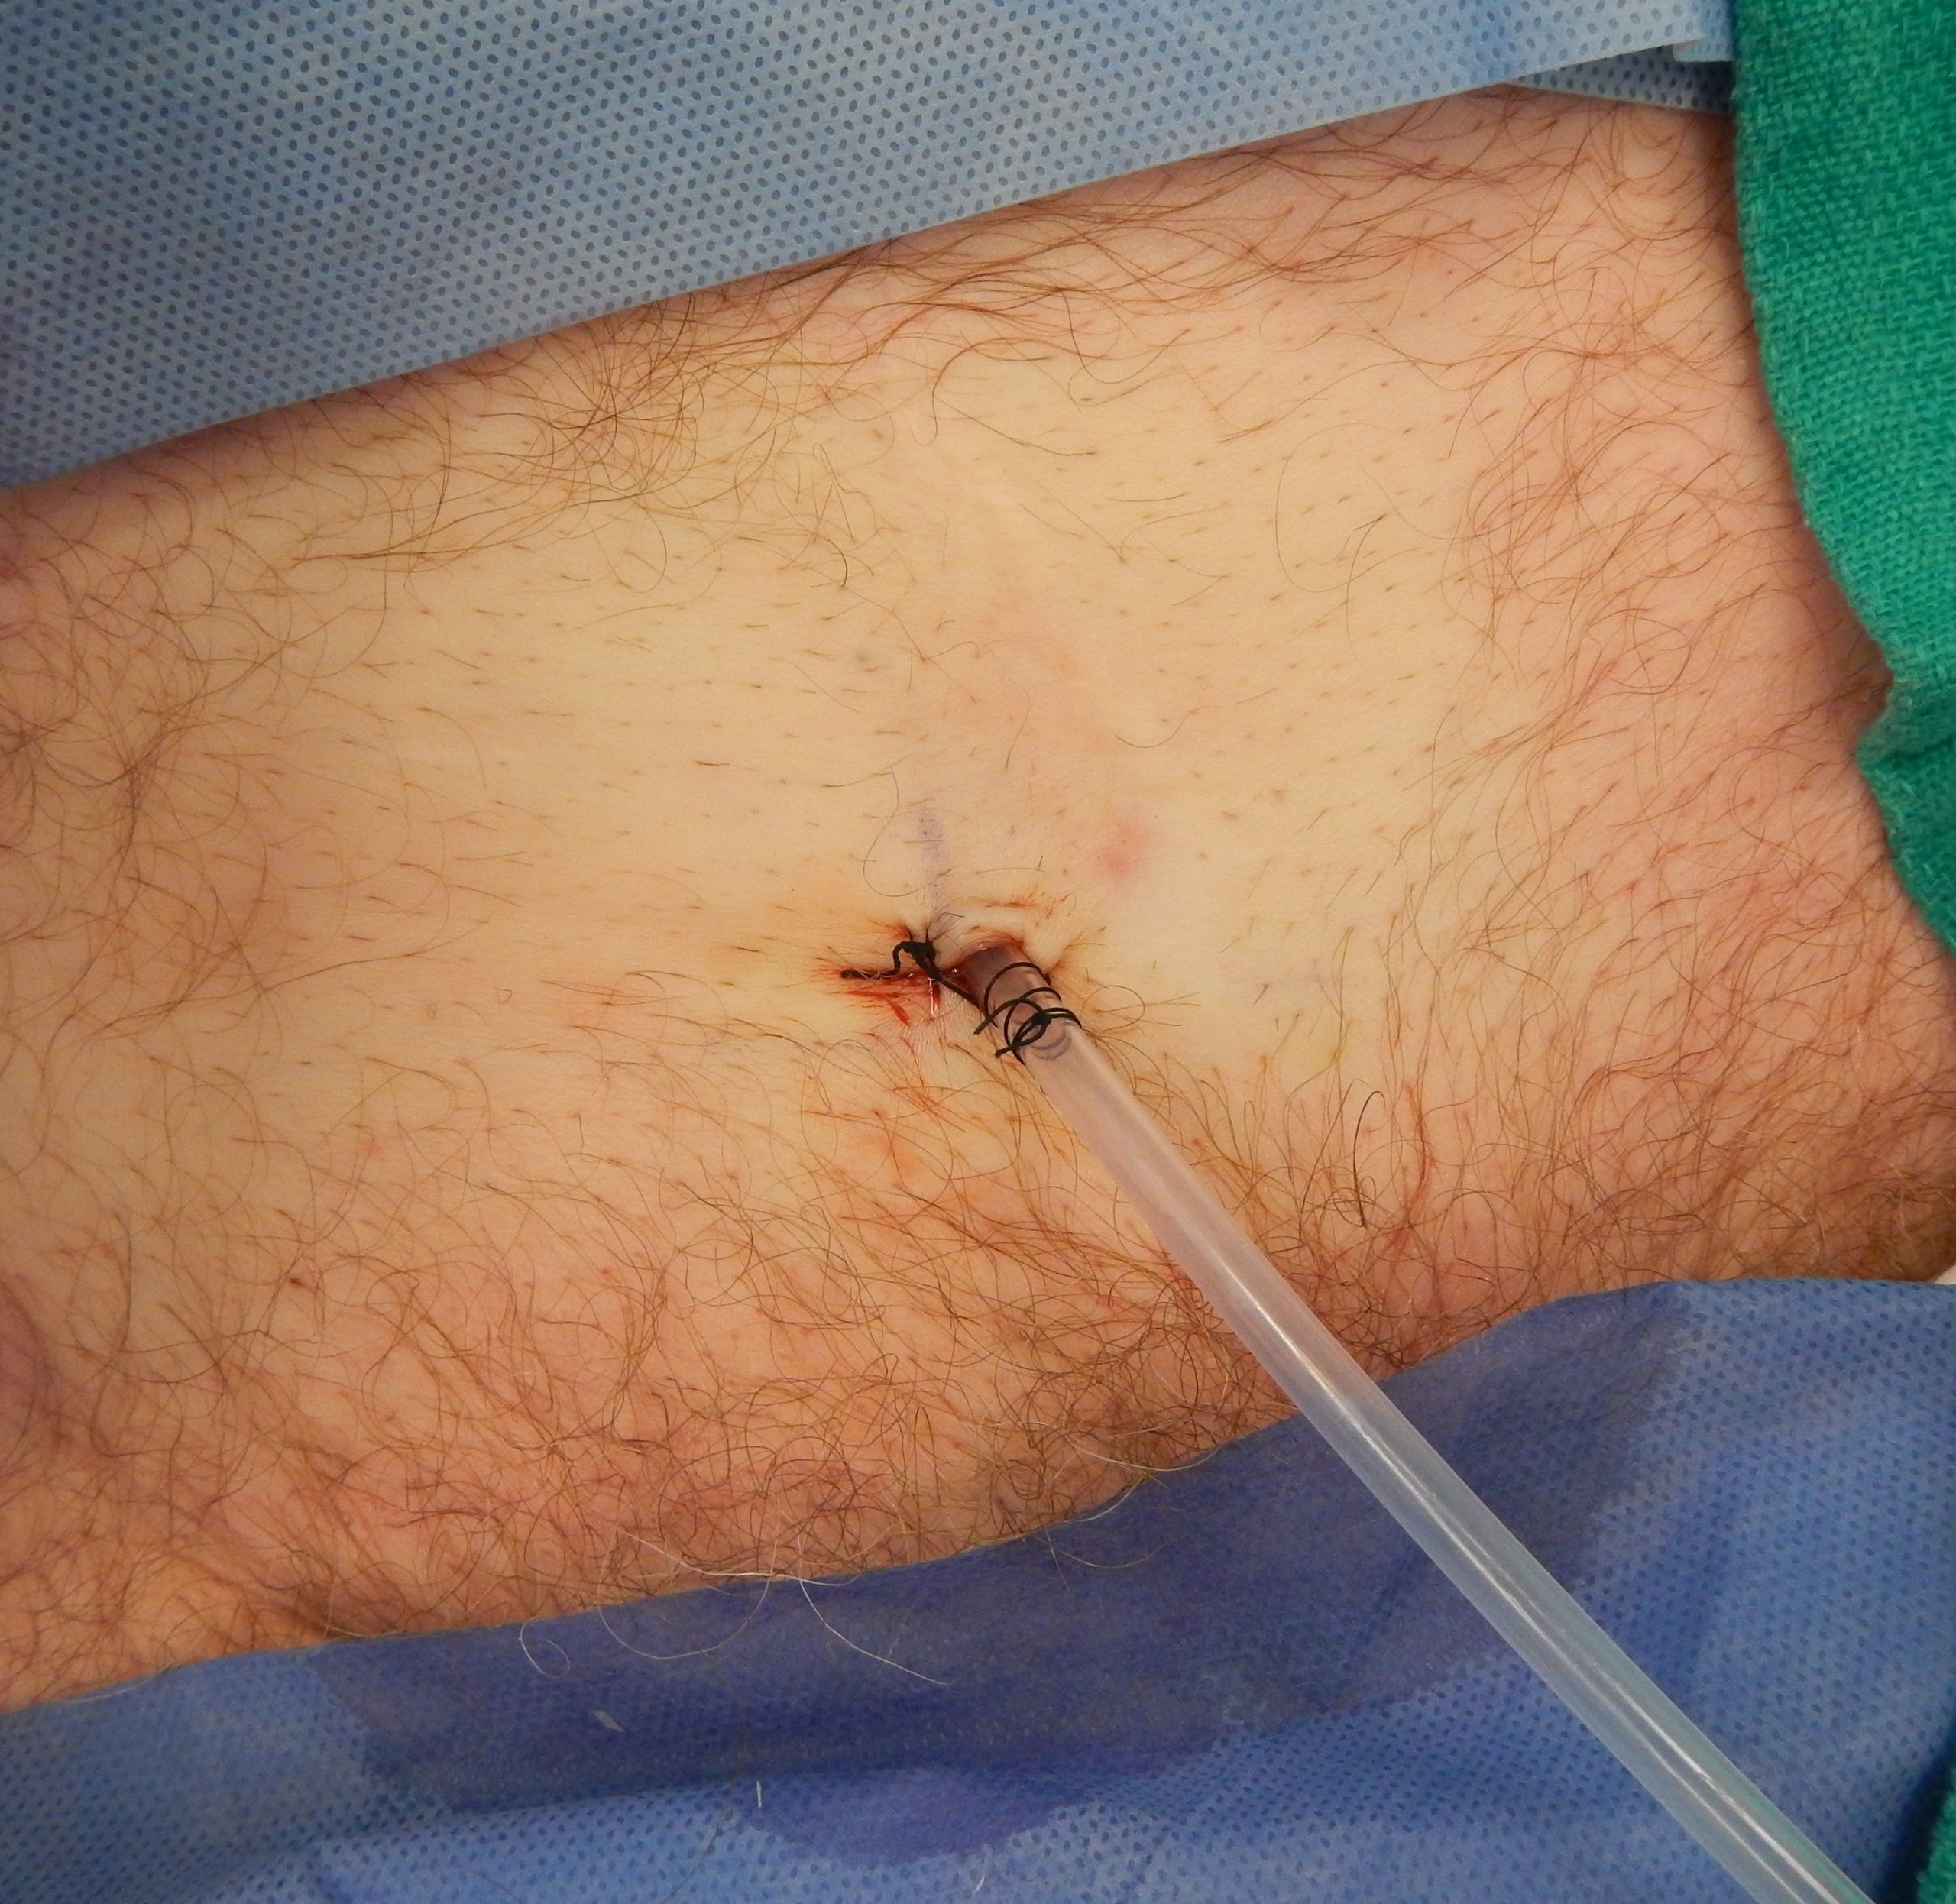
Suprapubic catheters are surgically inserted through the abdominal wall into the bladder. This type of catheter is typically inserted when there is a blockage within the urethra that does not allow the use of a straight or indwelling catheter. Suprapubic catheters may be used for a short period of time for acute medical conditions or may be used permanently for chronic conditions. See Figure 21.11[12] for an image of a suprapubic catheter. The insertion site of a suprapubic catheter must be cleaned regularly according to agency policy with appropriate steps to prevent skin breakdown.
Male Condom Catheter
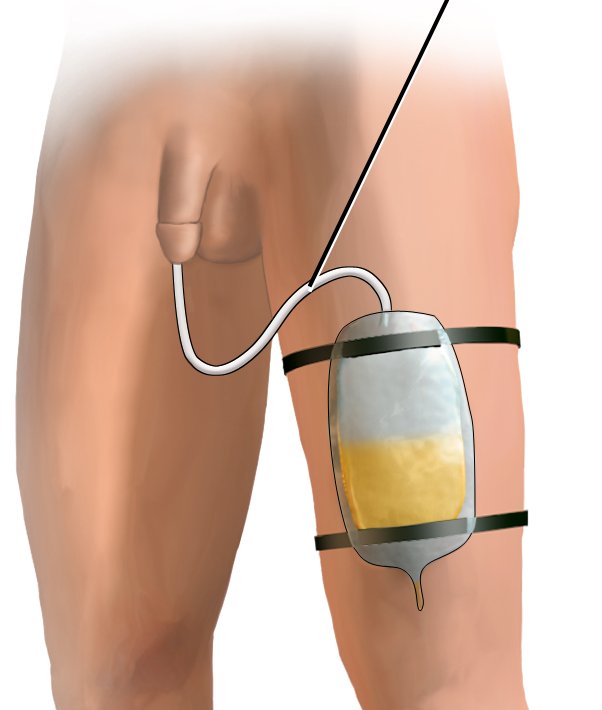
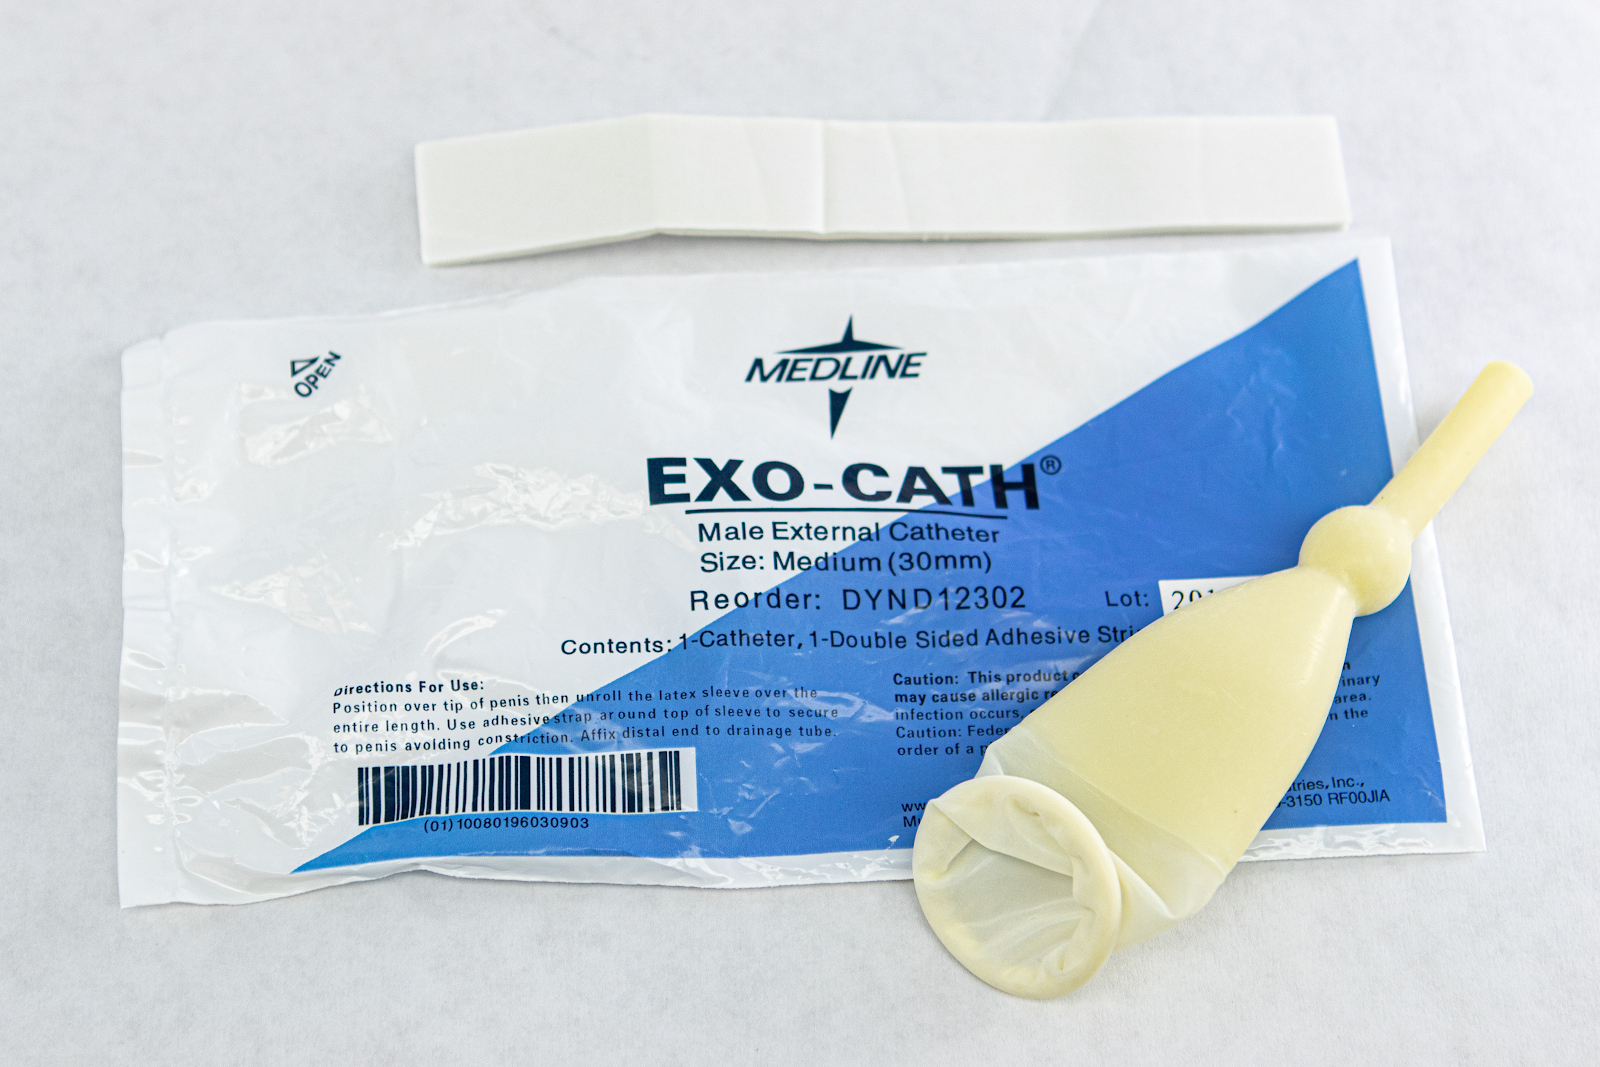
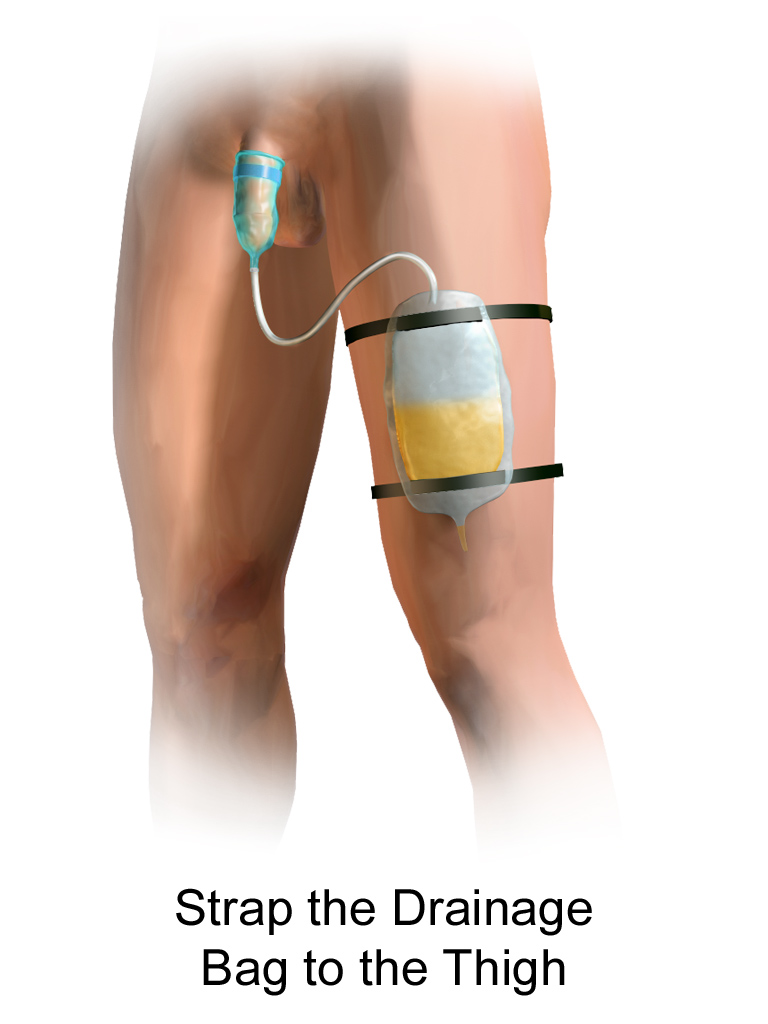
A condom catheter is a noninvasive device used for males with incontinence. It is placed over the penis and connected to a drainage bag. This device protects and promotes healing of the skin around the perineal area and inner legs and is used as an alternative to an indwelling urinary catheter. See Figure 21.12[13] for an image of a condom catheter and Figure 21.13[14] for an illustration of a condom catheter attached to a leg bag.
Female External Urinary Catheter
Female external urinary catheters (FEUC) have been recently introduced into practice to reduce the incidence of catheter-associated urinary tract infection (CAUTI) in women.[15] The external female catheter device is made of a purewick material that is placed externally over the female’s urinary meatus. The wicking material is attached to a tube that is hooked to a low-suction device. When the wick becomes saturated with urine, it is suctioned into a drainage canister. Preliminary studies have found that utilizing the FEUC device reduced the risk for CAUTI.[16],[17]
View these supplementary YouTube videos on female external urinary catheters:
Students demonstrate use of PureWick female external catheter[18]
How to use the use the PureWick - a female external catheter[19]
Before discussing specific procedures related to facilitating bowel and bladder function, let’s review basic concepts related to urinary and bowel elimination. When facilitating alternative methods of elimination, it is important to understand the anatomy and physiology of the gastrointestinal and urinary systems, as well as the adverse effects of various conditions and medications on elimination. Use the information below to review information about these topics.
For more information about the anatomy and physiology of the gastrointestinal system and medications used to treat diarrhea and constipation, visit the "Gastrointestinal" chapter of the Open RN Nursing Pharmacology textbook.
For more information about the anatomy and physiology of the kidneys and diuretic medications used to treat fluid overload, visit the "Cardiovascular and Renal System" chapter in Open RN Nursing Pharmacology textbook.
For more information about applying the nursing process to facilitate elimination, visit the "Elimination" chapter in Open RN Nursing Fundamentals.
Urinary Elimination Devices
This section will focus on the devices used to facilitate urinary elimination. Urinary catheterization is the insertion of a catheter tube into the urethral opening and placing it in the neck of the urinary bladder to drain urine. There are several types of urinary elimination devices, such as indwelling catheters, intermittent catheters, suprapubic catheters, and external devices. Each of these types of devices is described in the following subsections.
Indwelling Catheter
An indwelling catheter, often referred to as a “Foley catheter,” refers to a urinary catheter that remains in place after insertion into the bladder for the continual collection of urine. It has a balloon on the insertion tip to maintain placement in the neck of the bladder. The other end of the catheter is attached to a drainage bag for the collection of urine. See Figure 21.1[20] for an illustration of the anatomical placement of an indwelling catheter in the bladder neck.

The distal end of an indwelling catheter has a urine drainage port that is connected to a drainage bag. The size of the catheter is marked at this end using the French catheter scale. A balloon port is also located at this end, where a syringe is inserted to inflate the balloon after it is inserted into the bladder. The balloon port is marked with the amount of fluid required to fill the balloon. See Figure 21.2[21] for an image of the parts of an indwelling catheter.

Catheters have different sizes, with the larger the number indicating a larger diameter of the catheter. See Figure 21.3[22] for an image of the French catheter scale.

There are two common types of bags that may be attached to an indwelling catheter. During inpatient or long-term care, larger collection bags that can hold up to two liters of fluid are used. See Figure 21.4[23] for an image of a typical collection bag attached to an indwelling catheter. These bags should be emptied when they are half to two-thirds full to prevent traction on the urethra from the bag. Additionally, the collection bag should always be placed below the level of the patient’s bladder so that urine flows out of the bladder and urine does not inadvertently flow back into the bladder. Ensure the tubing is not coiled, kinked, or compressed so that urine can flow unobstructed into the bag. Slack should be maintained in the tubing to prevent injury to the patient's urethra. To prevent the development of a urinary tract infection, the bag should not be permitted to touch the floor.

See Figure 21.5[24] for an illustration of the placement of the urine collection bag when the patient is lying in bed.

A second type of urine collection bag is a leg bag. Leg bags provide discretion when the patient is in public because they can be worn under clothing. However, leg bags are small and must be emptied more frequently than those used during inpatient care. Figure 21.6[25] for an image of leg bag and Figure 21.7[26] for an illustration of an indwelling catheter attached to a leg bag.


Straight Catheter
A straight catheter is used for intermittent urinary catheterization. The catheter is inserted to allow for the flow of urine and then immediately removed, so a balloon is not required at the insertion tip. See Figure 21.8[27] for an image of a straight catheter. Intermittent catheterization is used for the relief of urinary retention. It may be performed once, such as after surgery when a patient is experiencing urinary retention due to the effects of anesthesia, or performed several times a day to manage chronic urinary retention. Some patients may also independently perform self-catheterization at home to manage chronic urinary retention caused by various medical conditions. In some situations, a straight catheter is also used to obtain a sterile urine specimen for culture when a patient is unable to void into a sterile specimen cup. According to the Centers for Disease Control and Prevention (CDC), intermittent catheterization is preferred to indwelling urethral catheters whenever feasible because of decreased risk of developing a urinary tract infection.[28]

Other Types of Urinary Catheters
Coude Catheter Tip
Coude catheter tips are curved to follow the natural curve of the urethra during catheterization. They are often used when catheterizing male patients with enlarged prostate glands. See Figure 21.9[29] for an example of a urinary catheter with a coude tip. During insertion, the tip of the coude catheter must be pointed anteriorly or it can cause damage to the urethra. A thin line embedded in the catheter provides information regarding orientation during the procedure; maintain the line upwards to keep it pointed anteriorly.

Irrigation Catheter
Irrigation catheters are typically used after prostate surgery to flush the surgical area. These catheters are larger in size to allow for irrigation of the bladder to help prevent the formation of blood clots and to flush them out. See Figure 21.10[30] for an image comparing a larger 20 French catheter (typically used for irrigation) to a 14 French catheter (typically used for indwelling catheters).

Suprapubic Catheters
Suprapubic catheters are surgically inserted through the abdominal wall into the bladder. This type of catheter is typically inserted when there is a blockage within the urethra that does not allow the use of a straight or indwelling catheter. Suprapubic catheters may be used for a short period of time for acute medical conditions or may be used permanently for chronic conditions. See Figure 21.11[31] for an image of a suprapubic catheter. The insertion site of a suprapubic catheter must be cleaned regularly according to agency policy with appropriate steps to prevent skin breakdown.

Male Condom Catheter
A condom catheter is a noninvasive device used for males with incontinence. It is placed over the penis and connected to a drainage bag. This device protects and promotes healing of the skin around the perineal area and inner legs and is used as an alternative to an indwelling urinary catheter. See Figure 21.12[32] for an image of a condom catheter and Figure 21.13[33] for an illustration of a condom catheter attached to a leg bag.


Female External Urinary Catheter
Female external urinary catheters (FEUC) have been recently introduced into practice to reduce the incidence of catheter-associated urinary tract infection (CAUTI) in women.[34] The external female catheter device is made of a purewick material that is placed externally over the female’s urinary meatus. The wicking material is attached to a tube that is hooked to a low-suction device. When the wick becomes saturated with urine, it is suctioned into a drainage canister. Preliminary studies have found that utilizing the FEUC device reduced the risk for CAUTI.[35],[36]
View these supplementary YouTube videos on female external urinary catheters:
Students demonstrate use of PureWick female external catheter[37]
How to use the use the PureWick - a female external catheter[38]
A catheter-associated urinary tract infection (CAUTI) is a common, life-threatening complication caused by indwelling urinary catheters. The development of a CAUTI is associated with patients’ increased length of stay in the hospital, resulting in additional hospital costs and a higher risk of death. It is estimated that 17% to 69% of CAUTI cases are preventable, meaning that up to 380,000 infections and 9,000 patient deaths per year related to CAUTI can be prevented with appropriate nursing measures.[39]
Nurses can save lives, prevent harm, and lower health care costs by following interventions outlined in the document created by the American Nurses Association titled Streamlined Evidence-Based RN Tool: Catheter Associated Urinary Tract Infection (CAUTI) Prevention. Review the entire tool in the box provided below. Key interventions include the following:
- Ensure the patient meets CDC-approved indications prior to inserting an indwelling catheter. If the patient does not meet the approved indications, contact the provider and advocate for an alternative method to facilitate elimination.
- According to the Centers for Disease Control and Prevention (CDC), appropriate indications for inserting an indwelling urinary catheter include the following[40]:
- Urinary retention or bladder outlet obstruction
- Hourly monitoring of urinary output in critically ill patients
- Perioperative use for selected surgeries
- Healing of open sacral and perineal wounds in patients with urinary incontinence
- Prolonged immobilization
- End-of-life care[41]
- Inappropriate reasons for inserting an indwelling urinary catheter include the following:
- Substitution of nursing care for a patient or resident with incontinence
- A means for obtaining a urine culture when a patient can voluntarily void
- Prolonged postoperative care without appropriate indications[42]
- According to the Centers for Disease Control and Prevention (CDC), appropriate indications for inserting an indwelling urinary catheter include the following[40]:
- After an indwelling urinary catheter is inserted, assess the patient daily to determine if the patient still meets the CDC criteria for an indwelling catheter and document the findings. If the patient no longer meets the approved criteria, follow agency policy for removal.
- When an indwelling catheter is in place, prevent CAUTI by following the maintenance steps outlined by the CDC.
- Continually monitor for signs of a CAUTI and report concerns to the health care provider.[43]
- Signs and symptoms of CAUTI to urgently report to the health care provider include fever greater than 38 degrees Celsius, change in mental status such as confusion or lethargy, chills, malodorous urine, and suprapubic or flank pain. Flank pain can be assessed by assisting the patient to a sitting or side-lying position and percussing the costovertebral areas.[44]
Read a nurse-driven, evidence-based PDF tool to prevent CAUTI from the American Nurses Association[45]: Streamlined Evidence-Based RN Tool: Catheter Associated Urinary Tract Infection (CAUTI) Prevention
A catheter-associated urinary tract infection (CAUTI) is a common, life-threatening complication caused by indwelling urinary catheters. The development of a CAUTI is associated with patients’ increased length of stay in the hospital, resulting in additional hospital costs and a higher risk of death. It is estimated that 17% to 69% of CAUTI cases are preventable, meaning that up to 380,000 infections and 9,000 patient deaths per year related to CAUTI can be prevented with appropriate nursing measures.[46]
Nurses can save lives, prevent harm, and lower health care costs by following interventions outlined in the document created by the American Nurses Association titled Streamlined Evidence-Based RN Tool: Catheter Associated Urinary Tract Infection (CAUTI) Prevention. Review the entire tool in the box provided below. Key interventions include the following:
- Ensure the patient meets CDC-approved indications prior to inserting an indwelling catheter. If the patient does not meet the approved indications, contact the provider and advocate for an alternative method to facilitate elimination.
- According to the Centers for Disease Control and Prevention (CDC), appropriate indications for inserting an indwelling urinary catheter include the following[47]:
- Urinary retention or bladder outlet obstruction
- Hourly monitoring of urinary output in critically ill patients
- Perioperative use for selected surgeries
- Healing of open sacral and perineal wounds in patients with urinary incontinence
- Prolonged immobilization
- End-of-life care[48]
- Inappropriate reasons for inserting an indwelling urinary catheter include the following:
- Substitution of nursing care for a patient or resident with incontinence
- A means for obtaining a urine culture when a patient can voluntarily void
- Prolonged postoperative care without appropriate indications[49]
- According to the Centers for Disease Control and Prevention (CDC), appropriate indications for inserting an indwelling urinary catheter include the following[47]:
- After an indwelling urinary catheter is inserted, assess the patient daily to determine if the patient still meets the CDC criteria for an indwelling catheter and document the findings. If the patient no longer meets the approved criteria, follow agency policy for removal.
- When an indwelling catheter is in place, prevent CAUTI by following the maintenance steps outlined by the CDC.
- Continually monitor for signs of a CAUTI and report concerns to the health care provider.[50]
- Signs and symptoms of CAUTI to urgently report to the health care provider include fever greater than 38 degrees Celsius, change in mental status such as confusion or lethargy, chills, malodorous urine, and suprapubic or flank pain. Flank pain can be assessed by assisting the patient to a sitting or side-lying position and percussing the costovertebral areas.[51]
Read a nurse-driven, evidence-based PDF tool to prevent CAUTI from the American Nurses Association[52]: Streamlined Evidence-Based RN Tool: Catheter Associated Urinary Tract Infection (CAUTI) Prevention
Safely and accurately placing an indwelling urinary catheter poses several challenges that require the nurse to use clinical judgment. Challenges can include anatomical variations in a specific patient, medical conditions affecting patient positioning, and maintaining sterility of the procedure with confused or agitated patients. See the checklists on Foley Catheter Insertion (Male) and Foley Catheter Insertion (Female) for detailed instructions.
Nursing interventions to prevent the development of a catheter-associated urinary tract infection (CAUTI) on insertion include the following[53]:
- Determine if insertion of an indwelling catheter meets CDC guidelines.
- Select the smallest-sized catheter that is appropriate for the patient, typically a 14 French.
- Obtain assistance as needed to facilitate patient positioning, visualization, and insertion. Many agencies require two nurses for the insertion of indwelling catheters.
- Perform perineal care before inserting a urinary catheter and regularly thereafter.
- Perform hand hygiene before and after insertion, as well as during any manipulation of the device or site.
- Maintain strict aseptic technique during insertion and use sterile gloves and equipment.
- Inflate the balloon after insertion per manufacturer instructions. It is not recommended to preinflate the balloon prior to insertion.
- Properly secure the catheter after insertion to prevent tissue damage.
- Keep the drainage bag below the bladder but not resting on the floor.
- Check the system to ensure there are no kinks or obstructions to urine flow.
- Provide routine hygiene of the urinary meatus during daily bathing and cleanse the perineal area after every bowel movement. In uncircumcised males, gently retract the foreskin, cleanse the meatus, and then return the foreskin to the original position. Do not cleanse the periurethral area with antiseptics after the catheter is in place.[54] To avoid contaminating the urinary tract, always clean by wiping away from the urinary meatus.
- Empty the collection bag regularly using a separate, clean collecting container for each patient. Avoid splashing and prevent contact of the drainage spigot with the nonsterile collecting container or other surfaces. Never allow the bag to touch the floor.[55],[56]
Video Review of Thompson Rivers University's Urinary Catheterization:
Safely and accurately placing an indwelling urinary catheter poses several challenges that require the nurse to use clinical judgment. Challenges can include anatomical variations in a specific patient, medical conditions affecting patient positioning, and maintaining sterility of the procedure with confused or agitated patients. See the checklists on Foley Catheter Insertion (Male) and Foley Catheter Insertion (Female) for detailed instructions.
Nursing interventions to prevent the development of a catheter-associated urinary tract infection (CAUTI) on insertion include the following[59]:
- Determine if insertion of an indwelling catheter meets CDC guidelines.
- Select the smallest-sized catheter that is appropriate for the patient, typically a 14 French.
- Obtain assistance as needed to facilitate patient positioning, visualization, and insertion. Many agencies require two nurses for the insertion of indwelling catheters.
- Perform perineal care before inserting a urinary catheter and regularly thereafter.
- Perform hand hygiene before and after insertion, as well as during any manipulation of the device or site.
- Maintain strict aseptic technique during insertion and use sterile gloves and equipment.
- Inflate the balloon after insertion per manufacturer instructions. It is not recommended to preinflate the balloon prior to insertion.
- Properly secure the catheter after insertion to prevent tissue damage.
- Keep the drainage bag below the bladder but not resting on the floor.
- Check the system to ensure there are no kinks or obstructions to urine flow.
- Provide routine hygiene of the urinary meatus during daily bathing and cleanse the perineal area after every bowel movement. In uncircumcised males, gently retract the foreskin, cleanse the meatus, and then return the foreskin to the original position. Do not cleanse the periurethral area with antiseptics after the catheter is in place.[60] To avoid contaminating the urinary tract, always clean by wiping away from the urinary meatus.
- Empty the collection bag regularly using a separate, clean collecting container for each patient. Avoid splashing and prevent contact of the drainage spigot with the nonsterile collecting container or other surfaces. Never allow the bag to touch the floor.[61],[62]
Video Review of Thompson Rivers University's Urinary Catheterization:
If a small amount of a fresh urine is needed for specimen collection for urinalysis or culture, aspirate the urine from the needleless sampling port with a sterile syringe after cleansing the port with a disinfectant.[65] See the "Checklist for Obtaining a Urine Specimen from a Foley Catheter" for more detailed instructions. Do not collect the urine that is already in the collection bag because it is contaminated and will lead to an erroneous test result.
If a small amount of a fresh urine is needed for specimen collection for urinalysis or culture, aspirate the urine from the needleless sampling port with a sterile syringe after cleansing the port with a disinfectant.[66] See the "Checklist for Obtaining a Urine Specimen from a Foley Catheter" for more detailed instructions. Do not collect the urine that is already in the collection bag because it is contaminated and will lead to an erroneous test result.
It is the nurse’s responsibility to assess for a patient’s continued need for an indwelling catheter daily and to advocate for removal when appropriate.[67] Prolonged use of indwelling catheters increases the risk of developing CAUTIs. For patients who require an indwelling catheter for operative purposes, the catheter is typically removed within 24 hours or less. Some agencies have a protocol for the removal of indwelling catheters, whereas others require a prescription from a provider. For additional instructions about how to remove an indwelling catheter, see the "Checklist for Foley Removal."
When removing an indwelling urinary catheter, it is considered a standard of practice to document the time and track the time of the first void. This information is also communicated during handoff reports. If the patient is unable to void within 4-6 hours and/or complains of bladder fullness, the nurse determines if incomplete bladder emptying is occurring according to agency policy. The ANA has made the following recommendations to assess for incomplete bladder emptying:
- The patient should be prompted to urinate.
- If urination volume is less than 180 mL, the nurse should perform a bladder scan to determine the post-void residual. A bladder scan is a bedside test performed by nurses that uses ultrasonic waves to determine the amount of fluid in the bladder.
- If a bladder scanner is not available, a straight urinary catheterization is performed.[68]
When a urinary catheter is removed, instruct the patient on the following guidelines:
- Increase or maintain fluid intake (unless contraindicated).
- Void when able with the goal to urinate within six hours after removal of the catheter. Inform the nurse of the void so that the amount can be measured and documented.
- Be aware that there may be a mild burning sensation during the first void.
- Report any burning, discomfort, frequency, or small amounts of urine when voiding.
- Report an inability to void, bladder tenderness, or distension.
It is the nurse’s responsibility to assess for a patient’s continued need for an indwelling catheter daily and to advocate for removal when appropriate.[69] Prolonged use of indwelling catheters increases the risk of developing CAUTIs. For patients who require an indwelling catheter for operative purposes, the catheter is typically removed within 24 hours or less. Some agencies have a protocol for the removal of indwelling catheters, whereas others require a prescription from a provider. For additional instructions about how to remove an indwelling catheter, see the "Checklist for Foley Removal."
When removing an indwelling urinary catheter, it is considered a standard of practice to document the time and track the time of the first void. This information is also communicated during handoff reports. If the patient is unable to void within 4-6 hours and/or complains of bladder fullness, the nurse determines if incomplete bladder emptying is occurring according to agency policy. The ANA has made the following recommendations to assess for incomplete bladder emptying:
- The patient should be prompted to urinate.
- If urination volume is less than 180 mL, the nurse should perform a bladder scan to determine the post-void residual. A bladder scan is a bedside test performed by nurses that uses ultrasonic waves to determine the amount of fluid in the bladder.
- If a bladder scanner is not available, a straight urinary catheterization is performed.[70]
When a urinary catheter is removed, instruct the patient on the following guidelines:
- Increase or maintain fluid intake (unless contraindicated).
- Void when able with the goal to urinate within six hours after removal of the catheter. Inform the nurse of the void so that the amount can be measured and documented.
- Be aware that there may be a mild burning sensation during the first void.
- Report any burning, discomfort, frequency, or small amounts of urine when voiding.
- Report an inability to void, bladder tenderness, or distension.

