Open Resources for Nursing (Open RN)
The integumentary system includes the skin, hair, and nails. The skin is an organ that performs a variety of essential functions, such as protecting the body from invasion by microorganisms, chemicals, and other environmental factors; preventing dehydration; acting as a sensory organ; modulating body temperature and electrolyte balance; and synthesizing vitamin D.[1]
Skin
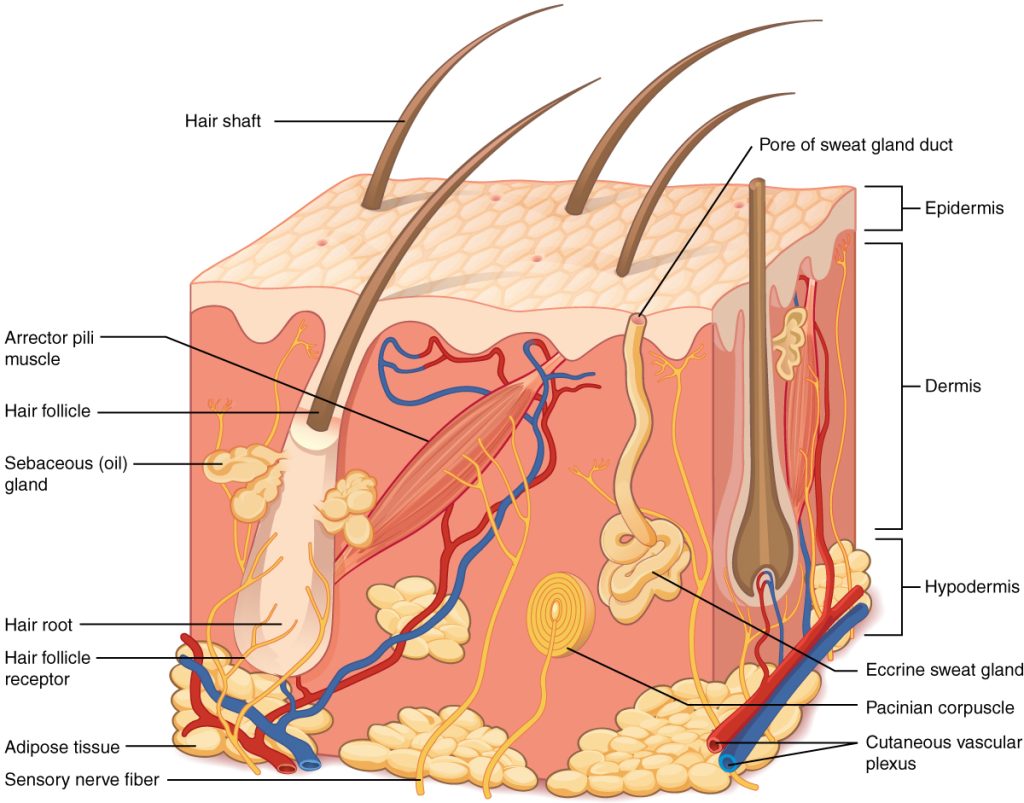
The skin is made of multiple layers of cells and tissues, which are held to underlying structures by connective tissue. See Figure 14.1[2] for an image of the layers of the skin. The skin is composed of two main layers: the uppermost thin layer called the epidermis made of closely packed epithelial cells, and the inner thick layer called the dermis that houses blood vessels, hair follicles, sweat glands, and nerve fibers. Beneath the dermis lies the hypodermis that contains connective tissue and adipose tissue (stored fat) to connect the skin to the underlying bones and muscles. The skin acts as a sense organ because the epidermis, dermis, and hypodermis contain specialized sensory nerve structures that detect touch, surface temperature, and pain.[3]
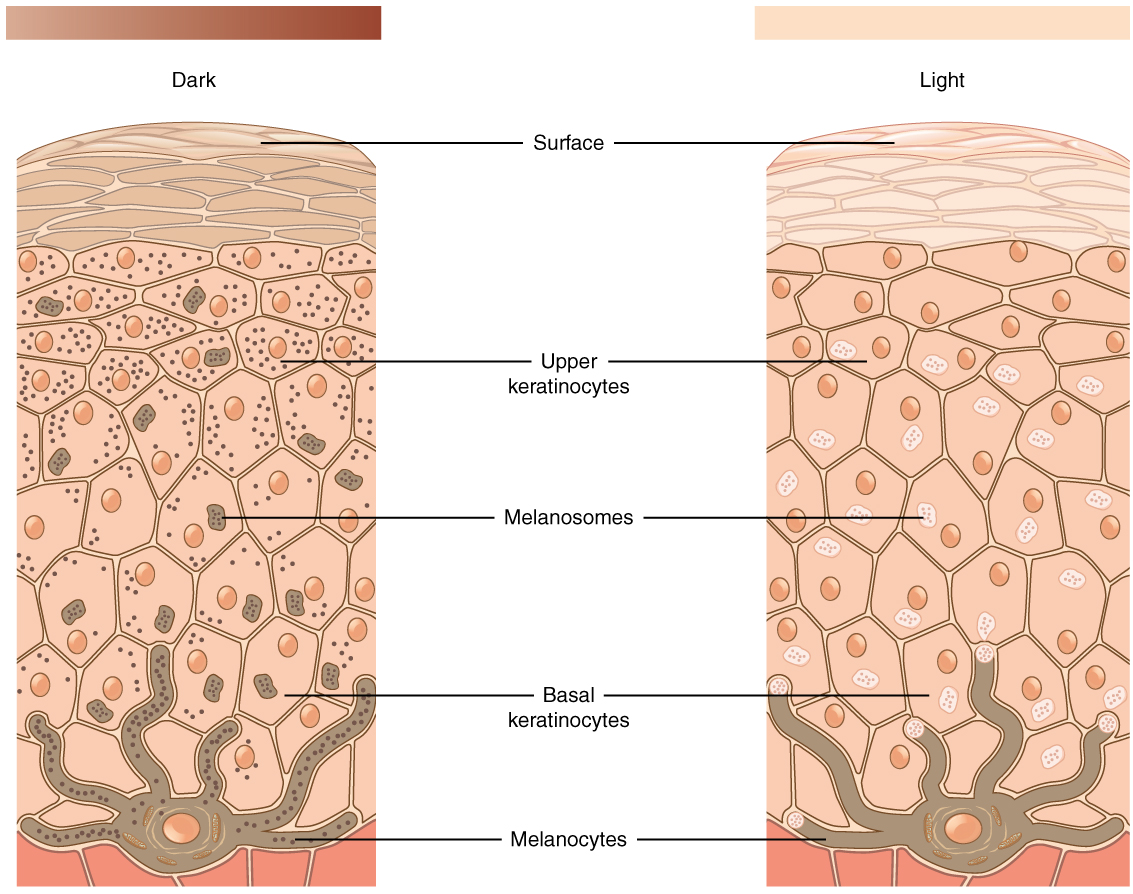
The color of skin is created by pigments, including melanin, carotene, and hemoglobin. Melanin is produced by cells called melanocytes that are scattered throughout the epidermis. See Figure 14.2[4] for an illustration of melanin and melanocytes. When there is an irregular accumulation of melanocytes in the skin, freckles appear. Dark-skinned individuals produce more melanin than those with pale skin. Exposure to the UV rays of the sun or a tanning bed causes additional melanin to be manufactured and built up, resulting in the darkening of the skin referred to as a tan. Increased melanin accumulation protects the DNA of epidermal cells from UV ray damage, but it requires about ten days after initial sun exposure for melanin synthesis to peak. This is why pale-skinned individuals often suffer sunburns during initial exposure to the sun. Darker-skinned individuals can also get sunburns, but they are more protected from their existing melanin than pale-skinned individuals.[5]
Too much sun exposure can eventually lead to wrinkling due to the destruction of the cellular structure of the skin, and in severe cases, can cause DNA damage resulting in skin cancer. Moles are larger masses of melanocytes, and although most are benign, they should be monitored for changes that indicate the presence of skin cancer. See Figure 14.3[6] for an image of moles.
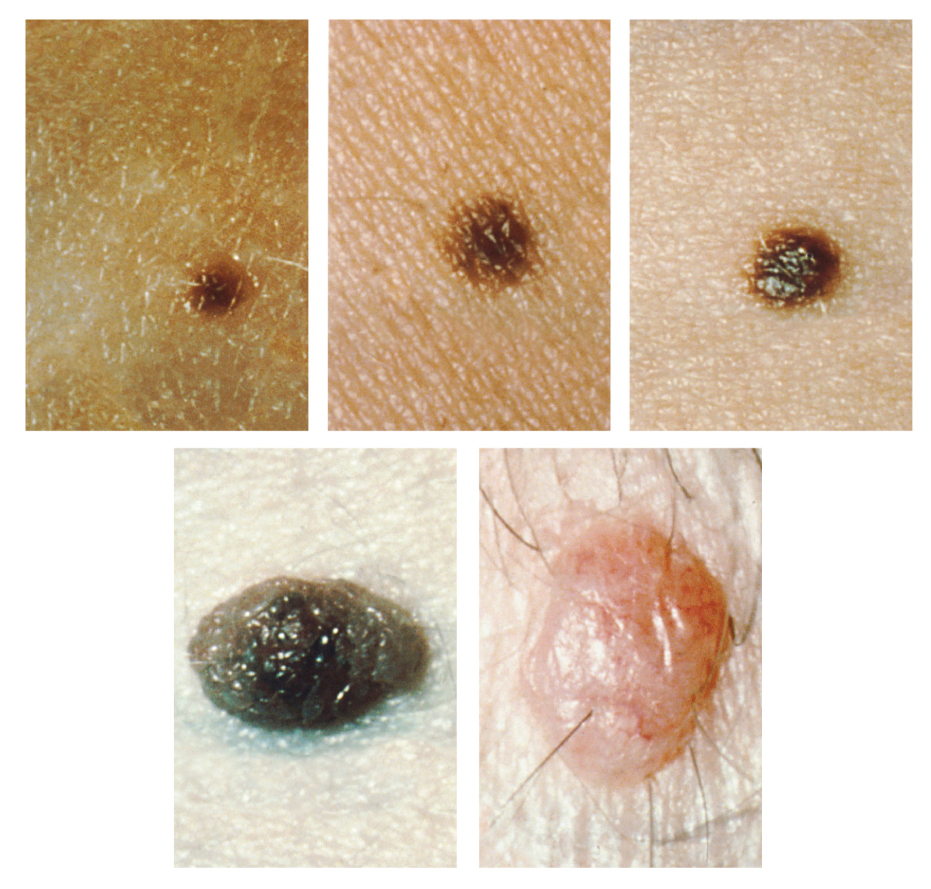
Patients are encouraged to use the ABCDE mnemonic to watch for signs of early-stage melanoma developing in moles. Consult a health care provider if you find these signs of melanoma when assessing a patient’s skin:
- Asymmetrical: The sides of the moles are not symmetrical
- Borders: The edges of the mole are irregular in shape
- Color: The color of the mole has various shades of brown or black
- Diameter: The mole is larger than 6 mm (0.24 in)
- Evolving: The shape of the mole has changed
Hair
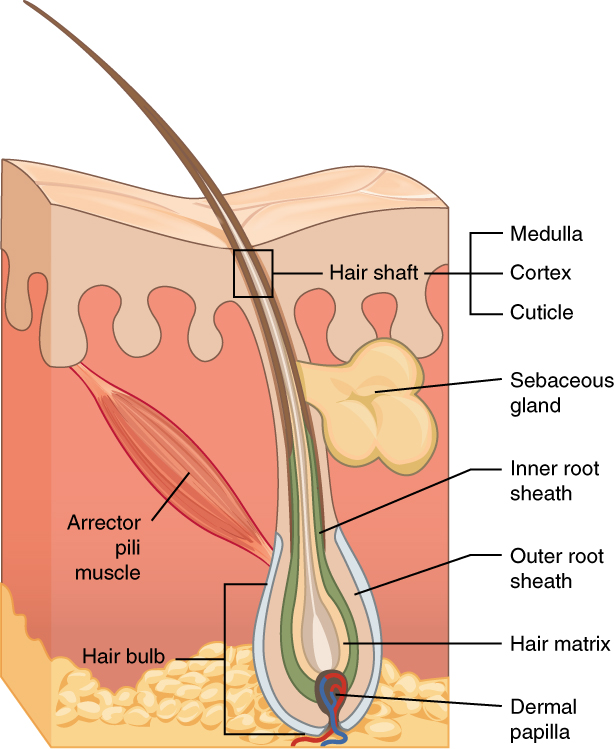
Hair is made of dead, keratinized cells that originate in the hair follicle in the dermis. For these reasons, there is no sensation in hair. See Figure 14.4[7] for an image of a hair follicle. Hair serves a variety of functions, including protection, sensory input, thermoregulation, and communication. For example, hair on the head protects the skull from the sun. Hair in the nose, ears, and around the eyes (eyelashes) defends the body by trapping any dust particles that may contain allergens and microbes. Hair of the eyebrows prevents sweat and other particles from dripping into the eyes.
Hair also has a sensory function due to sensory innervation by a hair root plexus surrounding the base of each hair follicle. Hair is extremely sensitive to air movement or other disturbances in the environment, even more so than the skin surface. This feature is also useful for the detection of the presence of insects or other potentially damaging substances on the skin surface. Each hair root is also connected to a smooth muscle called the arrector pili that contracts in response to nerve signals from the sympathetic nervous system, making the external hair shaft “stand up.” This movement is commonly referred to as goose bumps. The primary purpose for this movement is to trap a layer of air to add insulation.[8]
Nails
The nail bed is a specialized structure of the epidermis that is found at the tips of our fingers and toes. See Figure 14.5[9] for an illustration of a fingernail. The nail body is formed on the nail bed and protects the tips of our fingers and toes as they experience mechanical stress while being used. In addition, the nail body forms a back-support for picking up small objects with the fingers.[10]

Sweat Glands
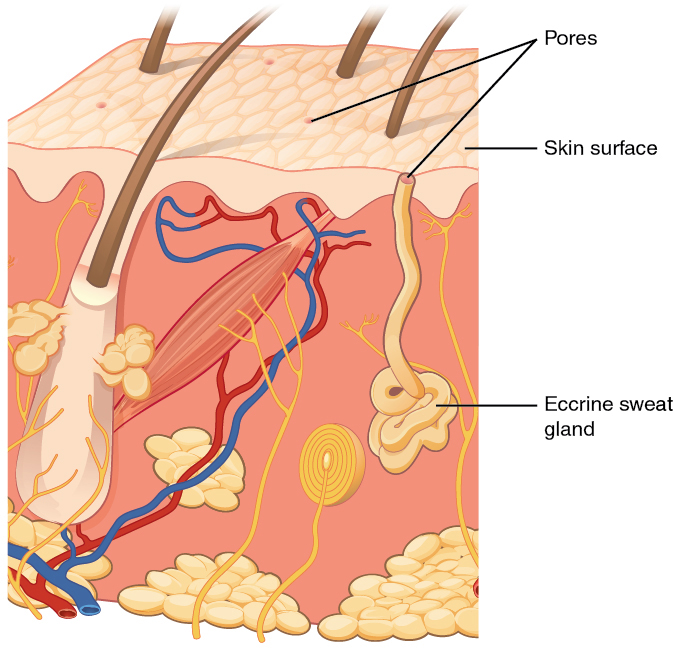
When the body becomes warm, sweat glands produce sweat to cool the body. There are two types of sweat glands that secrete slightly different products. An eccrine sweat gland produces hypotonic sweat for thermoregulation. See Figure 14.6[11] for an illustration of an eccrine sweat gland. These glands are found all over the skin’s surface but are especially abundant on the palms of the hand, the soles of the feet, and the forehead. They are coiled glands lying deep in the dermis, with the duct rising up to a pore on the skin surface where the sweat is released. This type of sweat is composed mostly of water and some salt, antibodies, traces of metabolic waste, and dermcidin, an antimicrobial peptide. Eccrine glands are a primary component of thermoregulation and help to maintain homeostasis.[12]
Apocrine sweat glands are mostly found in hair follicles in densely hairy areas, such as the armpits and genital regions. In addition to secreting water and salt, apocrine sweat includes organic compounds that make the sweat thicker and subject to bacterial decomposition and subsequent odor. The release of this sweat is controlled by the nervous system and hormones and plays a role in the human pheromone response. Most commercial antiperspirants use an aluminum-based compound as their primary active ingredient to stop sweat. When the antiperspirant enters the sweat gland duct, the aluminum-based compounds form a physical block in the duct, which prevents sweat from coming out of the pore.[13]
Skin Lesions
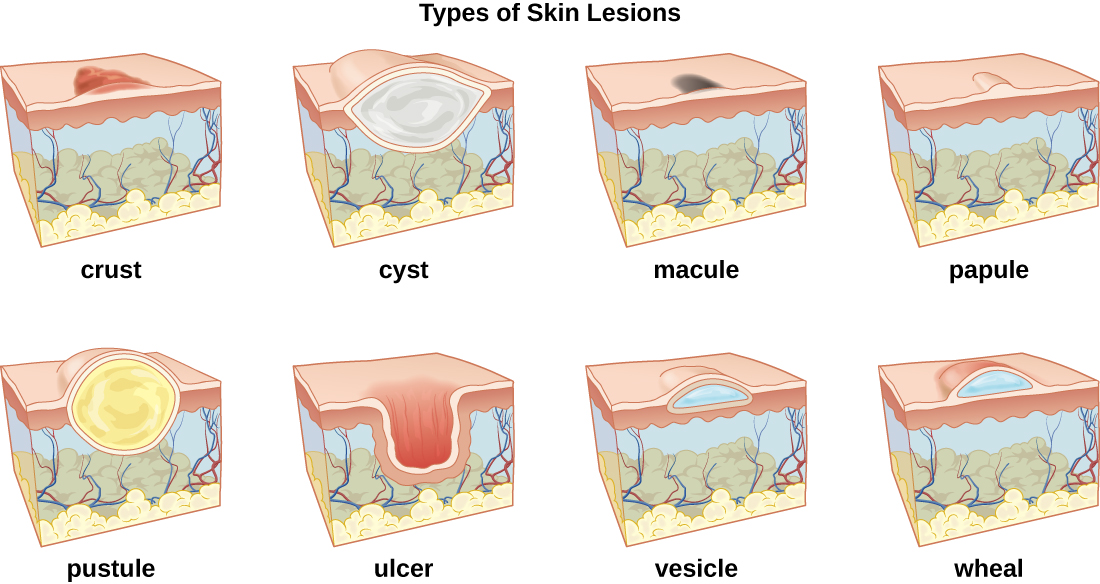
A lesion is an area of abnormal tissue. There are many terms for common skin lesions that may be described in a patient’s chart. These terms are defined in Table 14.2. See Figure 14.7[14] for illustrations of common skin lesions.
Table 14.2 Medical Terms Associated with Skin Lesions and Rashes[15]
| Medical Term | Definition |
|---|---|
| abscess | localized collection of pus |
| bulla (pl., bullae) | fluid-filled blister no more than 5 mm in diameter |
| carbuncle | deep, pus-filled abscess generally formed from multiple furuncles |
| crust | dried fluids from a lesion on the surface of the skin |
| cyst | encapsulated sac filled with fluid, semi-solid matter, or gas, typically located just below the upper layers of skin |
| folliculitis | a localized rash due to inflammation of hair follicles |
| furuncle (boil) | pus-filled abscess due to infection of a hair follicle |
| macules | smooth spots of discoloration on the skin |
| papules | small, raised bumps on the skin, such as a mosquito bite |
| pseudocyst | lesion that resembles a cyst but with a less-defined boundary |
| purulent | pus-producing; also called suppurative |
| pustules | fluid- or pus-filled bumps on the skin, such as acne |
| pyoderma | any suppurative (pus-producing) infection of the skin |
| suppurative | producing pus; purulent |
| ulcer | break in the skin or open sore such as a venous ulcer |
| vesicle | small, fluid-filled lesion, such as a herpes blister |
| wheal | swollen, inflamed skin that itches or burns, often from an allergic reaction |
- This work is a derivative of Anatomy & Physiology by OpenStax and is licensed under CC BY 4.0. Access for free at https://openstax.org/books/anatomy-and-physiology/pages/1-introduction ↵
- “501 Structure of the skin.jpg” by OpenStax is licensed under CC BY 3.0. Access for free at https://openstax.org/books/anatomy-and-physiology/pages/5-1-layers-of-the-skin ↵
- This work is a derivative of Anatomy & Physiology by OpenStax and is licensed under CC BY 4.0. Access for free at https://openstax.org/books/anatomy-and-physiology/pages/1-introduction ↵
- “504 Melanocytes.jpg” by OpenStax is licensed under CC BY 3.0. Access for free at https://openstax.org/books/anatomy-and-physiology/pages/5-1-layers-of-the-skin ↵
- A.D.A.M. Medical Encyclopedia [Internet]. Atlanta (GA): A.D.A.M., Inc.; c1997-2020. Skin turgor; [updated 2020, Sep 16; cited 2020, Sep 18]. https://medlineplus.gov/ency/article/003281.htm#:~:text=To%20check%20for%20skin%20turgor,back%20to%20its%20normal%20position ↵
- “508 Moles.jpg” by OpenStax is licensed under CC BY 3.0. Access for free at https://openstax.org/books/anatomy-and-physiology/pages/5-1-layers-of-the-skin ↵
- “506 Hair.jpg” by OpenStax is licensed under CC BY 3.0. Access for free at https://openstax.org/books/anatomy-and-physiology/pages/5-2-accessory-structures-of-the-skin ↵
- This work is a derivative of Anatomy & Physiology by OpenStax and is licensed under CC BY 4.0. Access for free at https://openstax.org/books/anatomy-and-physiology/pages/1-introduction ↵
- “507 Nails.jpg” by OpenStax is licensed under CC BY 3.0. Access for free at https://openstax.org/books/anatomy-and-physiology/pages/5-2-accessory-structures-of-the-skin ↵
- This work is a derivative of Anatomy & Physiology by OpenStax and is licensed under CC BY 4.0. Access for free at https://openstax.org/books/anatomy-and-physiology/pages/1-introduction ↵
- “508 Eccrine gland.jpg” by OpenStax is licensed under CC BY 3.0. Access for free at https://openstax.org/books/anatomy-and-physiology/pages/5-2-accessory-structures-of-the-skin ↵
- This work is a derivative of Anatomy & Physiology by OpenStax and is licensed under CC BY 4.0. Access for free at https://openstax.org/books/anatomy-and-physiology/pages/1-introduction ↵
- This work is a derivative of Anatomy & Physiology by OpenStax and is licensed under CC BY 4.0. Access for free at https://openstax.org/books/anatomy-and-physiology/pages/1-introduction ↵
- “OSC Microbio 21 01 LesionLine.jpg” by OpenStax is licensed under CC BY 4.0. Access for free at https://commons.wikimedia.org/wiki/File:OSC_Microbio_21_01_LesionLine.jpg ↵
- This work is derivative of Microbiology by OpenStax and is licensed under CC BY 4.0. Access for free at https://openstax.org/books/microbiology/pages/1-introduction ↵
Respiratory System Anatomy
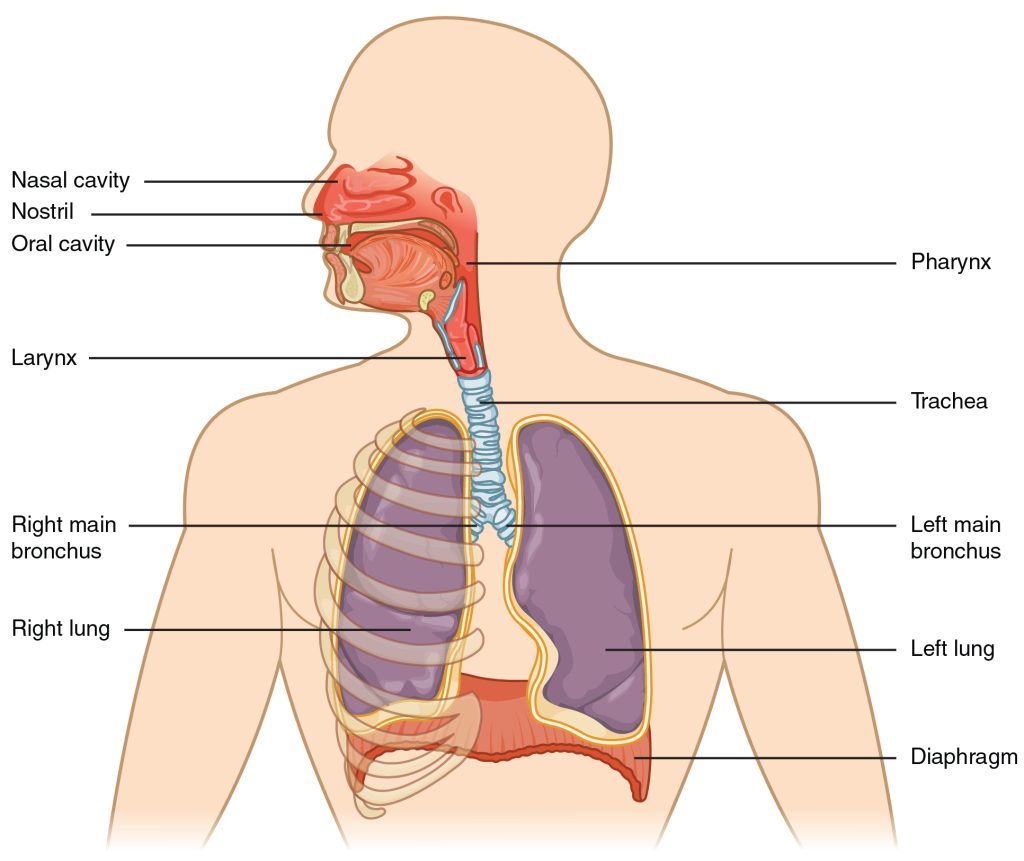
It is important for the nurse to have an understanding of the underlying structures of the respiratory system before performing suctioning to ensure that care is given to protect sensitive tissues and that airways are appropriately assessed during the suctioning procedure. See Figure 22.1[1] for an illustration of the anatomy of the respiratory system.
Maintaining a patent airway is a top priority and one of the “ABCs” of patient care (i.e., Airway, Breathing, and Circulation). Suctioning is often required in acute care settings for patients who cannot maintain their own airway due to a variety of medical conditions such as respiratory failure, stroke, unconsciousness, or postoperative care. The suctioning procedure is useful for removing mucus that may obstruct the airway and compromise the patient’s breathing ability.
To read more details about the respiratory system, see the “Respiratory Assessment” chapter.
Respiratory Failure and Respiratory Arrest
Respiratory failure and respiratory arrest often require emergency suctioning. Respiratory failure is a life-threatening condition that is caused when the respiratory system cannot get enough oxygen from the lungs into the blood to oxygenate the tissues, or there are high levels of carbon dioxide in the blood that the body cannot effectively eliminate via the lungs. Acute respiratory failure can happen quickly without much warning. It is often caused by a disease or injury that affects breathing, such as pneumonia, opioid overdose, stroke, or a lung or spinal cord injury. Acute respiratory failure requires emergency treatment. Untreated respiratory failure can lead to respiratory arrest.
Signs and symptoms of respiratory failure include shortness of breath (dyspnea), rapid breathing (tachypnea), rapid heart rate (tachycardia), unusual sweating (diaphoresis), decreasing pulse oximetry readings below 90%, and air hunger (a feeling as if you can't breathe in enough air). In severe cases, signs and symptoms may include cyanosis (a bluish color of the skin, lips, and fingernails), confusion, and sleepiness.
The main goal of treating respiratory failure is to ensure that sufficient oxygen reaches the lungs and is transported to the other organs while carbon dioxide is cleared from the body.[2] Treatment measures may include suctioning to clear the airway while also providing supplemental oxygen using various oxygenation devices. Severe respiratory distress may require intubation and mechanical ventilation, or the emergency placement of a tracheostomy may be performed if the airway is obstructed. For additional details about oxygenation and various oxygenation devices, go to the “Oxygen Therapy" chapter.
Tracheostomy
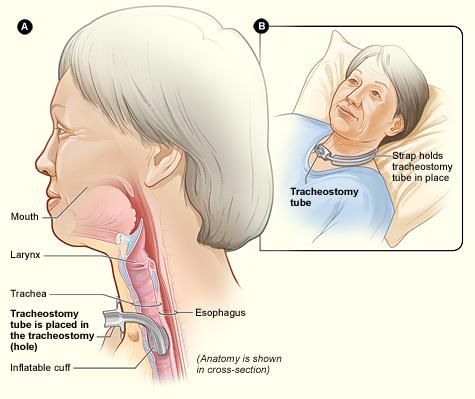
A tracheostomy is a surgically created opening called a stoma that goes from the front of the patient’s neck into the trachea. A tracheostomy tube is placed through the stoma and directly into the trachea to maintain an open (patent) airway. See Figure 22.2[3] for an illustration of a patient with a tracheostomy tube in place.
Placement of a tracheostomy tube may be performed emergently or as a planned procedure due to the following:
- A large object blocking the airway
- Respiratory failure or arrest
- Severe neck or mouth injuries
- A swollen or blocked airway due to inhalation of harmful material such as smoke, steam, or other toxic gases
- Cancer of the throat or neck, which can affect breathing by pressing on the airway
- Paralysis of the muscles that affect swallowing
- Surgery around the larynx that prevents normal breathing and swallowing
- Long-term oxygen therapy via a mechanical ventilator[4]
See Figure 22.3[5] for an image of the parts of a tracheostomy tube. The outside end of the outer cannula has a flange that is placed against the patient’s neck. The flange is secured around the patient’s neck with tie straps, and a split 4" x 4" tracheostomy dressing is placed under the flange to absorb secretions. A cuff is typically present on the distal end of the outer cannula to make a tight seal in the airway. (See the top image in Figure 22.3.) The cuff is inflated and deflated with a syringe attached to the pilot balloon. Most tracheostomy tubes have a hollow inner cannula inside the outer cannula that is either disposable or removed for cleaning as part of the tracheostomy care procedure. (See the middle image of Figure 22.3.) A solid obturator is used during the initial tracheostomy insertion procedure to help guide the outer cannula through the tracheostomy and into the airway. (See the bottom image of Figure 22.3.) It is removed after insertion and the inner cannula is slid into place.
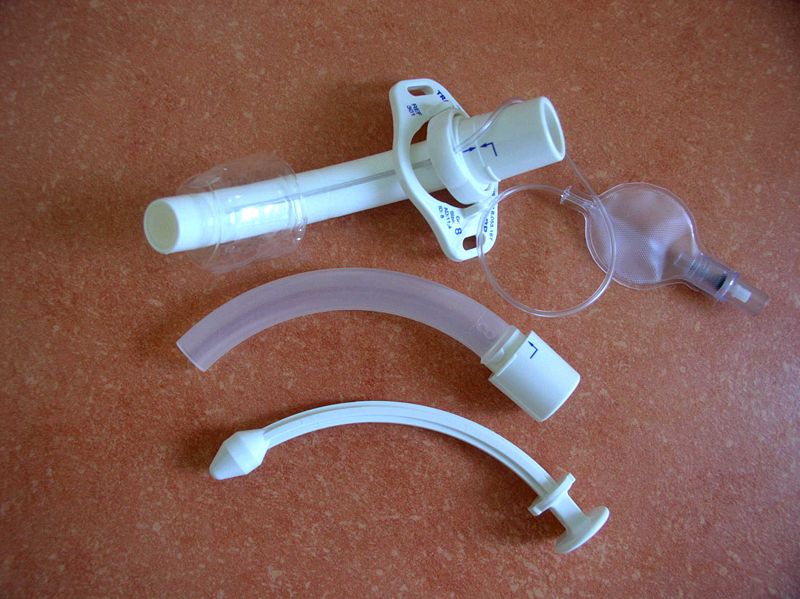
When a tracheostomy is placed, the provider determines if a fenestrated or unfenestrated outer cannula is needed based on the patient's condition. A fenestrated tube is used for patients who can speak with their tracheostomy tube in place. Under the guidance of a speech pathologist and respiratory therapist, the inner cannula is eventually removed from a fenestrated tube and the cuff deflated so the patient is able to speak. Otherwise, a patient with a tracheostomy tube is unable to speak because there is no airflow over the vocal cords, and alternative communication measures, such as a whiteboard, pen and paper, or computer device with note-taking ability, must be put into place by the nurse. Suctioning should never be performed through a fenestrated tube without first inserting a nonfenestrated inner cannula, or severe tracheal damage can occur. See Figure 22.4[6] for images of a fenestrated and nonfenestrated outer cannula.

Caring for a patient with a tracheostomy tube includes providing routine tracheostomy care and suctioning. Tracheostomy care is a procedure performed routinely to keep the flange, tracheostomy dressing, ties or straps, and surrounding area clean to reduce the introduction of bacteria into the trachea and lungs. The inner cannula becomes occluded with secretions and must be cleaned or replaced frequently according to agency policy to maintain an open airway. Suctioning through the tracheostomy tube is also performed to remove mucus and to maintain a patent airway.
Subjective Assessment
If appropriate, perform a focused interview collecting a brief history of respiratory conditions and assess for feelings of shortness of breath (dyspnea), sputum production, and coughing.
Objective Assessment
Prior to suctioning, a baseline assessment for indications of respiratory distress and the need for suctioning should be obtained and documented, including, but not limited to, the following:
- Secretions from the mouth and/or tracheal stoma
- Auscultation of lung sounds
- Heart rate
- Respiratory rate
- Cardiac rhythm
- Oxygen saturation
- Skin color and perfusion
- Effectiveness of cough[7]
Prepare the patient by explaining the procedure and providing adequate sedation and pain relief as needed. Place the patient in semi-Fowler’s position if conscious or in a lateral position facing you if they are unconscious. While suctioning the patient, if signs of worsening respiratory distress occur, stop the procedure and request emergency assistance. The following should be monitored during and following the procedure:
- Lung sounds
- Skin color
- Breathing pattern and rate
- Oxygenation (pulse oximeter)
- Pulse rate
- Dysrhythmias if electrocardiogram is available
- Color, consistency, and volume of secretions
- Presence of bleeding or evidence of physical trauma
- Subjective response, including pain
- Cough
- Laryngospasm (spasm of the vocal cords that can result in airway obstruction)[8]
After completing suctioning, the outcomes from the procedure should be evaluated and documented, including the following:
- Improvement of lung sounds
- Removal of secretions
- Improvement of pulse oximetry
- Decreased work of breathing
- Stabilized respiratory rate
- Decreased dyspnea
Be aware that the patient's lung sounds may not clear completely after suctioning, but the removal of secretions should improve the patency of the patient's airway.
Potential complications resulting from this procedure include nasal irritation/bleeding, gagging/vomiting, discomfort and pain, and uncontrolled coughing. Potential adverse reactions include mucosal hemorrhage, laceration of nasal turbinate, perforation of the pharynx, hypoxia/hypoxemia, cardiac dysrhythmias/arrest, bradycardia, elevated blood pressure, hypotension, respiratory arrest, laryngospasm, bronchoconstriction, bronchospasm, hospital-acquired infection, atelectasis, increased intracranial pressure, and pneumothorax.
Subjective Assessment
If appropriate, perform a focused interview collecting a brief history of respiratory conditions and assess for feelings of shortness of breath (dyspnea), sputum production, and coughing.
Objective Assessment
Prior to suctioning, a baseline assessment for indications of respiratory distress and the need for suctioning should be obtained and documented, including, but not limited to, the following:
- Secretions from the mouth and/or tracheal stoma
- Auscultation of lung sounds
- Heart rate
- Respiratory rate
- Cardiac rhythm
- Oxygen saturation
- Skin color and perfusion
- Effectiveness of cough[9]
Prepare the patient by explaining the procedure and providing adequate sedation and pain relief as needed. Place the patient in semi-Fowler’s position if conscious or in a lateral position facing you if they are unconscious. While suctioning the patient, if signs of worsening respiratory distress occur, stop the procedure and request emergency assistance. The following should be monitored during and following the procedure:
- Lung sounds
- Skin color
- Breathing pattern and rate
- Oxygenation (pulse oximeter)
- Pulse rate
- Dysrhythmias if electrocardiogram is available
- Color, consistency, and volume of secretions
- Presence of bleeding or evidence of physical trauma
- Subjective response, including pain
- Cough
- Laryngospasm (spasm of the vocal cords that can result in airway obstruction)[10]
After completing suctioning, the outcomes from the procedure should be evaluated and documented, including the following:
- Improvement of lung sounds
- Removal of secretions
- Improvement of pulse oximetry
- Decreased work of breathing
- Stabilized respiratory rate
- Decreased dyspnea
Be aware that the patient's lung sounds may not clear completely after suctioning, but the removal of secretions should improve the patency of the patient's airway.
Potential complications resulting from this procedure include nasal irritation/bleeding, gagging/vomiting, discomfort and pain, and uncontrolled coughing. Potential adverse reactions include mucosal hemorrhage, laceration of nasal turbinate, perforation of the pharynx, hypoxia/hypoxemia, cardiac dysrhythmias/arrest, bradycardia, elevated blood pressure, hypotension, respiratory arrest, laryngospasm, bronchoconstriction, bronchospasm, hospital-acquired infection, atelectasis, increased intracranial pressure, and pneumothorax.
Suctioning via the oropharyngeal (mouth) and nasopharyngeal (nasal) routes is performed to remove accumulated saliva, pulmonary secretions, blood, vomitus, and other foreign material from these areas that cannot be removed by the patient’s spontaneous cough or other less invasive procedures. Nasal and pharyngeal suctioning are performed in a wide variety of settings, including critical care units, emergency departments, inpatient acute care, skilled nursing facility care, home care, and outpatient/ambulatory care. Suctioning is indicated when the patient is unable to clear secretions and/or when there is audible or visible evidence of secretions in the large/central airways that persist in spite of the patient's best cough effort. Need for suctioning is evidenced by one or more of the following:
- Visible secretions in the airway
- Chest auscultation of coarse, gurgling breath sounds, rhonchi, or diminished breath sounds
- Reported feeling of secretions in the chest
- Suspected aspiration of gastric or upper airway secretions
- Clinically apparent increased work of breathing
- Restlessness
- Unrelieved coughing[11]
In emergent situations, a provider order is not necessary for suctioning to maintain a patient’s airway. However, routine suctioning does require a provider order.
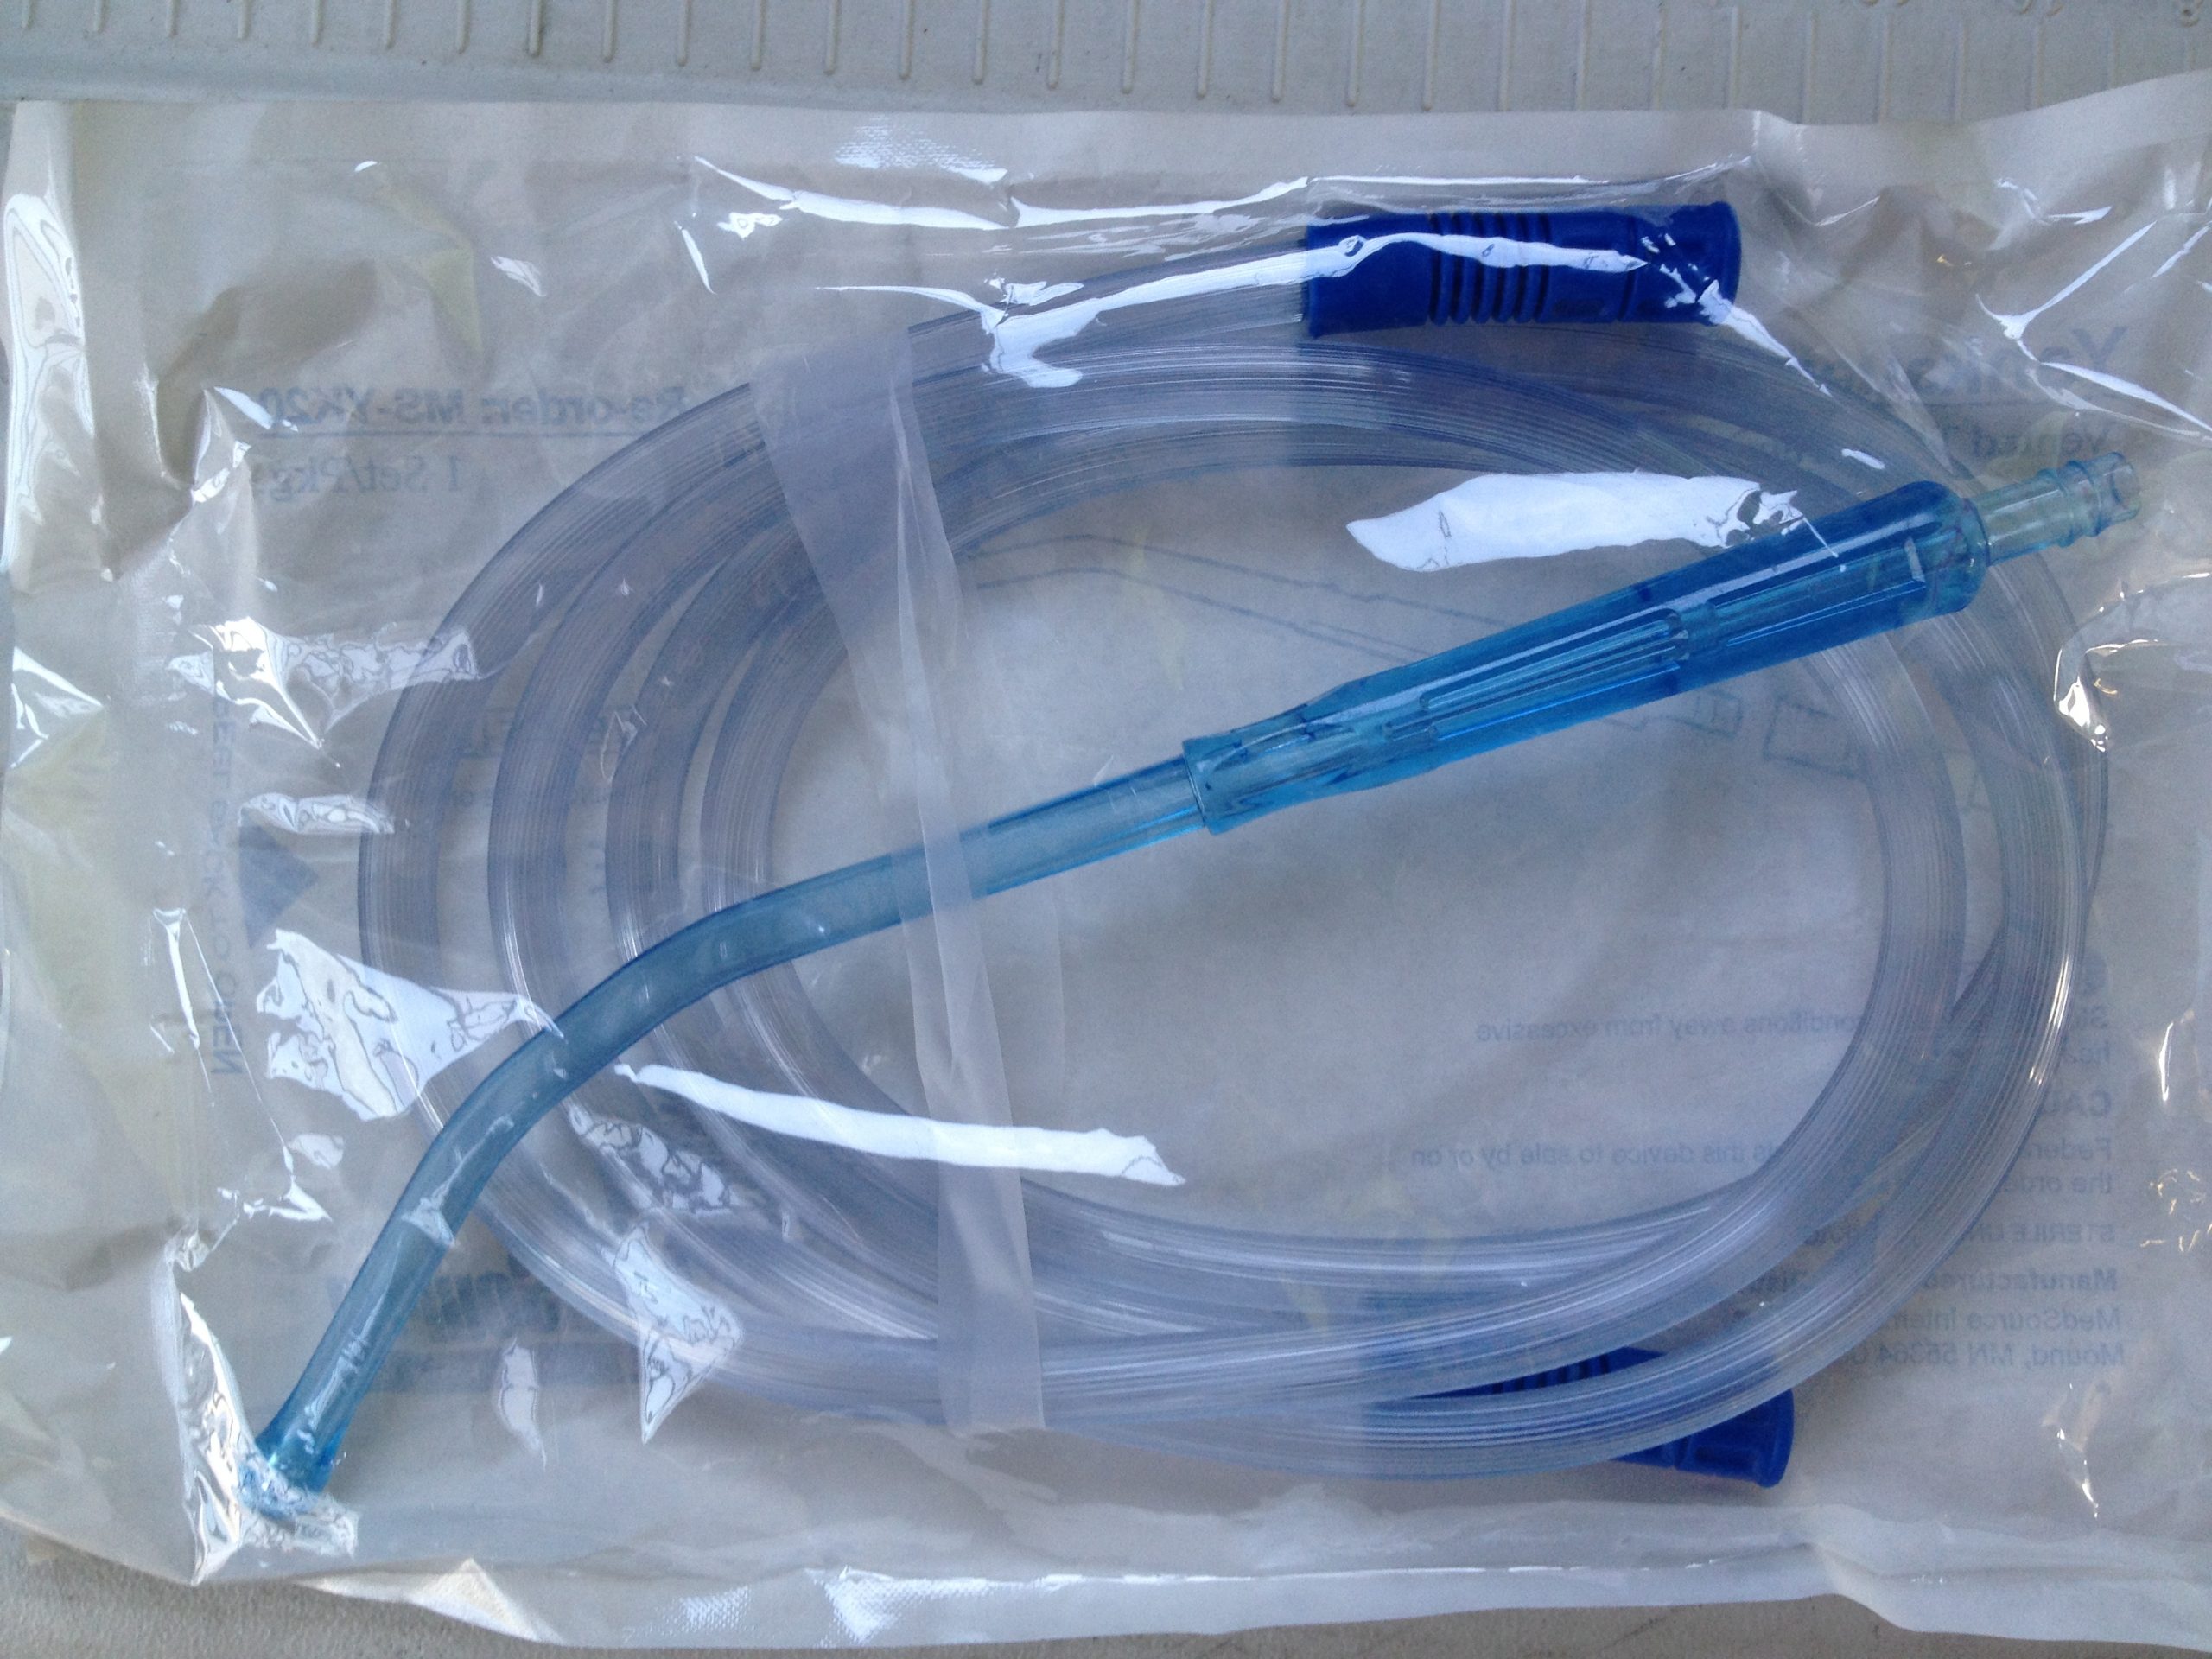
For oropharyngeal suctioning, a device called a Yankauer suction tip is typically used for suctioning mouth secretions. A Yankauer device is rigid and has several holes for suctioning secretions that are commonly thick and difficult for the patient to clear. See Figure 22.5[12] for an image of a Yankauer device. In many agencies, Yankauer suctioning can be delegated to trained assistive personnel if the patient is stable, but the nurse is responsible for assessing and documenting the patient’s respiratory status.
Nasopharyngeal suctioning removes secretions from the nasal cavity, pharynx, and throat by inserting a flexible, soft suction catheter through the nares. This type of suctioning is performed when oral suctioning with a Yankauer is ineffective. See Figure 22.6[13] for an image of a sterile suction catheter.
![“DSC_0210-150x150.jpg” by British Columbia Institute of Technology (BCIT) is licensed under CC BY 4.0. [/footnote] Access for free at https://opentextbc.ca/clinicalskills/chapter/5-7-oral-suctioning/ Photo of a sterile suction catheter being handled by a person wearing gloves](https://open.maricopa.edu/app/uploads/sites/683/2024/09/DSC_0210-scaled-1-1.jpg)
Extension tubing is used to attach the Yankauer or suction catheter device to a suction canister that is attached to wall suction or a portable suction source. The amount of suction is set to an appropriate pressure according to the patient’s age. See Figure 22.7[14] for an image of extension tubing attached to a suction canister that is connected to a wall suctioning source.
![“DSC_0206-e1437445438554.jpg” by by British Columbia Institute of Technology (BCIT) is licensed under CC BY 4.0. [/footnote]. Access for free at https://opentextbc.ca/clinicalskills/chapter/5-7-oral-suctioning/ Photo showing tubing attaching suction canister to wall suction source](https://open.maricopa.edu/app/uploads/sites/683/2024/09/DSC_0206-e1437445438554-scaled-1-1.jpg)
Follow agency policy regarding setting suction pressure. Pressure should not exceed 150 mm Hg because higher pressures have been shown to cause trauma, hypoxemia, and atelectasis. The following ranges are appropriate pressure according to the patient's age:
- Neonates: 60-80 mm Hg
- Infants: 80-100 mm Hg
- Children: 100-120 mm Hg
- Adults: 100-150 mm Hg
Checklist for Oropharyngeal or Nasopharyngeal Suctioning
Use the checklist below to review the steps for completion of “Oropharyngeal or Nasopharyngeal Suctioning.”
Steps
Disclaimer: Always review and follow agency policy regarding this specific skill.
- Gather supplies: Yankauer or suction catheter, suction machine or wall suction device, suction canister, connecting tubing, pulse oximeter, stethoscope, PPE (e.g., mask, goggles or face shield, nonsterile gloves), sterile gloves for suctioning with sterile suction catheter, towel or disposable paper drape, nonsterile basin or disposable cup, water soluble lubricant, normal saline or tap water.
- Perform safety steps:
- Perform hand hygiene.
- Check the room for transmission-based precautions.
- Introduce yourself, your role, the purpose of your visit, and an estimate of the time it will take.
- Confirm patient ID using two patient identifiers (e.g., name and date of birth).
- Explain the process to the patient.
- Be organized and systematic.
- Use appropriate listening and questioning skills.
- Listen and attend to patient cues.
- Ensure the patient’s privacy and dignity.
- Assess ABCs.
- Adjust the bed to a comfortable working height and lower the side rail closest to you.
- Position the patient:
- If conscious, place the patient in a semi-Fowler’s position.
- If unconscious, place the patient in the lateral position, facing you.
- Move the bedside table close to your work area and raise it to waist height.
- Place a towel or waterproof pad across the patient’s chest.
- Adjust the suction to the appropriate pressure:
- Adults and adolescents: no more than 150 mm Hg
- Children: no more than 120 mmHg
- Infants: no more than 100 mm Hg
- Neonates: no more than 80 mm Hg
For a portable unit:
- Adults: 10 to 15 cm Hg
- Adolescents: 8 to 15 cm Hg
- Children: 8 to 10 cm Hg
- Infants: 8 to 10 cm Hg
- Neonates: 6 to 8 cm Hg
- Put on a clean glove and occlude the end of the connection tubing to check suction pressure.
- Place the connecting tubing in a convenient location (e.g., at the head of the bed).
- Open the sterile suction package using aseptic technique. (NOTE: The open wrapper or container becomes a sterile field to hold other supplies.) Carefully remove the sterile container, touching only the outside surface. Set it up on the work surface and fill with sterile saline using sterile technique.
- Place a small amount of water-soluble lubricant on the sterile field, taking care to avoid touching the sterile field with the lubricant package.
- Increase the patient’s supplemental oxygen level or apply supplemental oxygen per facility policy or primary care provider order.
- Don additional PPE. Put on a face shield or goggles and mask.
- Don sterile gloves. The dominant hand will manipulate the catheter and must remain sterile.
- The nondominant hand is considered clean rather than sterile and will control the suction valve on the catheter.
- In the home setting and other community-based settings, maintenance of sterility is not necessary.
- With the dominant gloved hand, pick up the sterile suction catheter. Pick up the connecting tubing with the nondominant hand and connect the tubing and suction catheter.
- Moisten the catheter by dipping it into the container of sterile saline. Occlude the suction valve on the catheter to check for suction.
- Encourage the patient to take several deep breaths.
- Apply lubricant to the first 2 to 3 inches of the catheter, using the lubricant that was placed on the sterile field.
- Remove the oxygen delivery device, if appropriate. Do not apply suction as the catheter is inserted. Hold the catheter between your thumb and forefinger.
- Insert the catheter. For nasopharyngeal suctioning, gently insert the catheter through the naris and along the floor of the nostril toward the trachea. Roll the catheter between your fingers to help advance it. Advance the catheter approximately 5 to 6 inches to reach the pharynx. For oropharyngeal suctioning, insert the catheter through the mouth, along the side of the mouth toward the trachea. Advance the catheter 3 to 4 inches to reach the pharynx.
- Apply suction by intermittently occluding the suction valve on the catheter with the thumb of your nondominant hand and continuously rotate the catheter as it is being withdrawn.[16]
- Suction only on withdrawal and do not suction for more than 10 to 15 seconds at a time to minimize tissue trauma.
- Replace the oxygen delivery device using your nondominant hand, if appropriate, and have the patient take several deep breaths.
- Flush the catheter with saline. Assess the effectiveness of suctioning by listening to lung sounds and repeat, as needed, and according to the patient’s tolerance. Wrap the suction catheter around your dominant hand between attempts:
- Repeat the procedure up to three times until gurgling or bubbling sounds stop, and respirations are quiet. Allow 30 seconds to 1 minute between passes to allow reoxygenation and reventilation.[17]
- When suctioning is completed, remove gloves from the dominant hand over the coiled catheter, pulling them off inside out.
- Remove the glove from the nondominant hand and dispose of gloves, catheter, and the container with solution in the appropriate receptacle.
- Turn off the suction. Remove the supplemental oxygen placed for suctioning, if appropriate.
- Remove face shield or goggles and mask; perform hand hygiene.
- Perform oral hygiene on the patient after suctioning.
- Reassess the patient’s respiratory status, including respiratory rate, effort, oxygen saturation, and lung sounds.
- Assist the patient to a comfortable position, ask if they have any questions, and thank them for their time.
- Ensure safety measures when leaving the room:
- CALL LIGHT: Within reach
- BED: Low and locked (in lowest position and brakes on)
- SIDE RAILS: Secured
- TABLE: Within reach
- ROOM: Risk-free for falls (scan room and clear any obstacles)
- Perform hand hygiene.
- Document the procedure and related assessment findings. Report any concerns according to agency policy.
Sample Documentation
Sample Documentation of Expected Findings
Patient complaining of difficulty coughing up secretions. Order obtained for nasopharyngeal suctioning. Procedure explained to patient. Vitals signs prior to procedure: heart rate 88 regular, respiratory rate 28/minute, O2 saturation 88% on room air. Coarse rhonchi present over anterior upper airway. No cyanosis. Patient suctioned through left nare x 1 at 120 mm Hg with small amount clear, white, thick sputum obtained. Post-procedure vital signs: heart rate 78 regular, respiratory rate 18/minute, O2 saturation 94% room air. Lung sounds clear to auscultation and no cyanosis present.
Sample Documentation of Unexpected Findings
Patient complaining of difficulty expectorating secretions. Order obtained for nasopharyngeal suctioning and procedure explained to patient. Vital signs prior to procedure: heart rate 88 and regular, respiratory rate 28/minute, and O2 sat 88% room air. Coarse rhonchi present over anterior upper airway. No cyanosis. After first suctioning pass, patient coughing uncontrollably. Procedure stopped and emergency assistance requested from respiratory therapist. Post-procedure vital signs: heart rate 78 and regular, respiratory rate 18/minute, and O2 sat 94% room air. Course rhonchi remain over anterior upper airway but no cyanosis present. Dr. Smith notified and STAT order for chest X-ray received. Dr. Smith to be called with results.
Catheter Size and Type Selection
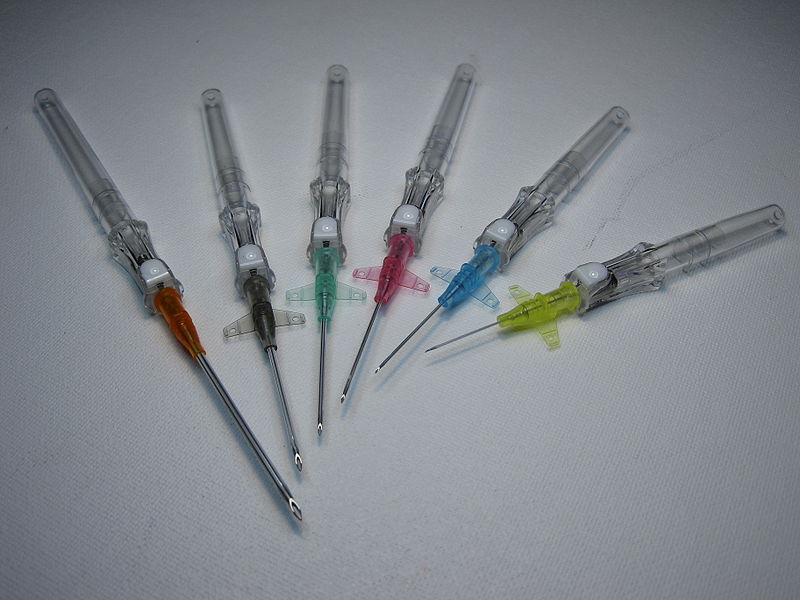
Peripheral IV catheters are available in a variety of sizes, most commonly ranging from 14 gauge to 26 gauge. Note that the lower the gauge size, the wider the diameter of the catheter, with 14-gauge catheters allowing for the greatest flow rate.[18] Catheter sizes are color coded to allow for easy identification of the catheter size after a vein is accessed. See Figure 23.12[19] for colors associated with IV catheter sizes and their associated flow rates.

Nurses must consider the purpose for venous access, along with assessment of the patient's vessel size, when selecting an IV catheter to attempt cannulation. The smallest IV catheter should be selected that will accommodate the prescribed therapy and patient need.[20]
Catheters with a smaller gauge (i.e., larger diameter) permit infusion of viscous fluids, such as blood products, at a faster rate with decreased opportunity for catheter occlusion.[21] Additionally, an appropriately sized catheter also allows for adequate blood flow around the catheter itself. The most common IV catheter size for adult patients is 18- or 20-gauge catheters. However, frail elderly patients and children have smaller vasculature, so a 22-gauge catheter is often preferred.
There are different manufacturer brands of IV catheters, but all include a beveled hollow needle, a flashback chamber in which blood can be visualized when entering the vein, and a flexible catheter that is left in the vein after the catheter has been threaded into the vein and the needle removed.
IV insertion equipment varies among institutions, but common types include shielded IV catheters or winged (i.e., "butterfly") devices. Variation is often related to the presence of a stabilizing device at the site of insertion, as well as the presence of short extension tubing. For shielded catheter types, the stabilizing device and extension tubing are typically added to the catheter itself and not included with the cannulation needle. See Figure 23.13[22] for an image of shielded IV catheters.
Nurses must ensure the selected size and type of IV catheter are appropriate for the procedure or infusion that is ordered because not all peripheral IV catheters are suitable for all procedures. For example, if a procedure requires the infusion of contrast dye, a specific size infusion port is required.
Despite the wide variation in catheter equipment that is available, there has been significant focus among manufacturers regarding the need for safety equipment during venipuncture. Many devices utilize mechanisms to self-contain needles within a plastic sheath after withdrawal from the patient. These devices can be activated through a button in the devices or a manual trigger initiated by the individual attempting cannulation. Regardless of the type of safety lock, it is important to utilize the equipment as intended and never attempt to disable or override the mechanism. These mechanisms are important to help prevent accidental needlesticks or injury with a contaminated needle after it has been removed from the patient. Additionally, after cannulation is attempted, the individual who attempted cannulation is responsible for ensuring all needles are disposed of in a sharps container. It is good practice to be aware of how many sharps were brought into the room, opened, and disposed. This helps to ensure that any needles are not inadvertently left in a patient's bed, tray table, floor, etc. Nurses must be familiar with the equipment used at the health care facility and receive orientation on the specific mechanics related to the equipment and safety practices.
Initiating Peripheral IV Access
The steps for initiating peripheral IV access are described in the Open RN Nursing Advanced Skills "Perform IV Insertion and IV Removal" checklist in Chapter 1.
Monitoring for Potential Complications
Several potential complications may arise from peripheral intravenous therapy. It is the responsibility of the nurse to prevent, assess, and manage signs and symptoms of complications. Complications can be categorized as local or systemic. See Table 23.4a for potential local complications of peripheral IV therapy.
Table 23.4a Local Complications of Peripheral IV Therapy[23],[24]
| Complications | Potential Causes and Prevention | Treatment |
|---|---|---|
| Phlebitis: The inflammation of the vein's inner lining, the tunica intima. Clinical indications are localized redness, pain, heat, purulent drainage, and swelling that can track up the vein leading to a palpable venous cord. | Mechanical causes: Inflammation of the vein's inner lining can be caused by the cannula rubbing and irritating the vein. To prevent mechanical inflammation, choose the smallest outer diameter of a catheter for therapy, secure the catheter with securement technology, avoid areas of flexion, and stabilize the joint as needed.[25]
Chemical causes: Inflammation of the vein's inner lining can be caused by medications or fluids with high alkaline, acidic, or hypertonic qualities. To avoid chemical phlebitis, follow the parenteral drug therapy guidelines in a drug reference resource for administering IV medications, including the appropriate amount of solution and rate of infusion. Infectious causes: May be related to emergent VAD insertions, poor aseptic technique, or contaminated dressings. |
Chemical phlebitis: Evaluate infusion therapy and the need for different vascular access, different medication, slower rate of infusion, or more dilute infusate. If indicated, remove the Vascular Access Device (VAD).[26]
Transient mechanical phlebitis: May be treatable by stabilizing the catheter, applying heat, elevating limb, and providing analgesics as needed. Consider requesting other pharmacologic interventions such as anti-inflammatory agents if needed. Monitor site for 24 hours post-insertion, and if signs and symptoms persist, remove the catheter.[27] Infectious phlebitis: If purulent drainage is present or infection is suspected, remove the catheter and obtain a culture of the purulent drainage and catheter tip. Monitor for signs of systemic infection.[28] |
| Infiltration: A condition that occurs when a nonvesicant solution is inadvertently administered into surrounding tissue. Signs and symptoms include pain, swelling, redness, the skin surrounding the insertion site is cool to touch, there is a change in the quality or flow of IV, the skin is tight around the IV site, IV fluid is leaking from IV site, or there are frequent alarms on the IV pump. | Infiltration is one of the most common complications in infusion therapy involving an IV catheter.[29] For this reason, the patency of an IV site must always be checked before administering IV push medications.
Infiltration can be caused by piercing the vein, excessive patient movement, a dislodged or incorrectly placed IV catheter, or too rapid infusion of fluids or medications into a fragile vein. Always secure a peripheral IV catheter with tape or a stabilization device to avoid accidental dislodgement. Avoid sites that are areas of flexion. |
Stop the infusion and remove the cannula. Follow agency policy related to infiltration. |
| Extravasation: A condition that occurs when vesicant (an irritating solution or medication) is administered and inadvertently leaks into surrounding tissue and causes damage. It is characterized by the same signs and symptoms as infiltration but also includes burning, stinging, redness, blistering, or necrosis of the tissue. | Extravasation has the same potential causes of infiltration but with worse consequences because of the effects of vesicants. Extravasation can result in severe tissue injury and death (necrosis). For this reason, known vesicant medications should be administered via central lines. | Stop the infusion. Detach all administration sets and aspirate from the catheter hub prior to removing the catheter to remove vesicant medication from the catheter lumen and as much as possible from the subcutaneous tissue.[30]
Follow agency policy regarding extravasation of specific medications. For example, toxic medications have a specific treatment plan. |
| Hemorrhage: Bleeding from the IV access site. | Bleeding occurs when the IV catheter becomes dislodged. | If dislodgement occurs, apply pressure with gauze to the site until the bleeding stops and then apply a sterile transparent dressing. |
| Local infection: Infection at the site is indicated by purulent drainage, typically two to three days after an IV site is started. | Local infection is often caused by nonadherence to aseptic technique during IV initiation or IV maintenance or the dressing becomes contaminated or non-intact over the access site. | Remove the cannula and clean the site using sterile technique. If infection is suspected, remove the catheter and obtain a culture of the purulent drainage and catheter tip. Monitor for signs of systemic infection. |
| Nerve injury[31] | Paresthesia-type pain occurring during venipuncture or during an indwelling IV catheter can indicate nerve injury. | Immediately remove the cannula, notify the provider, and document findings in the chart. |
In addition to local complications that can occur at the site of IV insertion, there are many systemic complications that nurses must monitor for when initiating peripheral IV access, as well as monitoring a patient receiving IV therapy. See Table 23.4b for a list of systemic complications, signs, symptoms, and treatment.
Table 23.4b Systemic Complications of Peripheral IV Therapy[32]
| Complication | Signs, Symptoms, and Treatment |
|---|---|
| Pulmonary Edema | Pulmonary edema, also known as fluid overload or circulatory overload, is a condition caused by excess fluid accumulation in the lungs due to excessive fluid in the circulatory system. It is characterized by decreased oxygen saturation; increased respiratory rate; fine or coarse crackles in the lung bases; restlessness; breathlessness; dyspnea; and coughing up pink, frothy sputum. Pulmonary edema requires prompt medical attention and treatment. If pulmonary edema is suspected, raise the head of the bed, apply oxygen, take vital signs, complete a cardiovascular assessment, and immediately notify the provider. |
| Air Embolism | An air embolism refers to the presence of air in the cardiovascular system. It occurs when air is introduced into the venous system and travels to the right ventricle and/or pulmonary circulation. Air embolisms can occur during catheter insertion, changing IV bags, adding secondary medication administration, and catheter removal. Inadvertent administration of 10 mL of air can have serious and fatal consequences. However, small air bubbles are tolerated by most patients. Signs and symptoms of an air embolism include sudden shortness of breath, continued coughing, breathlessness, shoulder or neck pain, agitation, feeling of impending doom, light-headedness, hypotension, wheezing, increased heart rate, altered mental status, and jugular venous distension.
If an air embolism is suspected, occlude the source of air entry. Place the patient in a Trendelenburg position on their left side (if not contraindicated), apply oxygen at 100%, obtain vital signs, and immediately notify the provider. To prevent air embolisms, perform the following steps when administering IV therapy: ensure the drip chamber is one-third to one-half filled, remove all air from the IV tubing by priming it prior to attaching it to the patient, use precautions when changing IV bags or adding secondary medication bags, ensure all IV connections are tight, and ensure clamps are used when the IV system is not in use. |
| Catheter Embolism | A catheter embolism occurs when a small part of the cannula breaks off and flows into the vascular system. When removing a peripheral IV cannula, inspect the catheter tip to ensure the end is intact. Notify the provider immediately if the catheter tip is not intact when it is removed. |
| Catheter-Related Bloodstream Infection (CR-BSI) | Catheter-related bloodstream infection (CR-BSI) is caused by microorganisms introduced into the bloodstream through the puncture site, the hub, or contaminated IV tubing or IV solution, leading to bacteremia or sepsis. A CR-BSI is a hospital-acquired preventable infection and considered an adverse event. A CR-BSI is diagnosed when infection occurs with one positive blood culture in a patient with a vascular device (or a patient who had a vascular device within 48 hours before the infection) with no apparent source for the infection other than the vascular access device. Treatment for CR-BSI is IV antibiotic therapy.
To prevent CR-BSI, it is vital to perform hand hygiene prior to care and maintenance of an IV system and to use strict aseptic technique for care and maintenance of all IV therapy procedures. |

