Open Resources for Nursing (Open RN)
Standard Versus Transmission-Based Precautions
Standard Precautions
Standard precautions are used when caring for all patients to prevent health care associated infections. According to the Centers for Disease Control and Prevention (CDC), standard precautions are “the minimum infection prevention practices that apply to all patient care, regardless of suspected or confirmed infection status of the patient, in any setting where health care is delivered.”[1] They are based on the principle that all blood, body fluids (except sweat), nonintact skin, and mucous membranes may contain transmissible infectious agents. These standards reduce the risk of exposure for the health care worker and protect the patient from potential transmission of infectious organisms.
Current standard precautions according to the CDC (2019) include the following:
- Appropriate hand hygiene
- Use of personal protective equipment (e.g., gloves, gowns, masks, eyewear) whenever infectious material exposure may occur
- Appropriate patient placement and care using transmission-based precautions when indicated
- Respiratory hygiene/cough etiquette
- Proper handling and cleaning of environment, equipment, and devices
- Safe handling of laundry
- Sharps safety (i.e., engineering and work practice controls)
- Aseptic technique for invasive nursing procedures such as parenteral medication administration[2]
Each of these standard precautions is described in more detail in the following subsections.
Transmission-Based Precautions
In addition to standard precautions, transmission-based precautions are used for patients with documented or suspected infection, or colonization, of highly transmissible or epidemiologically important pathogens. Epidemiologically important pathogens include, but are not limited to, Coronavirus disease (COVID-19), Clostridium difficile (C-diff), Methicillin-resistant staphylococcus aureus (MRSA), Vancomycin-resistant enterococci (VRE), Respiratory syncytial sirus (RSV), measles, and tuberculosis (TB). For patients with these types of pathogens, standard precautions are used along with specific transmission-based precautions.
There are four categories of transmission-based precautions: contact precautions, enhanced barrier precautions, droplet precautions, and airborne precautions. Transmission-based precautions are used when the route(s) of transmission is (are) not completely interrupted using standard precautions alone. Some diseases, such as tuberculosis, have multiple routes of transmission so more than one transmission-based precautions category must be implemented. See Table 4.2 outlining the categories of transmission precautions with associated PPE and other precautions. When possible, patients with transmission-based precautions should be placed in a single occupancy room with dedicated patient care equipment (e.g., blood pressure cuffs, stethoscope, thermometer). Transport of the patient and unnecessary movement outside the patient room should be limited. However, when transmission-based precautions are implemented, it is also important for the nurse to make efforts to counteract possible adverse effects of these precautions on patients, such as anxiety, depression, perceptions of stigma, and reduced contact with clinical staff.
Table 4.2 Transmission-Based Precautions[3]
| Precaution | Implementation | PPE and Other Precautions |
|---|---|---|
| Contact | Known or suspected infections with increased risk for contact transmission (e.g., draining wounds, fecal incontinence) or with epidemiologically important organisms, such as C-diff, MRSA, VRE, or RSV |
Note: Use only soap and water for hand hygiene in patients with C. difficile infection. |
| Enhanced barrier | Used during high-contact resident care activities for individuals colonized or infected with a multidrug-resistant organism (MDRO), as well as those at increased risk of MDRO acquisition |
|
| Droplet | Known or suspected infection with pathogens transmitted by large respiratory droplets generated by coughing, sneezing, or talking, such as influenza, coronavirus, or pertussis |
|
| Airborne | Known or suspected infection with pathogens transmitted by small respiratory droplets, such as measles, tuberculosis, and disseminated herpes zoster | Fit-tested N-95 respirator or PAPR
|
View a list of transmission-based precautions used for specific medical conditions at the CDC Guideline for Isolation Precautions.
Patient Transport
Several principles are used to guide transport of patients requiring transmission-based precautions. In the inpatient and residential settings, these principles include the following:
- Limiting transport for essential purposes only, such as diagnostic and therapeutic procedures that cannot be performed in the patient’s room
- Using appropriate barriers on the patient consistent with the route and risk of transmission (e.g., mask, gown, covering the affected areas when infectious skin lesions or drainage is present)
- Notify other health care personnel involved in the care of the patient of the transmission-based precautions. For example, when transporting the patient to radiology, inform the radiology technician of the precautions.[4]
Appropriate Hand Hygiene
Hand hygiene is the single most important practice to reduce the transmission of infectious agents in health care settings and is an essential element of standard precautions.[5] Routine handwashing during appropriate moments is a simple and effective way to prevent infection. However, it is estimated that health care professionals, on average, properly clean their hands less than 50% of the time it is indicated.[6] The Joint Commission, the organization that sets evidence-based standards of care for hospitals, recently updated its hand hygiene standards in 2018 to promote enforcement. If a Joint Commission surveyor witnesses an individual failing to properly clean their hands when it is indicated, a deficiency will be cited requiring improvement by the agency. This deficiency could potentially jeopardize a hospital’s accreditation status and their ability to receive payment for patient services. Therefore, it is essential for all health care workers to ensure they are using proper hand hygiene at the appropriate times.[7]
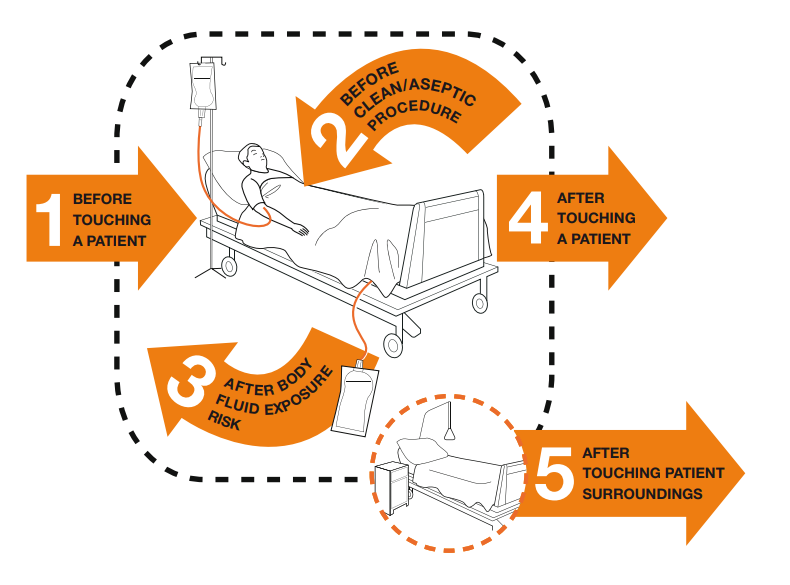
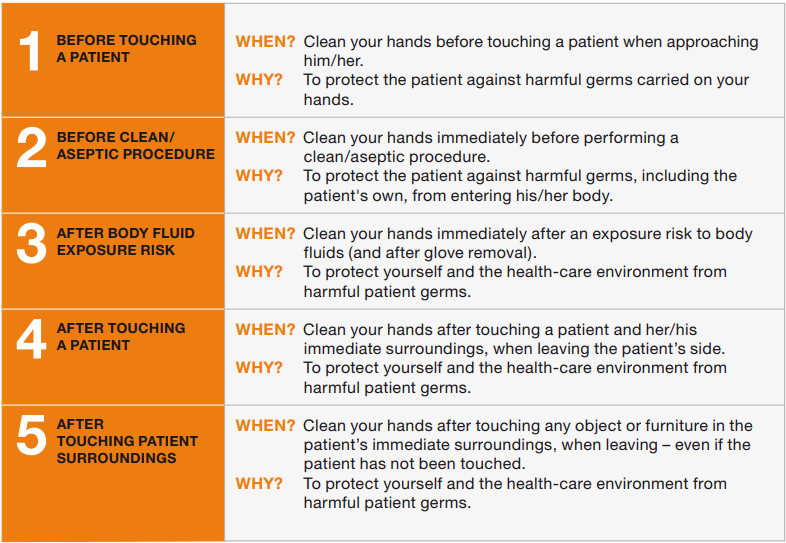
There are several evidence-based guidelines for performing appropriate hand hygiene. These guidelines include frequency of performing hand hygiene according to the care circumstances, solutions used, and technique performed. The Healthcare Infection Control Practices Advisory Committee (HICPAC) recommends health care personnel perform hand hygiene at specific times when providing care to patients. These moments are often referred to as the “Moments for Hand Hygiene.”[8] See Figures 4.1[9] and 4.2[10] for an illustration and application of the five moments of hand hygiene. The five moments of hand hygiene are as follows:
- Immediately before touching a patient
- Before performing an aseptic task or handling invasive devices
- Before moving from a soiled body site to a clean body site on a patient
- After touching a patient or their immediate environment
- After contact with blood, body fluids, or contaminated surfaces (with or without glove use)
When performing hand hygiene, washing with soap and water, or an approved alcohol-based hand rub solution that contains at least 60% alcohol, may be used. Unless hands are visibly soiled, an alcohol-based hand rub is preferred over soap and water in most clinical situations due to evidence of improved compliance. Handrubs are also preferred because they are generally less irritating to health care worker’s hands. However, it is important to recognize that alcohol-based rubs do not eliminate some types of germs, such as Clostridium difficile (C-diff).
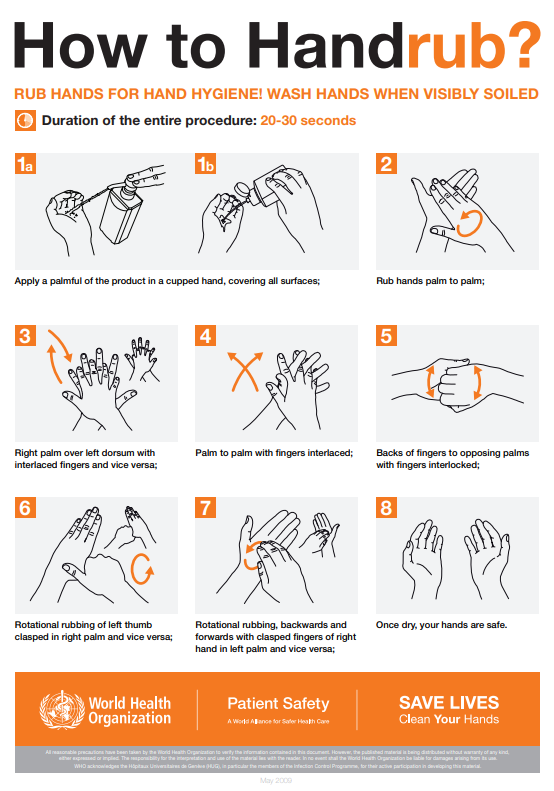
When using the alcohol-based handrub method, the CDC recommends the following steps. See Figure 4.3[11] for a handrub poster created by the World Health Organization.
- Apply product to the palm of one hand in an amount that will cover all surfaces.
- Rub hands together, covering all the surfaces of the hands, fingers, and wrists until the hands are dry. Surfaces include the palms and fingers, between the fingers, the backs of the hands and fingers, the fingertips, and the thumbs.
- The process should take about 20 seconds, and the solution should be dry.[12]
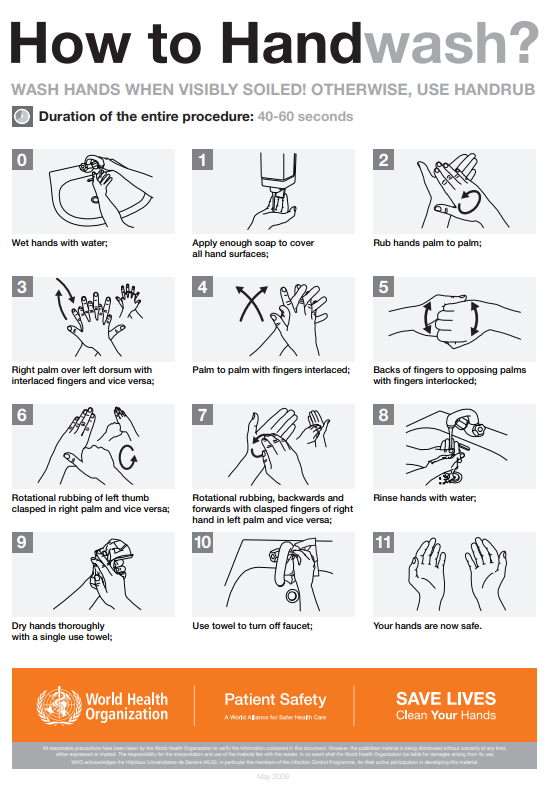
When washing with soap and water, the CDC recommends using the following steps. See Figure 4.4[13] for an image of a handwashing poster created by the World Health Organization.
- Wet hands with warm or cold running water and apply facility-approved soap.
- Lather hands by rubbing them together with the soap. Use the same technique as the handrub process to clean the palms and fingers, between the fingers, the backs of the hands and fingers, the fingertips, and the thumbs.
- Scrub thoroughly for at least 20 seconds.
- Rinse hands well under clean, running water.
- Dry the hands using a clean towel or disposable toweling.
- Use a clean paper towel to shut off the faucet.[14]
By performing hand hygiene at the proper moments and using appropriate techniques, you will ensure your hands are safe and you are not transmitting infectious organisms to yourself or others.
Hand Hygiene for Healthcare Workers on YouTube[15]
Personal Protective Equipment (PPE)
Personal protective equipment (PPE) includes gloves, gowns, face shields, goggles, and masks used to prevent the spread of infection to and from patients and health care providers. Depending on the anticipated exposure, PPE may include the use of gloves, a fluid-resistant gown, goggles or a face shield, and a mask or respirator. When used for a patient with transmission-based precautions, PPE supplies are typically stored in an isolation cart next to the patient’s room, and a card is posted on the door alerting staff and visitors to precautions needed before entering the room.
Gloves
Gloves protect both patients and health care personnel from exposure to infectious material that may be carried on the hands. Gloves are used to prevent contamination of health care personnel hands during activities such as the following:
- Anticipating direct contact with blood or body fluids, mucous membranes, nonintact skin, and other potentially infectious material
- Having direct contact with patients who are colonized or infected with pathogens transmitted by the contact route, such as Vancomycin-resistant enterococci (VRE), Methicillin-resistant staphylococcus aureus (MRSA), and Respiratory syncytial virus (RSV)
- Handling or touching visibly or potentially contaminated patient care equipment and environmental surfaces[16]
Nonsterile disposable medical gloves for routine patient care are made of a variety of materials, such as latex, vinyl, and nitrile. Many people are allergic to latex, so be sure to check for latex allergies for the patient and other health care professionals. See Figure 4.5[17] for an image of nonsterile medical gloves in various sizes in a health care setting. At times, gloves may need to be changed when providing care to a single patient to prevent cross-contamination of body sites. It is also necessary to change gloves if the patient interaction requires touching portable computer keyboards or other mobile equipment that is transported from room to room. Discarding gloves between patients is necessary to prevent transmission of infectious material. Gloves must not be washed for subsequent reuse because microorganisms cannot be reliably removed from glove surfaces, and continued glove integrity cannot be ensured.[18]
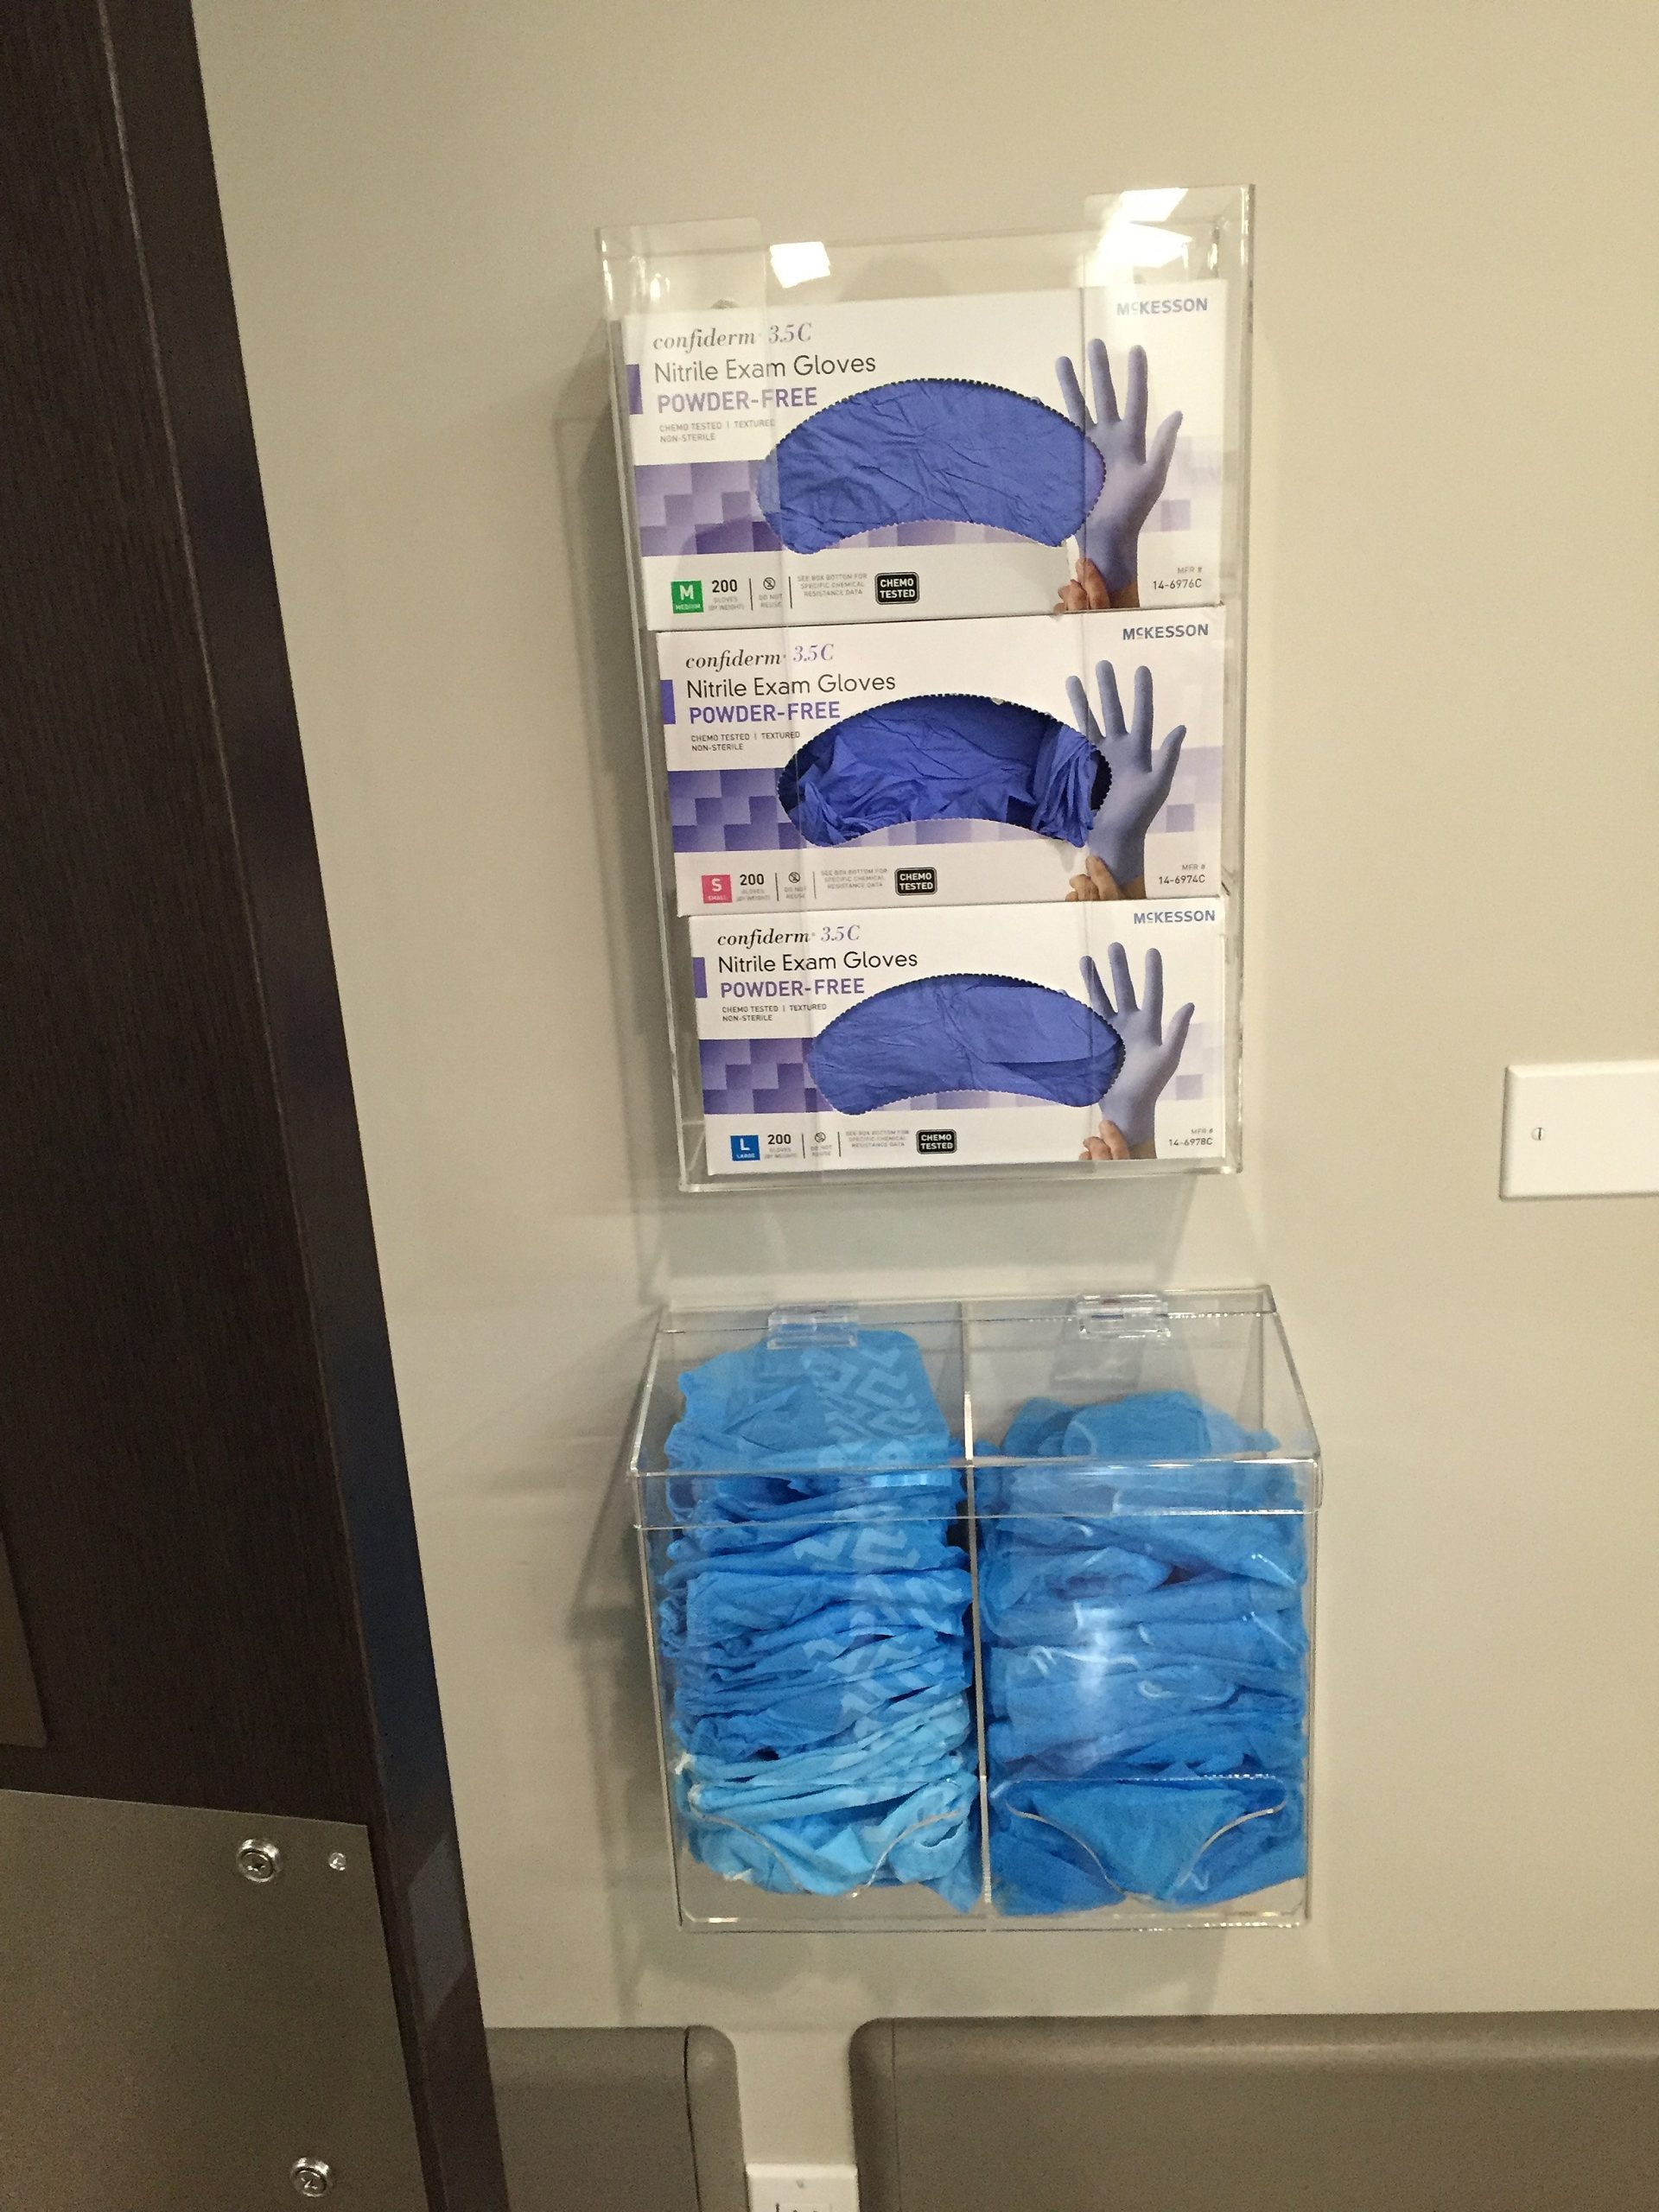
When gloves are worn in combination with other PPE, they are put on last. Gloves that fit snugly around the wrist should be used in combination with isolation gowns because they will cover the gown cuff and provide a more reliable continuous barrier for the arms, wrists, and hands.
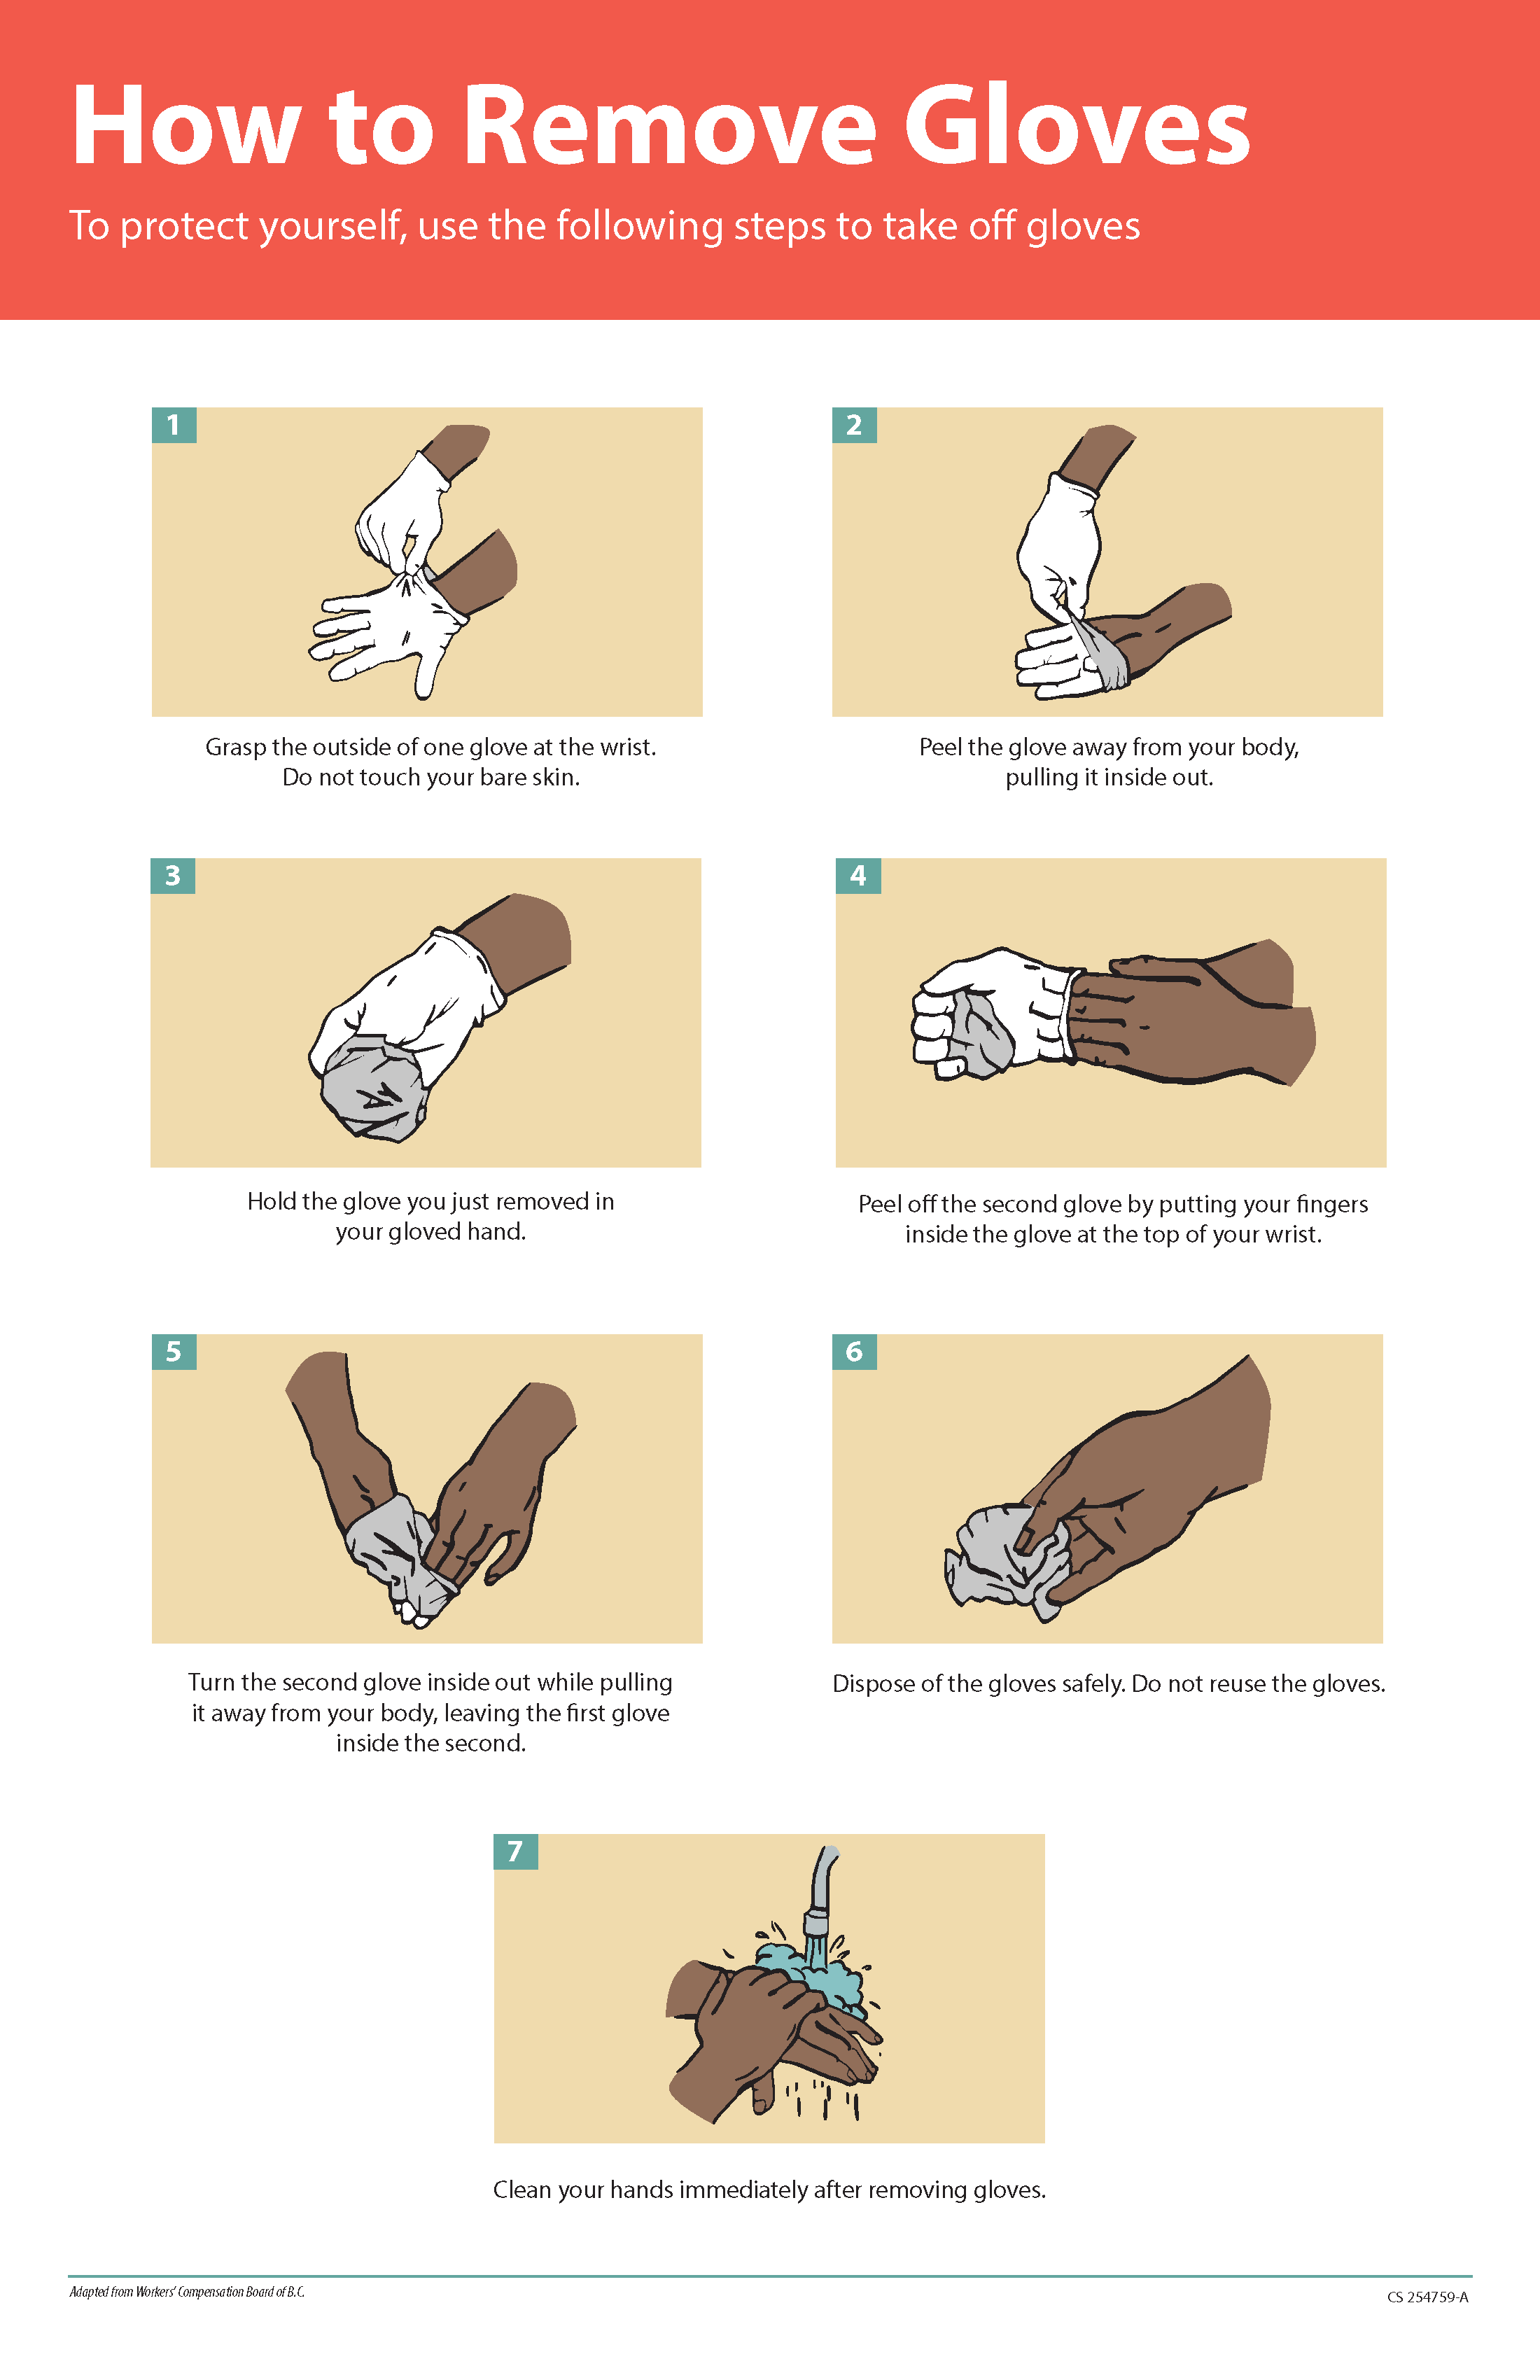
Gloves should be removed properly to prevent contamination. See Figure 4.6[19] for an illustration of properly removing gloves. Hand hygiene should be performed following glove removal to ensure the hands will not carry potentially infectious material that might have penetrated through unrecognized tears or contaminated the hands during glove removal. One method for properly removing gloves includes the following steps:
- Grasp the outside of one glove near the wrist. Do not touch your skin.
- Peel the glove away from your body, pulling it inside out.
- Hold the removed glove in your gloved hand.
- Put your fingers inside the glove at the top of your wrist and peel off the second glove.
- Turn the second glove inside out while pulling it away from your body, leaving the first glove inside the second.
- Dispose of the gloves safely. Do not reuse.
- Perform hand hygiene immediately after removing the gloves.[20]
Gowns
Isolation gowns are used to protect the health care worker’s arms and exposed body areas and to prevent contamination of their clothing with blood, body fluids, and other potentially infectious material. Isolation gowns may be disposable or washable/reusable. See Figure 4.7[21] for an image of a nurse wearing an isolation gown along with goggles and a respirator. When using standard precautions, an isolation gown is worn only if contact with blood or body fluid is anticipated. However, when contact transmission-based precautions are in place, donning of both gown and gloves upon room entry is indicated to prevent unintentional contact of clothing with contaminated environmental surfaces.
Gowns are usually the first piece of PPE to be donned. Isolation gowns should be removed before leaving the patient room to prevent possible contamination of the environment outside the patient’s room. Isolation gowns should be removed in a manner that prevents contamination of clothing or skin. The outer, “contaminated,” side of the gown is turned inward and rolled into a bundle, and then it is discarded into a designated container to contain contamination. See more information about putting on and removing PPE in the subsection below.[22]

Masks
The mucous membranes of the mouth, nose, and eyes are susceptible portals of entry for infectious agents. Masks are used to protect these sites from entry of large infectious droplets. See Figure 4.8[23] for an image of nurse wearing a surgical mask. Masks have three primary purposes in health care settings:
- Used by health care personnel to protect them from contact with infectious material from patients (e.g., respiratory secretions and sprays of blood or body fluids), consistent with standard precautions and droplet transmission precautions
- Used by health care personnel when engaged in procedures requiring sterile technique to protect patients from exposure to infectious agents potentially carried in a health care worker’s mouth or nose
- Placed on coughing patients to limit potential dissemination of infectious respiratory secretions from the patient to others in public areas (i.e., respiratory hygiene)[24]
Masks may be used in combination with goggles or a face shield to provide more complete protection for the face. Masks should not be confused with respirators used during airborne transmission-based precautions to prevent inhalation of small, aerosolized infectious droplets.[25]

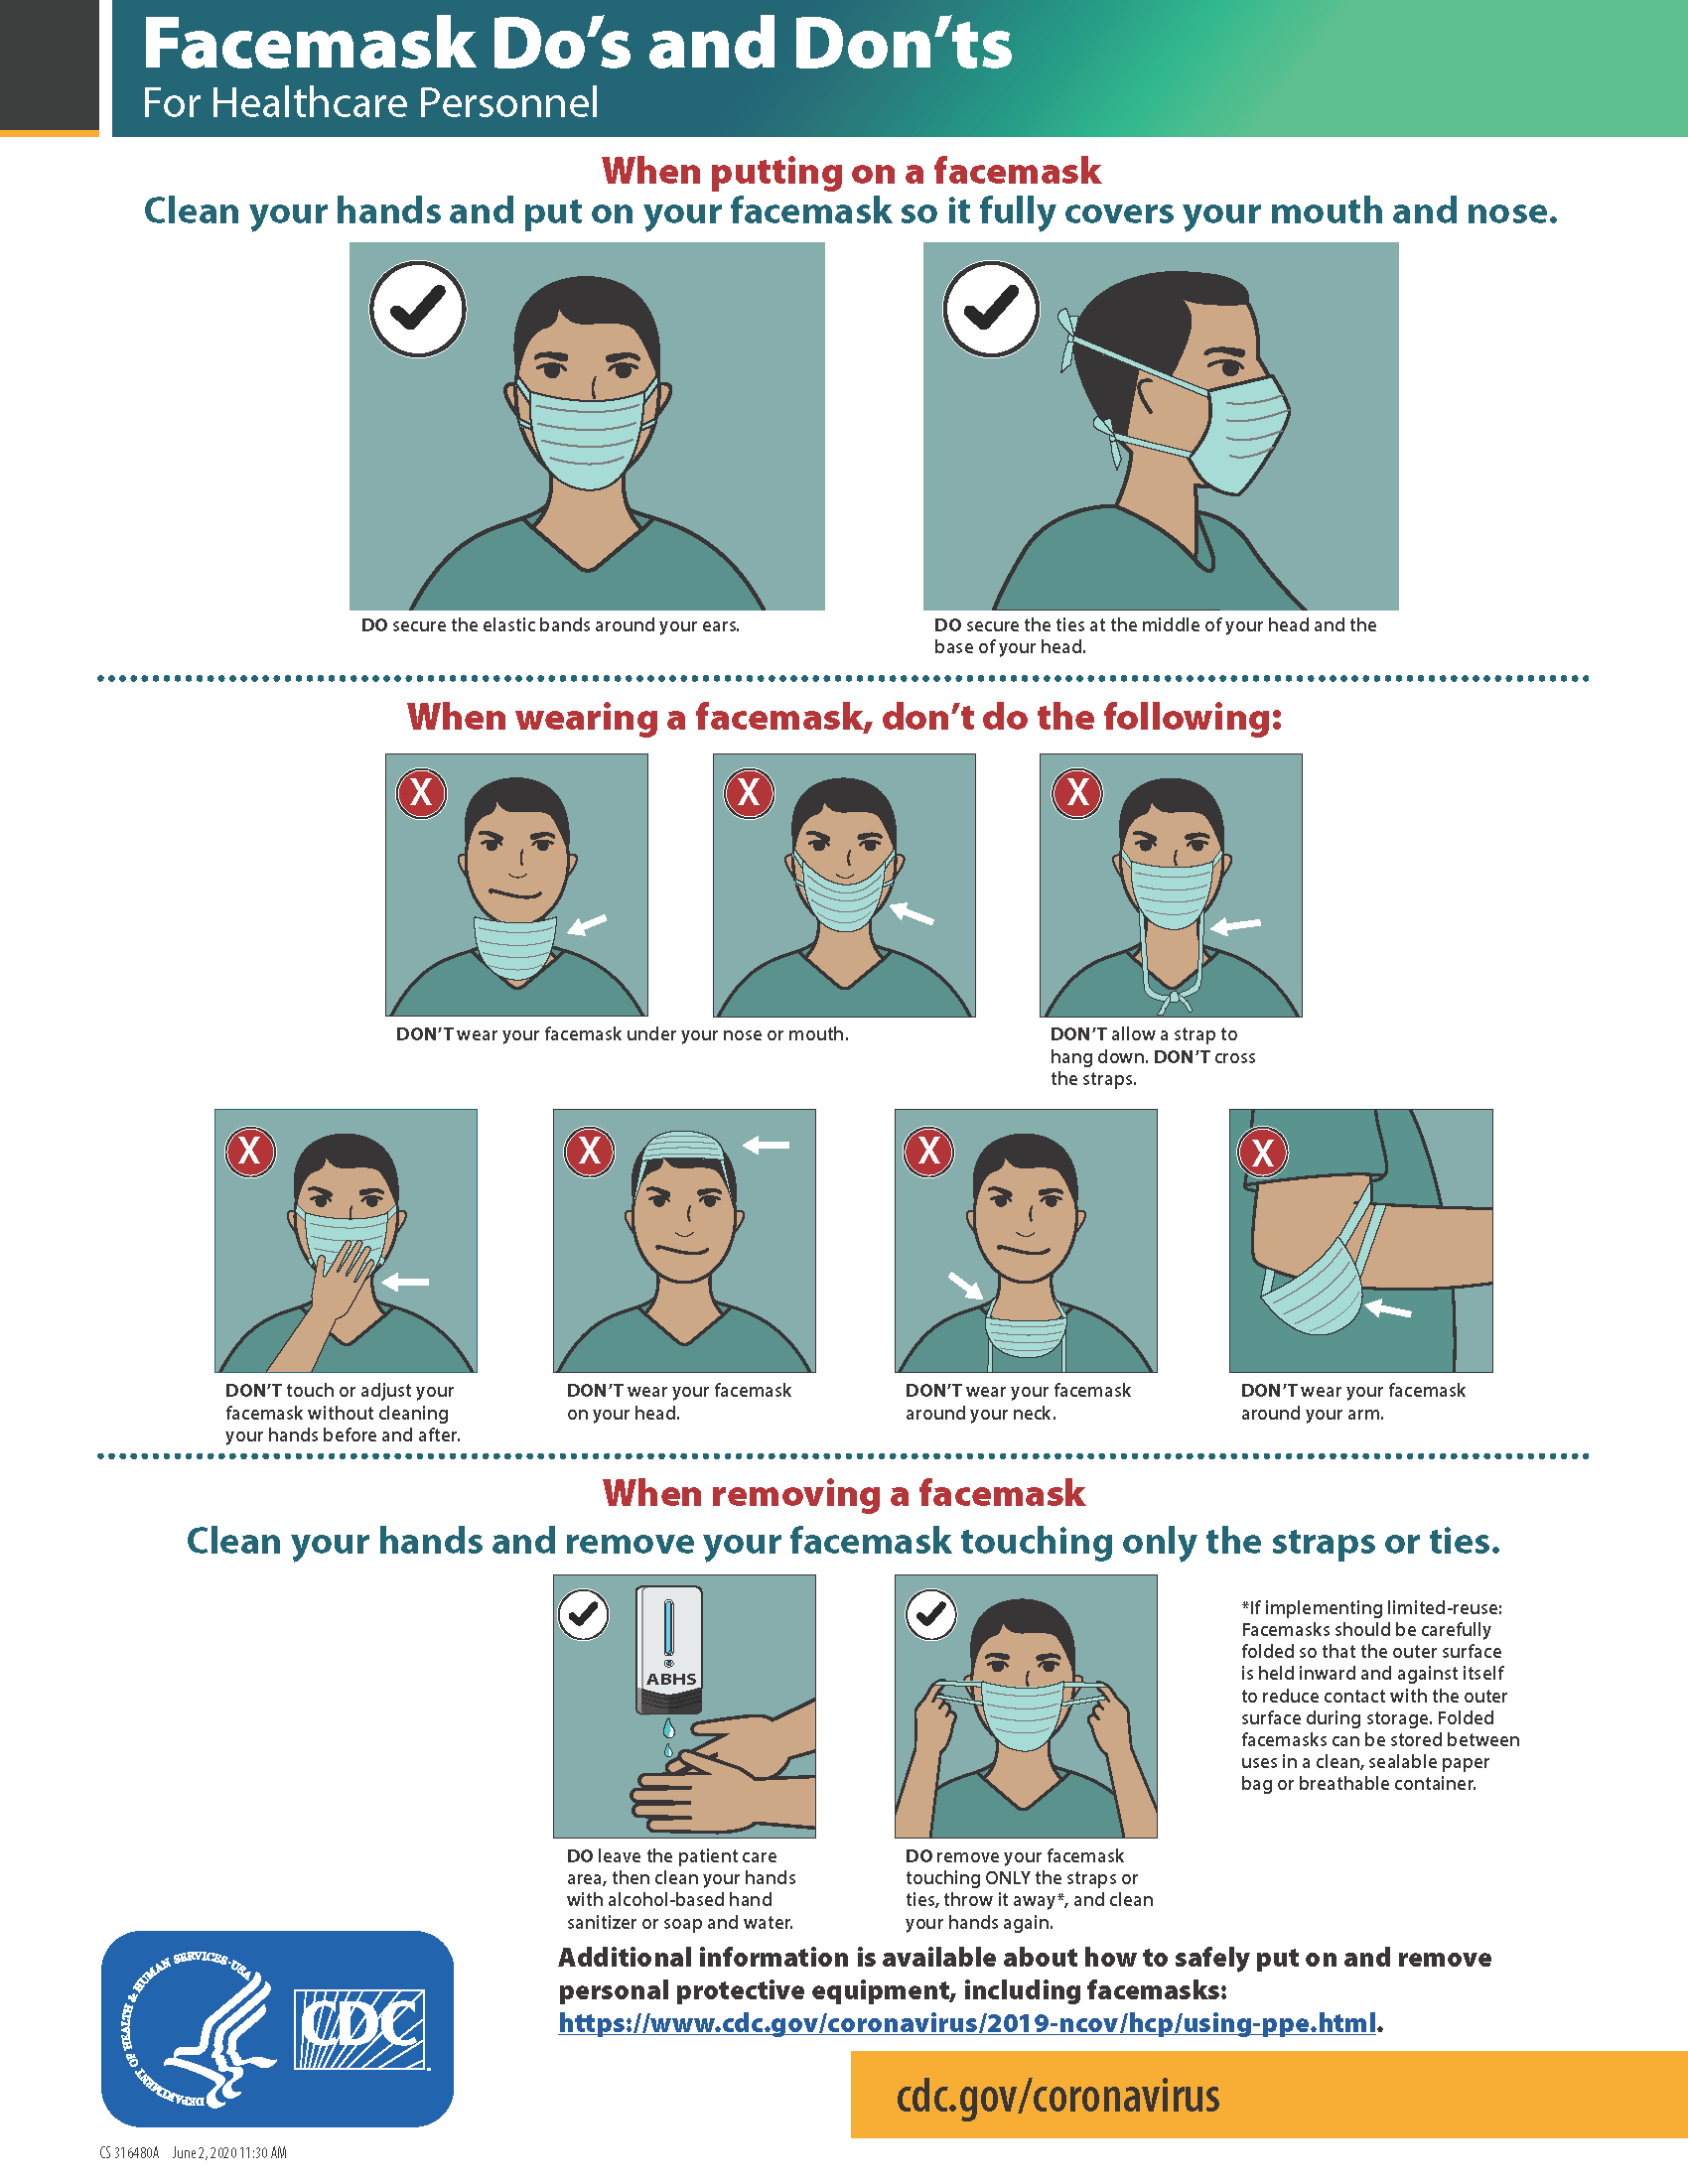
It is important to properly wear and remove masks to avoid contamination. See Figure 4.9[26] for CDC face mask recommendations for health care personnel.
Goggles/Face Shields
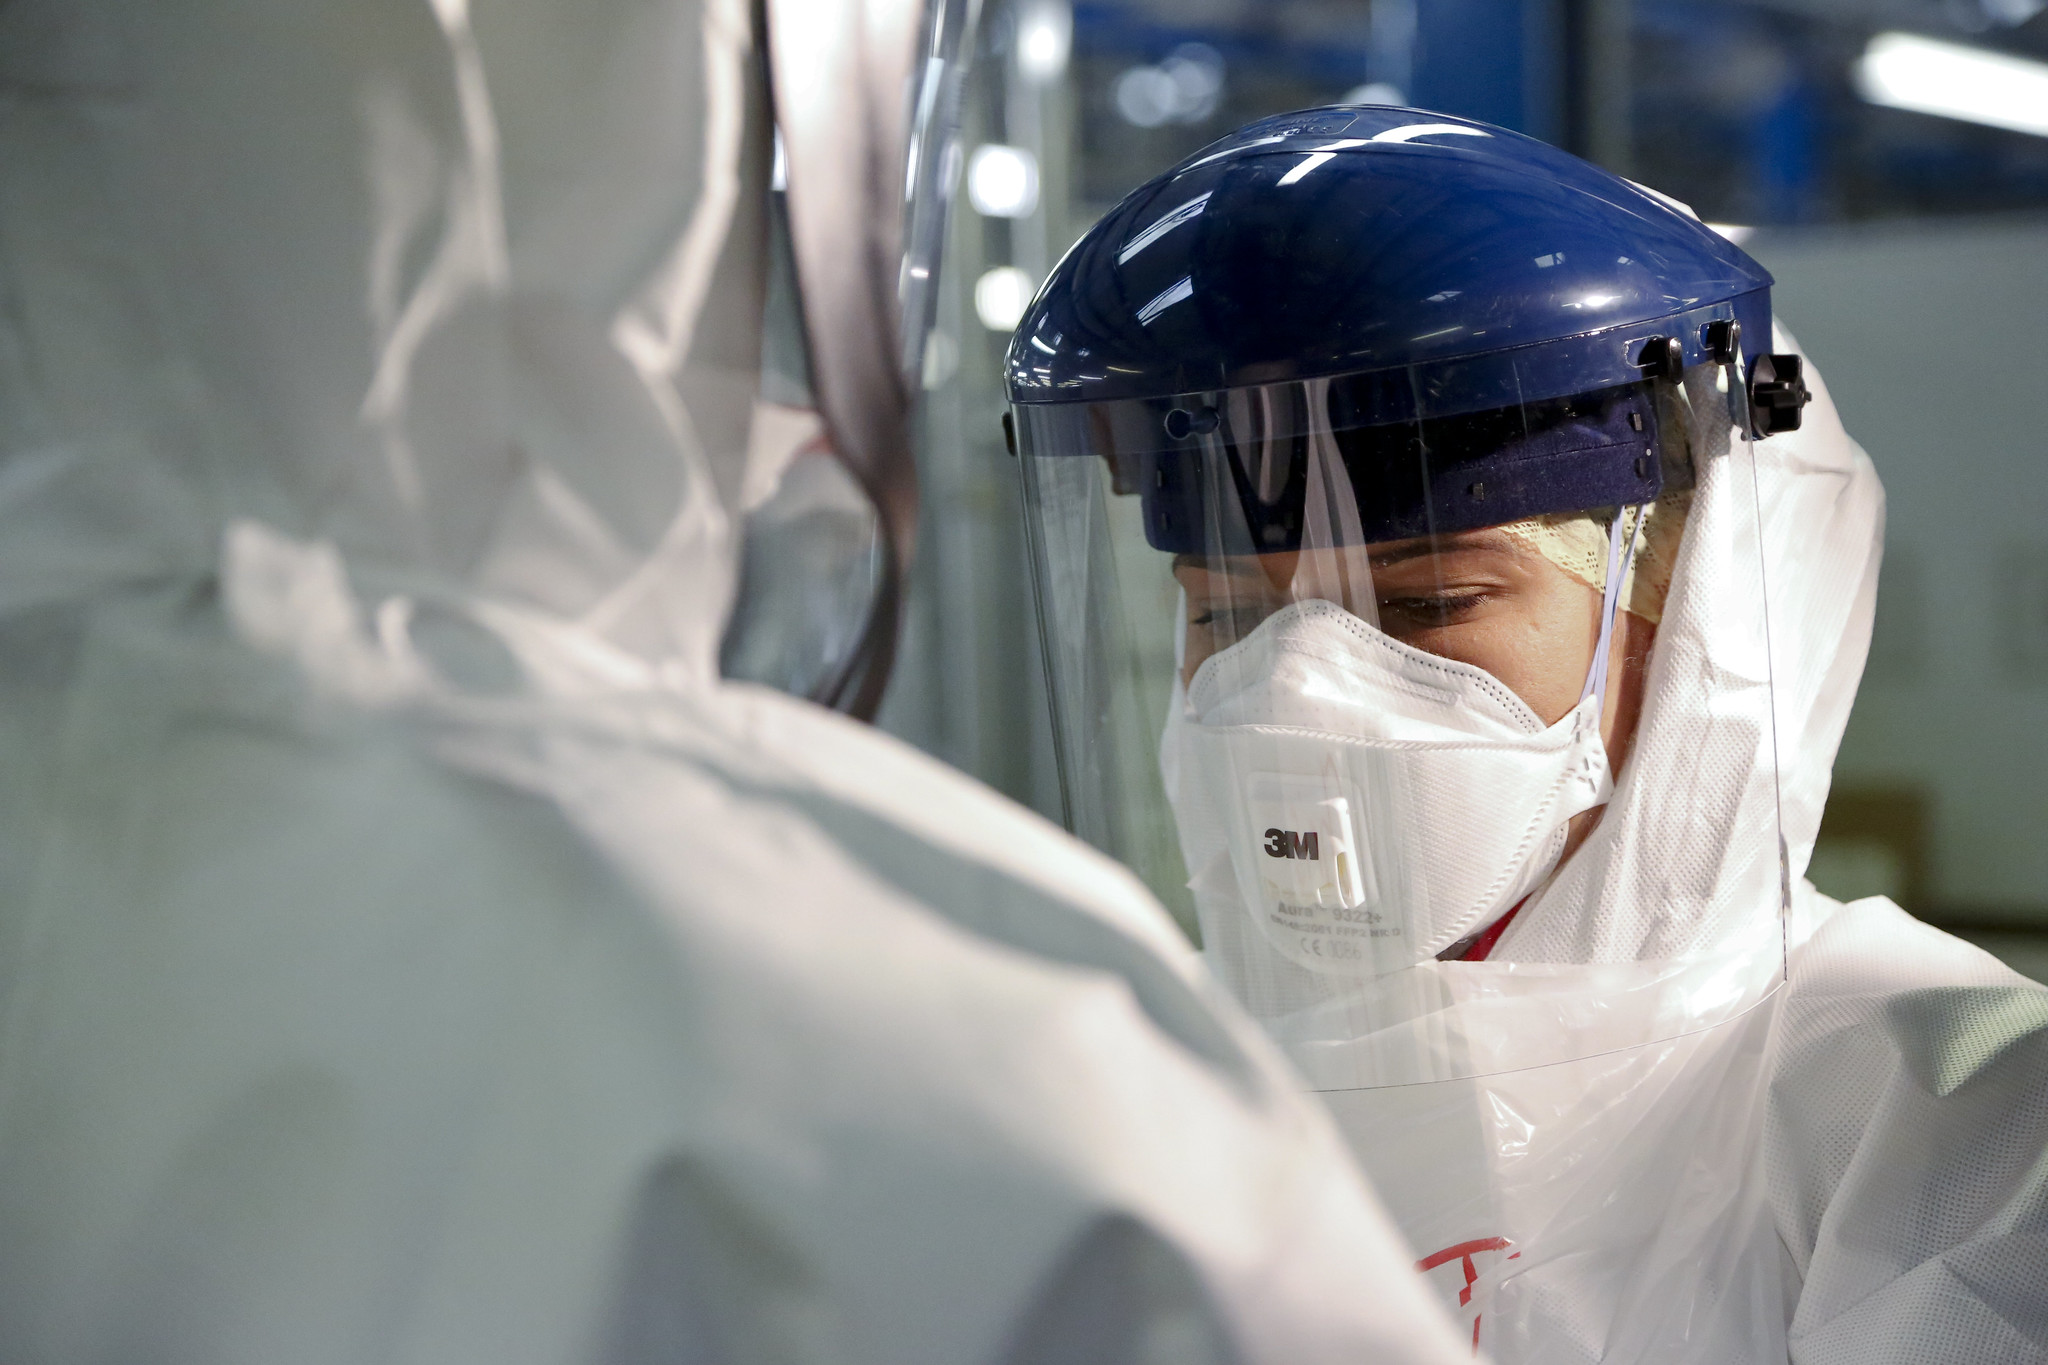
Eye protection chosen for specific work situations (e.g., goggles or face shields) depends upon the circumstances of exposure, other PPE used, and personal vision needs. Personal eyeglasses are not considered adequate eye protection. See Figure 4.10[27] for an image of a health care professional wearing a face shield along with a N95 respirator.
Respirators and PAPRs
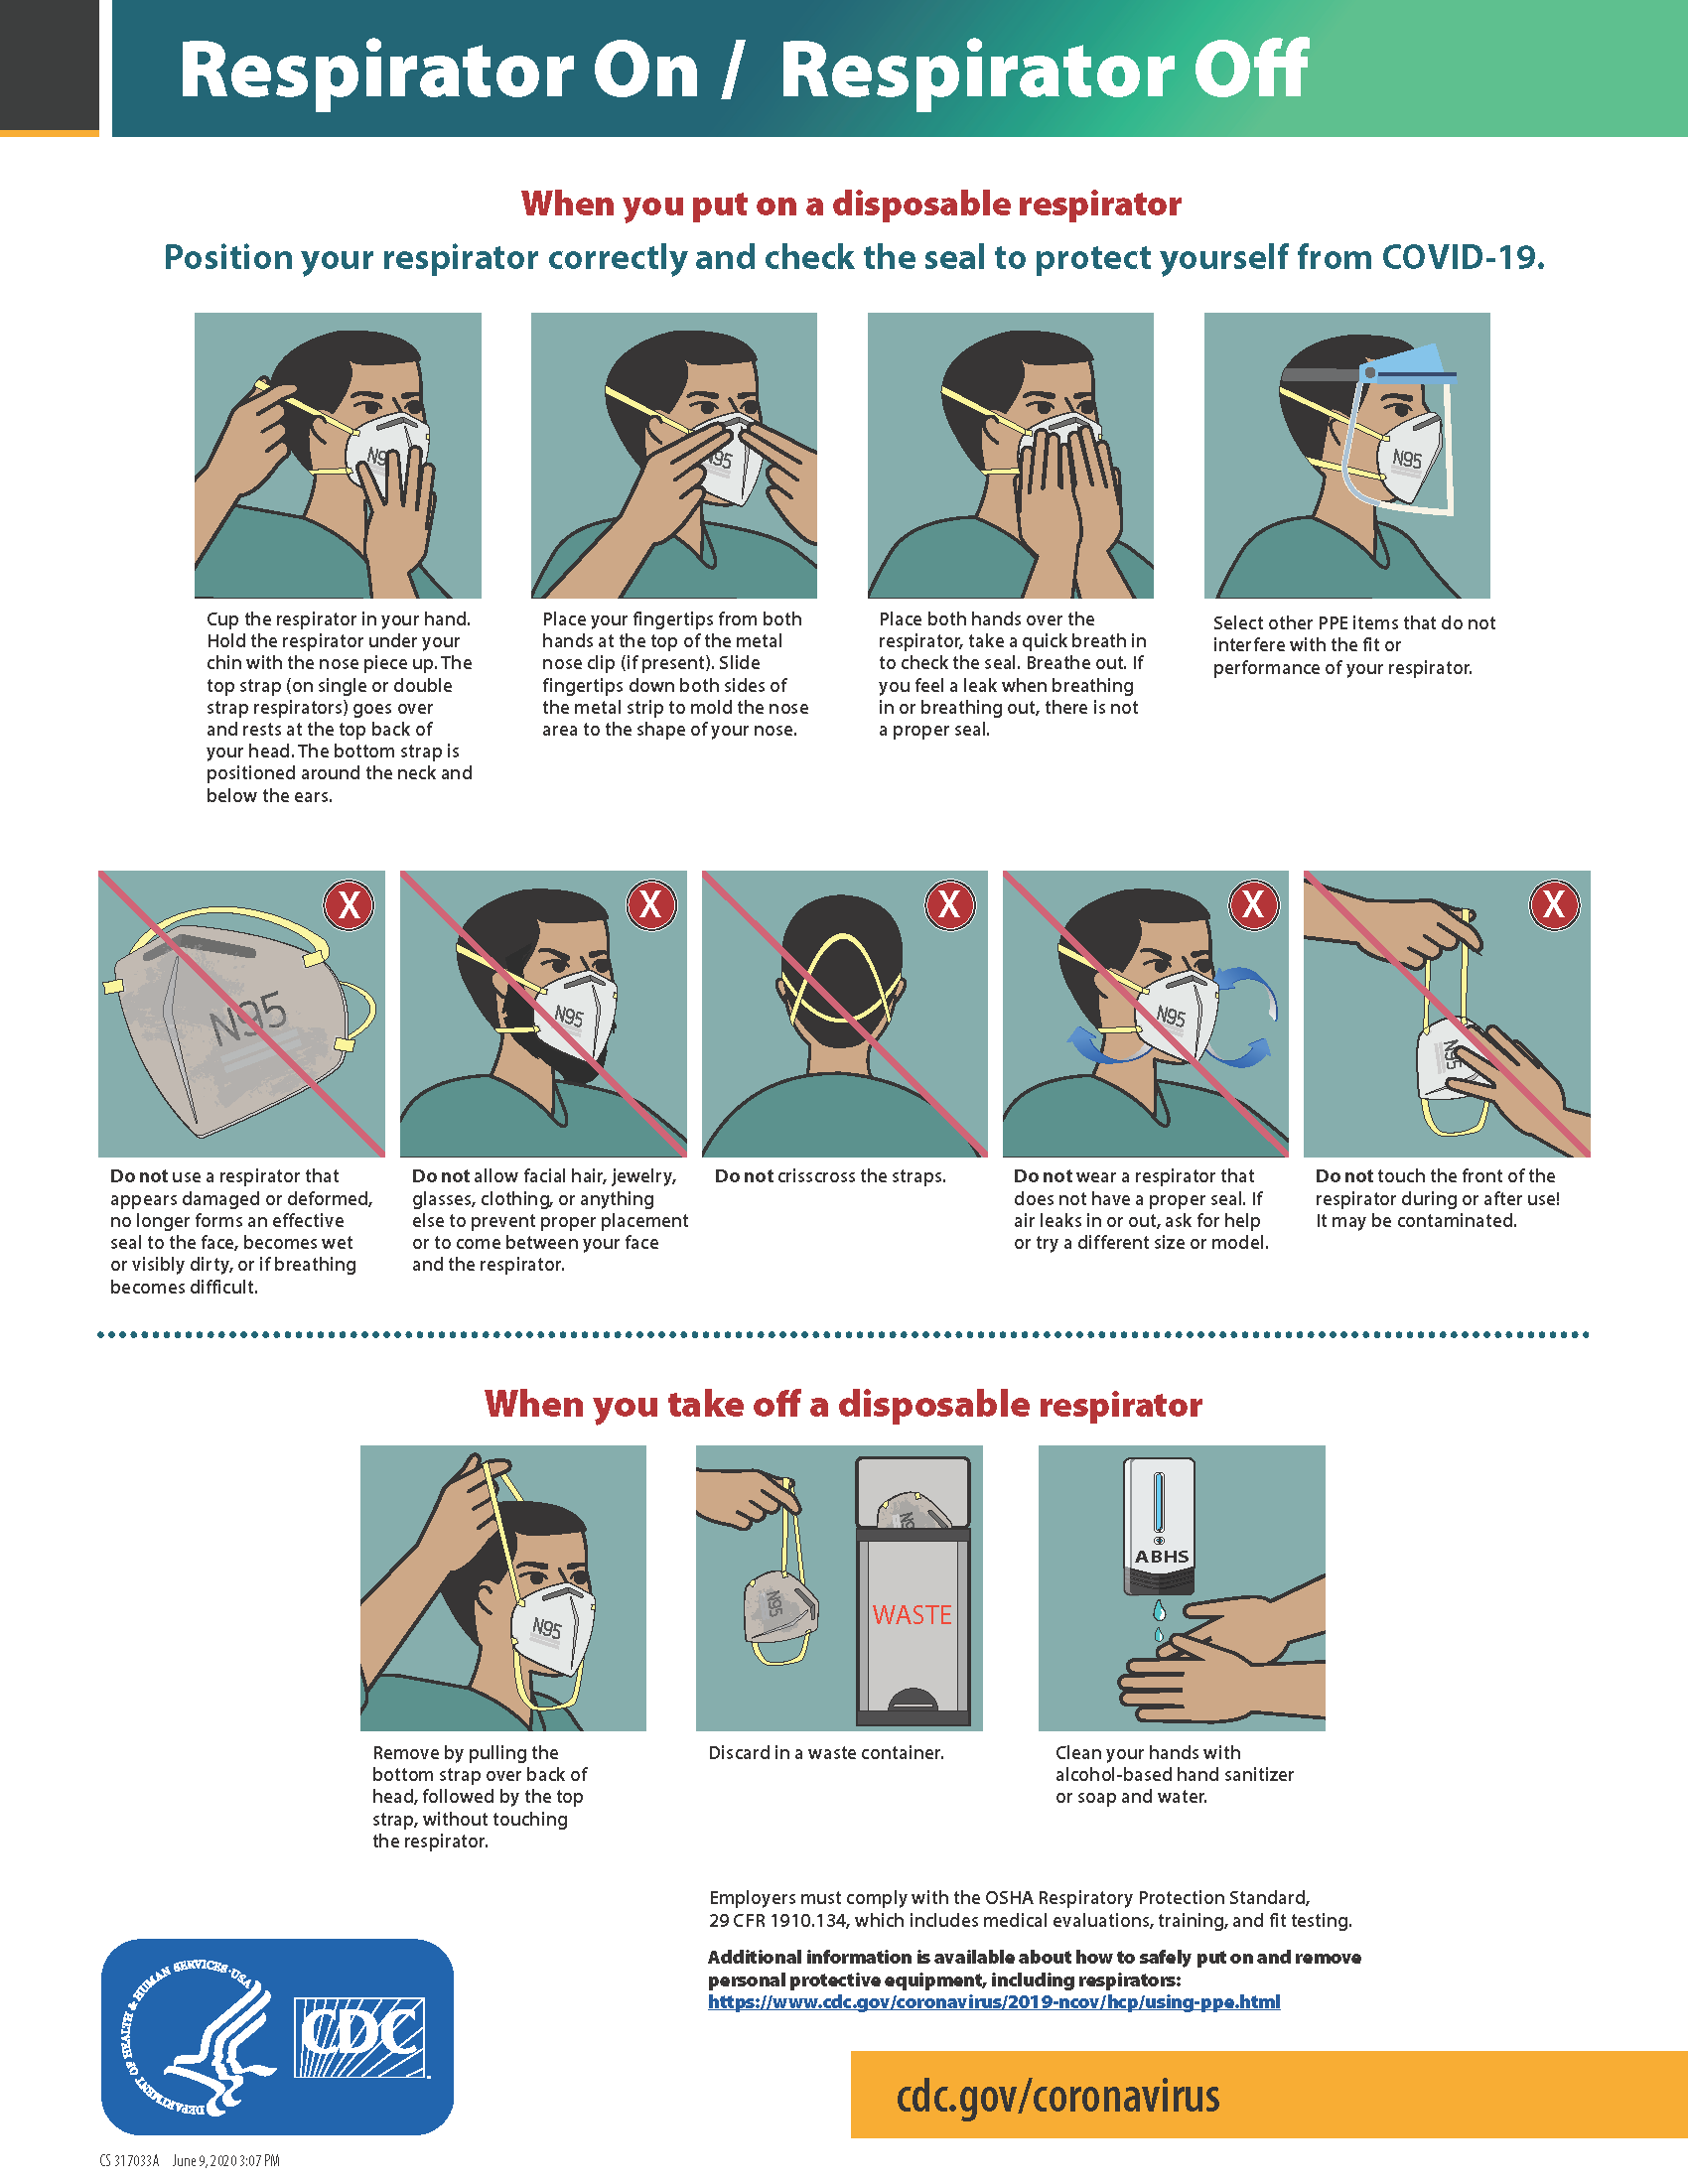
Respiratory protection used during airborne transmission precautions requires the use of special equipment. Traditionally, a fitted respirator mask with N95 or higher filtration has been worn by health care professionals to prevent inhalation of small airborne infectious particles. A user-seal check (formerly called a “fit check”) should be performed by the wearer of a respirator each time a respirator is donned to minimize air leakage around the facepiece.
A newer piece of equipment used for respiratory protection is the powered air-purifying respirator (PAPR). A PAPR is an air-purifying respirator that uses a blower to force air through filter cartridges or canisters into the breathing zone of the wearer. This process creates an air flow inside either a tight-fitting facepiece or loose-fitting hood or helmet, providing a higher level of protection against aerosolized pathogens, such as COVID-19, than a N95 respirator. See Figure 4.11[28] for an example of PAPR in use.
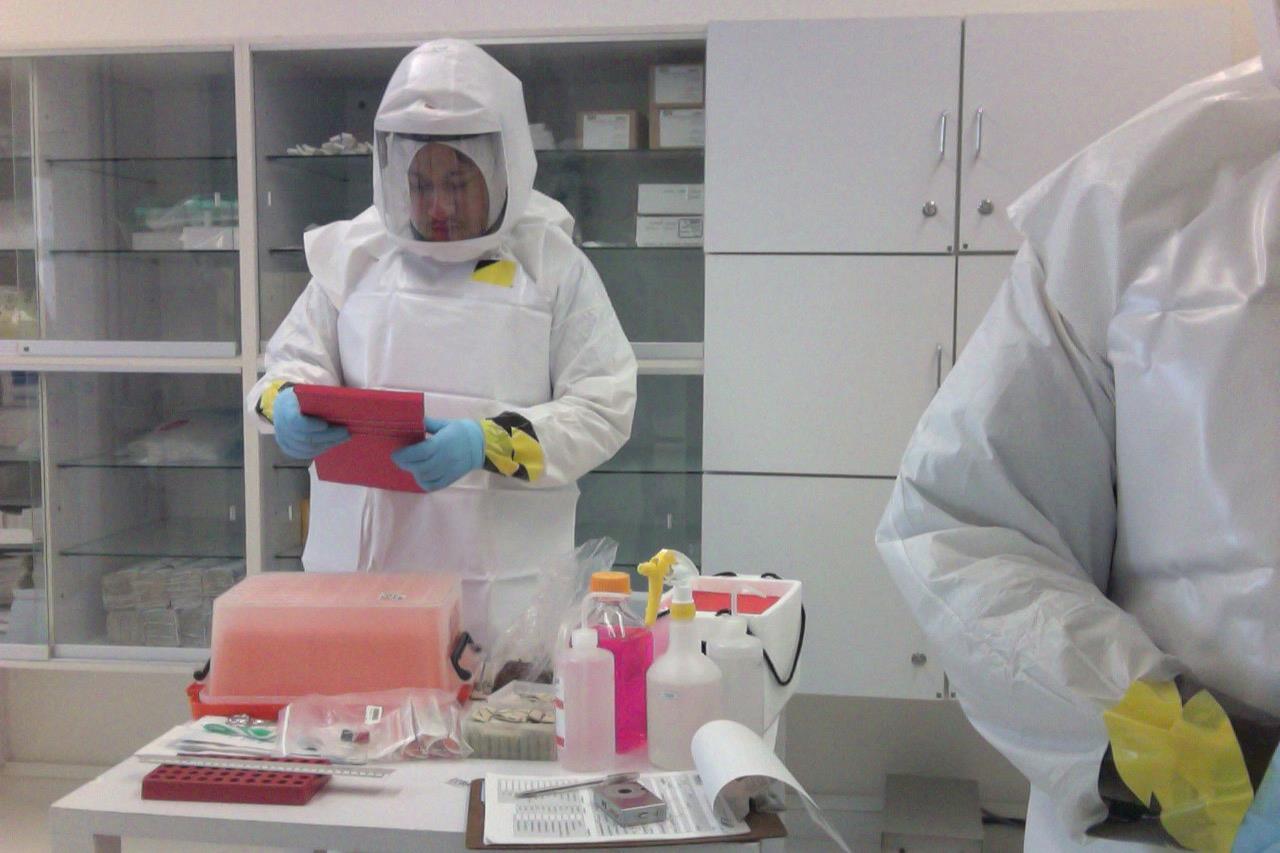
The CDC currently recommends N95 or higher level respirators for personnel exposed to patients with suspected or confirmed tuberculosis and other airborne diseases, especially during aerosol-generating procedures such as respiratory-tract suctioning.[29] It is important to apply, wear, and remove respirators appropriately to avoid contamination. See Figure 4.12[30] for CDC recommendations when wearing disposable respirators.
How to Put On (Don) PPE Gear
Follow agency policy for donning PPE according to transmission-based precautions. More than one donning method for putting on PPE may be acceptable. The CDC recommends the following steps for donning PPE[31]:
- Identify and gather the proper PPE to don. Ensure the gown size is correct.
- Perform hand hygiene using hand sanitizer or wash hands with soap and water.
- Put on the isolation gown. Tie all of the ties on the gown. Assistance may be needed by other health care personnel to tie back ties.
- Based on specific transmission-based precautions and agency policy, put on a mask or N95 respirator. The top strap should be placed on the crown (top) of the head, and the bottom strap should be at the base of the neck. If the mask has loops, hook them appropriately around your ears. Masks and respirators should extend under the chin, and both your mouth and nose should be protected. Perform a user-seal check each time you put on a respirator. If the respirator has a nosepiece, it should be fitted to the nose with both hands, but it should not be bent or tented. Masks typically require the nosepiece to be pinched to fit around the nose, but do not pinch the nosepiece of a respirator with one hand. Do not wear a respirator or mask under your chin or store it in the pocket of your scrubs between patients.
- Put on a face shield or goggles when indicated. When wearing an N95 respirator with eye protection, select eye protection that does not affect the fit or seal of the respirator and one that does not affect the position of the respirator. Goggles provide excellent protection for the eyes, but fogging is common. Face shields provide full-face coverage.
- Put on gloves. Gloves should cover the cuff (wrist) of the gown.
- You may now enter the patient’s room.
How to Take Off (Doff) PPE Gear
More than one doffing method for removing PPE may be acceptable. Train using your agency’s procedure, and practice until you have successfully mastered the steps to avoid contamination of yourself and others. There are established cases of nurses dying from disease transmitted during incorrect removal of PPE. Below are sample steps of doffing established by the CDC[34]:
- Remove the gloves. Ensure glove removal does not cause additional contamination of the hands. Gloves can be removed using more than one technique (e.g., glove-in-glove or bird beak).
- Remove the gown. Untie all ties (or unsnap all buttons). Some gown ties can be broken rather than untied; do so in a gentle manner and avoid a forceful movement. Reach up to the front of your shoulders and carefully pull the gown down and away from your body. Rolling the gown down is also an acceptable approach. Dispose of the gown in a trash receptacle. If it is a washable gown, place it in the specified laundry bin for PPE in the room.
- Health care personnel may now exit the patient room.
- Perform hand hygiene.
- Remove the face shield or goggles. Carefully remove the face shield or goggles by grabbing the strap and pulling upwards and away from head. Do not touch the front of the face shield or goggles.
- Remove and discard the respirator or face mask. Do not touch the front of the respirator or face mask. Remove the bottom strap by touching only the strap and bringing it carefully over the head. Grasp the top strap and bring it carefully over the head, and then pull the respirator away from the face without touching the front of the respirator. For masks, carefully untie (or unhook ties from the ears) and pull the mask away from your face without touching the front.
- Perform hand hygiene after removing the respirator/mask. If your workplace is practicing reuse, perform hand hygiene before putting it on again.
View a YouTube Video from the CDC on Putting on PPE[35]
View a YouTube Video from the CDC on Removing PPE[36]
Respiratory Hygiene
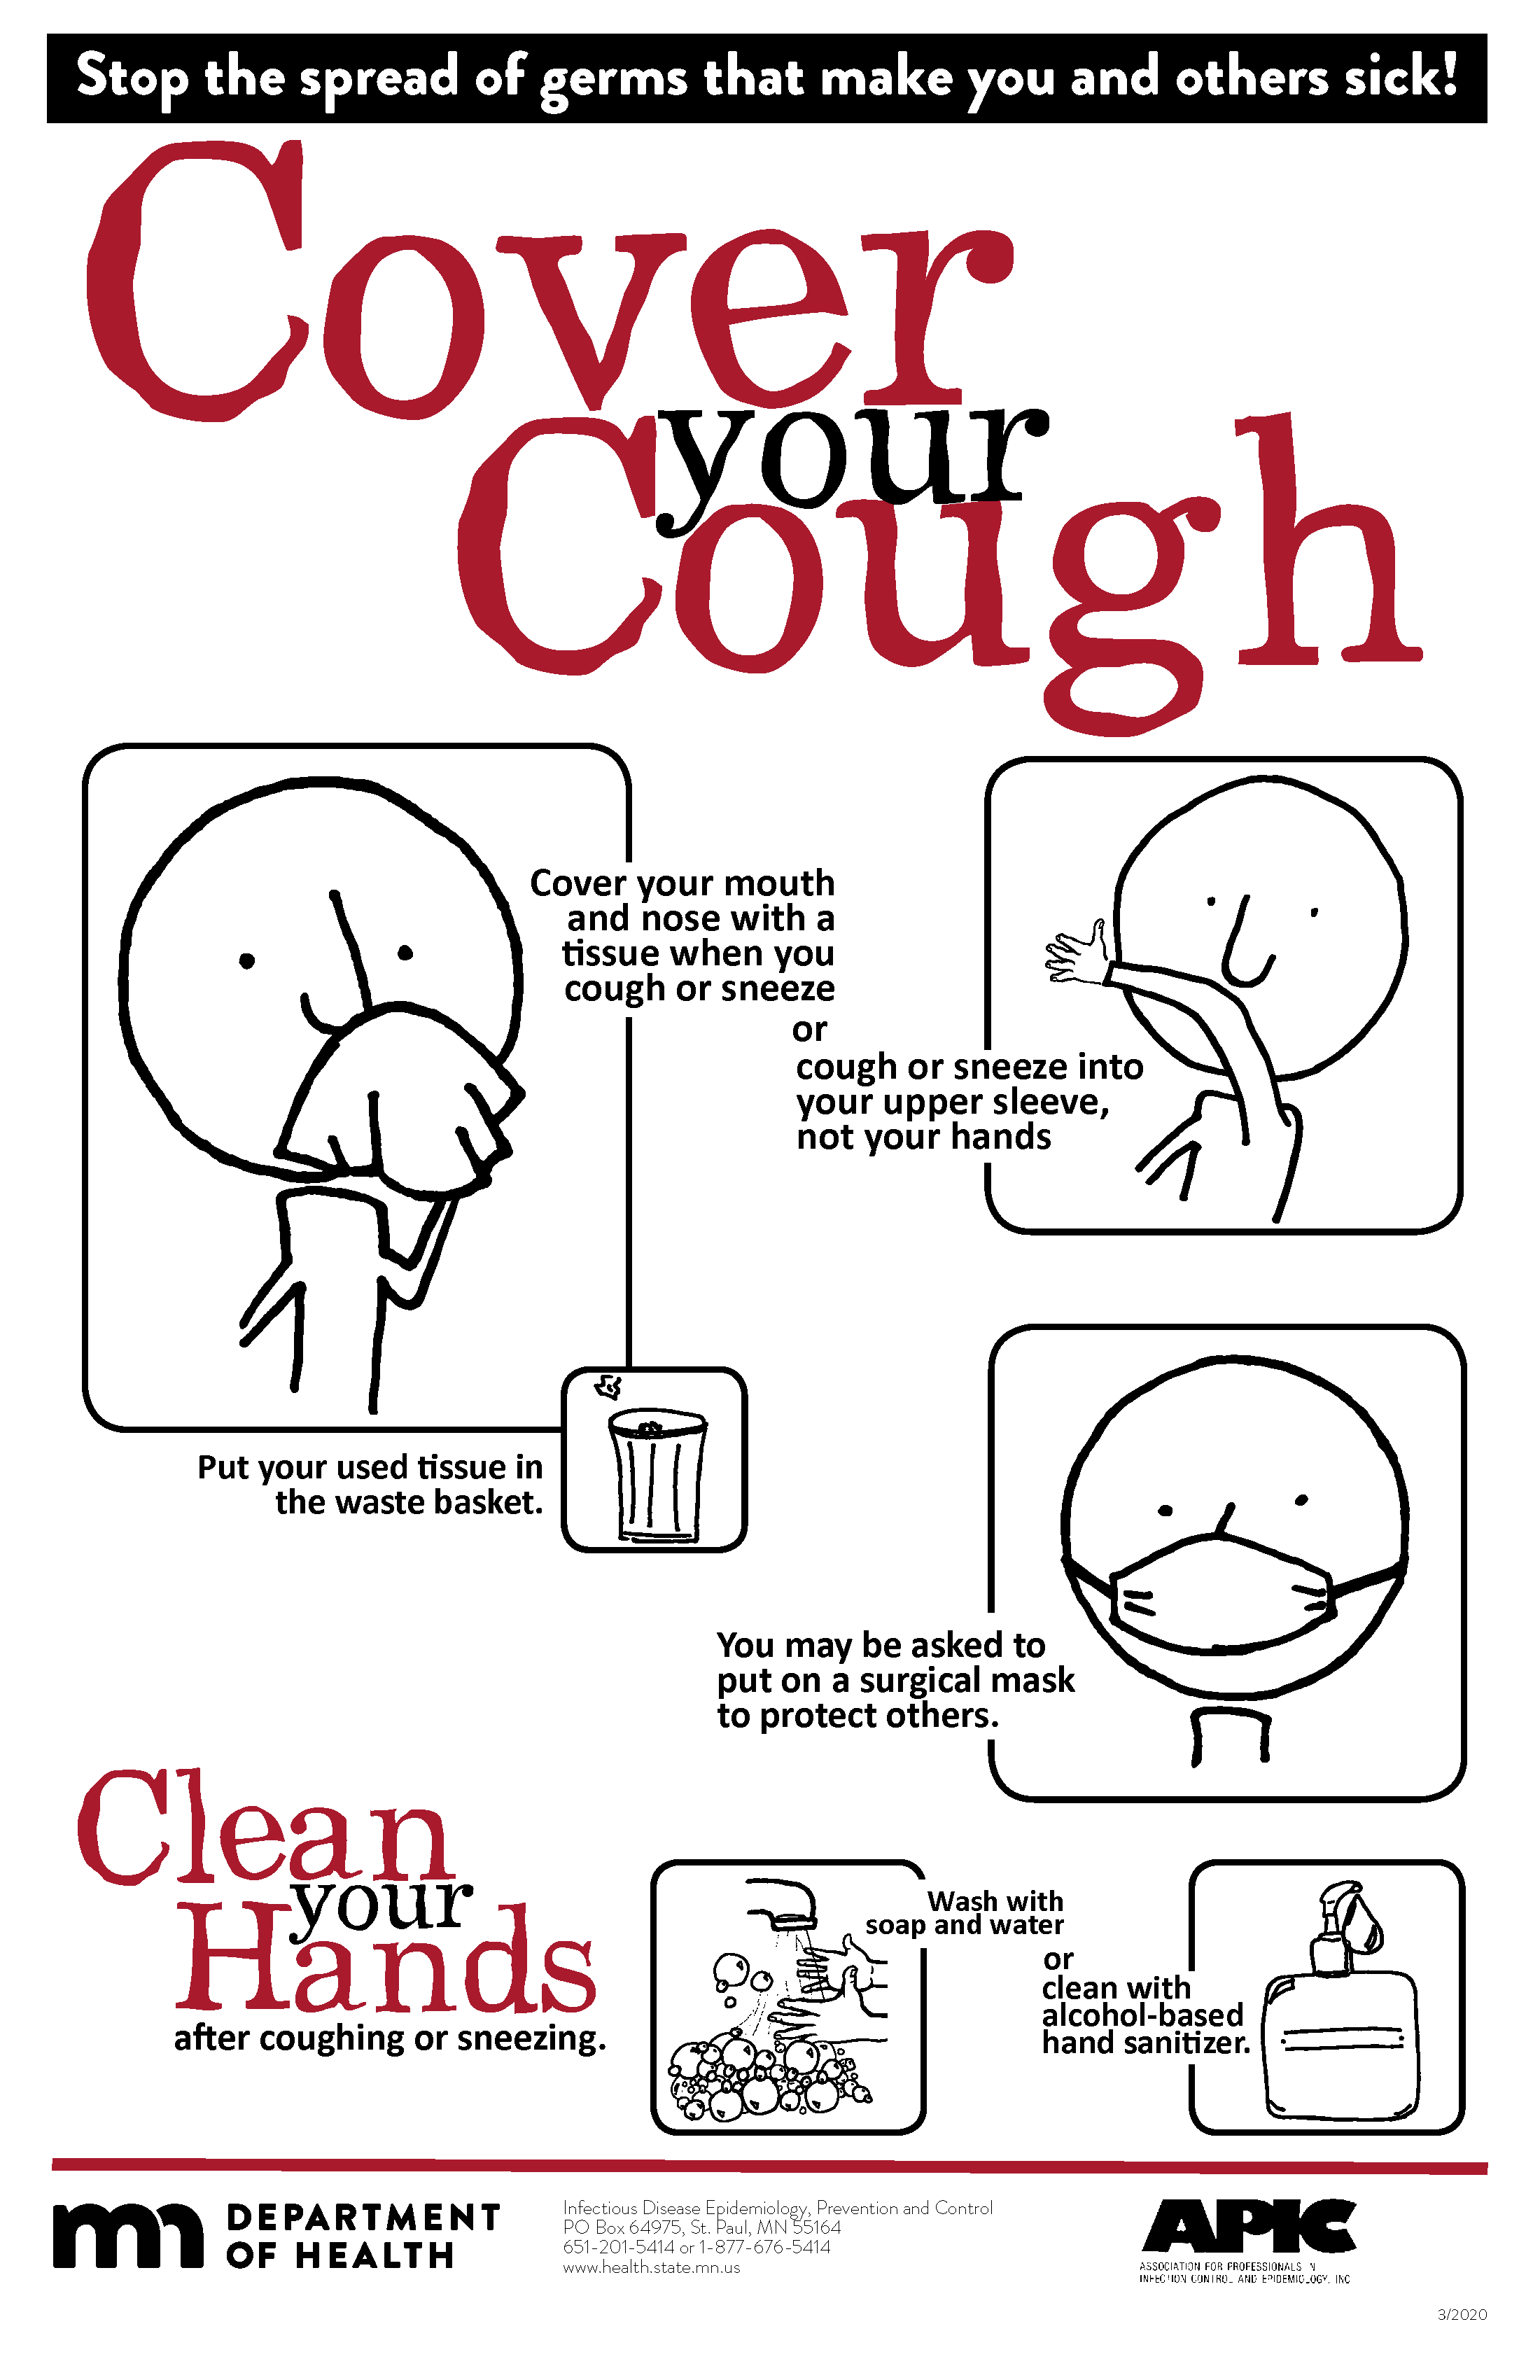
Respiratory hygiene is targeted at patients, accompanying family members and friends, and health care workers with undiagnosed transmissible respiratory infections. It applies to any person with signs of illness, including cough, congestion, rhinorrhea, or increased production of respiratory secretions when entering a health care facility. See Figure 4.13[37] for an example of a “Cover Your Cough” poster used in public areas to promote respiratory hygiene. The elements of respiratory hygiene include the following:
- Education of health care facility staff, patients, and visitors
- Posted signs, in language(s) appropriate to the population served, with instructions to patients and accompanying family members or friends
- Source control measures for a coughing person (e.g., covering the mouth/nose with a tissue when coughing and prompt disposal of used tissues, or applying surgical masks on the coughing person to contain secretions)
- Hand hygiene after contact with one’s respiratory secretions
- Spatial separation, ideally greater than 3 feet, of persons with respiratory infections in common waiting areas when possible.[38]
Health care personnel are advised to wear a mask and use frequent hand hygiene when examining and caring for patients with signs and symptoms of a respiratory infection. Health care personnel who have a respiratory infection are advised to avoid direct patient contact, especially with high-risk patients. If this is not possible, then a mask should be worn while providing patient care.[39]
Environmental Measures
Routine cleaning and disinfecting surfaces in patient-care areas are part of standard precautions. The cleaning and disinfecting of all patient-care areas are important for frequently touched surfaces, especially those closest to the patient that are most likely to be contaminated (e.g., bedrails, bedside tables, commodes, doorknobs, sinks, surfaces, and equipment in close proximity to the patient).
Medical equipment and instruments/devices must also be cleaned to prevent patient-to-patient transmission of infectious agents. For example, stethoscopes should be cleaned before and after use for all patients. Patients who have transmission-based precautions should have dedicated medical equipment that remains in their room (e.g., stethoscope, blood pressure cuff, thermometer). When dedicated equipment is not possible, such as a unit-wide bedside blood glucose monitor, disinfection after each patient’s use should be performed according to agency policy.[40]
Disposal of Contaminated Waste
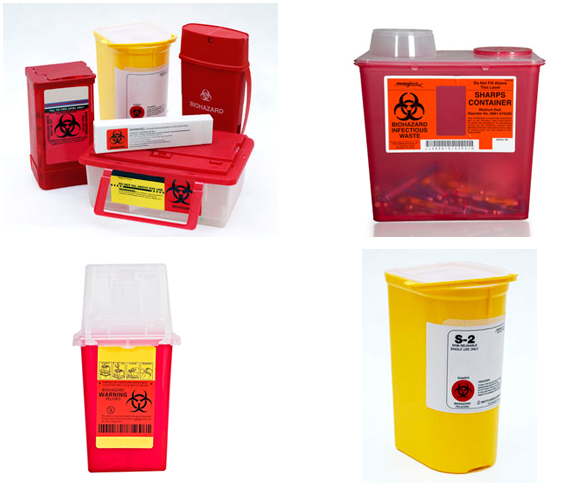
Medical waste requires careful disposal according to agency policy. The Occupational Safety and Health Administration (OSHA) has established measures for discarding regulated medical waste items to protect the workers who generate medical waste, as well as those who manage the waste from point of generation to disposal. Contaminated waste is placed in a leak-resistant biohazard bag, securely closed, and placed in a labeled, leakproof, puncture-resistant container in a storage area. Sharps containers are used to dispose of sharp items such as discarded tubes with small amounts of blood, scalpel blades, needles, and syringes.[41]
Sharps Safety
Injuries due to needles and other sharps have been associated with transmission of blood-borne pathogens (BBP), including hepatitis B, hepatitis C, and HIV to health care personnel. The prevention of sharps injuries is an essential element of standard precautions and includes measures to handle needles and other sharp devices in a manner that will prevent injury to the user and to others who may encounter the device during or after a procedure. The Bloodborne Pathogens Standard is a regulation that prescribes safeguards to protect workers against health hazards related to blood-borne pathogens. It includes work practice controls, hepatitis B vaccinations, hazard communication and training, plans for when an employee is exposed to a BBP, and recordkeeping.
When performing procedures that include needles or other sharps, dispose of these items immediately in FDA-cleared sharps disposal containers. Additionally, to prevent needlestick injuries, needles and other contaminated sharps should not be recapped. See Figure 4.14[42] for an image of a sharps disposal container. FDA-cleared sharps disposal containers are made from rigid plastic and come marked with a line that indicates when the container should be considered full, which means it’s time to dispose of the container. When a sharps disposal container is about three-quarters full, follow agency policy for proper disposal of the container.
If you are stuck by a needle or other sharps or are exposed to blood or other potentially infectious materials in your eyes, nose, mouth, or on broken skin, immediately flood the exposed area with water and clean any wound with soap and water. Report the incident immediately to your instructor or employer and seek immediate medical attention according to agency and school policy.
Textiles and Laundry
Soiled textiles, including bedding, towels, and patient or resident clothing may be contaminated with pathogenic microorganisms. However, the risk of disease transmission is negligible if they are handled, transported, and laundered in a safe manner. Follow agency policy for handling soiled laundry using standard precautions. Key principles for handling soiled laundry are as follows:
- Do not shake items or handle them in any way that may aerosolize infectious agents.
- Avoid contact of one’s body and personal clothing with the soiled items being handled.
- Place soiled items in a laundry bag or designated bin in the patient’s room before transporting to a laundry area. When laundry chutes are used, they must be maintained to minimize dispersion of aerosols from contaminated items.[43]
- Centers for Disease Control and Prevention. (2016, January 26). Standard precautions for all patient care. https://www.cdc.gov/infectioncontrol/basics/standard-precautions.html ↵
- Centers for Disease Control and Prevention. (2016, January 26). Standard precautions for all patient care. https://www.cdc.gov/infectioncontrol/basics/standard-precautions.html ↵
- Siegel, J. D., Rhinehart, E., Jackson, M., Chiarello, L., & Healthcare Infection Control Practices Advisory Committee. (2019, July 22). 2007 guideline for isolation precautions: Preventing transmission of infectious agents in healthcare settings. https://www.cdc.gov/infectioncontrol/guidelines/isolation/index.html ↵
- Siegel, J. D., Rhinehart, E., Jackson, M., Chiarello, L., & Healthcare Infection Control Practices Advisory Committee. (2019, July 22). 2007 guideline for isolation precautions: Preventing transmission of infectious agents in healthcare settings. https://www.cdc.gov/infectioncontrol/guidelines/isolation/index.html ↵
- Siegel, J. D., Rhinehart, E., Jackson, M., Chiarello, L., & Healthcare Infection Control Practices Advisory Committee. (2019, July 22). 2007 guideline for isolation precautions: Preventing transmission of infectious agents in healthcare settings. https://www.cdc.gov/infectioncontrol/guidelines/isolation/index.html ↵
- Centers for Disease Control and Prevention. (2019, April 29). Hand hygiene in healthcare settings. https://www.cdc.gov/handhygiene/ ↵
- The Joint Commission. (n.d.). Update: Citing observations of hand hygiene noncompliance. https://www.jointcommission.org/-/media/tjc/documents/standards/jc-requirements/ambulatory-care/2018/update_citing_observations_of_hand_hygiene_noncompliancepdf.pdf?db=web&hash=F89BFFFAEDA700CC2E667049D8F542B2 ↵
- World Health Organization. (n.d.). My 5 moments of hand hygiene. https://www.who.int/infection-prevention/campaigns/clean-hands/5moments/en/ ↵
- “5Moments_Image.gif” by World Health Organization is licensed under CC BY-NC-SA 3.0 IGO. Access for free at https://www.who.int/infection-prevention/campaigns/clean-hands/5moments/en/ ↵
- This work is derived from “Hand_Hygiene_When_and_How_Leaflet.pdf” by World Health Organization and is licensed under CC BY-NC-SA 3.0 IGO. Access for free at https://www.who.int/infection-prevention/tools/hand-hygiene/workplace_reminders/en/ ↵
- This work is derived from “Hand_Hygiene_When_and_How_Leaflet.pdf” by World Health Organization and is licensed under CC BY-NC-SA 3.0 IGO. Access for free at https://www.who.int/infection-prevention/tools/hand-hygiene/workplace_reminders/en/ ↵
- Centers for Disease Control and Prevention. (2019, April 29). Hand hygiene in healthcare settings. https://www.cdc.gov/handhygiene/ ↵
- “How_To_HandWash_Poster.pdf” by World Health Organization is licensed under CC BY-NC-SA 3.0 IGO. Access for free at https://www.who.int/infection-prevention/campaigns/clean-hands/5moments/en/ ↵
- Centers for Disease Control and Prevention. (2019, April 29). Hand hygiene in healthcare settings. https://www.cdc.gov/handhygiene/ ↵
- RegisteredNurseRN. (2018, December 1). Hand hygiene for healthcare workers | Hand washing soap and water technique nursing skill [Video]. YouTube. All rights reserved. Video used with permission. https://youtu.be/G5-Rp-6FMCQ ↵
- Centers for Disease Control and Prevention. (2016, January 26). Standard precautions for all patient care. https://www.cdc.gov/infectioncontrol/basics/standard-precautions.html ↵
- “Surgery Centre Accriditation.jpg” by Accredia is licensed under CC BY-SA 4.0 ↵
- Siegel, J. D., Rhinehart, E., Jackson, M., Chiarello, L., & Healthcare Infection Control Practices Advisory Committee. (2019, July 22). 2007 guideline for isolation precautions: Preventing transmission of infectious agents in healthcare settings. https://www.cdc.gov/infectioncontrol/guidelines/isolation/index.html ↵
- “poster-how-to-remove-gloves.pdf” by Centers for Disease Control and Prevention is in the Public Domain. Access for free at https://www.cdc.gov/vhf/ebola/resources/posters.html ↵
- Siegel, J. D., Rhinehart, E., Jackson, M., Chiarello, L., & Healthcare Infection Control Practices Advisory Committee. (2019, July 22). 2007 guideline for isolation precautions: Preventing transmission of infectious agents in healthcare settings. https://www.cdc.gov/infectioncontrol/guidelines/isolation/index.html ↵
- “U.S. Navy Doctors, Nurses and Corpsmen Treat COVID Patients in the ICU Aboard USNS Comfort (49825651378).jpg” by Navy Medicine is in the Public Domain. ↵
- Siegel, J. D., Rhinehart, E., Jackson, M., Chiarello, L., & Healthcare Infection Control Practices Advisory Committee. (2019, July 22). 2007 guideline for isolation precautions: Preventing transmission of infectious agents in healthcare settings. https://www.cdc.gov/infectioncontrol/guidelines/isolation/index.html ↵
- “USNS Comfort (T-AH 20) Performs Surgery (49803007781).jpg” by Navy Medicine is in the Public Domain. ↵
- Siegel, J. D., Rhinehart, E., Jackson, M., Chiarello, L., & Healthcare Infection Control Practices Advisory Committee. (2019, July 22). 2007 guideline for isolation precautions: Preventing transmission of infectious agents in healthcare settings. https://www.cdc.gov/infectioncontrol/guidelines/isolation/index.html ↵
- Siegel, J. D., Rhinehart, E., Jackson, M., Chiarello, L., & Healthcare Infection Control Practices Advisory Committee. (2019, July 22). 2007 guideline for isolation precautions: Preventing transmission of infectious agents in healthcare settings. https://www.cdc.gov/infectioncontrol/guidelines/isolation/index.html ↵
- “fs-facemask-dos-donts.pdf” by Centers for Disease Control and Prevention is in the Public Domain. Access for free at https://www.cdc.gov/coronavirus/2019-ncov/hcp/using-ppe.html ↵
- “Checking Personal Protective Equipment (PPE) in the fight against Ebola” by DFID - UK Department for International Development is licensed under CC BY 2.0 ↵
- “PAPRs_in_use_01.jpg" by Ca.garcia.s is licensed under CC BY-SA 4.0 ↵
- Siegel, J. D., Rhinehart, E., Jackson, M., Chiarello, L., & Healthcare Infection Control Practices Advisory Committee. (2019, July 22). 2007 guideline for isolation precautions: Preventing transmission of infectious agents in healthcare settings. https://www.cdc.gov/infectioncontrol/guidelines/isolation/index.html ↵
- “fs-respirator-on-off.pdf” by Centers for Disease Control and Prevention is in the Public Domain. Access for free at https://www.cdc.gov/coronavirus/2019-ncov/hcp/using-ppe.html ↵
- Centers for Disease Control and Prevention. (2020, August 19). Using personal protective equipment (PPE). https://www.cdc.gov/coronavirus/2019-ncov/hcp/using-ppe.html ↵
- RegisteredNurseRN. (2020, May 11). N95 mask - How to wear | N95 respirator nursing skill tutorial [Video]. YouTube. All rights reserved. Video used with permission. https://youtu.be/i-uD8rUwG48 ↵
- RegisteredNurseRN. (2020, May 29). PPE training video: Donning and doffing PPE nursing skill [Video]. YouTube. All rights reserved. Video used with permission. https://youtu.be/iwvnA_b9Q8Y ↵
- Centers for Disease Control and Prevention. (2020, August 19). Using personal protective equipment (PPE). https://www.cdc.gov/coronavirus/2019-ncov/hcp/using-ppe.html ↵
- Centers for Disease Control and Prevention. (2020, July 14). Demonstration of donning (putting on) personal protective equipment (PPE) [Video]. YouTube. All rights reserved. https://youtu.be/H4jQUBAlBrI ↵
- Centers for Disease Control and Prevention. (2020, April 21). Demonstration of doffing (taking off) personal protective equipment (PPE) [Video]. YouTube. All rights reserved. https://youtu.be/PQxOc13DxvQ ↵
- “cycphceng.pdf” by https://www.health.state.mn.us/index.html is in the Public Domain. ↵
- Siegel, J. D., Rhinehart, E., Jackson, M., Chiarello, L., & Healthcare Infection Control Practices Advisory Committee. (2019, July 22). 2007 guideline for isolation precautions: Preventing transmission of infectious agents in healthcare settings. https://www.cdc.gov/infectioncontrol/guidelines/isolation/index.html ↵
- Siegel, J. D., Rhinehart, E., Jackson, M., Chiarello, L., & Healthcare Infection Control Practices Advisory Committee. (2019, July 22). 2007 guideline for isolation precautions: Preventing transmission of infectious agents in healthcare settings. https://www.cdc.gov/infectioncontrol/guidelines/isolation/index.html ↵
- Siegel, J. D., Rhinehart, E., Jackson, M., Chiarello, L., & Healthcare Infection Control Practices Advisory Committee. (2019, July 22). 2007 guideline for isolation precautions: Preventing transmission of infectious agents in healthcare settings. https://www.cdc.gov/infectioncontrol/guidelines/isolation/index.html ↵
- Centers for Disease Control and Prevention. (2015, November 5). Background I. Regulated medical waste. https://www.cdc.gov/infectioncontrol/guidelines/environmental/background/medical-waste.html#i3 ↵
- “Sharps-Containers.jpg” by Federal Drug Administration (FDA) is in the Public Domain. Access for free at https://www.fda.gov/medical-devices/safely-using-sharps-needles-and-syringes-home-work-and-travel/sharps-disposal-containers ↵
- Siegel, J. D., Rhinehart, E., Jackson, M., Chiarello, L., & Healthcare Infection Control Practices Advisory Committee. (2019, July 22). 2007 guideline for isolation precautions: Preventing transmission of infectious agents in healthcare settings. https://www.cdc.gov/infectioncontrol/guidelines/isolation/index.html ↵
Skin
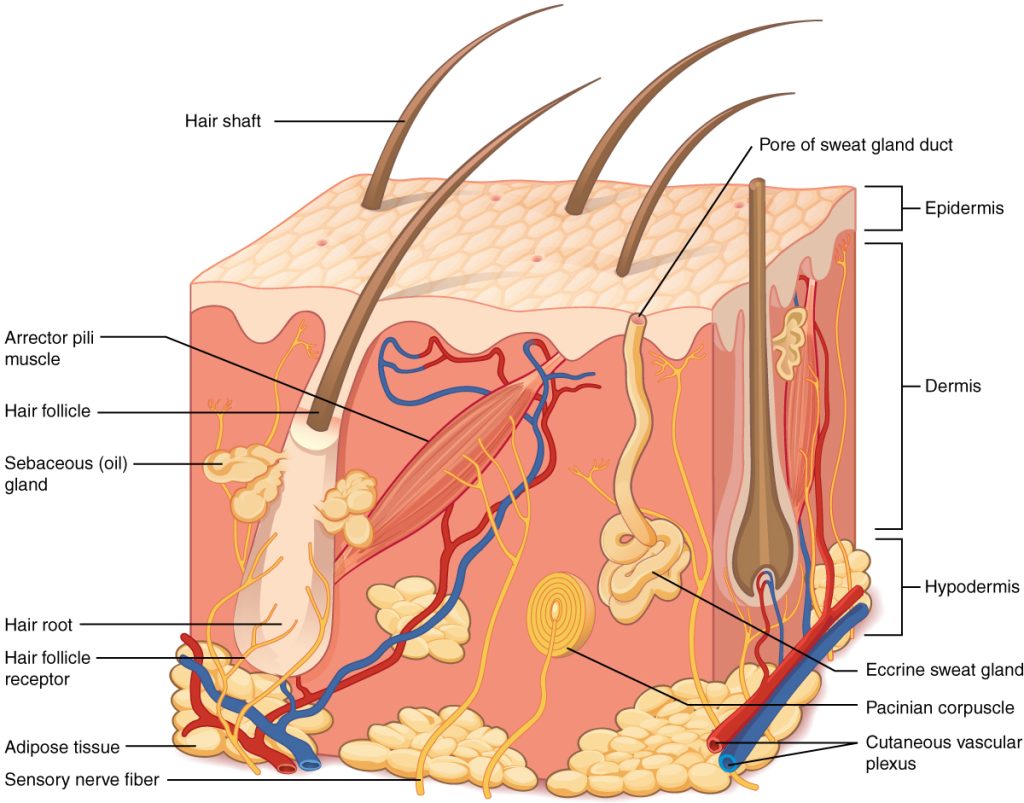
Skin is made up of three layers: epidermis, dermis, and hypodermis. See Figure 10.1[1] for an illustration of skin layers. The epidermis is the thin, topmost layer of the skin. It contains sweat gland duct openings and the visible part of hair known as the hair shaft. Underneath the epidermis lies the dermis where many essential components of skin function are located. The dermis contains hair follicles (the roots of hair shafts), sebaceous oil glands, blood vessels, endocrine sweat glands, and nerve endings. The bottommost layer of skin is the hypodermis (also referred to as the subcutaneous layer). It mostly consists of adipose tissue (fat), along with some blood vessels and nerve endings. Beneath the hypodermis layer lies bone, muscle, ligaments, and tendons.
Hair
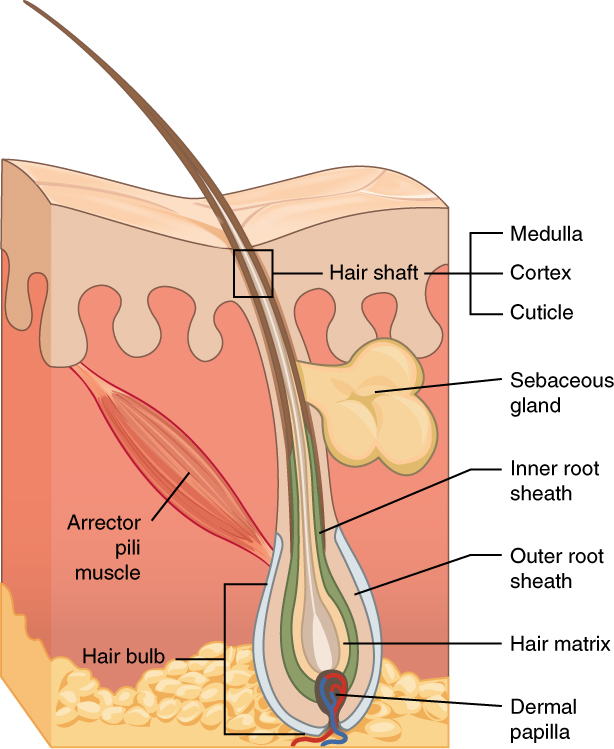
Hair is a filament that grows from a hair follicle in the dermis of the skin. See Figure 10.2[2] for an illustration of a hair follicle. It consists mainly of tightly packed, keratin-filled cells called keratinocytes. The human body is covered with hair follicles except for the mucous membranes, lips, palms of the hands, and soles of the feet. The part of the hair that is located within the follicle is called the hair root, the only living part of the hair. The part of the hair that is visible above the surface of the skin is the hair shaft. The shaft of the hair has no biochemical activity and is considered dead.
Functions of Hair
The functions of head hair are to provide insulation to retain heat and to protect the skin from damage by UV light. The function of hair in other locations on the body is debated. One idea is that body hair helps to keep us warm in cold weather. When the body is cold, the arrector pili muscles contract, causing hairs to stand up and trapping a layer of warm air above the epidermis. However, this action is more effective in mammals that have thick hair than it is in relatively hairless human beings.
Human hair has an important sensory function as well. Sensory receptors in the hair follicles can sense when the hair moves, whether it is because of a breeze or the touch of a physical object. Some hairs, such as the eyelashes, are especially sensitive to the presence of potentially harmful matter. The eyebrows protect the eyes from dirt, sweat, and rain. In addition, the eyebrows play a key role in nonverbal communication by expressing emotions such as sadness, anger, surprise, and excitement.[3]
Nails
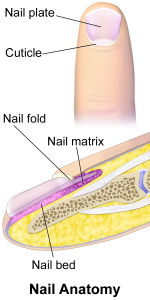
Nails are accessory organs of the skin. They are made of sheets of dead keratinocytes and are found on the distal ends of the fingers and toes. The keratin in nails makes them hard but flexible. Nails serve a number of purposes, including protecting the fingers, enhancing sensations, and acting like tools. A nail has three main parts: root, plate, and free margin. Other structures around or under the nail include the nail bed, cuticle, and nail fold. See Figure 10.3 for an illustration of the structure of a nail.[4],[5] The top diagram in this figure shows the external, visible part of the nail and the cuticle. The bottom diagram shows internal structures in a cross-section of the nail and nail bed.
Impaired Skin and Tissue Integrity
Skin integrity is a medical term that refers to skin health. Impaired skin integrity is a NANDA-I nursing diagnosis defined as, “Altered epidermis/or dermis.”[6] However, when deeper layers of the skin or integumentary structures are damaged, it is referred to as impaired tissue integrity. The NANDA-I definition of impaired tissue integrity is, “Damage to the mucous membrane, cornea, integumentary system, muscular fascia, muscle, tendon, bone, cartilage, joint capsule, and/or ligament.”[7]
Risk Factors Affecting Skin Health and Wound Healing
There are several risk factors that place a client at increased risk for altered skin health and delayed wound healing. Risk factors include impaired circulation and oxygenation, impaired immune function, diabetes, inadequate nutrition, obesity, exposure to moisture, smoking, and age. Each of these risk factors is discussed in more detail in the following subsections.
Impaired Circulation and Oxygenation
Skin, like every other organ in the body, depends on good blood perfusion to keep it healthy and functioning correctly. Cardiovascular circulation delivers important oxygen, nutrients, infection-fighting cells, and clotting factors to tissues. These elements are needed by skin, tissues, and nerves to properly grow, function, and repair damage. Without good cardiovascular circulation, skin becomes damaged. Damage can occur from poor blood perfusion from the arteries, as well as from poor return of blood through the veins to the heart. Common medical conditions that decrease cardiovascular circulation include cardiac disease, diabetes, and peripheral vascular disease (PVD). PVD includes two medical conditions called arterial insufficiency and venous insufficiency.
Arterial Insufficiency
Arterial insufficiency refers to a lack of adequately oxygenated blood movement in arteries to specific tissues. Arterial insufficiency can be a sudden, acute lack of oxygenated blood, such as when a blood clot in an artery blocks blood flow to a specific area. Arterial insufficiency can also be a chronic condition caused by peripheral vascular disease (PVD). As a person’s arteries become blocked with plaque due to atherosclerosis, there is decreased blood flow to the tissues. Signs of arterial insufficiency are cool skin temperature, pale skin color, pain that increases with exercise, and possible arterial ulcers.
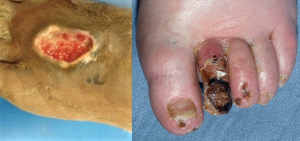
When oxygenated blood flow to tissues becomes inadequate, the tissue dies. This is called necrosis. Tissue death causes the skin and tissue to become necrotic (black). Necrotic tissue does not heal, so surgical debridement or amputation of the extremity becomes necessary for healing. See Figure 10.4[8] for images of an arterial insufficiency ulcer and necrotic toes.
Venous Insufficiency
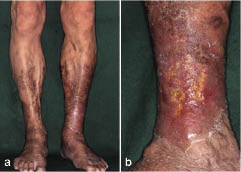
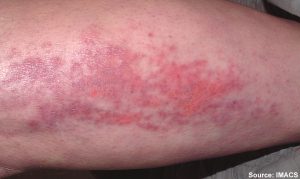
Venous insufficiency occurs when the cardiovascular system cannot adequately return blood and fluid from the extremities to the heart. Venous insufficiency can cause stasis dermatitis when blood pools in the lower legs and leaks out into the skin and other tissues. Signs of venous insufficiency are edema, a brownish-leathery appearance to skin in the lower extremities, and venous ulcers that weep fluid.[9] See Figure 10.5[10] for an image of stasis dermatitis.
Impaired Immune Function
Skin contributes to the body’s immune function and is also affected by the immune system. Intact skin provides an excellent first line of defense against microorganisms entering the body. This is why it is essential to keep skin intact. If skin does break down, the next line of defense is a strong immune system that attacks harmful invading organisms. However, if the immune system is not working well, the body is much more susceptible to infections. This is why maintaining intact skin, especially in the presence of an impaired immune system, is imperative to decrease the risk of infections.
Stress can cause an impaired immune response that results in delayed wound healing.[11] Being hospitalized or undergoing surgery triggers the stress response in many clients. Medications, such as corticosteroids, also affect a client’s immune function and can impair wound healing.[12] When assessing a chronic wound that is not healing as expected, it is important to consider the potential effects of stress and medications.
Diabetes
Diabetes can cause wounds to develop, as well as delayed healing of wounds. This is due to elevated blood glucose causing stiffening of arterial walls, resulting in decreased circulation and tissue hypoxia. Elevated blood glucose also reduces leukocyte function, directly affecting wound healing and risk for infection. Additionally, if clients with diabetes also have diabetic neuropathy, they do not feel pain associated with skin injuries, resulting in delayed treatment and further risk of infection.[13] Nurses provide vital health teaching to clients with diabetes to help them effectively manage the disease and prevent complications.
Read more about diabetes in the “Antidiabetics” section of the “Endocrine” chapter in Open RN Nursing Pharmacology, 2e.
Inadequate Nutrition
A healthy diet is essential for maintaining healthy skin, as well as maintaining an appropriate weight. Nutrients that are particularly important for skin health include protein; vitamins A, C, D, and E; and minerals such as selenium, copper, and zinc.[14]
Nutritional deficiencies can have a profound impact on wound healing and must be addressed for chronic wounds to heal. Protein is one of the most important nutritional factors affecting wound healing. For example, in clients with pressure injuries, 30 to 35 kcal/kg of calorie intake with 1.25 to 1.5g/kg of protein and micronutrients supplementation are recommended daily.[15] In addition, vitamin C and zinc have many roles in wound healing. It is important to collaborate with a dietician to identify and manage nutritional deficiencies when a client is experiencing poor wound healing.[16]
Obesity
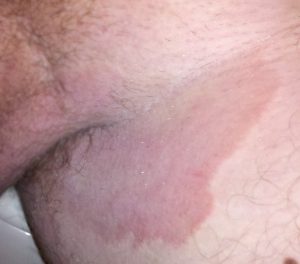
In the same way a balanced diet is vital for healthy skin, a healthy weight is also imperative. Obese individuals are at increased risk for fungal and yeast infections in skin folds caused by increased moisture and friction. See Figure 10.6[17] for an image of a fungal infection in the groin.[18] Symptoms of yeast and fungal infection include redness and scaliness of the skin associated with itching.
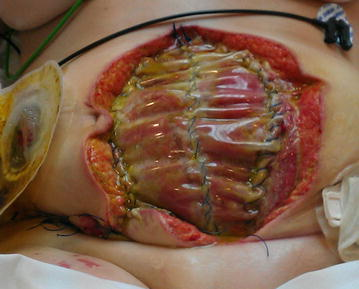
Obese clients also are at higher risk for wound complications due to a decreased supply of oxygenated blood flow to adipose tissue. Potential complications include infection, dehiscence (separation of the edges of a surgical wound), hematoma formation, pressure injuries, and venous ulcers.[19] Evisceration is a rare but severe complication when an abdominal surgical incision separates and the abdominal organs protrude or come out of the incision. Nurses can educate clients about making healthy lifestyle choices to reduce obesity and the risk of dehiscence. See Figure 10.7[20] for an image of a dehiscence in an abdominal surgical wound of an obese client.
Exposure to Moisture
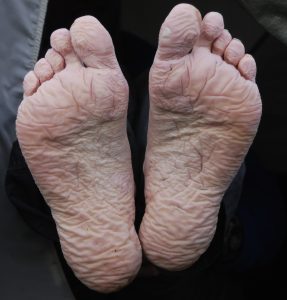
Healthy skin needs good moisture balance. If too much moisture (i.e., sweat, urine, or water) is left on the skin for extended periods of time, the skin will become soggy, wrinkly, and turn whiter than usual and is called maceration. A simple example of maceration is when you spend too much time in a bathtub and your fingers and toes turn white and get “pruny.” See Figure 10.8[21] for an image of maceration. If healthy skin is exposed to moisture for an extended period of time, such as when a moist wound dressing is incorrectly applied on healthy skin, the skin will break down. This type of skin breakdown is called excoriation. Excoriation refers to removal of the topmost surface of the skin, which results in redness and abrasions. See Figure 10.9[22] for an image of excoriation.
The opposite occurs when skin lacks proper moisture. Skin becomes flaky, itchy, and cracked when it becomes too dry. Conditions such as decreased moisture in the air during cold winter months or bathing in hot water can worsen skin dryness. Dry skin, especially when accompanied with cracking, breaks the protective barrier and increases the risk of infection. It is important for nurses to apply emollient cream to clients’ areas of dry skin to maintain the protective skin barrier.
Smoking
Smoking impacts the inflammatory phase of the wound healing process, which can result in poor wound healing and an increased risk of infection, wound dehiscence, and necrosis. This is likely due to tissue hypoxia caused by toxins in tobacco smoke such as carbon monoxide and hydrogen cyanide, as well as vasoconstriction caused by nicotine.[23],[24] Clients who smoke should be encouraged to stop smoking.
Age
Older adults have thin, less elastic skin that puts them at increased risk for injury. They also have an altered inflammatory response that can impair wound healing. Additionally, the elderly are at risk for poor nutrition that contributes to poor wound healing. Nurses teach older clients about the importance of exercise for skin health and improved wound healing as appropriate.[25]
Phases of Wound Healing
When skin is injured, there are four phases of wound healing that take place: hemostasis, inflammatory, proliferative, and maturation. See Figure 10.10[26] for an illustration of wound healing demonstrating hemostasis/inflammation, proliferation, and maturation.
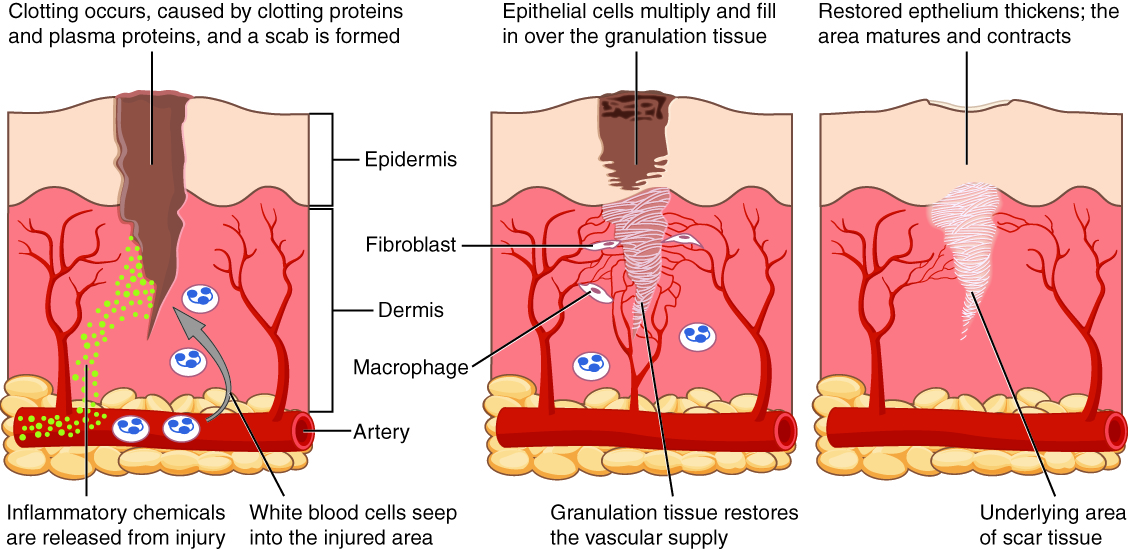
To illustrate the phases of wound healing, imagine that you accidentally cut your finger with a knife as you were slicing an apple for a snack. Immediately after the injury occurs, blood vessels constrict and clotting factors are activated. This is referred to as the hemostasis phase. Clotting factors are released to form clots and to stop the bleeding. Platelets release growth factors that alert various cells to start the repair process at the wound location. The hemostasis phase lasts up to 60 minutes, depending on the severity of the injury.[27],[28]
After the hemostasis phase, the inflammatory phase begins. Vasodilation occurs so that white blood cells in the bloodstream can move to the location of the wound and start cleaning the wound bed. The inflammatory process appears as edema (swelling), erythema (redness), and exudate. Exudate is fluid that oozes out of a wound, such as pus or other drainage.[29],[30]
The proliferative phase of wound healing begins within a few days after the injury and includes four important processes: epithelialization, angiogenesis, collagen formation, and contraction. Epithelialization refers to the development of new epidermis and granulation tissue. Granulation tissue is new connective tissue with new, fragile, thin-walled capillaries. Collagen is also formed to provide strength and integrity to the wound. At the end of the proliferation phase, the wound begins to contract in size.[31],[32]
Capillaries begin to develop within the wound 24 hours after injury during a process called angiogenesis. These capillaries bring more oxygen and nutrients to the wound for healing. When performing dressing changes, it is essential for the nurse to protect this granulation tissue and the associated new capillaries. Healthy granulation tissue appears pink due to the new capillary formation. It is moist, painless to the touch, and may appear “bumpy.” Conversely, unhealthy granulation tissue is dark red and painful. It bleeds easily with minimal contact and may be covered by shiny white or yellow fibrous tissue, referred to as biofilm, that impairs healing and should be removed by a trained health care provider. Unhealthy granulation tissue is often caused by an infection, so wound cultures should be obtained when infection is suspected.[33]
During the maturation phase, collagen continues to be created to strengthen the wound. Collagen contributes strength to the wound to prevent it from reopening. A wound typically heals within 4-5 weeks and often leaves behind a scar. The scar tissue is initially firm, red, and slightly raised from the excess collagen deposition. In roughly nine months, the scar begins to soften, flatten, and become pale.[34],[35]
Types of Wound Healing
There are three types of wound healing: primary intention, secondary intention, and tertiary intention. Healing by primary intention means that the wound is sutured, stapled, glued, or otherwise closed so the wound heals beneath the closure. This type of healing occurs with clean-edged lacerations or surgical incisions, and the closed edges are referred to as approximated. See Figure 10.11[36] for an image of a surgical wound healing by primary intention with approximated edges.

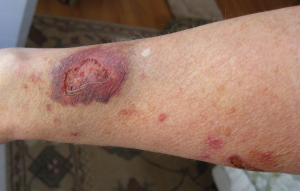
Secondary intention occurs when the edges of a wound cannot be approximated (brought together), so the wound heals by filling in from the bottom up with the production of granulation tissue. Examples of common wounds that heal by secondary intention are pressure injuries and skin tears. Wounds that heal by secondary infection are at higher risk for infection and must be protected from contamination. See Figure 10.12[37] for an image of a wound that if left untreated, would heal by secondary intention.
Tertiary intention refers to the healing of a wound that has had to remain open or has been reopened, often due to severe infection or swelling. The wound is typically closed at a later date when infection or swelling has resolved. Wounds that heal by secondary and tertiary intention have delayed healing times and increased risk for infection and scar tissue.
Types of Wounds
There are many common types of wounds that nurses care for, such as skin tears, venous ulcers, arterial ulcers, diabetic ulcers, and pressure injuries.
Wound Care
Wound care includes assessing and cleansing wounds, performing dressing changes, and implementing interventions to promote wound healing. Assessing wounds and implementing interventions to promote wound healing are further discussed in the "Applying the Nursing Process" section later in this chapter.
Phases of Wound Healing
When skin is injured, there are four phases of wound healing that take place: hemostasis, inflammatory, proliferative, and maturation. See Figure 10.10[38] for an illustration of wound healing demonstrating hemostasis/inflammation, proliferation, and maturation.

To illustrate the phases of wound healing, imagine that you accidentally cut your finger with a knife as you were slicing an apple for a snack. Immediately after the injury occurs, blood vessels constrict and clotting factors are activated. This is referred to as the hemostasis phase. Clotting factors are released to form clots and to stop the bleeding. Platelets release growth factors that alert various cells to start the repair process at the wound location. The hemostasis phase lasts up to 60 minutes, depending on the severity of the injury.[39],[40]
After the hemostasis phase, the inflammatory phase begins. Vasodilation occurs so that white blood cells in the bloodstream can move to the location of the wound and start cleaning the wound bed. The inflammatory process appears as edema (swelling), erythema (redness), and exudate. Exudate is fluid that oozes out of a wound, such as pus or other drainage.[41],[42]
The proliferative phase of wound healing begins within a few days after the injury and includes four important processes: epithelialization, angiogenesis, collagen formation, and contraction. Epithelialization refers to the development of new epidermis and granulation tissue. Granulation tissue is new connective tissue with new, fragile, thin-walled capillaries. Collagen is also formed to provide strength and integrity to the wound. At the end of the proliferation phase, the wound begins to contract in size.[43],[44]
Capillaries begin to develop within the wound 24 hours after injury during a process called angiogenesis. These capillaries bring more oxygen and nutrients to the wound for healing. When performing dressing changes, it is essential for the nurse to protect this granulation tissue and the associated new capillaries. Healthy granulation tissue appears pink due to the new capillary formation. It is moist, painless to the touch, and may appear “bumpy.” Conversely, unhealthy granulation tissue is dark red and painful. It bleeds easily with minimal contact and may be covered by shiny white or yellow fibrous tissue, referred to as biofilm, that impairs healing and should be removed by a trained health care provider. Unhealthy granulation tissue is often caused by an infection, so wound cultures should be obtained when infection is suspected.[45]
During the maturation phase, collagen continues to be created to strengthen the wound. Collagen contributes strength to the wound to prevent it from reopening. A wound typically heals within 4-5 weeks and often leaves behind a scar. The scar tissue is initially firm, red, and slightly raised from the excess collagen deposition. In roughly nine months, the scar begins to soften, flatten, and become pale.[46],[47]
Types of Wound Healing
There are three types of wound healing: primary intention, secondary intention, and tertiary intention. Healing by primary intention means that the wound is sutured, stapled, glued, or otherwise closed so the wound heals beneath the closure. This type of healing occurs with clean-edged lacerations or surgical incisions, and the closed edges are referred to as approximated. See Figure 10.11[48] for an image of a surgical wound healing by primary intention with approximated edges.

Secondary intention occurs when the edges of a wound cannot be approximated (brought together), so the wound heals by filling in from the bottom up with the production of granulation tissue. Examples of common wounds that heal by secondary intention are pressure injuries and skin tears. Wounds that heal by secondary infection are at higher risk for infection and must be protected from contamination. See Figure 10.12[49] for an image of a wound that if left untreated, would heal by secondary intention.

Tertiary intention refers to the healing of a wound that has had to remain open or has been reopened, often due to severe infection or swelling. The wound is typically closed at a later date when infection or swelling has resolved. Wounds that heal by secondary and tertiary intention have delayed healing times and increased risk for infection and scar tissue.
Types of Wounds
There are many common types of wounds that nurses care for, such as skin tears, venous ulcers, arterial ulcers, diabetic ulcers, and pressure injuries.
Wound Care
Wound care includes assessing and cleansing wounds, performing dressing changes, and implementing interventions to promote wound healing. Assessing wounds and implementing interventions to promote wound healing are further discussed in the "Applying the Nursing Process" section later in this chapter.
Review the following example of applying the nursing process to a client with a pressure injury.
Client Scenario

Ms. Betty Pruitt is a 92-year-old female admitted to a skilled nursing facility after a fall at her daughter’s home while transferring the client from her bed to a wheelchair. See Figure 10.24 for an image of Ms. Pruitt.[50] Although no injury was sustained, it became clear to the family that they could no longer provide adequate care at home.
Ms. Pruitt’s past medical history includes congestive heart failure, hypertension, hypercholesterolemia, and moderate stage Alzheimer's disease. Her cognitive ability has significantly declined over the last six months. Her speech continues to be mostly clear and at times coherent, but she tends to be quiet and does not express her needs adequately, even with prompting. She no longer has the ability to ambulate but can stand for short periods of time, requiring two people to transfer. She rarely changes body position without encouragement and assistance, spending most of her days in a recliner or bed. Ms. Pruitt is 69 inches tall and currently weighs 122 pounds, having lost 22 pounds over the last three months. BMI is 18. Her family reports her appetite is poor, and she eats only in small amounts at mealtimes with feeding assistance. She does take liquids well and shows no swallowing difficulties at this time. Ms. Pruitt is incontinent of urine and stool most of the time but will use the toilet if offered and given transfer help. A skin assessment revealed a Stage III pressure injury on her coccyx area that is unknown to the family. The wound measures 4 cm long, 4 cm wide, and 3 cm deep, with adipose tissue visible but no undermining or tunneling visible. There is a scant amount of yellowish purulent drainage noted with a slight foul odor, redness, and increased heat around the wound present.
A Braden Scale Risk Assessment was completed and revealed a total score of 12 (High Risk) with the following category scores: Sensory Perception-3, Moisture-2, Activity-2, Mobility-2, Nutrition-2, Friction & Shear-1.
Applying the Nursing Process
Based on this information, the following nursing care plan was implemented for Ms. Pruitt.
Nursing Diagnosis: Impaired Tissue Integrity related to imbalanced nutritional state and associated with impaired mobility as evidenced by damaged tissue, redness, area hot to touch.
Overall Goal: The client will experience wound healing demonstrated by decreased wound size and increased granulation tissue.
SMART Expected Outcome: Ms. Pruitt will have a 50% reduction in wound dimensions (from 4 cm in diameter to 2 cm) within two weeks.
Planned Nursing Interventions With Rationale: See Table 10.7 for a list of planned nursing interventions with rationale.
Table 10.7 Selected Interventions and Rationale for Ms. Pruitt
| Interventions | Rationale |
|---|---|
| 1. Assess and document wound characteristics every shift, including size (length x width x depth), stage (I-IV), location, exudate, presence of granulation tissue, and epithelization. | Consistent and accurate documentation of wounds is important in determining the progression of wound healing and effectiveness of treatments. |
| 2. Monitor for signs of infection (color, temperature, edema, moisture, pain, and appearance of surrounding skin). | Frequent monitoring for possible wound infection provides the ability to intervene quickly if changes in the wound are noted. |
| 3. Offer PRN pain medications prior to dressing changes if pain is present. | Dressing changes may be painful for clients. PRN pain medications should be offered in advance of the procedure for effective pain management. |
| 4. Cleanse wound and periwound area (skin around the wound) per facility protocol or as ordered. | Removal of exudate, dirt, and slough promotes wound healing. Decreasing the number of microorganisms around the wound may decrease the chance of wound infection. |
| 5. Apply and change wound dressings, per facility protocol or wound orders. | Dressings that maintain moisture in the wound keep periwound skin dry, absorb drainage, and pad the wound to protect from further injury assist in healing. |
| 6. Turn/reposition the client every two hours and position with pillows as needed. | Frequent repositioning relieves pressure point areas from damage. Avoid positioning the client directly on an injured area if possible. |
| 7. Consider the use of a specialty mattress, bed, or chair pad. | Specialty mattresses, beds, or pads offer added padding and support, while decreasing pressure areas. |
| 8. Use moisture barrier ointments (protective skin barriers). | Moisture barrier ointments can significantly decrease skin breakdown and pressure injury formation. |
| 9. Check incontinence pads frequently (every two to three hours) and change as needed to keep dry. | Frequent changing of soiled pads will prevent exposure to chemicals in urine and stool that erode the skin. |
| 10. Monitor nutritional status and obtain order for dietary consult if needed. | Optimizing nutritional intake, including calories, protein, and vitamins, is essential to promote wound healing. |
| 11. Offer nutritional supplements and water. | Nutritional supplements, such as protein shakes, can provide additional calories and protein without a large volume of intake needed. Water intake is essential for proper tissue hydration. |
| 12. Keep bed linens clean, dry, and wrinkle free. | Soiled, wet, or wrinkled sheets may contribute to skin breakdown. |
| 13. Use a minimum of two-person assistance and a draw sheet to pull the client up in bed. | Carefully transferring clients avoids adverse effects of external mechanical forces (pressure, friction, and shear) from causing skin or tissue damage. |
Interventions Implemented:
After the admission assessment was completed, Ms. Pruitt became settled in her new room. The wound was assessed, documented, and cleansed. A specimen for wound culture was obtained and a wound dressing applied per protocol. The health care provider was notified of the wound. Requests were made for a wound culture, referrals to a wound care nurse specialist and a dietician, and a pressure-relieving mattress for the bed. A two-hour turning schedule was implemented, and the CNA was reminded to use two-person assistance with a lift sheet when repositioning the client. A barrier cream was applied to protect the peri-area whenever a new incontinence pad was placed. The following documentation note was entered in the client chart.
Sample Documentation:
7/1/2024 1030: On admission, a Stage III pressure injury was discovered on the client’s coccyx area. The wound measured 4 cm long, 4 cm wide, 3 cm deep, with adipose tissue visible. No undermining, tunneling, bone, muscle, or tendons visible. A small amount of yellow purulent drainage noted. Slight foul odor, with redness, and increased heat around the wound present. Wound was cleansed with normal saline and packed with moist gauze and covered with hydrogel dressing. Client tolerated the procedure well and gave no evidence of pain. A pressure-relieving mattress was placed on the client’s bed and a two-hour turning schedule was implemented. Client voided x 1 and the pad was changed. Barrier cream was applied to the perineal area. Client encouraged to rest until lunchtime and is resting comfortably at this time. -S. Jones, RN
Evaluation:
After two weeks, the measurements of the wound were compared to those on admission and the wound decreased in size to less than 2 cm. The expected outcome was "met." A new expected outcome was established, "Ms. Pruitt's wound will resolve within the next 2 weeks." The same planned interventions were continued to be implemented.

