
Open Resources for Nursing (Open RN)
When performing a comprehensive neurological exam, examiners may assess the functioning of the cranial nerves. When performing these tests, examiners compare responses of opposite sides of the face and neck. Instructions for assessing each cranial nerve are provided below.
Cranial Nerve I – Olfactory
Ask the patient to identify a common odor, such as coffee or peppermint, with their eyes closed. See Figure 6.11[1] for an image of a nurse performing an olfactory assessment.

Cranial Nerve II – Optic
Be sure to provide adequate lighting when performing a vision assessment.
Far vision is tested using the Snellen chart. See Figure 6.12[2] for an image of a Snellen chart. The numerator of the fractions on the chart indicates what the individual can see at 20 feet, and the denominator indicates the distance at which someone with normal vision could see this line. For example, a result of 20/40 indicates this individual can see this line at 20 feet but someone with normal vision could see this line at 40 feet.
Test far vision by asking the patient to stand 20 feet away from a Snellen chart. Ask the patient to cover one eye and read the letters from the lowest line they can see.[3] Record the corresponding result in the furthermost right-hand column, such as 20/30. Repeat with the other eye. If the patient is wearing glasses or contact lens during this assessment, document the results as “corrected vision.” Repeat with each eye, having the patient cover the opposite eye. Alternative charts are available for children or adults who can’t read letters in English.

Near vision is assessed by having a patient read from a prepared card from 14 inches away. See Figure 6.13[4] for a card used to assess near vision.

Cranial Nerve III, IV, and VI – Oculomotor, Trochlear, Abducens
Cranial nerve III, IV, and VI (oculomotor, trochlear, abducens nerves) are tested together.
- Test eye movement by using a penlight. Stand 1 foot in front of the patient and ask them to follow the direction of the penlight with only their eyes. At eye level, move the penlight left to right, right to left, up and down, upper right to lower left, and upper left to lower right. Watch for smooth movement of the eyes in all fields. An unexpected finding is involuntary eye movement which may cause the eye to move rapidly from side to side, up and down, or in a circle, and may slightly blur vision referred to as nystagmus.
- Test bilateral pupils to ensure they are equally round and reactive to light and accommodation. Dim the lights of the room before performing this test.
- Pupils should be round and bilaterally equal in size. The diameter of the pupils usually ranges from two to five millimeters. Emergency clinicians often encounter patients with the triad of pinpoint pupils, respiratory depression, and coma related to opioid overuse.
- Test pupillary reaction to light. Using a penlight, approach the patient from the side, and shine the penlight on one pupil. Observe the response of the lighted pupil, which is expected to quickly constrict. The pupil where you shine the light should constrict (direct reaction) and so should the other one (consensual reaction). Repeat by shining the light on the other pupil. Both pupils should react in the same manner to light. See Figure 6.14[5] for an image of a nurse assessing a patient’s pupillary reaction to light. An unexpected finding is when one pupil is larger than the other or one pupil responds more slowly than the other to light, which is often referred to as a “sluggish response.”
- Test eye convergence and accommodation. Recall that accommodation refers to the ability of the eye to adjust from near to far vision, with pupils constricting for near vision and dilating for far vision. Convergence refers to the action of both eyes moving inward as they focus on a close object using near vision. Ask the patient to look at a near object (4-6 inches away from the eyes), and then move the object out to a distance of 12 inches. Pupils should constrict while viewing a near object and then dilate while looking at a distant object, and both eyes should move together. See Figure 6.15[6] for an image of a nurse assessing convergence and accommodation.
- The acronym PERRLA is commonly used in medical documentation and refers to, “pupils are equal, round and reactive to light and accommodation.”


Review for Assessment of the Cardinal Fields of Gaze on YouTube[7]
Visit the National Library of Medicine’s webpage for more details about assessing the Pupillary Light Reflex.
Cranial Nerve V – Trigeminal
- Test sensory function. Ask the patient to close their eyes, and then use a wisp from a cotton ball to lightly touch their face, forehead, and chin. Instruct the patient to say “Now” every time they feel the placement of the cotton wisp. See Figure 6.16[8] for an image of assessing trigeminal sensory function. The expected finding is that the patient will report every instance the cotton wisp is placed. An advanced technique is to assess the corneal reflex in comatose patients by touching the cotton wisp to the cornea of the eye to elicit a blinking response.
- Test motor function. Ask the patient to clench their teeth tightly while bilaterally palpating the temporalis and masseter muscles for strength. Ask the patient to open and close their mouth several times while observing muscle symmetry. See Figure 6.17[9] for an image of assessing trigeminal motor strength. The expected finding is the patient is able to clench their teeth and symmetrically open and close their mouth.


Cranial Nerve VII – Facial Nerve
- Test motor function. Ask the patient to smile, show teeth, close both eyes, puff cheeks, frown, and raise eyebrows. Look for symmetry and strength of facial muscles. See Figure 6.18[10] for an image of assessing motor function of the facial nerve.
- Test sensory function. Test the sense of taste by moistening three different cotton applicators with salt, sugar, and lemon. Touch the patient’s anterior tongue with each swab separately, and ask the patient to identify the taste. See Figure 6.19[11] for an image of assessing taste.


Cranial Nerve VIII – Vestibulocochlear
- Test auditory function. Perform the whispered voice test. The whispered voice test is a simple test for detecting hearing impairment if done accurately. See Figure 6.20[12] for an image assessing hearing using the whispered voice test. Complete the following steps to accurately perform this test:
- Stand at arm’s length behind the seated patient to prevent lip reading.
- Each ear is tested individually. The patient should be instructed to occlude the non-test ear with their finger.
- Exhale before whispering and use as quiet a voice as possible.
- Whisper a combination of numbers and letters (for example, 4-K-2), and then ask the patient to repeat the sequence.
- If the patient responds correctly, hearing is considered normal; if the patient responds incorrectly, the test is repeated using a different number/letter combination.
- The patient is considered to have passed the screening test if they repeat at least three out of a possible six numbers or letters correctly.
- The other ear is assessed similarly with a different combination of numbers and letters.
- Test balance. The Romberg test is used to test balance and is also used as a test for driving under the influence of an intoxicant. See Figure 6.21[13] for an image of the Romberg test. Ask the patient to stand with their feet together and eyes closed. Stand nearby and be prepared to assist if the patient begins to fall. It is expected that the patient will maintain balance and stand erect. A positive Romberg test occurs if the patient sways or is unable to maintain balance. The Romberg test is also a test of the body’s sense of positioning (proprioception), which requires healthy functioning of the spinal cord.


Cranial Nerve IX – Glossopharyngeal
Ask the patient to open their mouth and say “Ah” and note symmetry of the upper palate. The uvula and tongue should be in a midline position and the uvula should rise symmetrically when the patient says “Ah.” (See Figure 6.22.[14])

Cranial Nerve X – Vagus
Use a cotton swab or tongue blade to touch the patient’s posterior pharynx and observe for a gag reflex followed by a swallow. The glossopharyngeal and vagus nerves work together for integration of gag and swallowing. See Figure 6.23[15] for an image of assessing the gag reflex.

Cranial Nerve XI – Spinal Accessory
Test the right sternocleidomastoid muscle. Face the patient and place your right palm laterally on the patient’s left cheek. Ask the patient to turn their head to the left while resisting the pressure you are exerting in the opposite direction. At the same time, observe and palpate the right sternocleidomastoid with your left hand. Then reverse the procedure to test the left sternocleidomastoid.
Continue to test the sternocleidomastoid by placing your hand on the patient’s forehead and pushing backward as the patient pushes forward. Observe and palpate the sternocleidomastoid muscles.
Test the trapezius muscle. Ask the patient to face away from you and observe the shoulder contour for hollowing, displacement, or winging of the scapula and observe for drooping of the shoulder. Place your hands on the patient’s shoulders and press down as the patient elevates or shrugs the shoulders and then retracts the shoulders.[16] See Figure 6.24[17] for an image of assessing the trapezius muscle.

Cranial Nerve XII – Hypoglossal
Ask the patient to protrude the tongue. If there is unilateral weakness present, the tongue will point to the affected side due to unopposed action of the normal muscle. An alternative technique is to ask the patient to press their tongue against their cheek while providing resistance with a finger placed on the outside of the cheek. See Figure 6.25[18] for an image of assessing the hypoglossal nerve.

Review of Cranial Nerve Assessment on YouTube[19]
Expected Versus Unexpected Findings
See Table 6.5 for a comparison of expected versus unexpected findings when assessing the cranial nerves.
Table 6.5 Expected Versus Unexpected Findings of an Adult Cranial Nerve Assessment
| Cranial Nerve | Expected Finding | Unexpected Finding (Dysfunction) |
|---|---|---|
| I. Olfactory | Patient is able to describe odor. | Patient has inability to identify odors (anosmia). |
| II. Optic | Patient has 20/20 near and far vision. | Patient has decreased visual acuity and visual fields. |
| III. Oculomotor | Pupils are equal, round, and reactive to light and accommodation. | Patient has different sized or reactive pupils bilaterally. |
| IV. Trochlear | Both eyes move in the direction indicated as they follow the examiner’s penlight. | Patient has inability to look up, down, inward, outward, or diagonally. Ptosis refers to drooping of the eyelid and may be a sign of dysfunction. |
| V. Trigeminal | Patient feels touch on forehead, maxillary, and mandibular areas of face and chews without difficulty. | Patient has weakened muscles responsible for chewing; absent corneal reflex; and decreased sensation of forehead, maxillary, or mandibular area. |
| VI. Abducens | Both eyes move in coordination. | Patient has inability to look side to side (lateral); patient reports diplopia (double vision). |
| VII. Facial | Patient smiles, raises eyebrows, puffs out cheeks, and closes eyes without difficulty; patient can distinguish different tastes. | Patient has decreased ability to taste. Patient has facial paralysis or asymmetry of face such as facial droop. |
| VIII. Vestibulocochlear (Acoustic) | Patient hears whispered words or finger snaps in both ears; patient can walk upright and maintain balance. | Patient has decreased hearing in one or both ears and decreased ability to walk upright or maintain balance. |
| IX. Glossopharyngeal | Gag reflex is present. | Gag reflex is not present; patient has dysphagia. |
| X. Vagus | Patient swallows and speaks without difficulty. | Slurred speech or difficulty swallowing is present. |
| XI. Spinal Accessory | Patient shrugs shoulders and turns head side to side against resistance. | Patient has inability to shrug shoulders or turn head against resistance. |
| XII. Hypoglossal | Tongue is midline and can be moved without difficulty. | Tongue is not midline or is weak. |
- “Cranial Exam Image 11” by Meredith Pomietlo for Chippewa Valley Technical College is licensed under CC BY 4.0 ↵
- “Snellen chart.svg” by Jeff Dahl is licensed under CC BY-SA 3.0 ↵
- Koder-Anne, D., & Klahr, A. (2010). Training nurses in cognitive assessment: Uses and misuses of the mini-mental state examination. Educational Gerontology, 36(10/11), 827–833. https://doi.org/10.1080/03601277.2010.485027 ↵
- “111012-F-ZT401-067.JPG” by Airman 1st Class Brooke P. Beers for U.S. Air Force is licensed under CC0. Access for free at https://www.pacaf.af.mil/News/Article-Display/Article/593609/keeping-sight-all-right/ ↵
- “Cranial Exam Image 1” and “Pupillary Exam Image 1” by Meredith Pomietlo for Chippewa Valley Technical College are licensed under CC BY 4.0 ↵
- “Cranial Nerve Exam 8” and “Cranial Nerve Exam Image 3” by Meredith Pomietlo for Chippewa Valley Technical College are licensed under CC BY 4.0 ↵
- Registered NurseRN.(2018, June 5). Six cardinal fields of gaze nursing | Nystagmus eyes, cranial nerve 3, 4, 6, test [Video]. YouTube. All rights reserved. Video used with permission. https://youtu.be/lrO4pLB95p0 ↵
- “Neuro Exam Image 28,” “Cranial Exam Image 12,” and “Neuro Exam Image 36” by Meredith Pomietlo for Chippewa Valley Technical College are licensed under CC BY 4.0 ↵
- “Cranial Exam Image 11,” “Neuro Exam Image 35,” and “Neuro Exam Image 4” by Meredith Pomietlo for Chippewa Valley Technical College are licensed under CC BY 4.0 ↵
- “Cranial Exam image 15.png,” “Cranial Exam Image 7.png,” and “Cranial Exam Image 10.png” by Meredith Pomietlo for Chippewa Valley Technical College are licensed under CC BY 4.0 ↵
- “Neuro Exam Image 17.png” by Meredith Pomietlo for Chippewa Valley Technical College is licensed under CC BY 4.0 ↵
- “Whisper Test Image 1.png” by Meredith Pomietlo for Chippewa Valley Technical College is licensed under CC BY 4.0 ↵
- “Neuro Exam Image 9.png” by Meredith Pomietlo for Chippewa Valley Technical College is licensed under CC BY 4.0 ↵
- “Oral Exam Image 2.png” by Meredith Pomietlo for Chippewa Valley Technical College is licensed under CC BY 4.0 ↵
- “Oral Exam.png” by Meredith Pomietlo for Chippewa Valley Technical College is licensed under CC BY 4.0 ↵
- Walker, H. K. Cranial nerve XI: The spinal accessory nerve. In Walker, H. K., Hall, W. D., Hurst, J. W. (Eds.), Clinical methods: The history, physical, and laboratory examinations (3rd ed.). Butterworths. https://www.ncbi.nlm.nih.gov/books/NBK387/ ↵
- “Neuro Exam image 10” by Meredith Pomietlo for Chippewa Valley Technical College is licensed under CC BY 4.0 ↵
- “Cranial Nerve Exam Image 9.png” and “Cranial Nerve Exam Image 11.png” by Meredith Pomietlo for Chippewa Valley Technical College are licensed under CC BY 4.0 ↵
- RegisteredNurseRN. (2018, April 8). Cranial nerve examination nursing | Cranial nerve assessment I-XII (1-12). [Video]. YouTube. All rights reserved. Video used with permission. https://youtu.be/oZGFrwogx14 ↵
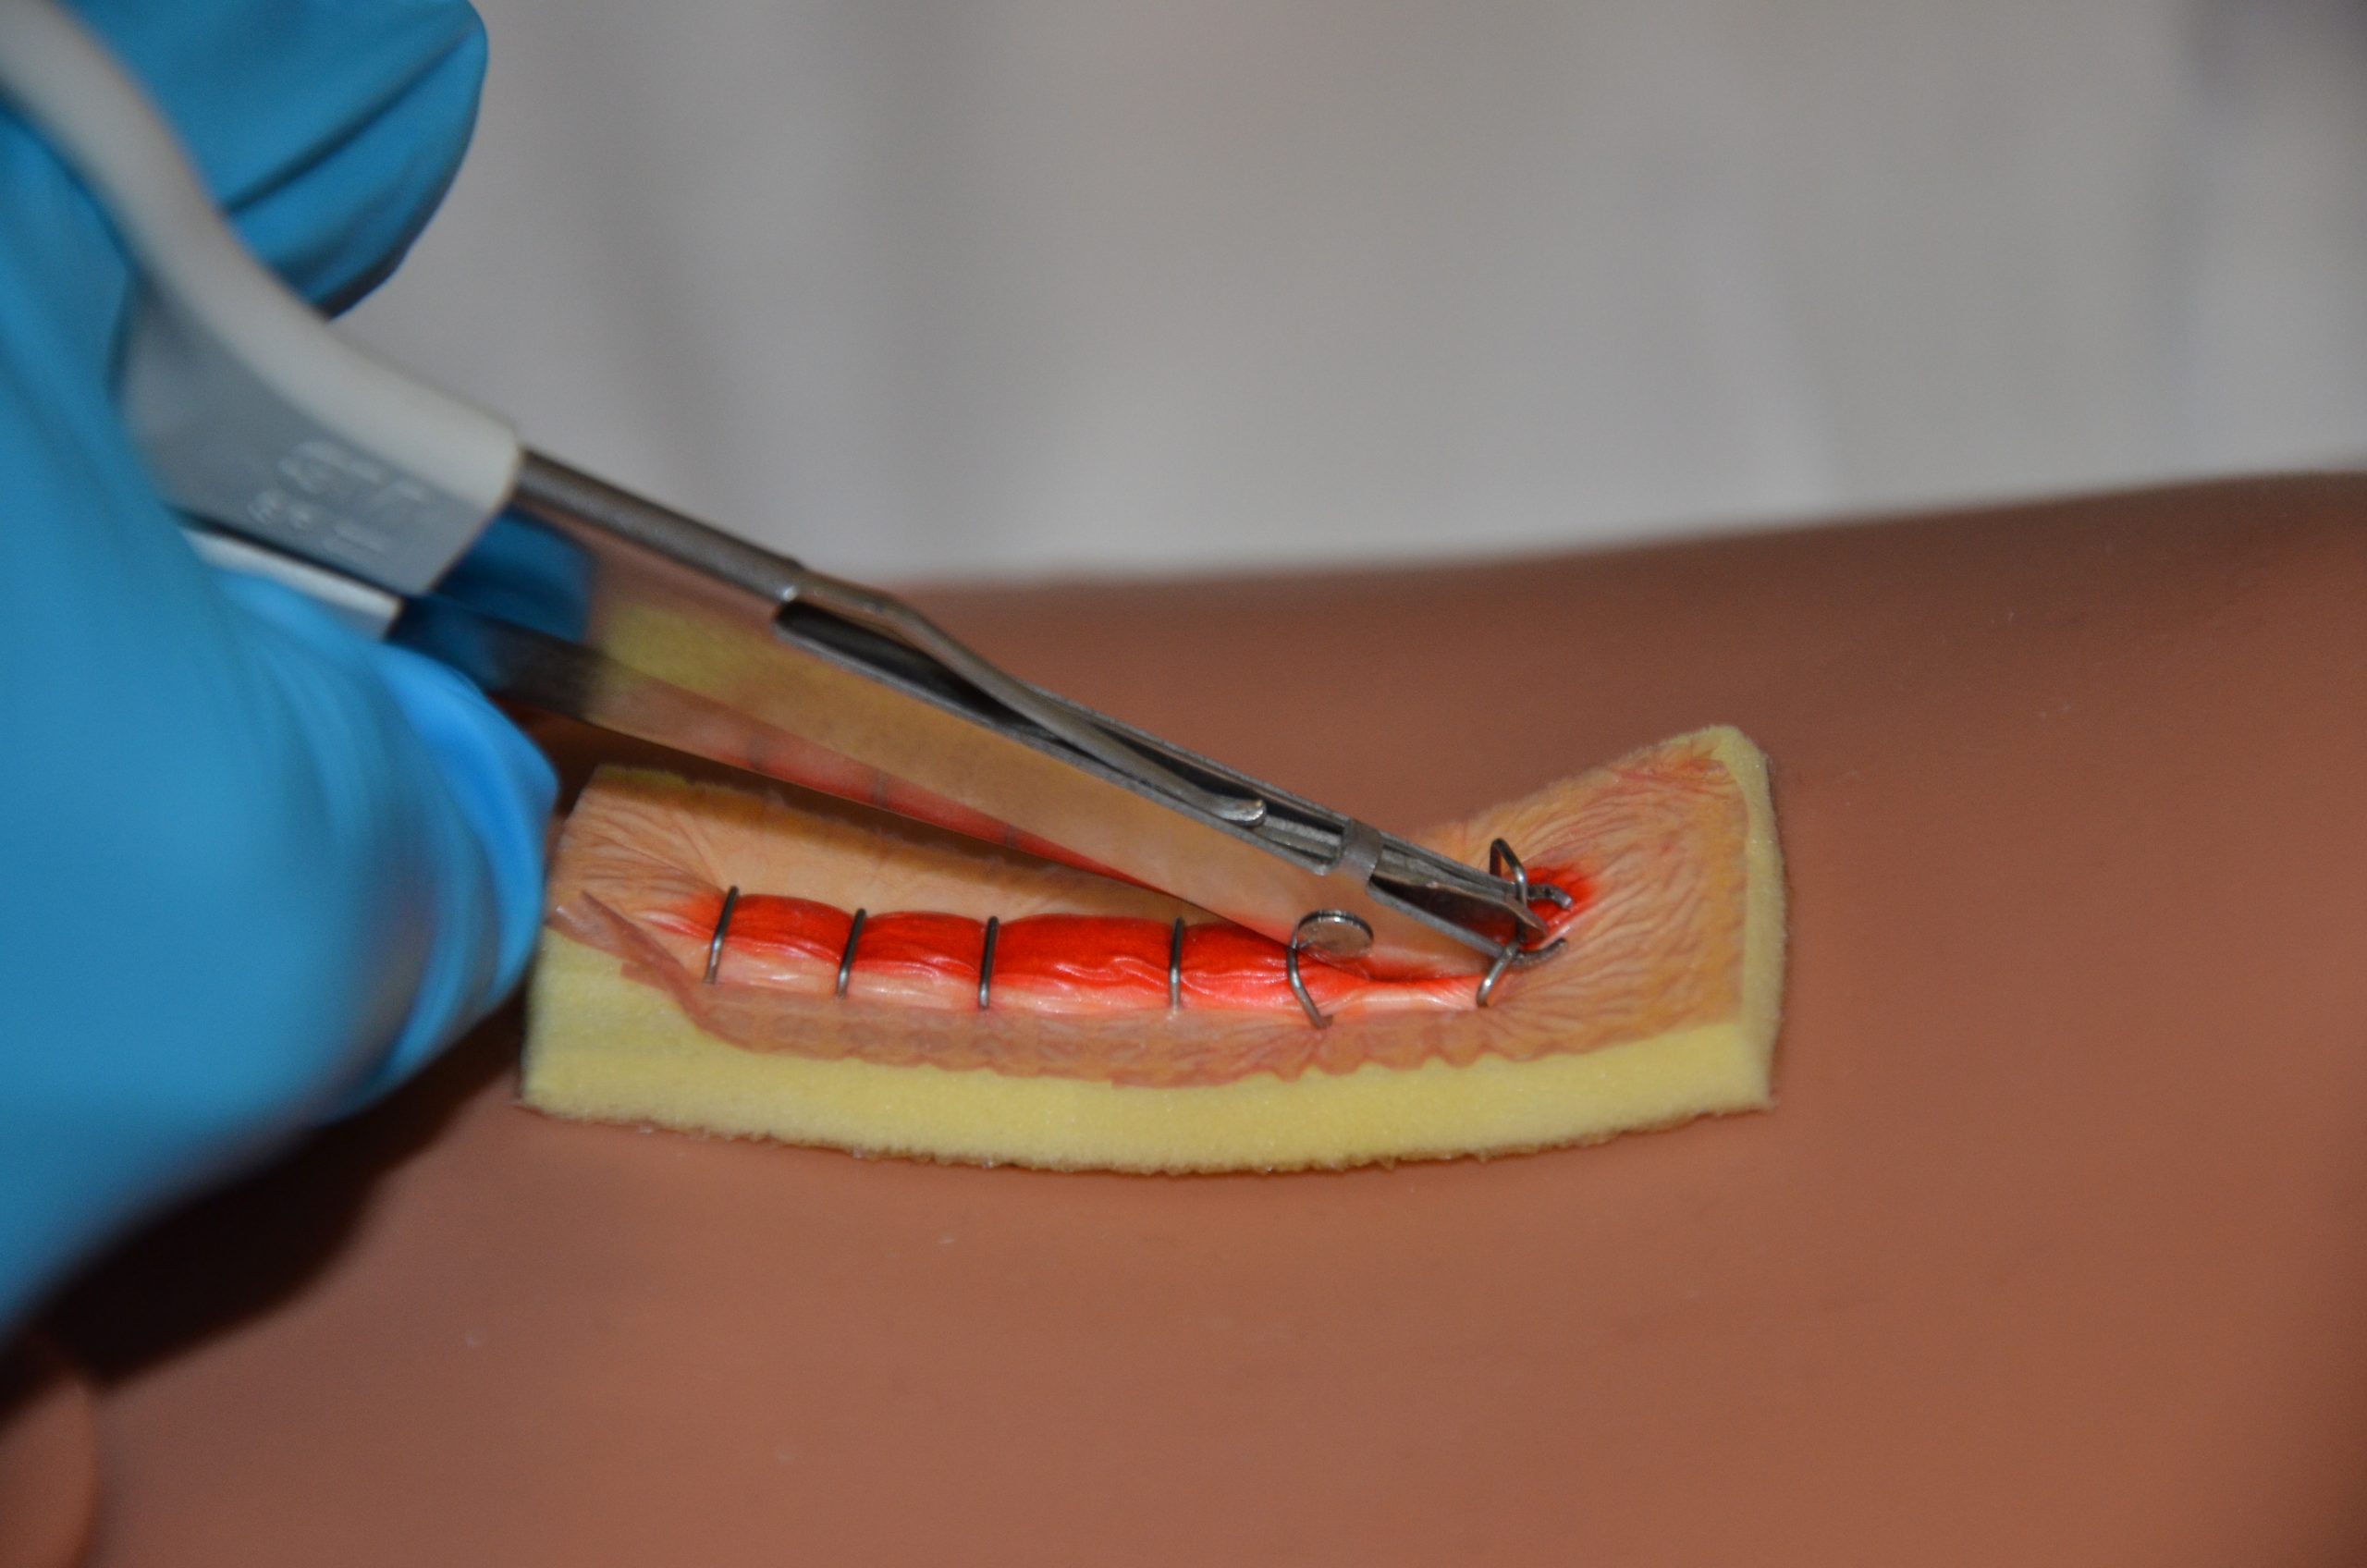
Staples are made of stainless-steel wire and provide strength for wound closure. Staples are strong, quick to insert, and simple to remove, but may cause more scarring than sutures.
Removal of staples is similar to the removal of sutures but requires a sterile staple extractor instead of forceps and suture scissors. Typically, every second staple is initially removed, and then the remaining staples are removed at a later time. In general, staples are removed within 7 to 14 days. See Figure 20.34[1] for an example of staple removal.
Checklist for Staple Removal
Please follow the checklist below to review the steps for completion of "Staple Removal."
Steps
Disclaimer: Always review and follow agency policy regarding this specific skill.
- Gather supplies: sterile staple extractors, sterile dressing tray, nonsterile gloves, normal saline, Steri-Strips, and sterile outer dressing.
- Perform safety steps:
- Perform hand hygiene.
- Check room for transmission-based precautions.
- Introduce yourself, your role, the purpose of your visit, and an estimate of the time it will take.
- Confirm patient ID using two patient identifiers (e.g., name and date of birth).
- Be organized and systematic.
- Use appropriate listening and questioning skills.
- Listen and attend to patient cues.
- Ensure the patient's privacy and dignity.
- Assess ABCs.
- Confirm the provider order and explain the procedure to patient. Explanation helps prevent anxiety and increases compliance with the procedure. Inform the patient the procedure is not painful but they may feel some pulling or pinching of the skin during staple removal.
- Prepare the environment, position the patient, adjust the height of the bed, and turn on the lights. Ensuring proper lighting allows for good visibility to assess the wound. Ensure proper body mechanics for yourself and create a comfortable position for the patient.
- Place a clean, dry barrier on the bedside tables and add necessary supplies.
- Perform hand hygiene and apply nonsterile gloves.
- Remove the dressing and inspect the wound. Visually assess the wound for uniform closure of the wound edges, absence of drainage, redness, and swelling. After assessing the wound, decide if the wound is sufficiently healed to have the staples removed. If there are concerns, discuss the status of the wound before proceeding with the health care provider. For safety purposes, count the number of staples before beginning the procedure.
- Irrigate the wound with sterile normal saline solution to remove surface debris or exudate to reduce risk of infection from microorganisms on the wound site or surrounding skin and to help loosen and remove any dried blood or crusted exudate from the sutures and wound bed.
- Remove gloves, perform hand hygiene, and apply nonsterile gloves.
- Place a sterile 2" x 2" next to the wound to collect the staples.
- Remove the staples (start with every second staple).
- Place the lower tip of the staple extractor beneath the staple. Do not pull up while depressing the handle on the staple remover or change the angle of your wrist or hand. Close the handle, and then gently move the staple side to side to remove. The closed handle depresses the middle of the staple causing the two ends to bend outward and out of the top layer of skin.
- When both ends of the staple are visible, move the staple extractor away from the skin and place the staple on a sterile piece of gauze by releasing the handles on the staple extractor. This avoids pulling the staple out prematurely and avoids putting pressure on the wound. It also prevents scratching the skin with the sharp staple.
- Using the principles of no-touch technique, place Steri-Strips on the location of every removed staple along the incision line. Steri-Strips are supplied in pre-cut lengths. Cut the Steri-Strips to allow them to extend 1.5 to 2 cm on each side of the incision. Steri-Strips support wound tension across wounds and eliminate scarring. This allows wounds to heal by primary intention.
- Remove the remaining staples as indicated, followed by applying Steri-Strips along the incision line. Count the number of removed staples and compare to the pre-count to ensure safety.
- Apply a dry, sterile dressing on the incision site or leave it exposed to the air according to provider orders.
- Discard the supplies according to agency policies for sharps disposal and biohazard waste:
- The staple extractor may be disposed of or sent for sterilization according to agency policy.
- Perform hand hygiene.
- Complete patient teaching regarding Steri-Strips, bathing, and inspecting wound for separation. Instruct the patient to:
- Take showers rather than bathe in a tub.
- Avoid pulling off Steri-Strips but allow them to fall off naturally and gradually (usually takes one to three weeks).
- Receive adequate rest, fluids, nutrition, and ambulation for optional wound healing
- Assist the patient to a comfortable position, ask if they have any questions, and thank them for their time.
- Ensure safety measures when leaving the room:
- CALL LIGHT: Within reach
- BED: Low and locked (in lowest position and brakes on)
- SIDE RAILS: Secured
- TABLE: Within reach
- ROOM: Risk-free for falls (scan room and clear any obstacles)
- Document the procedure and assessment findings regarding the appearance of the incision. Report any concerns according to agency policy.
Wound dressings should be selected based on the type of the wound, the cause of the wound, and the characteristics of the wound. A specially trained wound care nurse should be consulted, when possible, for appropriate selection of dressings for chronic wounds. See Table 20.5 for commonly used wound dressings and associated nursing considerations.[2] See additional information about many types of wound dressings in Appendix B - Wound Dressings, including indications and instructions for use.
Table 20.5 Wound Dressings[3]
| Type of Dressing | Description | Nursing Considerations |
|---|---|---|
| Sterile gauze
(see Figure 20.22[4]) Kerlix (see Figure 20.23[5])
|
Can be used as a primary dressing or moistened wound packing. |
|
| Nonadherent dressings, nonadherent gauze, or petroleum impregnated gauze
Nonadherent dressing (see Figure 20.24[6]) Petroleum impregnated gauze (see Figure 20.25[7])
|
Applied over open wounds and covered with a secondary dressing. Nontraumatic to skin and wound base. May be applied over skin tears. |
|
| Transparent films
(see Figure 20.26[8])
|
Can be used on wounds with minimal or no exudate to retain moisture. Commonly used to secure other dressing materials such as foam. |
|
| Hydrocolloids
(see Figure 20.27[9])
|
Used as an occlusive dressing to prevent contaminants, promote a moist wound environment, and cause autolytic debridement. Thicker hydrocolloids absorb moderate amounts of drainage. |
|
| Hydrogels
|
Creates a moist wound environment in wounds with little or no exudate. If in gel form, apply directly to the wound and cover with secondary dressing. |
|
| Silicone-based dressings
|
Nonadherent dressing used on moderately to highly exudative wounds. Nontraumatic to wound bed and promotes a moist wound environment. |
|
| Foam
(see Figure 20.28[10]) |
Nonadherent and absorptive. |
|
| Alginate/hydrofibers
(see Figure 20.29[11]) |
Nonadherent and highly absorptive for highly exudative wounds. Used for wound packing in full-thickness wounds such as Stage 3 or 4 pressure injuries. |
|


 Vaseline Gauze Package -1 3I3A0296.jpg\" and \"Vaseline Gauze Dressing 3I3A0299\" by Deanna Hoyord, Chippewa Valley Technical College is licensed under CC BY 4.0")


Types of Tape
There are several types of tape that can be used to secure dressings. The most commonly used types of tape are medical transpore, micropore paper, cloth, and waterproof tape.
- Medical transpore tape (often referred to as "medi-pore") is inexpensive, durable, and very sticky. It has tiny holes in it that allow air to reach the skin underneath and sweat and body fluid to pass through it without causing it to come off. However, it leaves residue and can damage sensitive skin.
- Micropore paper tape is gentle on skin and doesn't leave residue, but it is not waterproof and doesn't work well on irregular areas. It allows air to reach the skin underneath.
- Cloth tape sticks well, allows air to reach the skin, and does not leave a residue. It has high strength so it can be used to secure a splint. However, it is not flexible or waterproof and can be difficult to tear.
- Waterproof tape is more expensive, but it is flexible and doesn't leave residue. It sticks well to skin but does not stick well to hair. It is waterproof when applied to dry skin.
Read Inside First Aid's 5 Different Types of Medical Tapes and How to Use Them webpage about different types of medical tape.
Wound Vacs
The term wound vac refers to a device used with special foam dressings and suctioning to remove fluid and decrease air pressure around a wound to assist in healing. During a wound vac procedure, the nurse applies a special foam dressing over an open wound and seals it with a thin film layer. The film has an opening that rubber tubing fits through to connect to a vacuum pump. Once connected, the vacuum pump removes fluid from the wound while also helping to pull the edges of the wound together. A person with a wound vac typically wears the device 24 hours a day while the wound is healing.[12] See Figure 20.30[13] for an image of a wound vac foam dressing attached to suctioning by a wound vac device. Figure 20.31[14] demonstrates the progression of a wound healing with a wound vac from image A to D.


Sample Documentation of Expected Findings
3 cm x 2 cm Stage 3 pressure injury on the patient’s sacrum. Dark pink wound base with no signs of infection. Cleansed with normal saline spray and hydrocolloid dressing applied.
Sample Documentation of Unexpected Findings
3 cm x 2 cm x 1 cm Stage 3 pressure injury on sacrum. Wound base dark red with yellow-green drainage present. Removed 4 x 4 dressing has 5 cm diameter ring of drainage present. Periwound skin red, warm, tender to palpation. Temperature 36.8⁰ C. Dr. Smith notified of all the above. Wound culture order received. Wound cleansed with normal saline spray, wound culture collected, hydrocolloid dressing applied.
Cleansing is an important step when changing dressings in wounds healing by secondary intention to remove surface debris and to provide optimal visualization for the wound assessment. See Figure 20.35[15] for removal of dressing and wound assessment.
 is licensed under CC BY 4.0. Access for free at https://ecampusontario.pressbooks.pub/clinicalskills/chapter/4-5-complex-dressing-change/")
Follow agency policy and provider orders regarding cleansing solution and method. Many wounds can be cleansed with normal saline. See Figure 20.36[16] for an example of wound irrigation.
 is licensed under CC BY 4.0. Access for free at https://ecampusontario.pressbooks.pub/clinicalskills/chapter/4-5-complex-dressing-change/")
Cleansing solution should be applied with sufficient pressure to cleanse the wound without damaging tissue or driving bacteria into the wound.[17] Following cleansing, the wound may be packed to allow for granulation of new tissue. See Figure 20.37[18] for an example of wound packing.
 is licensed under CC BY 4.0. Access for free at https://ecampusontario.pressbooks.pub/clinicalskills/chapter/4-5-complex-dressing-change/")
Checklist for Wound Cleansing, Irrigation, and Packing
Use the checklist below to review the steps for completion of “Wound Cleansing, Irrigation, and Packing.”
Steps
Disclaimer: Always review and follow agency policy regarding this specific skill.
- Gather supplies: syringe, cannula with needleless adaptor, irrigation fluid, basin, waterproof pad, dressing tray with sterile forceps, scissors, skin barrier/protectant, cotton tip applicators, measuring guide, outer sterile dressing, and packing gauze or packing as per physician’s orders.
- Perform safety steps:
- Perform hand hygiene.
- Check the room for transmission-based precautions.
- Introduce yourself, your role, the purpose of your visit, and an estimate of the time it will take.
- Confirm patient ID using two patient identifiers (e.g., name and date of birth).
- Explain the process to the patient and ask if they have any questions.
- Be organized and systematic.
- Use appropriate listening and questioning skills.
- Listen and attend to patient cues.
- Ensure the patient’s privacy and dignity.
- Assess ABCs.
- Confirm the provider order and verify appropriateness of order according to wound assessment.
- Prepare the environment, position the patient, adjust the height of the bed, and turn on the lights. Ensure proper lighting to allow for good visibility to assess the wound. Ensure proper body mechanics for yourself and create a comfortable position for the patient. Position the patient so the wound is vertical to the collection basin, if possible, to allow the solution to flow off the patient.
- Place a waterproof pad under the patient to protect the patient’s clothing and bedding from irrigation fluid.
- Perform hand hygiene and apply clean gloves.
- Remove outer dressing:
- Using sterile forceps, remove the inner dressing (packing) from the wound.
- If the packing sticks, gently soak the packing with normal saline or sterile water and gently lift off the packing. Removing packing that adheres to the wound bed without soaking can cause trauma to the wound bed tissue. If packing material cannot be removed, contact the provider. If packing adheres to the wound, reassess the amount of wound exudate and consider a different packing material. All packing must be removed with each dressing change.
- Confirm the quantity and type of packing are the same as recorded on previous dressing change.
- Assess the wound:
- Note the location and type of wound.
- Measure the wound's length, width, and depth.
- If undermining or tunneling are present, note the location and measure the depth.
- Determine if the level of tissue damage indicates wound healing or worsening.
- Assess appearance of wound bed, noting color.
- Note presence of odor after cleansing.
- Assess appearance of periwound skin.
- Wound assessment helps identify if the wound care is effective. Always compare the current wound assessment with the previous assessment to determine if the wound is healing, delayed, worsening, or showing signs of infection.
- Apply nonsterile gloves, gown, and goggles or face shield according to agency policy.
- If irrigation is indicated, fill a 35-mL syringe with sterile saline and attach a needleless cannula to the end of the syringe.
- Hold the syringe about 1 inch above the wound and flush gently with continuous pressure until returned fluid is clear:
- Irrigation should be drained into the basin because it is a medium for bacterial growth and subsequent infection.
- Irrigation should not increase patient discomfort.
- Dry wound edges with sterile gauze using sterile forceps to prevent maceration of surrounding tissue from excess moisture.
- Remove goggles or face shield and gloves.
- Perform hand hygiene and apply sterile gloves (if not using sterile forceps) or nonsterile gloves if using sterile forceps.
- Apply a skin barrier/protectant on the periwound skin as needed to prevent saturated packing materials and/or wound exudate from macerating or irritating the periwound skin.
- While maintaining sterility, moisten the gauze with sterile normal saline and wring it out so it is damp but not wet:
- The wound must be moist, not wet, for optimal healing. Gauze packing that is too wet can cause tissue maceration and reduces the absorbency of the gauze.
- Normal saline gauze packing needs to be changed at least once daily.
- Ensure the wound is not overpacked or underpacked as either may diminish the healing process.
- Open the gauze and gently pack it into the wound using sterile forceps or the tip of a sterile, cotton-tipped swab:
- Continue until all wound surfaces are in contact with gauze.
- Do not pack too tightly.
- Do not overlap wound edges with wet packing.
- Apply an appropriate outer dry dressing, depending on the frequency of the dressing changes and the amount of exudate from the wound:
- The dressing on the wound must remain dry on the outside to avoid cross-contamination of the wound. If it becomes saturated before the next dressing change, it must be replaced.
- Discard the supplies.
- Remove gloves and perform hand hygiene.
- Assist the patient to a comfortable position, ask if they have any questions, and thank them for their time.
- Ensure safety measures when leaving the room:
- CALL LIGHT: Within reach
- BED: Low and locked (in lowest position and brakes on)
- SIDE RAILS: Secured
- TABLE: Within reach
- ROOM: Risk-free for falls (scan room and clear any obstacles)
- Document procedure, wound assessment, irrigation solution, and patient response to the irrigation and dressing change. Report any concerns according to agency policy.
Localized damage to the skin or underlying soft tissue, usually over a bony prominence, as a result of intense and prolonged pressure in combination with shear.
