Open Resources for Nursing (Open RN)
The sensory function exam tests the somatic senses, meaning those senses that are consciously perceived. Assessing sensory function includes two components, the sensory response that occurs when stimuli are perceived by afferent nerves in the peripheral nervous system and the cortical processing that occurs in the cerebral cortex of the brain.
Sensory Response
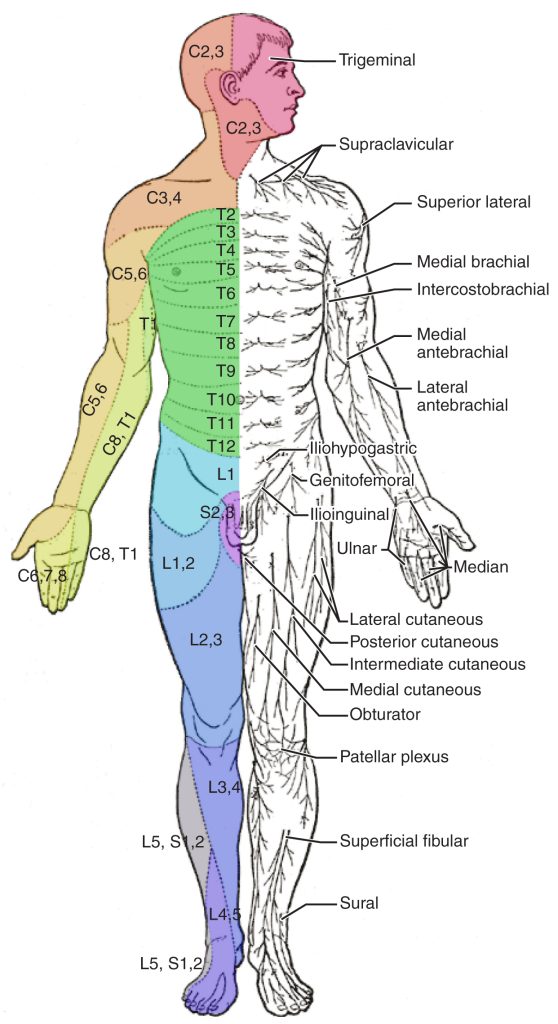
Testing of peripheral sensation begins with examining the response to light touch according to regions of the skin known as dermatomes. A dermatome is an area of the skin that is supplied by a single spinal nerve that sends information to the brain for processing. See Figure 6.26[1] for an illustration of color-coded dermatomes according to their associated spinal nerves. See more information about spinal nerves in the “Basic Neurological Concepts” section.
To test the sensory fields, ask the patient to close their eyes, and then gently touch the soft end of a cotton-tipped applicator on random locations of the skin according to the dermatome region. Instruct the patient to report “Now” when feeling the placement of the applicator. If a patient is unable to feel the sensation of a cotton applicator, an advanced technique is to use ice or even the prick of a pin in comatose patients.

It is not necessary to test every part of the skin’s surface during a routine neurological exam; testing a few distal areas with light touch is usually sufficient. In-depth testing is performed when the patient is exhibiting neurological symptoms such as motor deficits, numbness, tingling, and weakness. See Figure 6.27[2] demonstrating assessment of the sensory response.

Cortical Processing
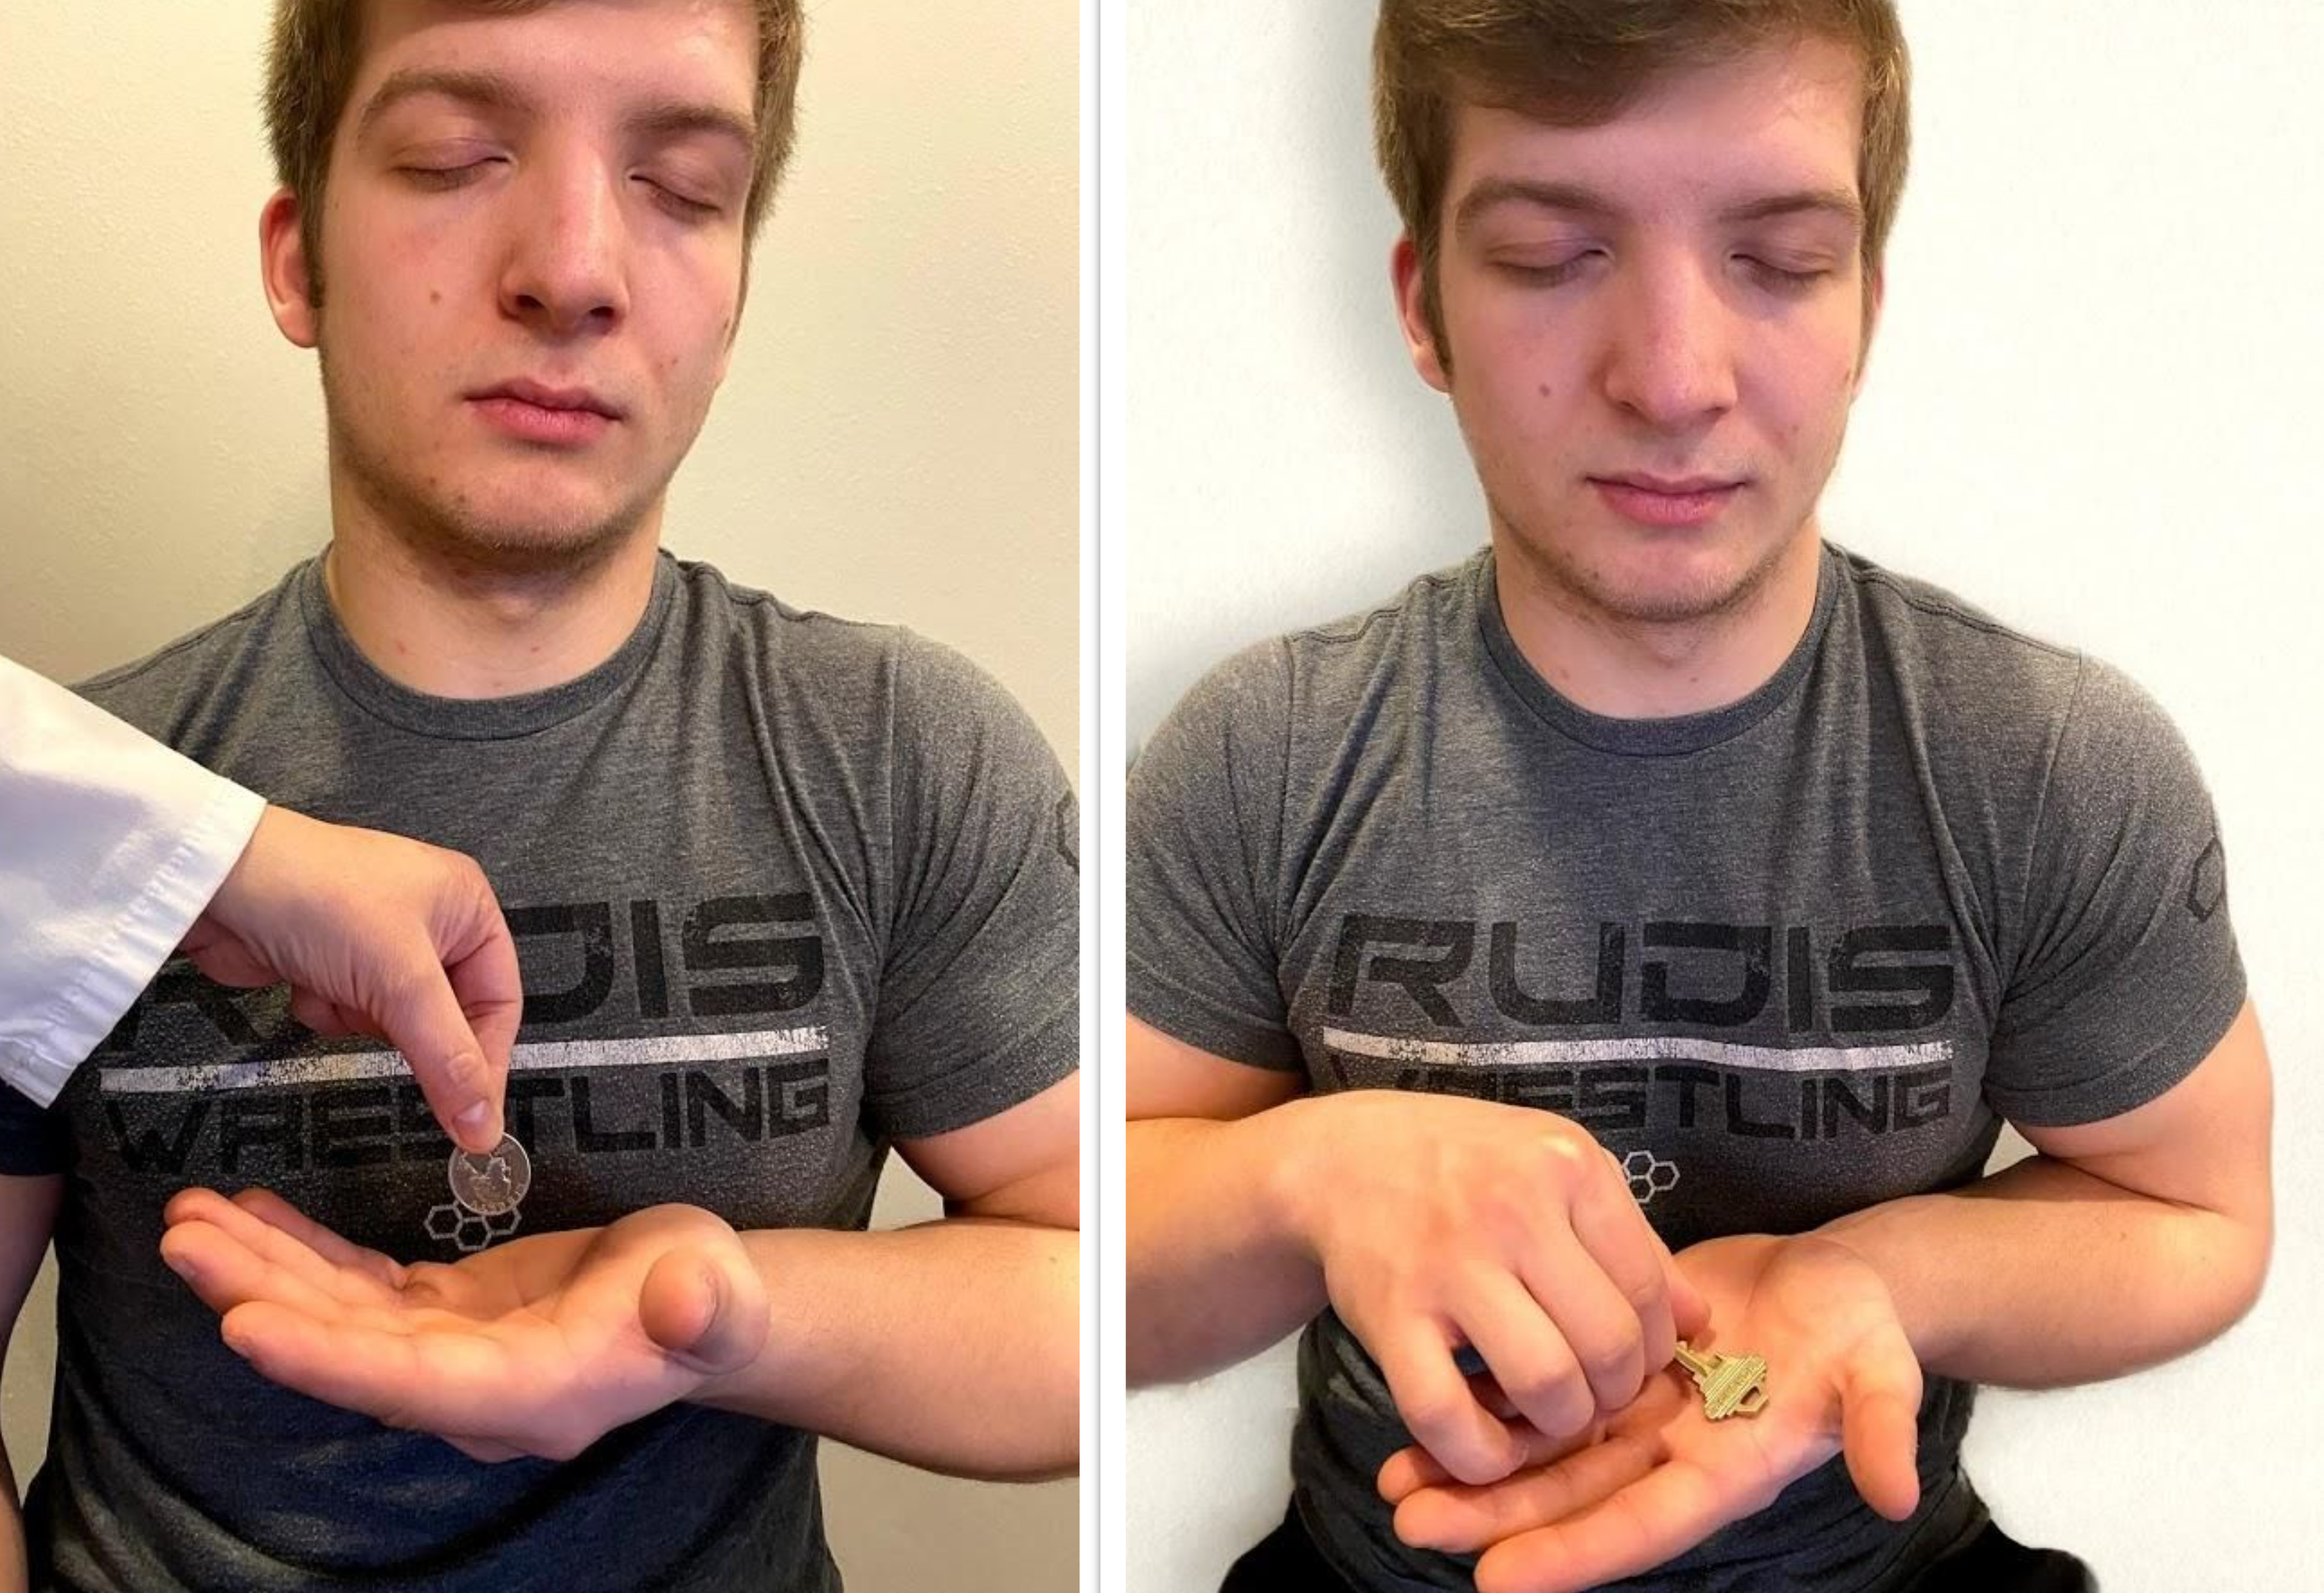
Cortical processing that occurs in the cerebral cortex of the parietal lobe is assessed using stereogenesis. Stereognosis is the ability to perceive the physical form and identity of a familiar object such as a key or paper clip based on tactile stimuli alone.[3] The person typically uses the finger to move the object around and then correctly names the object.
To perform the stereognosis test, ask the patient to close their eyes; then place a familiar object in their hand and ask them to name it. Each hand should be tested with a different object. See Figure 6.28[4] for an image of a patient being tested for stereognosis.
Graphesthesia tests assess both cortical sensation and primary sensation. Graphesthesia is the ability to recognize a tracing on the skin while using the sensation of touch. To test graphesthesia, trace a number or letter on the patient’s outstretched palm and ask them to identify it.

- “1611 Dermatomes-02.jpg” by OpenStax Anatomy and Physiology is licensed under CC BY 4.0. Access for free at https://openstax.org/books/anatomy-and-physiology/pages/16-4-the-sensory-and-motor-exams ↵
- “Neuro Exam Image 25,” “Cranial Exam Image 12,” “Neuro Exam Image 26,” and “Neuro Exam Image 30” by Meredith Pomietlo for Chippewa Valley Technical College are licensed under CC BY 4.0 ↵
- This work is a derivative of StatPearls by Schermann and Tadi and is licensed under CC BY 4.0 ↵
- “Neuro Exam Image 8.png” and “Neuro Exam Image 31.png” by Meredith Pomietlo for Chippewa Valley Technical College are licensed under CC BY 4.0 ↵
Use the checklist below to review the steps for completion of “Wound Assessment.”
Steps
Disclaimer: Always review and follow agency policy regarding this specific skill.
- Gather supplies: gloves, wound measuring tool, and sterile cotton-tipped swab.
- Perform safety steps:
- Perform hand hygiene.
- Check the room for transmission-based precautions.
- Introduce yourself, your role, the purpose of your visit, and an estimate of the time it will take.
- Confirm patient ID using two patient identifiers (e.g., name and date of birth).
- Explain the process to the patient and ask if they have any questions.
- Be organized and systematic.
- Use appropriate listening and questioning skills.
- Listen and attend to patient cues.
- Ensure the patient’s privacy and dignity.
- Assess ABCs.
- Identify wound location. Document the anatomical position of the wound on the body using accurate anatomical terminology.
- Identify the type and cause of the wound (e.g., surgical incision, pressure injury, venous ulcer, arterial ulcer, diabetic ulcers, or traumatic wound).
- Note tissue damage:
- If the wound is a pressure injury, identify the stage and use the Braden Scale to assess risk factors.
- Observe wound base. Describe the type of tissue in the wound base (i.e., granulation, slough, eschar).
- Follow agency policy to measure wound dimensions, including width, depth, and length. Assess for tunneling, undermining, or induration.
- Describe the amount and color of wound exudate:
- Serous drainage (plasma): clear or light yellowish
- Sanguineous drainage (fresh bleeding): bright red
- Serosanguineous drainage (a mix of blood and serous fluid): pink
- Purulent drainage (infected): thick, opaque, and yellow, green, or other color
- Note the presence or absence of odor, noting the presence of odor may indicate infection.
- Assess the temperature, color, and integrity of the skin surrounding the wound. Assess for tenderness of periwound area.
- Assess wound pain using PQRSTU. Note the need to premedicate before dressing changes if the wound is painful. (Read more about PQRSTU assessment in the "Health History" chapter.)
- Assess for signs of infection, such as fever, change in level of consciousness, type of drainage, presence of odor, dark red granulation tissue, or redness, warmth, and tenderness of the periwound area.
- Assist the patient back to a comfortable position, ask if they have any questions, and thank them for their time.
- Ensure safety measures when leaving the room:
- CALL LIGHT: Within reach
- BED: Low and locked (in lowest position and brakes on)
- SIDE RAILS: Secured
- TABLE: Within reach
- ROOM: Risk-free for falls (scan room and clear any obstacles)
- Perform hand hygiene.
- Document the assessment findings and report any concerns according to agency policy.
View a supplementary YouTube video of a nurse performing a wound assessment in Wound Care: Assessing Wounds.[1]
Use this checklist to review the steps for completion of “Simple Dressing Change.”
View an instructor demonstration of Wound Care[2]:
Steps
Disclaimer: Always review and follow agency policy regarding this specific skill.
- Gather supplies: nonsterile gloves, sterile gloves per agency policy, wound cleansing solution or sterile saline, sterile 2"x 2" gauze for wound cleansing, 4" x 4" sterile gauze for wound dressing, scissors, and tape (if needed).
- Use the smallest size of dressing for the wound.
- Take only the dressing supplies needed for the dressing change to the bedside.
- Perform safety steps:
- Perform hand hygiene.
- Check the room for transmission-based precautions.
- Introduce yourself, your role, the purpose of your visit, and an estimate of the time it will take.
- Confirm patient ID using two patient identifiers (e.g., name and date of birth).
- Explain the process to the patient and ask if they have any questions.
- Be organized and systematic.
- Use appropriate listening and questioning skills.
- Listen and attend to patient cues.
- Ensure the patient’s privacy and dignity.
- Assess ABCs.
- Assess wound pain using PQRSTU.
- Prepare the environment, position the patient, adjust the height of the bed, and turn on the lights. Ensure proper lighting to allow for good visibility to assess the wound. Ensure proper body mechanics for yourself and create a comfortable position for the patient. Premedicate, if indicated, to ensure patient’s comfort prior to and during the procedure.
- Perform hand hygiene immediately prior to arranging the supplies at the bedside.
- Place a clean, dry, barrier on the bedside table. Create a sterile field if indicated by agency policy.
- Pour sterile normal saline into opened sterile gauze packaging to moisten the gauze.
- Normal saline containers must be used for only one patient and must be dated and discarded within at least 24 hours of being opened.
- Commercial wound cleanser may also be used.
- Expose the dressing.
- Perform hand hygiene and apply nonsterile gloves.
- Remove the outer dressing.
- Remove the inner dressing. Use transfer forceps, if necessary, to avoid contaminating the wound bed.
- Remove gloves, perform hand hygiene, and put on new gloves.
- Wrap the old inner dressing inside the glove as you remove it, if feasible, to prevent contaminating the environment.
- Assess the wound:
- See “Checklist for Wound Assessment” checklist for details.
- Drape the patient with a water-resistant underpad, if indicated, to protect the patient's clothing and linen.
- Apply gloves and other PPE as indicated. Goggles, face shield, and/or mask may be indicated.
- Cleanse the wound based on agency policy, using moistened gauze, commercial cleanser, or sterile irrigant. When using moistened gauze, use one moistened 2" x 2" sterile gauze per stroke. Work in straight lines, moving away from the wound with each stroke. Strokes should move from a clean area to a dirty area and from top to bottom.
- Note: A suture line is considered the “least contaminated” area and should be cleansed first.
- Cleanse around the drain (if present):
- Clean around the drain site using a circular stroke, starting with the area immediately next to the drain.
- Using a new swab with each stroke, cleanse immediately next to the drain in a circular motion. With the next stroke, move a little farther out from the drain. Continue this process with subsequent circular swabs until the skin surrounding the drain is cleaned.
- Remove gloves, perform hand hygiene, and apply new gloves.
- Apply sterile dressing (4" x 4" sterile gauze) using nontouch technique so that the dressing touching the wound remains sterile.
- Apply outer dressing if required. Secure the dressing with tape as needed.
- Remove gloves and perform hand hygiene.
- Assist the patient to a comfortable position, ask if they have any questions, and thank them for their time.
- Ensure safety measures when leaving the room:
- CALL LIGHT: Within reach
- BED: Low and locked (in lowest position and brakes on)
- SIDE RAILS: Secured
- TABLE: Within reach
- ROOM: Risk-free for falls (scan room and clear any obstacles)
- Perform hand hygiene.
- Document the procedure and related assessment findings. Compare the wound assessment to previous documentation and analyze healing progress. Report any concerns according to agency policy.

