Open Resources for Nursing (Open RN)
To perform and document an accurate assessment of the head and neck, it is important to understand their basic anatomy and physiology.
Anatomy
Skull
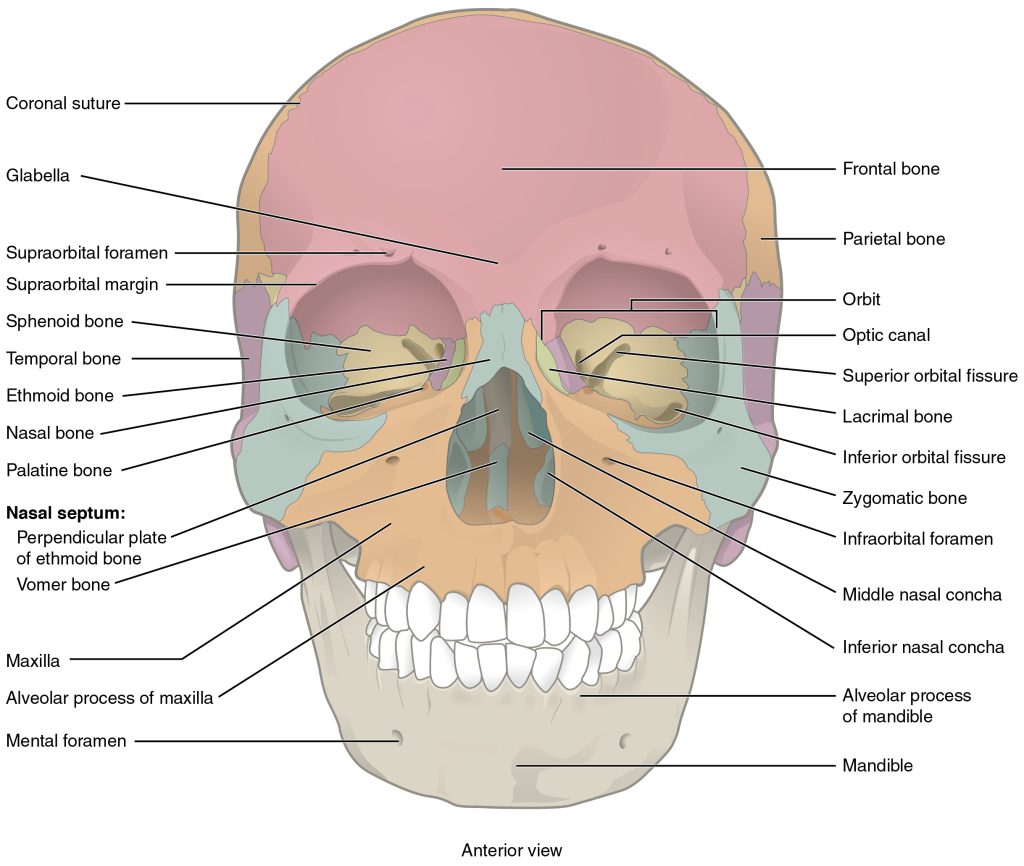
The anterior skull consists of facial bones that provide the bony support for the eyes and structures of the face. This anterior view of the skull is dominated by the openings of the orbits, the nasal cavity, and the upper and lower jaws. See Figure 7.1[1] for an illustration of the skull. The orbit is the bony socket that houses the eyeball and the muscles that move the eyeball. Inside the nasal area of the skull, the nasal cavity is divided into halves by the nasal septum that consists of both bone and cartilage components. The mandible forms the lower jaw and is the only movable bone in the skull. The maxilla forms the upper jaw and supports the upper teeth.[2]
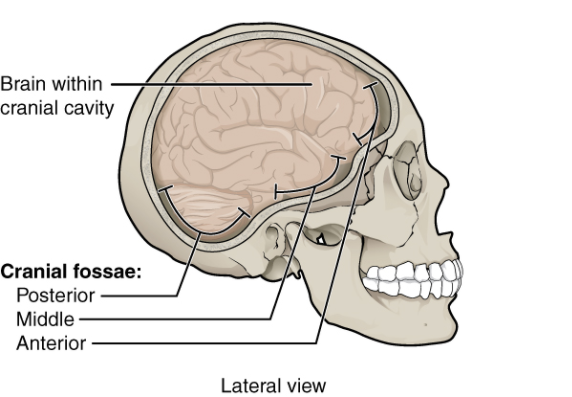
The cranium, or “brain case,” surrounds and protects the brain that occupies the cranial cavity. See Figure 7.2[3] for an image of the brain within the cranial cavity. The brain case consists of eight bones, including the paired parietal and temporal bones, plus the unpaired frontal, occipital, sphenoid, and ethmoid bones.[4]
A suture is an interlocking joint between adjacent bones of the skull and is filled with dense, fibrous connective tissue that unites the bones. In a newborn infant, the pressure from vaginal delivery compresses the head and causes the bony plates to overlap at the sutures, creating a small ridge. Over the next few days, the head expands, the overlapping disappears, and the edges of the bony plates meet edge to edge. This is the normal position for the remainder of the life span and the sutures become immobile.
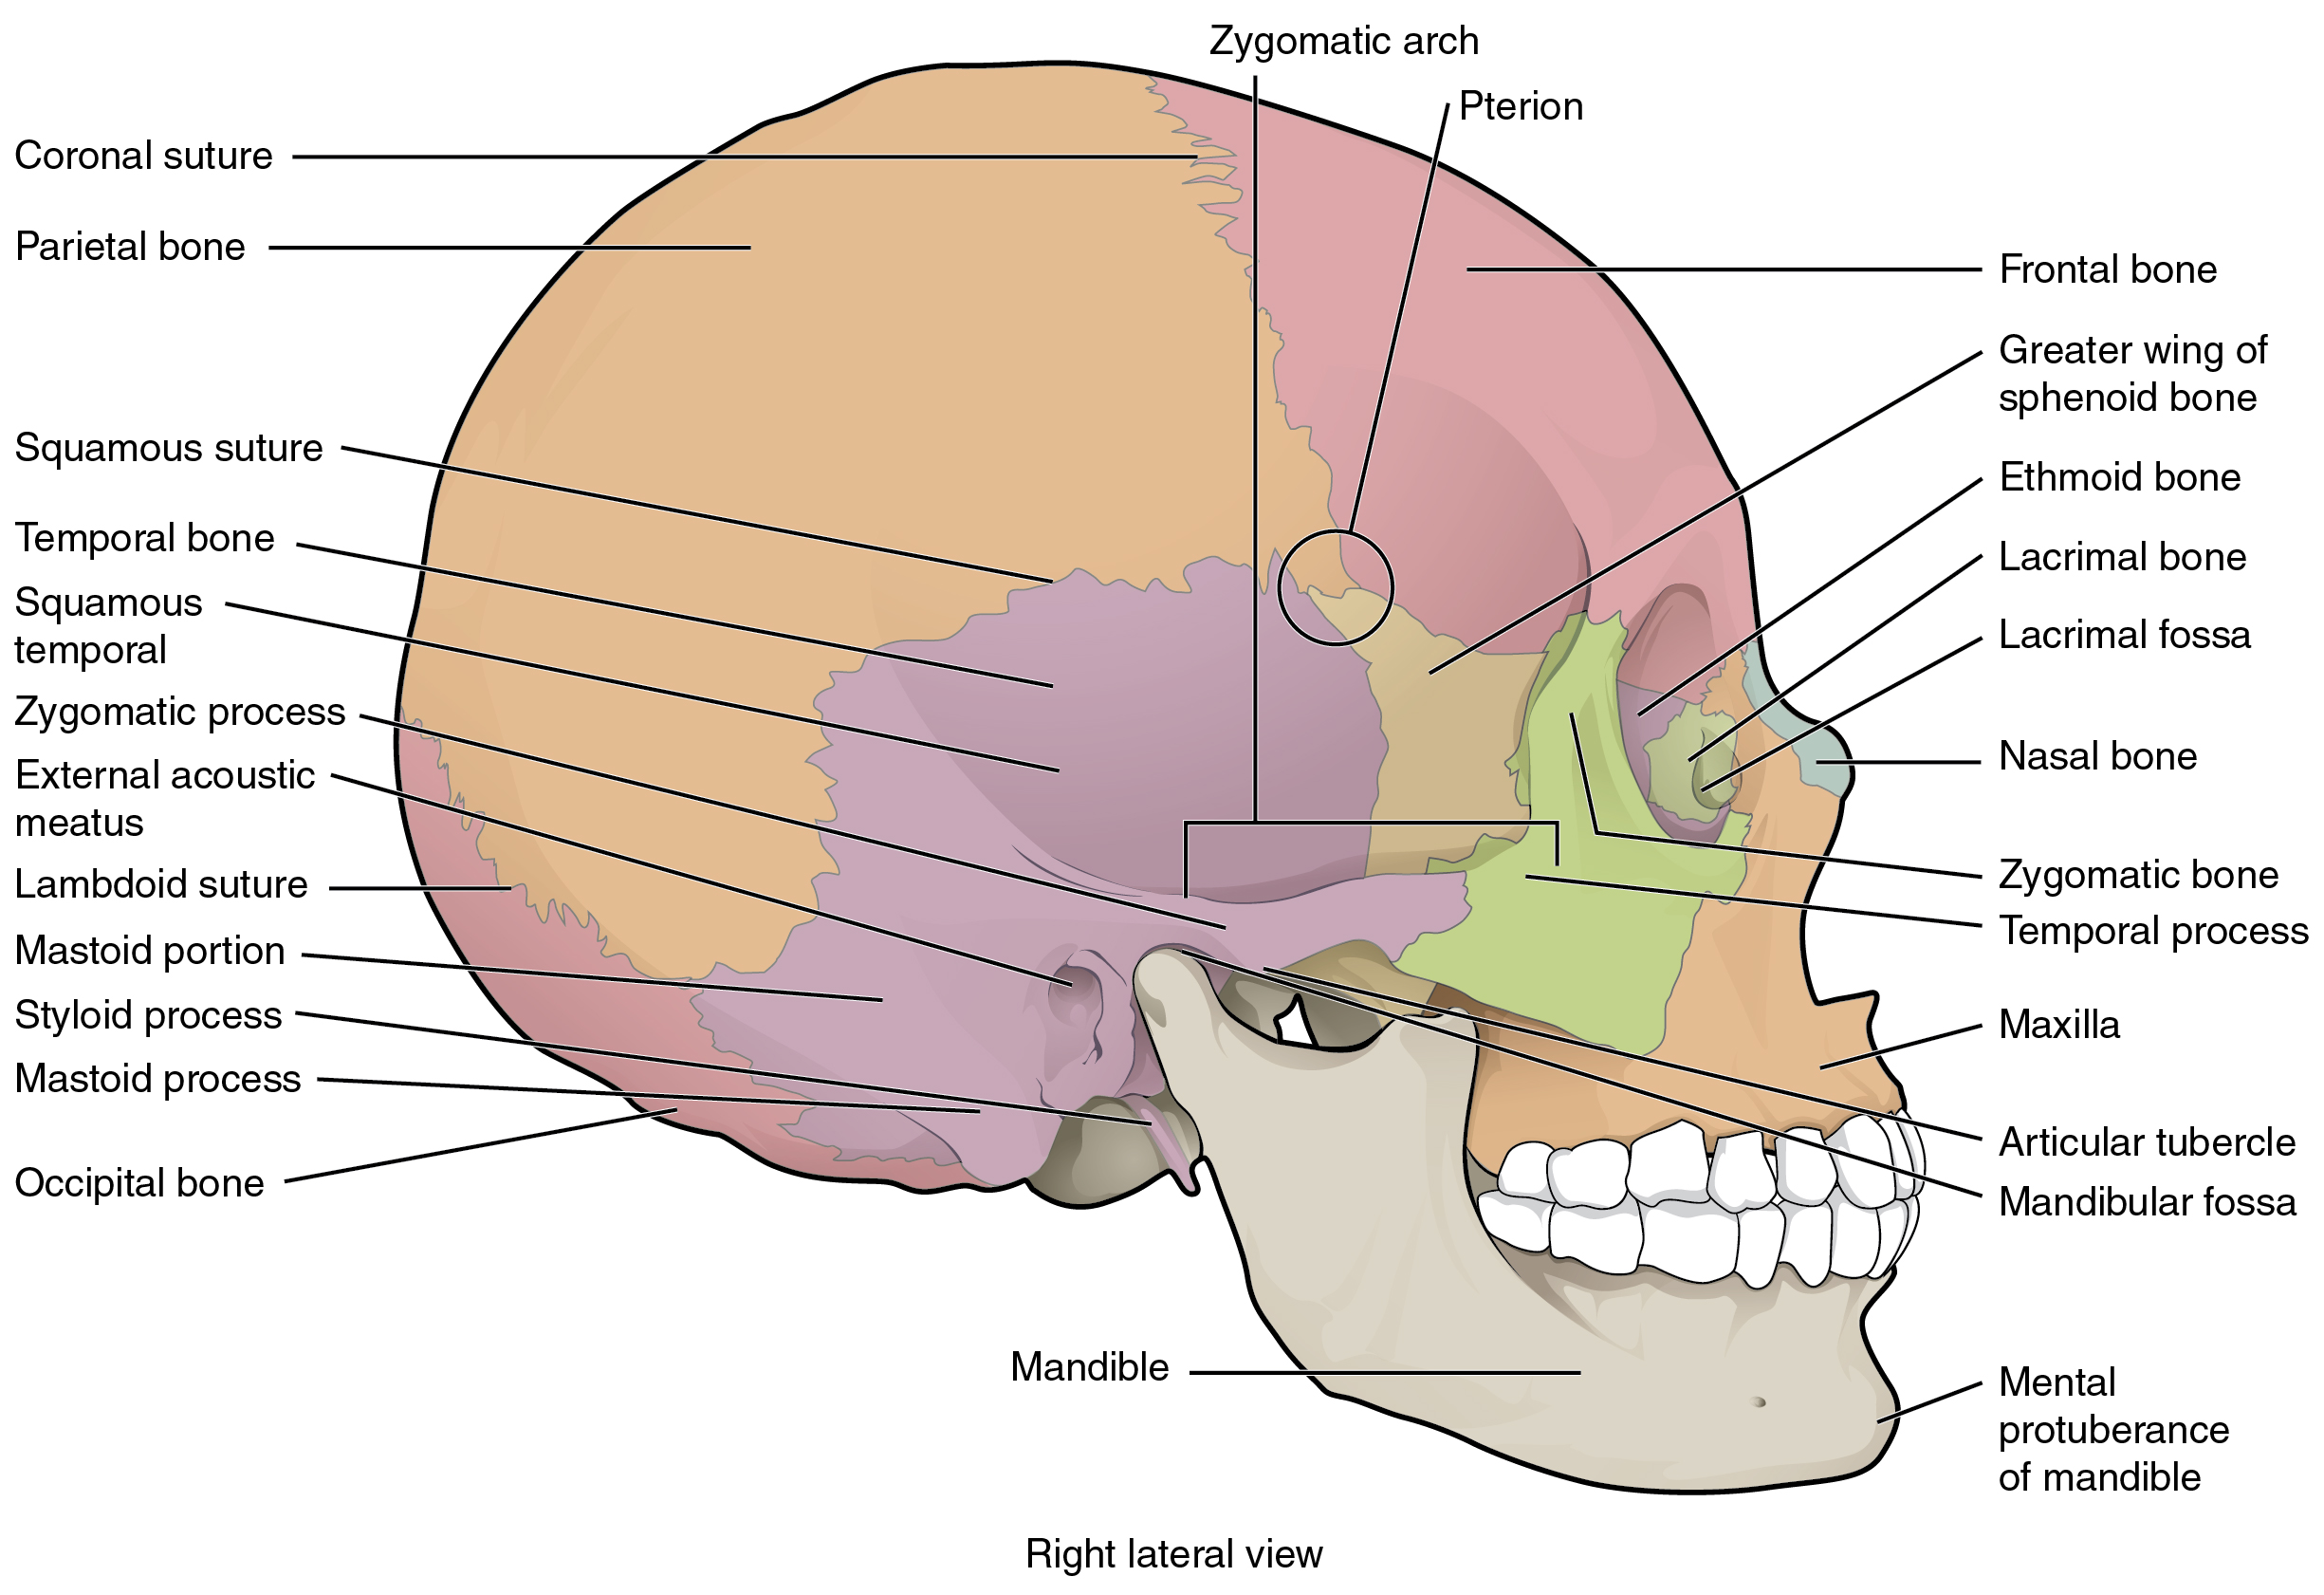
See Figure 7.3[5] for an illustration of two of the sutures, the coronal and squamous sutures, on the lateral view of the head. The coronal suture is seen on the top of the skull. It runs from side to side across the skull and joins the frontal bone to the right and left parietal bones. The squamous suture is located on the lateral side of the skull. It unites the squamous portion of the temporal bone with the parietal bone. At the intersection of the coronal and squamous sutures is the pterion, a small, capital H-shaped suture line region that unites the frontal bone, parietal bone, temporal bone, and greater wing of the sphenoid bone. The pterion is an important clinical landmark because located immediately under it, inside the skull, is a major branch of an artery that supplies the brain. A strong blow to this region can fracture the bones around the pterion. If the underlying artery is damaged, bleeding can cause the formation of a collection of blood, called a hematoma, between the brain and interior of the skull, which can be life-threatening.[6]
Paranasal Sinuses
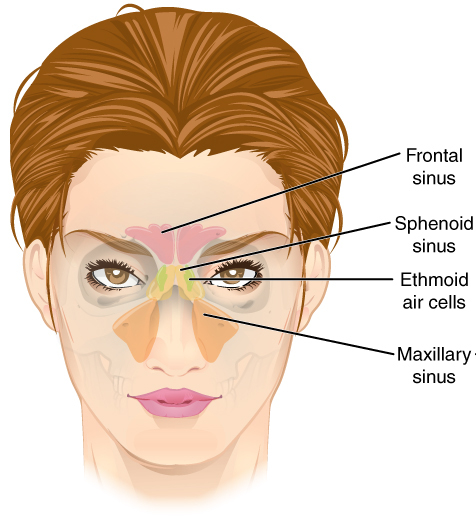
The paranasal sinuses are hollow, air-filled spaces located within the skull. See Figure 7.4[7] for an illustration of the sinuses. The sinuses connect with the nasal cavity and are lined with nasal mucosa. They reduce bone mass, lightening the skull, and also add resonance to the voice. When a person has a cold or sinus congestion, the mucosa swells and produces excess mucus that often obstructs the narrow passageways between the sinuses and the nasal cavity. The resulting pressure produces pain and discomfort.[8]
Each of the paranasal sinuses is named for the skull bone that it occupies. The frontal sinus is located just above the eyebrows within the frontal bone. The largest sinus, the maxillary sinus, is paired and located within the right and left maxillary bones just below the orbits. The maxillary sinuses are most commonly involved during sinus infections. The sphenoid sinus is a single, midline sinus located within the body of the sphenoid bone. The lateral aspects of the ethmoid bone contain multiple small spaces separated by very thin, bony walls. Each of these spaces is called an ethmoid air cell.
Anatomy of Nose, Pharynx, and Mouth
See Figure 7.5[9] to review the anatomy of the head and neck. The major entrance and exit for the respiratory system is through the nose. The bridge of the nose consists of bone, but the protruding portion of the nose is composed of cartilage. The nares are the nostril openings that open into the nasal cavity and are separated into left and right sections by the nasal septum. The floor of the nasal cavity is composed of the palate. The hard palate is located at the anterior region of the nasal cavity and is composed of bone. The soft palate is located at the posterior portion of the nasal cavity and consists of muscle tissue. The uvula is a small, teardrop-shaped structure located at the apex of the soft palate. Both the uvula and soft palate move like a pendulum during swallowing, swinging upward to close off the nasopharynx and prevent ingested materials from entering the nasal cavity.[10]
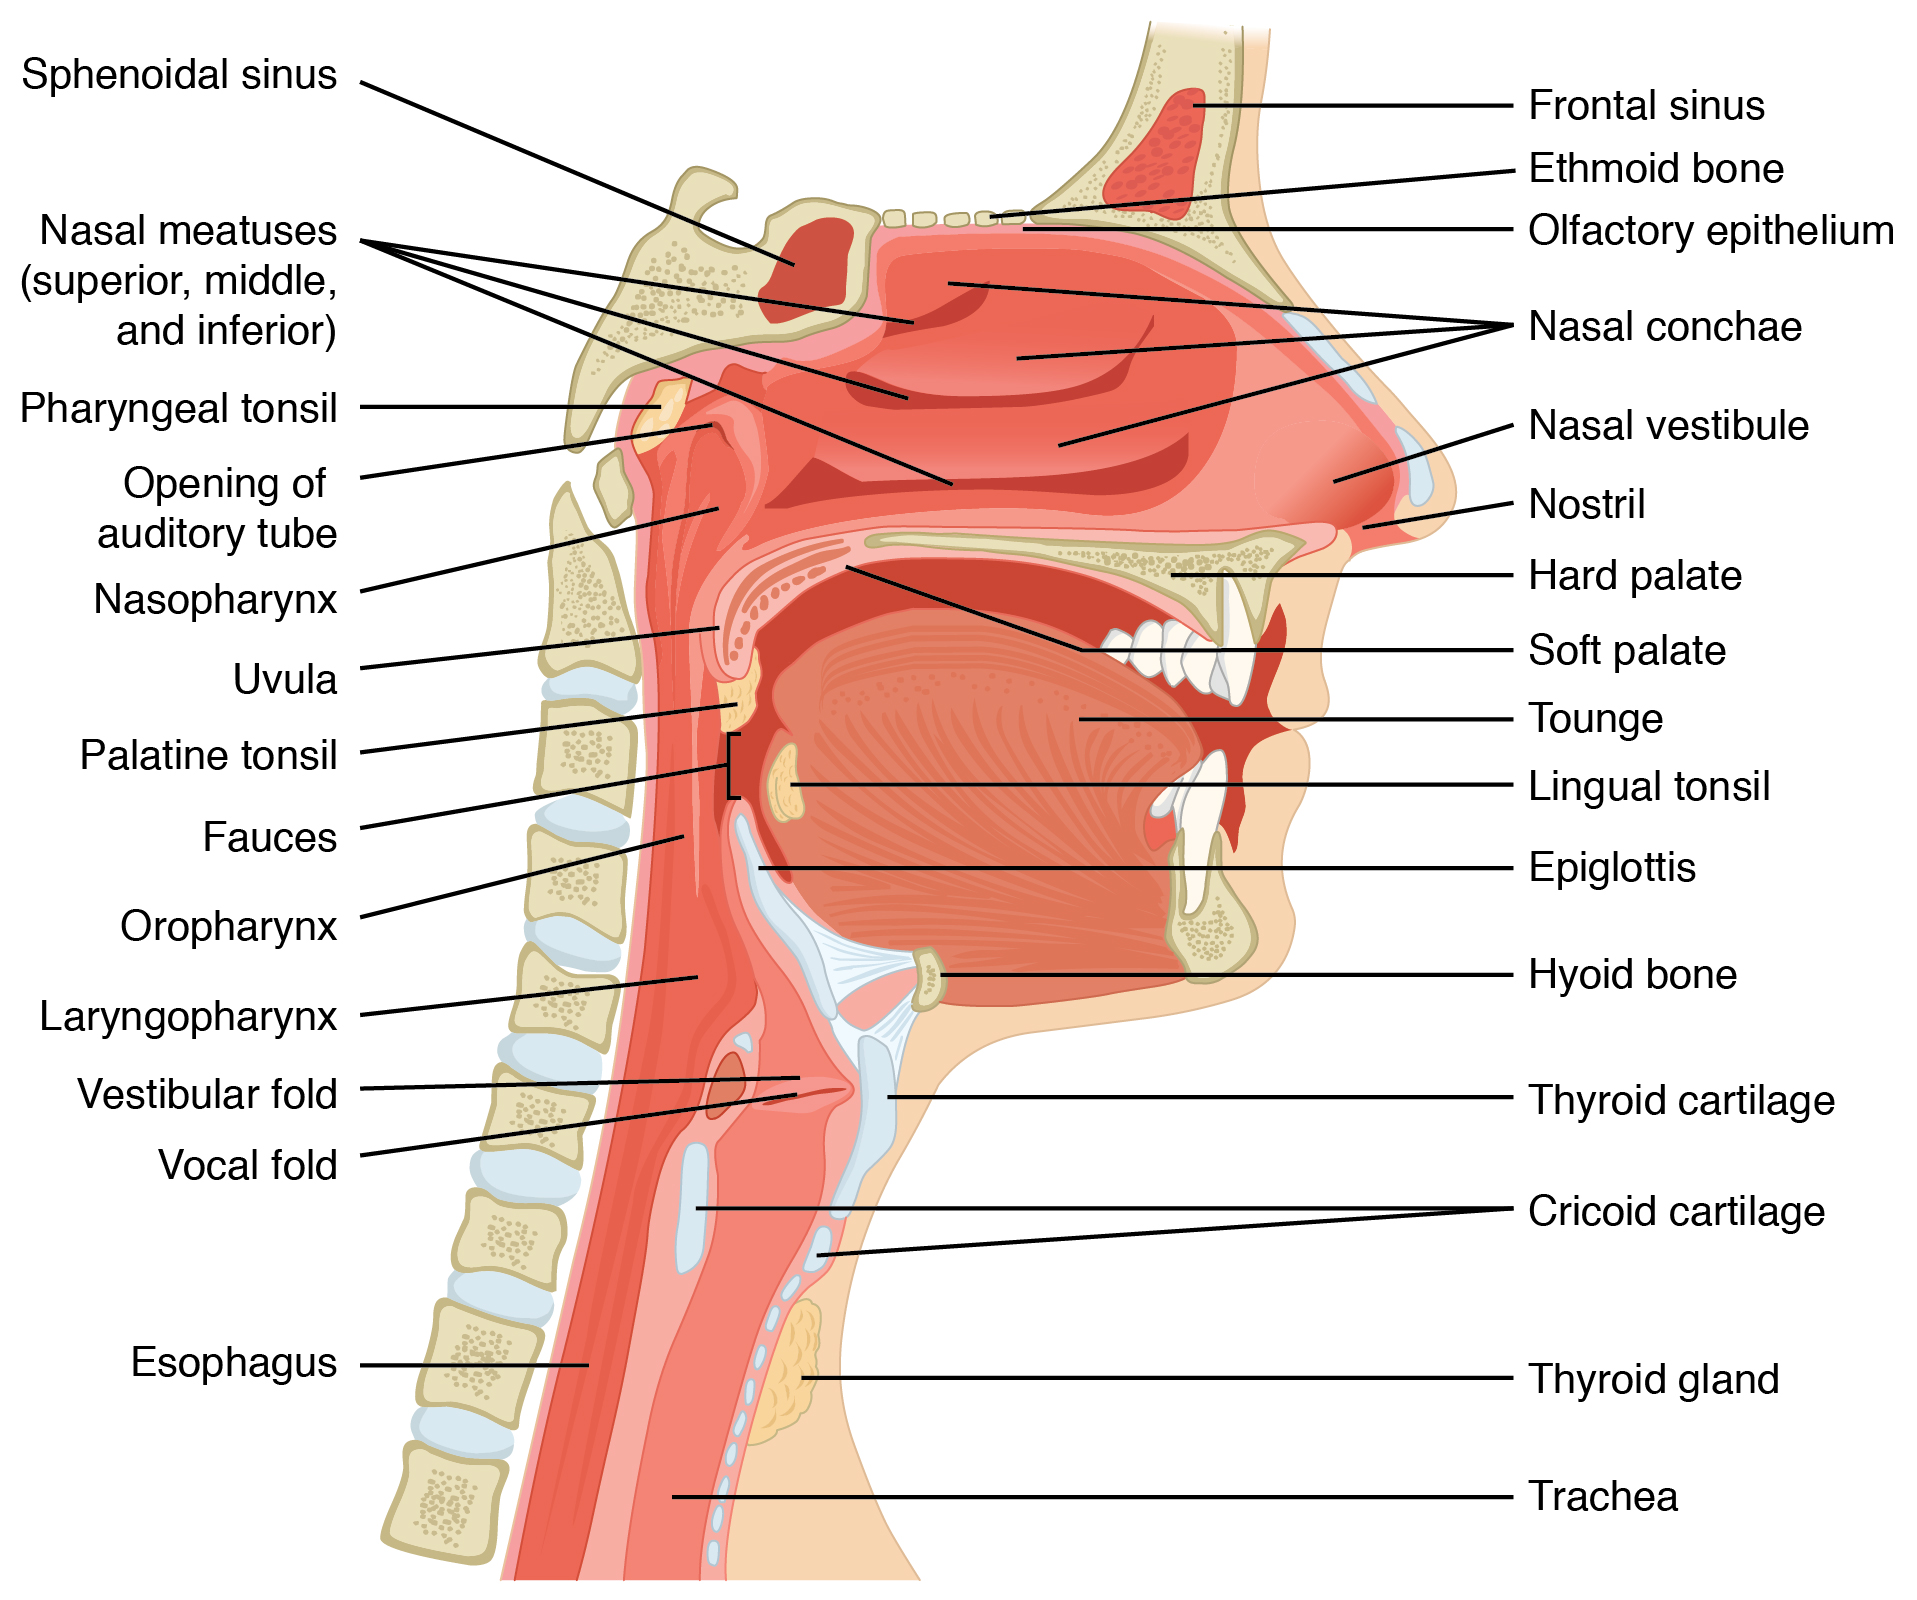
As air is inhaled through the nose, the paranasal sinuses warm and humidify the incoming air as it moves into the pharynx. The pharynx is a tube-lined mucous membrane that begins at the nasal cavity and is divided into three major regions: the nasopharynx, the oropharynx, and the laryngopharynx.[11]
The nasopharynx serves only as an airway. At the top of the nasopharynx is the pharyngeal tonsil, commonly referred to as the adenoids. Adenoids are lymphoid tissue that trap and destroy invading pathogens that enter during inhalation. They are large in children but tend to regress with age and may even disappear.[12]
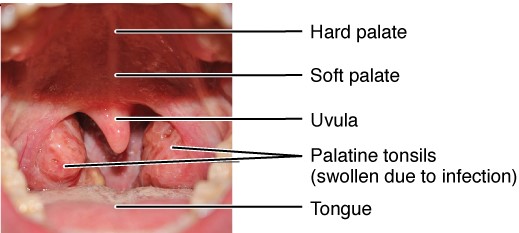
The oropharynx is a passageway for both air and food. The oropharynx is bordered superiorly by the nasopharynx and anteriorly by the oral cavity. The oropharynx contains two sets of tonsils, the palatine and lingual tonsils. The palatine tonsil is located laterally in the oropharynx, and the lingual tonsil is located at the base of the tongue. Similar to the pharyngeal tonsil, the palatine and lingual tonsils are composed of lymphoid tissue and trap and destroy pathogens entering the body through the oral or nasal cavities. See Figure 7.6[13] for an image of the oral cavity and oropharynx with enlarged palatine tonsils.
The laryngopharynx is inferior to the oropharynx and posterior to the larynx. It continues the route for ingested material and air until its inferior end where the digestive and respiratory systems diverge. Anteriorly, the laryngopharynx opens into the larynx, and posteriorly, it enters the esophagus that leads to the stomach. The larynx connects the pharynx to the trachea and helps regulate the volume of air that enters and leaves the lungs. It also contains the vocal cords that vibrate as air passes over them to produce the sound of a person’s voice. The trachea extends from the larynx to the lungs. The epiglottis is a flexible piece of cartilage that covers the opening of the trachea during swallowing to prevent ingested material from entering the trachea.[14]
Muscles and Nerves of the Head and Neck
Facial Muscles
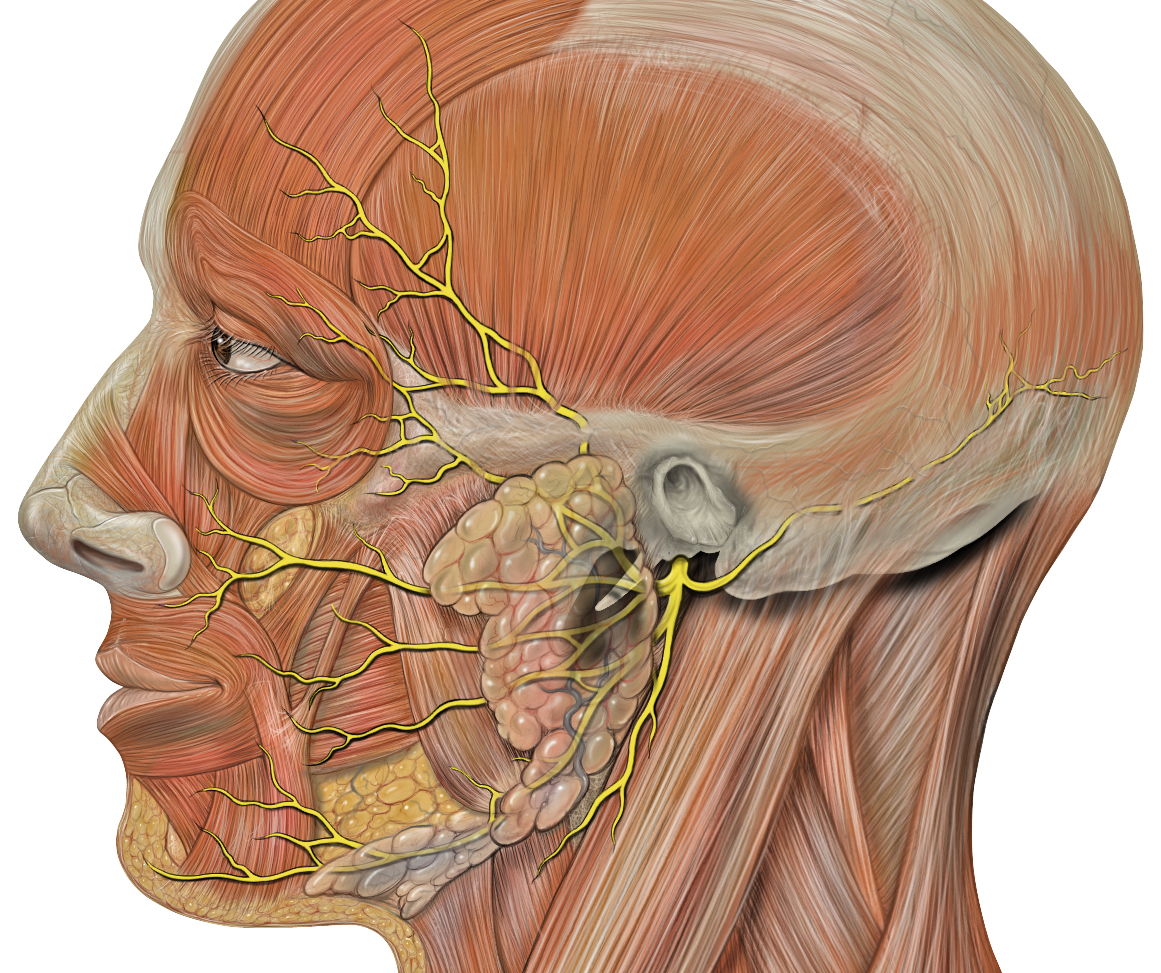
Several nerves innervate the facial muscles to create facial expressions. See Figure 7.7[15] for an illustration of nerves innervating facial muscles. These nerves and muscles are tested during a cranial nerve exam. See more information about performing a cranial nerve exam in the “Neurological Assessment” chapter.
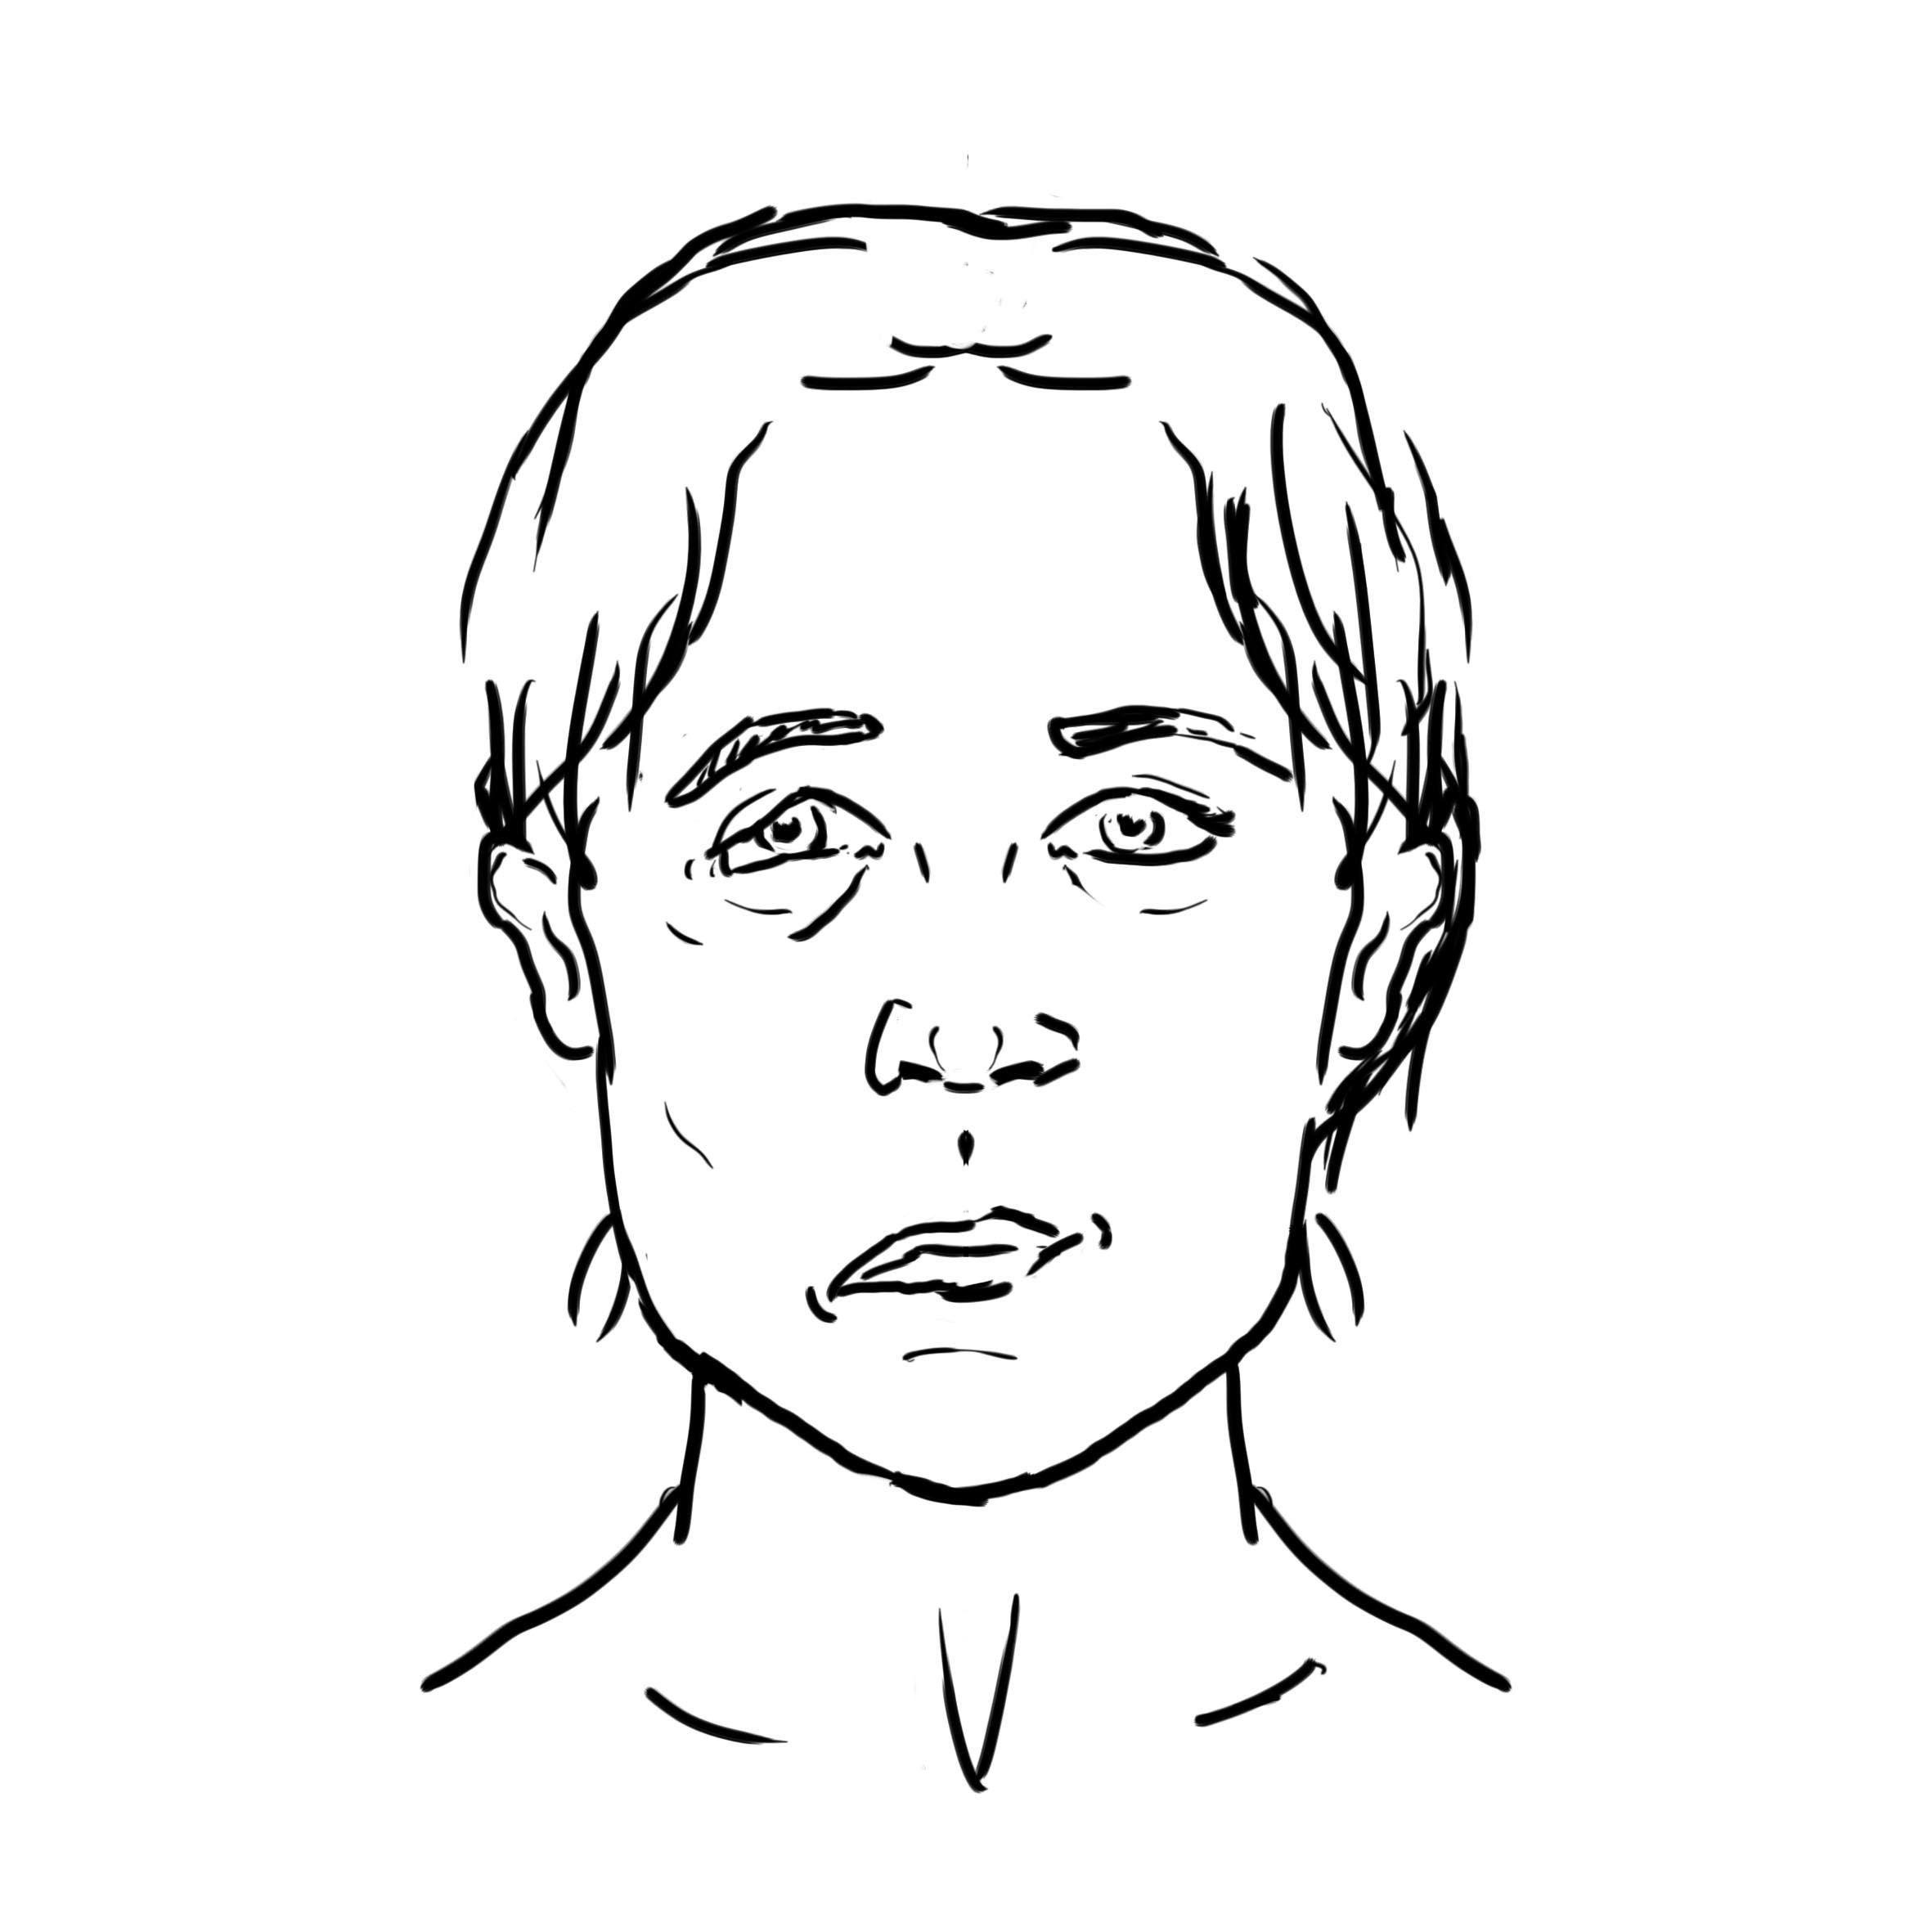
When a patient is experiencing a cerebrovascular accident (i.e., stroke), it is common for facial drooping to occur. Facial drooping is an asymmetrical facial expression that occurs due to damage of the nerve innervating a specific part of the face. See Figure 7.8[16] for an image of facial drooping occurring on the patient’s right side of their face.
Neck Muscles
The muscles of the anterior neck assist in swallowing and speech by controlling the positions of the larynx and the hyoid bone, a horseshoe-shaped bone that functions as a solid foundation on which the tongue can move. The head, attached to the top of the vertebral column, is balanced, moved, and rotated by the neck muscles. When these muscles act unilaterally, the head rotates. When they contract bilaterally, the head flexes or extends. The major muscle that laterally flexes and rotates the head is the sternocleidomastoid. The trapezius muscle elevates the shoulders (shrugging), pulls the shoulder blades together, and tilts the head backwards. See Figure 7.9[17] for an illustration of the sternocleidomastoid and trapezius muscles.[18] Both of these muscles are tested during a cranial nerve assessment. See more information about cranial nerve assessment in the “Neurological Assessment” chapter.

Jaw Muscles
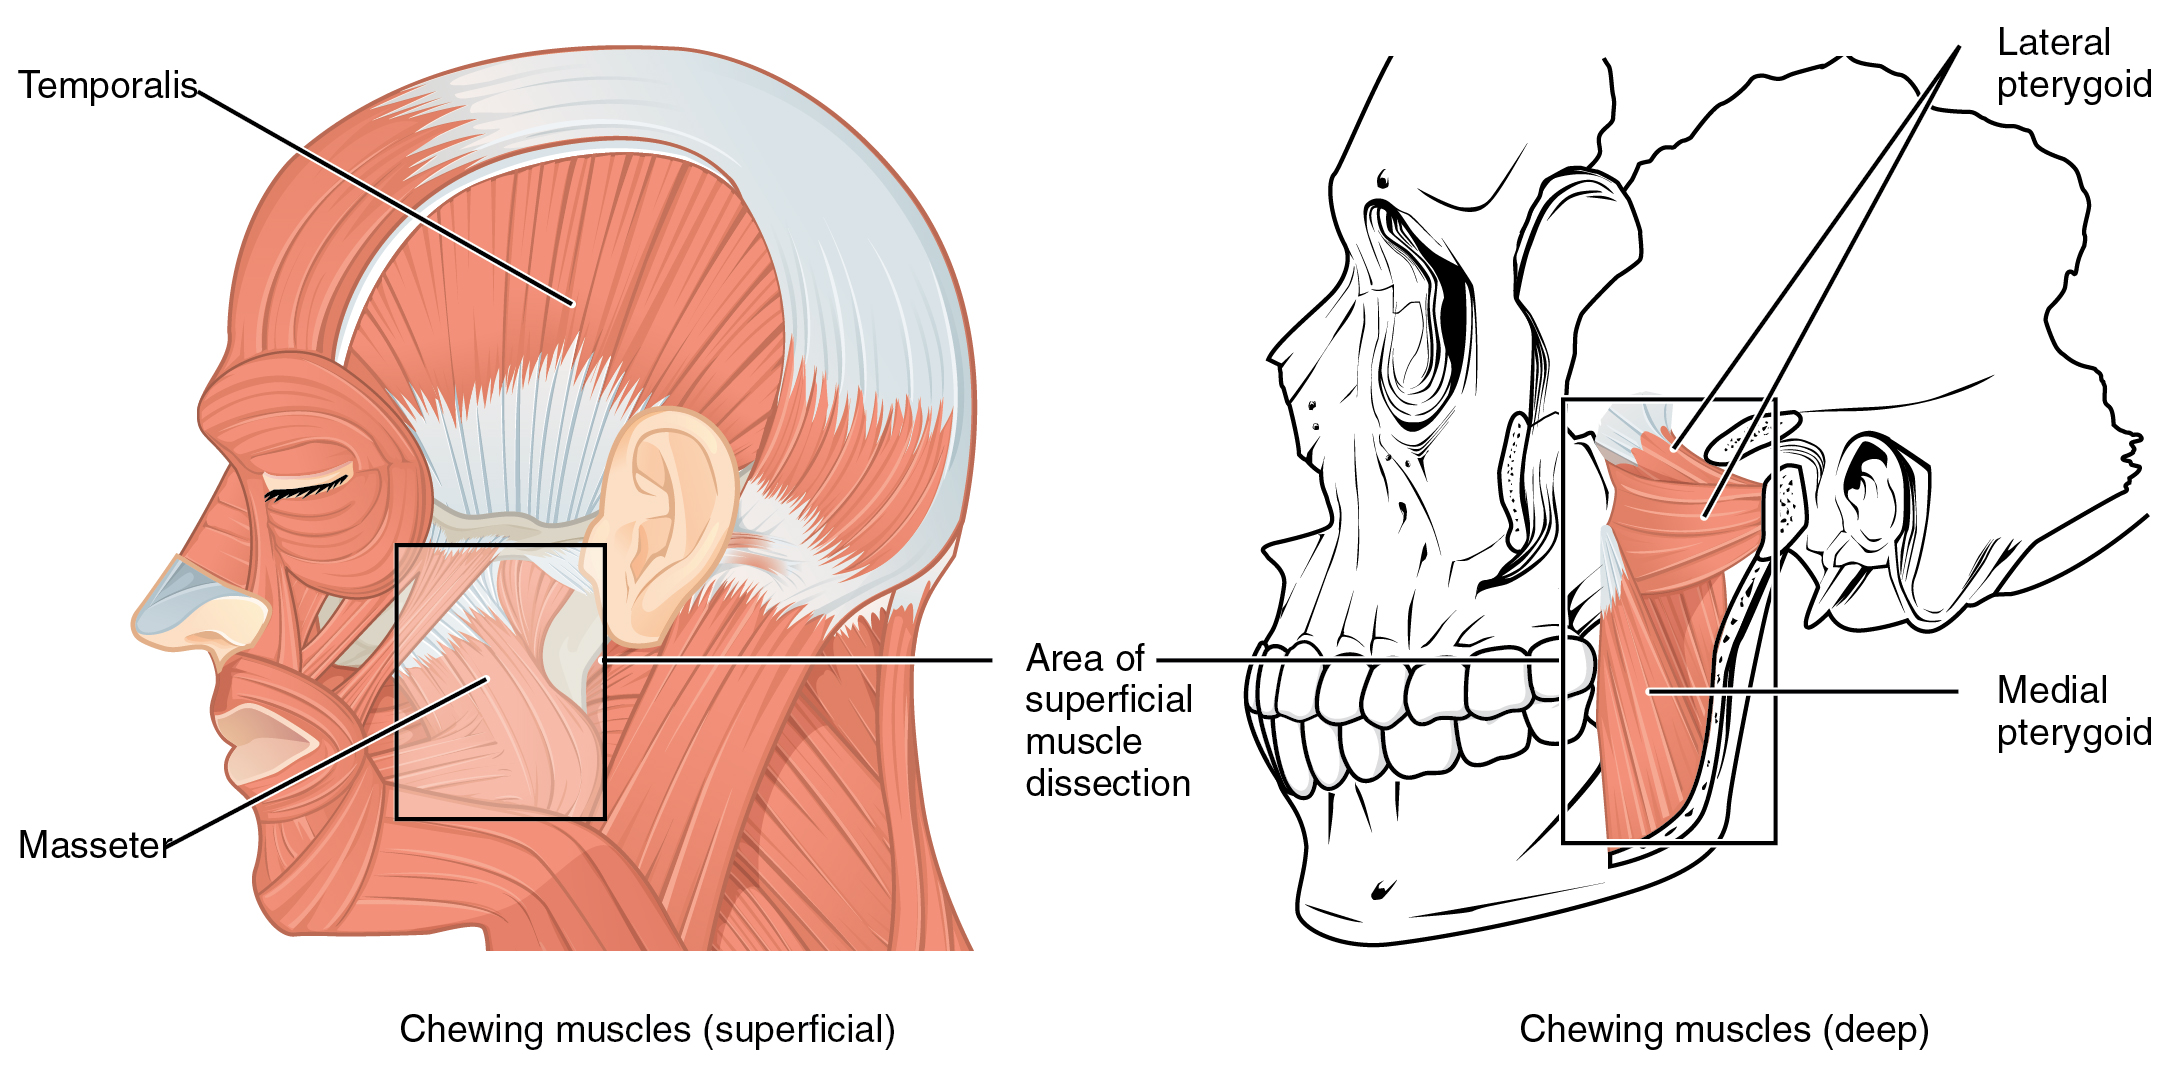
The masseter muscle is the main muscle used for chewing because it elevates the mandible (lower jaw) to close the mouth. It is assisted by the temporalis muscle that retracts the mandible. The temporalis muscle can be felt moving by placing fingers on the patient’s temple as they chew. See Figure 7.10[19] for an illustration of the masseter and temporalis muscles.[20]
Tongue Muscles
Muscles of the tongue are necessary for chewing, swallowing, and speech. Because it is so moveable, the tongue facilitates complex speech patterns and sounds.[21]
Airway and Unconsciousness
When a patient becomes unconscious and is lying supine, the tongue often moves backwards and blocks the airway. This is why it is important to open the airway when performing CPR by using a chin-thrust maneuver. See Figure 7.11[22] for an image of the tongue blocking the airway. In a similar manner, when a patient is administered general anesthesia during surgery, the tongue relaxes and can block the airway. For this reason, endotracheal intubation is performed during surgery with general anesthesia by placing a tube into the trachea to maintain an open airway to the lungs. After surgery, patients often report a sore or scratchy throat for a few days due to the endotracheal intubation.[23]

Swallowing
Swallowing is a complex process that uses 50 pairs of muscles and many nerves to receive food in the mouth, prepare it, and move it from the mouth to the stomach. Swallowing occurs in three stages. During the first stage, called the oral phase, the tongue collects the food or liquid and makes it ready for swallowing. The tongue and jaw move solid food around in the mouth so it can be chewed and made the right size and texture to swallow by mixing food with saliva. The second stage begins when the tongue pushes the food or liquid to the back of the mouth. This triggers a swallowing response that passes the food through the pharynx. During this phase, called the pharyngeal phase, the epiglottis closes off the larynx and breathing stops to prevent food or liquid from entering the airway and lungs. The third stage begins when food or liquid enters the esophagus, and it is carried to the stomach. The passage through the esophagus, called the esophageal phase, usually occurs in about three seconds.[24]
View the following video from Medline Plus on the swallowing process:
Dysphagia is the medical term for swallowing difficulties that occur when there is a problem with the nerves or structures involved in the swallowing process.[26] Nurses are often the first to notice signs of dysphagia in their patients that can occur due to a multitude of medical conditions such as a stroke, head injury, or dementia. For more information about the symptoms, screening, and treatment for dysphagia, go to the “Common Conditions of the Head and Neck” section.
Lymphatic System
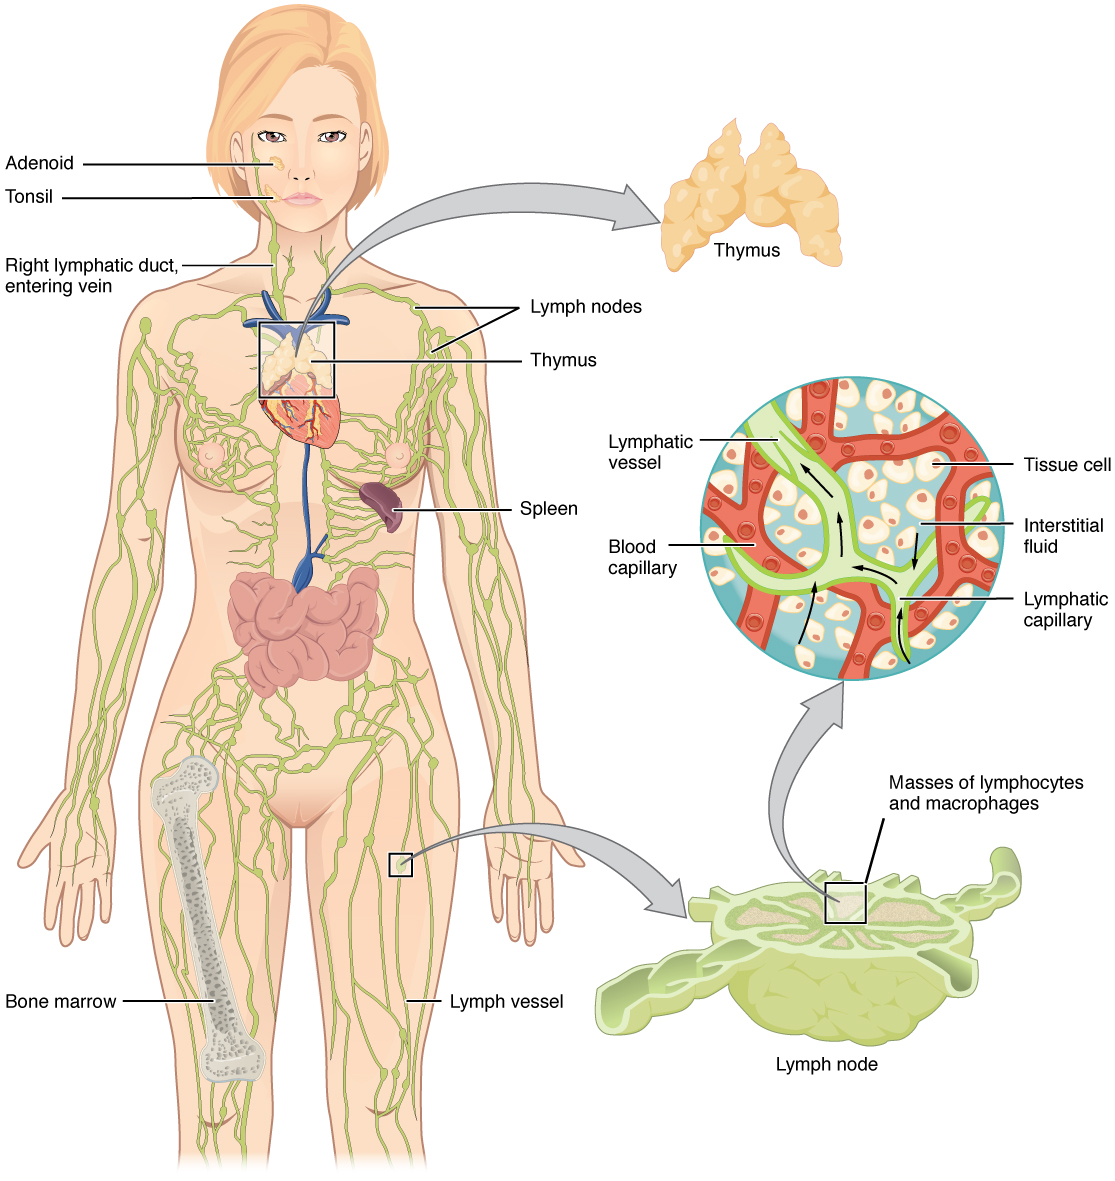
The lymphatic system is the system of vessels, cells, and organs that carries excess interstitial fluid to the bloodstream and filters pathogens from the blood through lymph nodes found near the neck, armpits, chest, abdomen, and groin. See Figure 7.12[27] and Figure 7.13[28] for an illustration of the lymph nodes found in the head and neck regions. When a person is fighting off an infection, the lymph nodes in that region become enlarged, indicating an active immune response to infection.[29]
![]“Cervical lymph nodes and level.png” by Mikael Häggström, M.D. is licensed under CC0 1.0 Illustration of lymph nodes in head and neck, with labels](https://open.maricopa.edu/app/uploads/sites/683/2024/09/Cervical_lymph_nodes_and_levels-3.png)
- “704 Skull -01.jpg” by OpenStax College is licensed under CC BY 3.0. Access for free at https://openstax.org/books/anatomy-and-physiology/pages/7-2-the-skull ↵
- This work is a derivative of Anatomy & Physiology by OpenStax and is licensed under CC BY 4.0. Access for free at https://openstax.org/books/anatomy-and-physiology/pages/1-introduction ↵
- This work is a derivative of “727_Cranial_Fossae.jpg” by OpenStax and is licensed under CC BY 3.0. Access for free at https://openstax.org/books/anatomy-and-physiology/pages/7-2-the-skull ↵
- This work is a derivative of Anatomy & Physiology by OpenStax and is licensed under CC BY 4.0. Access for free at https://openstax.org/books/anatomy-and-physiology/pages/1-introduction ↵
- “705 Lateral View of Skull-01.jpg” by OpenStax is licensed under CC BY 3.0. Access for free at https://openstax.org/books/anatomy-and-physiology/pages/7-2-the-skull ↵
- This work is a derivative of Anatomy & Physiology by OpenStax and is licensed under CC BY 4.0. Access for free at https://openstax.org/books/anatomy-and-physiology/pages/1-introduction ↵
- “Paranasal Sinuses ant.jpg” by OpenStax is licensed under CC BY-SA 3.0. Access for free at https://openstax.org/books/anatomy-and-physiology/pages/7-2-the-skull ↵
- This work is a derivative of Anatomy & Physiology by OpenStax and is licensed under CC BY 4.0. Access for free at https://openstax.org/books/anatomy-and-physiology/pages/1-introduction ↵
- "2303 Anatomy of Nose-Pharynx-Mouth-Larynx.jpg” by OpenStax is licensed CC BY 3.0 ↵
- This work is a derivative of Anatomy & Physiology by OpenStax and is licensed under CC BY 4.0. Access for free at https://openstax.org/books/anatomy-and-physiology/pages/1-introduction ↵
- This work is a derivative of Anatomy & Physiology by OpenStax and is licensed under CC BY 4.0. Access for free at https://openstax.org/books/anatomy-and-physiology/pages/1-introduction ↵
- This work is a derivative of Anatomy & Physiology by OpenStax and is licensed under CC BY 4.0. Access for free at https://openstax.org/books/anatomy-and-physiology/pages/1-introduction ↵
- This work is a derivative of “2209 Location and Histology of Tonsils.jpg” by OpenStax and is licensed under CC BY 3.0. Access for free at https://openstax.org/books/anatomy-and-physiology/pages/21-1-anatomy-of-the-lymphatic-and-immune-systems ↵
- This work is a derivative of Anatomy & Physiology by OpenStax and is licensed under CC BY 4.0. Access for free at https://openstax.org/books/anatomy-and-physiology/pages/1-introduction ↵
- “Head facial nerve branches.jpg” by Patrick J. Lynch, medical illustrator is licensed under CC BY 2.5 ↵
- “Stroke-facial-droop.jpg” by Another-anon-artist-234 is licensed under CC0 1.0 ↵
- “1111 Posterior and Side Views of the Next.jpg” by OpenStax is licensed under CC BY 4.0. Access for free at https://openstax.org/books/anatomy-and-physiology/pages/11-3-axial-muscles-of-the-head-neck-and-back. ↵
- This work is a derivative of Anatomy & Physiology by OpenStax and is licensed under CC BY 4.0. Access for free at https://openstax.org/books/anatomy-and-physiology/pages/1-introduction ↵
- “1108 Muscle that Move the Lower Jaw.jpg” by OpenStax is licensed under CC BY 4.0. Access for free at https://openstax.org/books/anatomy-and-physiology/pages/11-3-axial-muscles-of-the-head-neck-and-back ↵
- This work is a derivative of Anatomy & Physiology by OpenStax and is licensed under CC BY 4.0. Access for free at https://openstax.org/books/anatomy-and-physiology/pages/1-introduction ↵
- This work is a derivative of Anatomy & Physiology by OpenStax and is licensed under CC BY 4.0. Access for free at https://openstax.org/books/anatomy-and-physiology/pages/1-introduction ↵
- “Airway closed in an unconscious patient because the head inflexed forward.jpg” by Dr. Lorimer is licensed under CC BY-SA 4.0 ↵
- This work is a derivative of Anatomy & Physiology by OpenStax and is licensed under CC BY 4.0. Access for free at https://openstax.org/books/anatomy-and-physiology/pages/1-introduction ↵
- National Institute on Deafness and Other Communication Disorders. (2017, March 6). Dysphagia. https://www.nidcd.nih.gov/health/dysphagia ↵
- A.D.A.M. Medical Encyclopedia [Internet]. Atlanta (GA): A.D.A.M. Inc.; c1997-2021. Swallowing [Video]. [updated 2019, July 11]. https://medlineplus.gov/ency/anatomyvideos/000126.htm ↵
- National Institute on Deafness and Other Communication Disorders. (2017, March 6). Dysphagia. https://www.nidcd.nih.gov/health/dysphagia ↵
- “2201 Anatomy of the Lymphatic System.jpg” by OpenStax College is licensed under CC BY 3.0. Access for free at https://openstax.org/books/anatomy-and-physiology/pages/21-1-anatomy-of-the-lymphatic-and-immune-systems ↵
- “Cervical lymph nodes and level.png” by Mikael Häggström, M.D. is licensed under CC0 1.0 ↵
- This work is a derivative of Anatomy & Physiology by OpenStax and is licensed under CC BY 4.0. Access for free at https://openstax.org/books/anatomy-and-physiology/pages/1-introduction ↵
Drain management systems are commonly used during postoperative surgical management to remove drainage, prevent infection, and enhance wound healing. A drain may be superficial in the skin or deep in an organ, duct, or cavity, such as a hematoma. A patient may have several drains depending on the extent and type of surgery. A closed system uses a vacuum system to withdraw fluids and collect them in a reservoir. Closed systems must be emptied and drainage measured routinely according to agency policy.
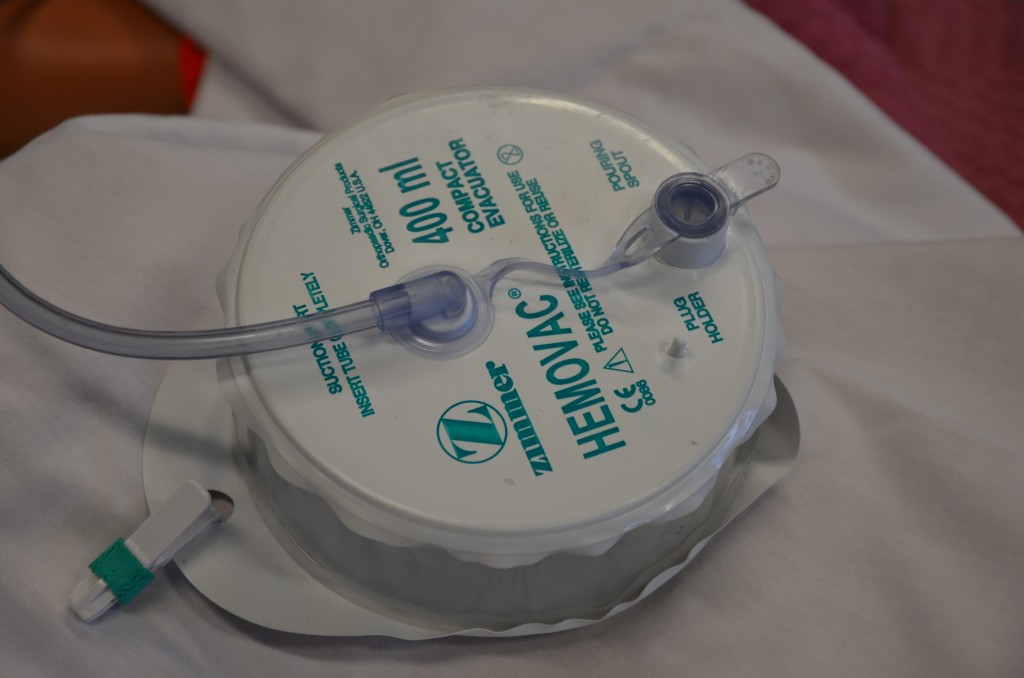
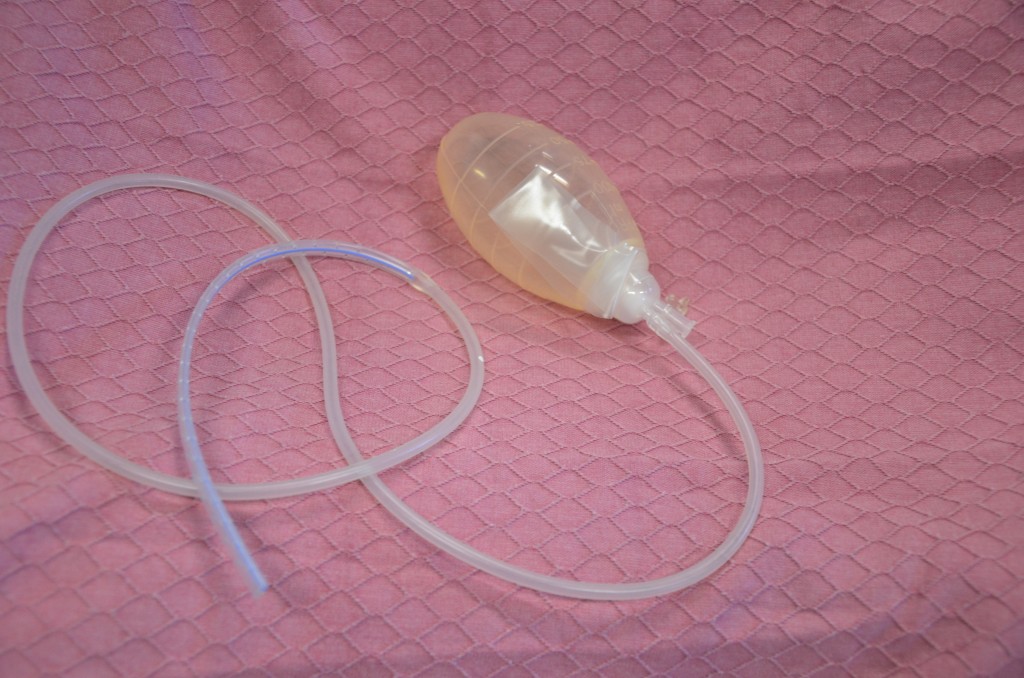
Drainage tubes contain perforations to allow fluid to drain from the surgical wound site. The drainage is collected in a closed sterile collection system/reservoir, such as a Hemovac or Jackson-Pratt. The amount of drainage varies depending on location and type of surgery. A Hemovac drain (see Figure 20.38[1]) can hold up to 500 mL of drainage. A Jackson-Pratt (JP) drain (see Figure 20.39[2]) is used for smaller amounts of drainage, usually ranging from 25 to 50 mL. Drains are usually sutured to the skin to prevent accidental removal, and the drainage site is covered with a sterile dressing. The site and drain should be checked periodically throughout the shift to ensure the drain is functioning effectively and that no leaking is occurring.
Checklist for Drain Management
Use the checklist below to review the steps for completion of “Drain Management."
Steps
Disclaimer: Always review and follow agency policy regarding this specific skill.
- Gather supplies: drainage measurement container, nonsterile gloves, waterproof pad, and alcohol swab.
- Perform safety steps:
- Perform hand hygiene.
- Check the room for transmission-based precautions.
- Introduce yourself, your role, the purpose of your visit, and an estimate of the time it will take.
- Confirm patient ID using two patient identifiers (e.g., name and date of birth).
- Explain the process to the patient and ask if they have any questions.
- Be organized and systematic.
- Use appropriate listening and questioning skills.
- Listen and attend to patient cues.
- Ensure the patient’s privacy and dignity.
- Assess ABCs.
- Apply nonsterile gloves and goggles or face shield according to agency policy to reduce the transmission of microorganisms and protect against an accidental body fluid exposure.
- Maintaining a sterile technique, remove the plug from the pouring spout as indicated on the drain:
- Open the plug pointing away from your face to avoid an accidental splash of contaminated fluid.
- Maintain the plug’s sterility.
- Notice that the vacuum will be broken, and the reservoir (drainage collection system) will expand.
- Gently tilt the opening of the reservoir toward the measuring container and pour out the drainage away from you to prevent exposure to body fluids. Do not touch the measuring container with the reservoir opening.
- Place the drainage container on the bed or hard surface, tilt it away from your face, and compress the drain to flatten it with one hand to remove all the air before closing the spout to establish the vacuum system.
- Cleanse the plug with the alcohol swab per agency policy. Maintaining sterility, place the plug back into the pour spout of the drainage system to establish the vacuum system of the drainage system.
- Secure the device onto the patient's gown using a safety pin; check patency and placement of tube. Ensure that enough slack is present in tubing and that the reservoir hangs lower than the wound. Proper placement of the reservoir allows gravity to facilitate wound drainage. Providing enough slack to accommodate patient movement prevents tension of the drainage system and pulling on the tubing and insertion site.
- Note the characteristics of the drainage: color, consistency, odor, and amount. Drainage counts as patient fluid output and must be documented on the patient chart per agency policy.
- Monitor and empty drains frequently in the postoperative period to reduce the weight of the reservoir and to assess drainage.
- Remove gloves and perform hand hygiene.
- Assist the patient to a comfortable position, ask if they have any questions, and thank them for their time.
- Ensure safety measures when leaving the room:
- CALL LIGHT: Within reach
- BED: Low and locked (in lowest position and brakes on)
- SIDE RAILS: Secured
- TABLE: Within reach
- ROOM: Risk-free for falls (scan room and clear any obstacles)
- Document the procedure and assessment findings according to agency policy. Report any unusual findings or concerns to the health care provider. If the amount of drainage increases or changes, notify the appropriate health care provider according to agency policy.
- If the amount of drainage significantly decreases, the drain may be ready to be assessed and removed.
- Notify required health care provider if the wound appears infected.
- Record the number of drains if there is more than one and record each one separately.
Learning Activities
(Answers to "Learning Activities" can be found in the "Answer Key" at the end of the book. Answers to interactive activity elements will be provided within the element as immediate feedback.)
Mr. Jones is a 76-year-old patient admitted to the medical surgical floor with complications of a nonhealing foot ulcer. Mr. Jones has a history of diabetes, hypertension, and COPD. He has a BMI of 29. His daily medications include metformin, Lisinopril, and prednisone. His wife has recently passed away and he lives alone.
- Based upon what is known about Mr. Jones, what factors might be contributing to his nonhealing wound?
- What other factors that influence wound healing might be important to assess with Mr. Jones?
Test your clinical judgment with an NCLEX Next Generation-style question: Chapter 20, Assignment 1.
Test your clinical judgment with an NCLEX Next Generation-style question: Chapter 20, Assignment 2.
Test your clinical judgment with an NCLEX Next Generation-style question: Chapter 20, Assignment 3.
Angiogenesis: The development of new capillaries in a wound base.
Arterial ulcers: Ulcers caused by lack of blood flow and oxygenation to tissues and typically occur in the distal areas of the body such as the feet, heels, and toes.
Debridement: The removal of nonviable tissue in a wound.
Dehiscence: The separation of the edges of a surgical wound.
Diabetic ulcers: Ulcers that typically develop on the plantar aspect of the feet and toes of patients with diabetes due to lack of sensation of pressure or injury.
Ecchymosis: Bruising that occurs when small veins and capillaries under the skin break.
Edema: Swelling.
Epithelialization: The development of new epidermis and granulation tissue.
Erythema: Redness.
Eschar: Dark brown/black, dry, thick, and leathery dead tissue in a wound base that must be removed for healing to occur.
Exudate: Fluid that oozes out of a wound; also commonly called pus.
Granulation tissue: New connective tissue in a wound base with fragile, thin-walled capillaries that must be protected.
Hematoma: An area of blood that collects outside of larger blood vessels.
Hemosiderin staining: Dark-colored discoloration of the lower legs due to blood pooling.
Hemostasis phase: The first phase of wound healing that occurs immediately after skin injury. Blood vessels constrict and clotting factors are activated.
Induration: Area of hardened tissue.
Inflammatory phase: The second phase of wound healing when vasodilation occurs so that white blood cells in the bloodstream can move into the wound to start cleaning the wound bed.
Maceration: The softening and wasting away of skin due to excess fluid.
Maturation phase: The final phase of wound healing as collagen continues to be created to strengthen the wound, causing scar tissue.
Necrotic: Black tissue color due to tissue death from lack of oxygenation to the area.
Nonblanchable erythema: Skin redness that does not turn white when pressure is applied.
Osteomyelitis: Bone infection.
Peripheral neuropathy: A condition that causes decreased sensation of pain and pressure, typically in the lower extremities.
Periwound: The skin around the outer edges of a wound.
Pressure injuries: Localized damage to the skin or underlying soft tissue, usually over a bony prominence, as a result of intense and prolonged pressure in combination with shear.[3]
Primary intention: Wound healing that occurs with surgical incisions or clean-edged lacerations that are closed with sutures, staples, or surgical glue.
Proliferative phase: The third phase of wound healing that includes epithelialization, angiogenesis, collagen formation, and contraction.
Purulent drainage: Wound exudate that is thick and opaque and can be tan, yellow, green, or brown in color. It is never considered normal in a wound, and new purulent drainage should always be reported to the health care provider.
Sanguineous drainage: Wound drainage that is fresh bleeding.
Secondary intention: Wound healing that occurs when the edges of a wound cannot be approximated (brought together), so the wound fills in from the bottom up by the production of granulation tissue. Examples of wounds that heal by secondary intention are pressure injuries and chainsaw injuries.
Serosanguinous drainage: Wound exudate contains serous drainage with small amounts of blood present.
Serous drainage: Wound drainage that is clear, thin, watery plasma. It is considered normal in minimal amounts during the inflammatory stage of wound healing.
Shear: A mechanical force that occurs when tissue layers move over the top of each other, causing blood vessels to stretch and break as they pass through the subcutaneous tissue.
Skin tears: Wounds caused by mechanical forces, typically in the nonelastic skin of older adults.
Slough: Inflammatory exudate that is light yellow, soft, and moist and must be removed for wound healing to occur.
Tertiary intention: Wound healing that occurs when a wound must remain open or has been reopened, often due to severe infection.
Tunneling: Passageways underneath the surface of the skin that extend from a wound and can take twists and turns.
Undermining: A condition that occurs in wounds when the tissue under the wound edges becomes eroded, resulting in a pocket beneath the skin at the wound's edge.
Unstageable: Occurs when slough or eschar obscures the wound so that tissue loss cannot be assessed.
Venous insufficiency: A medical condition where the veins in the legs do not adequately send blood back to the heart, resulting in a pooling of fluids in the legs that can cause venous ulcers.
Venous ulcers: Ulcers caused by the pooling of fluid in the veins of the lower legs when the valves are not working properly, causing fluid to seep out, macerate the skin, and cause an ulcer.
Wound vac: A device used with special foam dressings and suctioning to remove fluid and decrease air pressure around a wound to assist in healing.
Safely and accurately placing an indwelling urinary catheter poses several challenges that require the nurse to use clinical judgment. Challenges can include anatomical variations in a specific patient, medical conditions affecting patient positioning, and maintaining sterility of the procedure with confused or agitated patients. See the checklists on Foley Catheter Insertion (Male) and Foley Catheter Insertion (Female) for detailed instructions.
Nursing interventions to prevent the development of a catheter-associated urinary tract infection (CAUTI) on insertion include the following[4]:
- Determine if insertion of an indwelling catheter meets CDC guidelines.
- Select the smallest-sized catheter that is appropriate for the patient, typically a 14 French.
- Obtain assistance as needed to facilitate patient positioning, visualization, and insertion. Many agencies require two nurses for the insertion of indwelling catheters.
- Perform perineal care before inserting a urinary catheter and regularly thereafter.
- Perform hand hygiene before and after insertion, as well as during any manipulation of the device or site.
- Maintain strict aseptic technique during insertion and use sterile gloves and equipment.
- Inflate the balloon after insertion per manufacturer instructions. It is not recommended to preinflate the balloon prior to insertion.
- Properly secure the catheter after insertion to prevent tissue damage.
- Keep the drainage bag below the bladder but not resting on the floor.
- Check the system to ensure there are no kinks or obstructions to urine flow.
- Provide routine hygiene of the urinary meatus during daily bathing and cleanse the perineal area after every bowel movement. In uncircumcised males, gently retract the foreskin, cleanse the meatus, and then return the foreskin to the original position. Do not cleanse the periurethral area with antiseptics after the catheter is in place.[5] To avoid contaminating the urinary tract, always clean by wiping away from the urinary meatus.
- Empty the collection bag regularly using a separate, clean collecting container for each patient. Avoid splashing and prevent contact of the drainage spigot with the nonsterile collecting container or other surfaces. Never allow the bag to touch the floor.[6],[7]
Video Review of Thompson Rivers University's Urinary Catheterization:
A catheter-associated urinary tract infection (CAUTI) is a common, life-threatening complication caused by indwelling urinary catheters. The development of a CAUTI is associated with patients’ increased length of stay in the hospital, resulting in additional hospital costs and a higher risk of death. It is estimated that 17% to 69% of CAUTI cases are preventable, meaning that up to 380,000 infections and 9,000 patient deaths per year related to CAUTI can be prevented with appropriate nursing measures.[10]
Nurses can save lives, prevent harm, and lower health care costs by following interventions outlined in the document created by the American Nurses Association titled Streamlined Evidence-Based RN Tool: Catheter Associated Urinary Tract Infection (CAUTI) Prevention. Review the entire tool in the box provided below. Key interventions include the following:
- Ensure the patient meets CDC-approved indications prior to inserting an indwelling catheter. If the patient does not meet the approved indications, contact the provider and advocate for an alternative method to facilitate elimination.
- According to the Centers for Disease Control and Prevention (CDC), appropriate indications for inserting an indwelling urinary catheter include the following[11]:
- Urinary retention or bladder outlet obstruction
- Hourly monitoring of urinary output in critically ill patients
- Perioperative use for selected surgeries
- Healing of open sacral and perineal wounds in patients with urinary incontinence
- Prolonged immobilization
- End-of-life care[12]
- Inappropriate reasons for inserting an indwelling urinary catheter include the following:
- Substitution of nursing care for a patient or resident with incontinence
- A means for obtaining a urine culture when a patient can voluntarily void
- Prolonged postoperative care without appropriate indications[13]
- According to the Centers for Disease Control and Prevention (CDC), appropriate indications for inserting an indwelling urinary catheter include the following[11]:
- After an indwelling urinary catheter is inserted, assess the patient daily to determine if the patient still meets the CDC criteria for an indwelling catheter and document the findings. If the patient no longer meets the approved criteria, follow agency policy for removal.
- When an indwelling catheter is in place, prevent CAUTI by following the maintenance steps outlined by the CDC.
- Continually monitor for signs of a CAUTI and report concerns to the health care provider.[14]
- Signs and symptoms of CAUTI to urgently report to the health care provider include fever greater than 38 degrees Celsius, change in mental status such as confusion or lethargy, chills, malodorous urine, and suprapubic or flank pain. Flank pain can be assessed by assisting the patient to a sitting or side-lying position and percussing the costovertebral areas.[15]
Read a nurse-driven, evidence-based PDF tool to prevent CAUTI from the American Nurses Association[16]: Streamlined Evidence-Based RN Tool: Catheter Associated Urinary Tract Infection (CAUTI) Prevention
If a small amount of a fresh urine is needed for specimen collection for urinalysis or culture, aspirate the urine from the needleless sampling port with a sterile syringe after cleansing the port with a disinfectant.[17] See the "Checklist for Obtaining a Urine Specimen from a Foley Catheter" for more detailed instructions. Do not collect the urine that is already in the collection bag because it is contaminated and will lead to an erroneous test result.
Before discussing specific procedures related to facilitating bowel and bladder function, let’s review basic concepts related to urinary and bowel elimination. When facilitating alternative methods of elimination, it is important to understand the anatomy and physiology of the gastrointestinal and urinary systems, as well as the adverse effects of various conditions and medications on elimination. Use the information below to review information about these topics.
For more information about the anatomy and physiology of the gastrointestinal system and medications used to treat diarrhea and constipation, visit the "Gastrointestinal" chapter of the Open RN Nursing Pharmacology textbook.
For more information about the anatomy and physiology of the kidneys and diuretic medications used to treat fluid overload, visit the "Cardiovascular and Renal System" chapter in Open RN Nursing Pharmacology textbook.
For more information about applying the nursing process to facilitate elimination, visit the "Elimination" chapter in Open RN Nursing Fundamentals.
Urinary Elimination Devices
This section will focus on the devices used to facilitate urinary elimination. Urinary catheterization is the insertion of a catheter tube into the urethral opening and placing it in the neck of the urinary bladder to drain urine. There are several types of urinary elimination devices, such as indwelling catheters, intermittent catheters, suprapubic catheters, and external devices. Each of these types of devices is described in the following subsections.
Indwelling Catheter
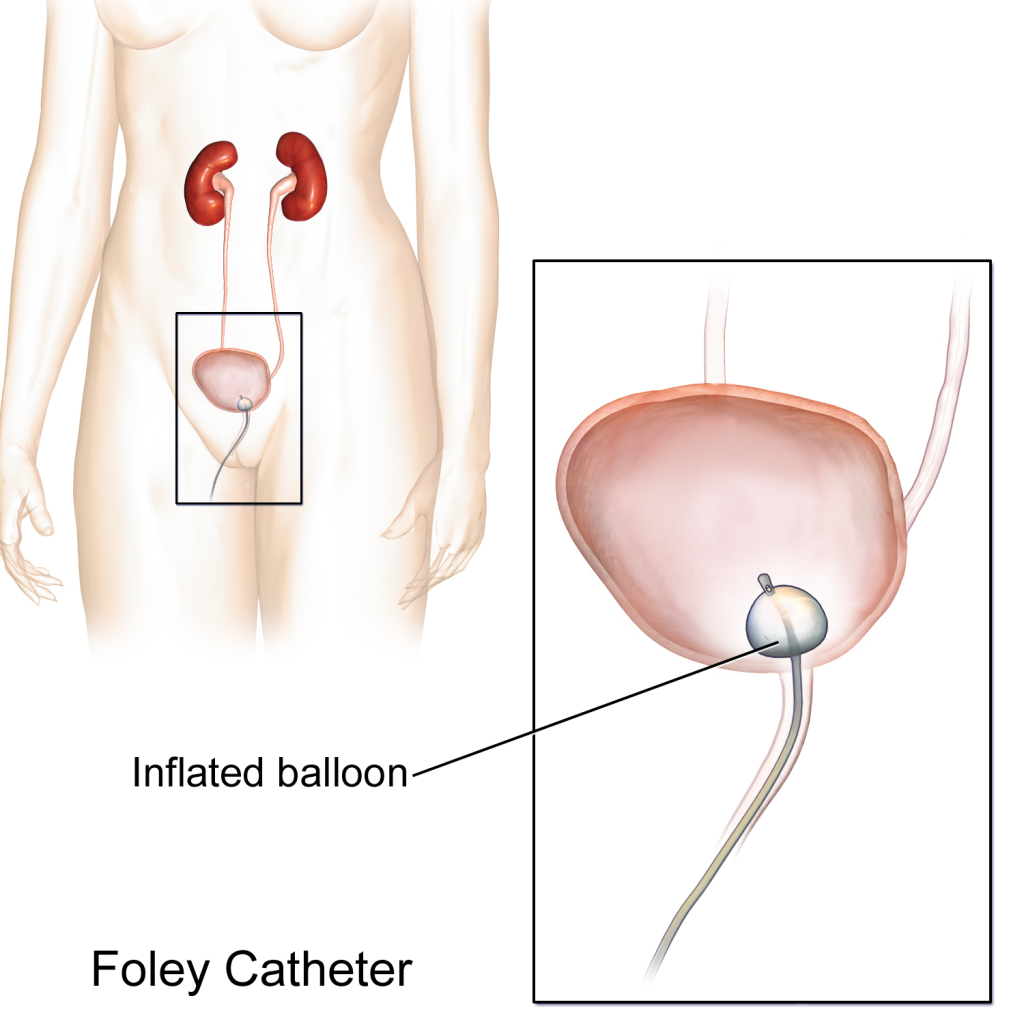
An indwelling catheter, often referred to as a “Foley catheter,” refers to a urinary catheter that remains in place after insertion into the bladder for the continual collection of urine. It has a balloon on the insertion tip to maintain placement in the neck of the bladder. The other end of the catheter is attached to a drainage bag for the collection of urine. See Figure 21.1[18] for an illustration of the anatomical placement of an indwelling catheter in the bladder neck.
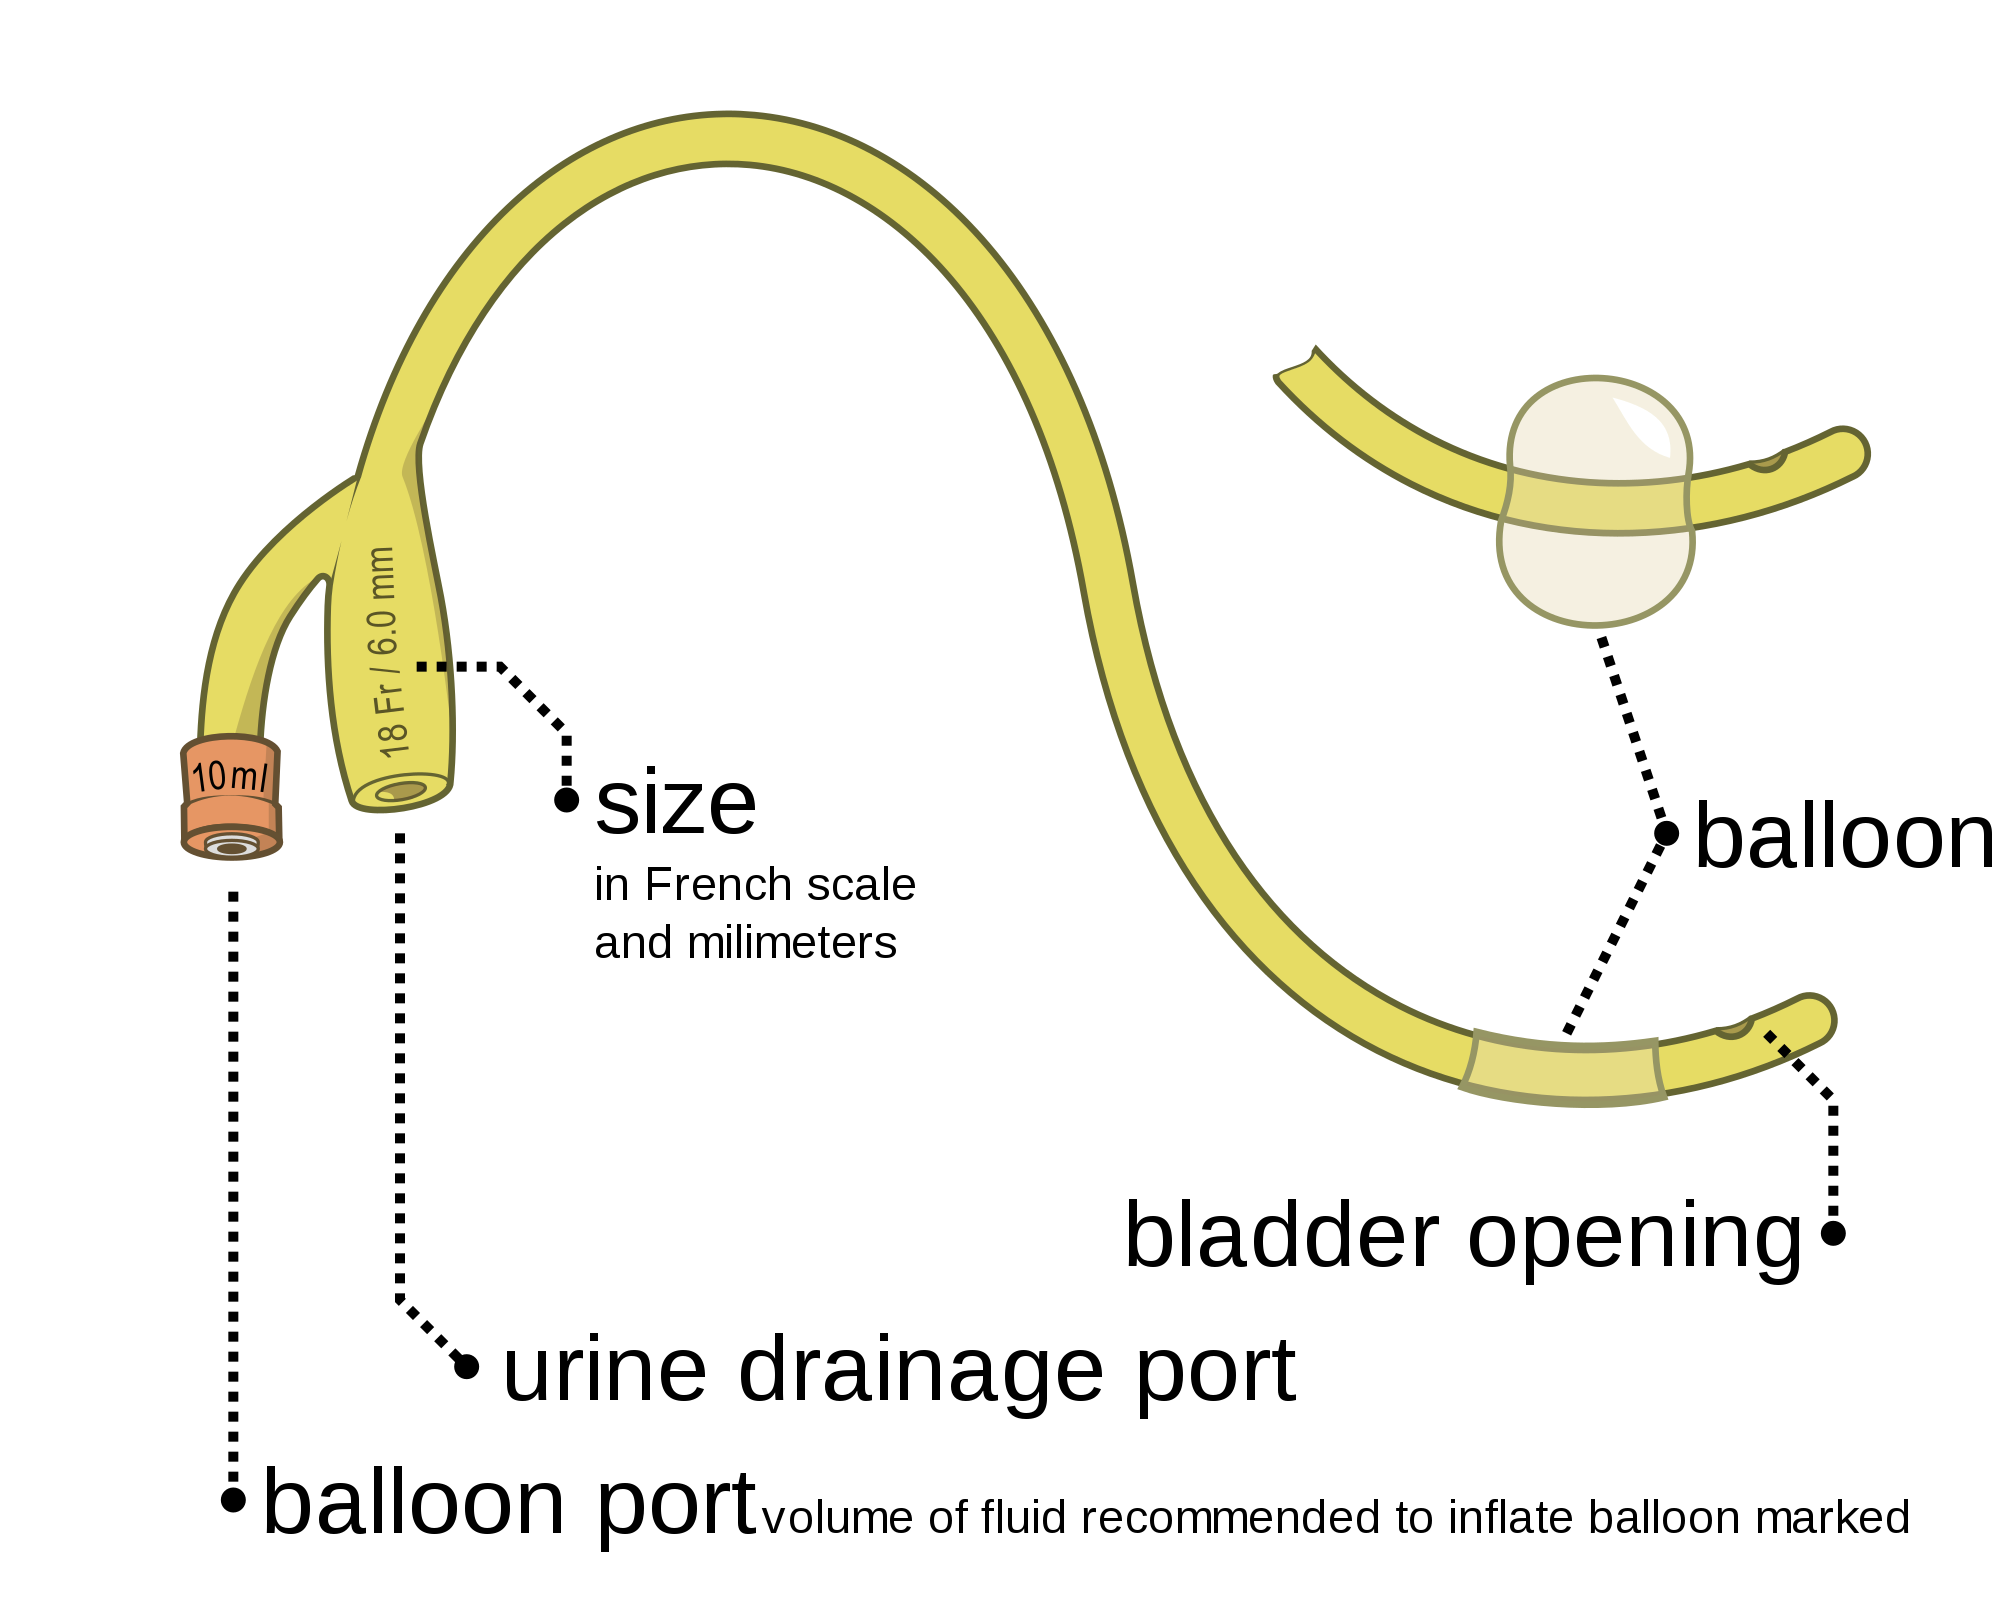
The distal end of an indwelling catheter has a urine drainage port that is connected to a drainage bag. The size of the catheter is marked at this end using the French catheter scale. A balloon port is also located at this end, where a syringe is inserted to inflate the balloon after it is inserted into the bladder. The balloon port is marked with the amount of fluid required to fill the balloon. See Figure 21.2[19] for an image of the parts of an indwelling catheter.
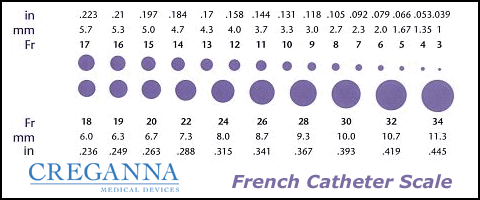
Catheters have different sizes, with the larger the number indicating a larger diameter of the catheter. See Figure 21.3[20] for an image of the French catheter scale.
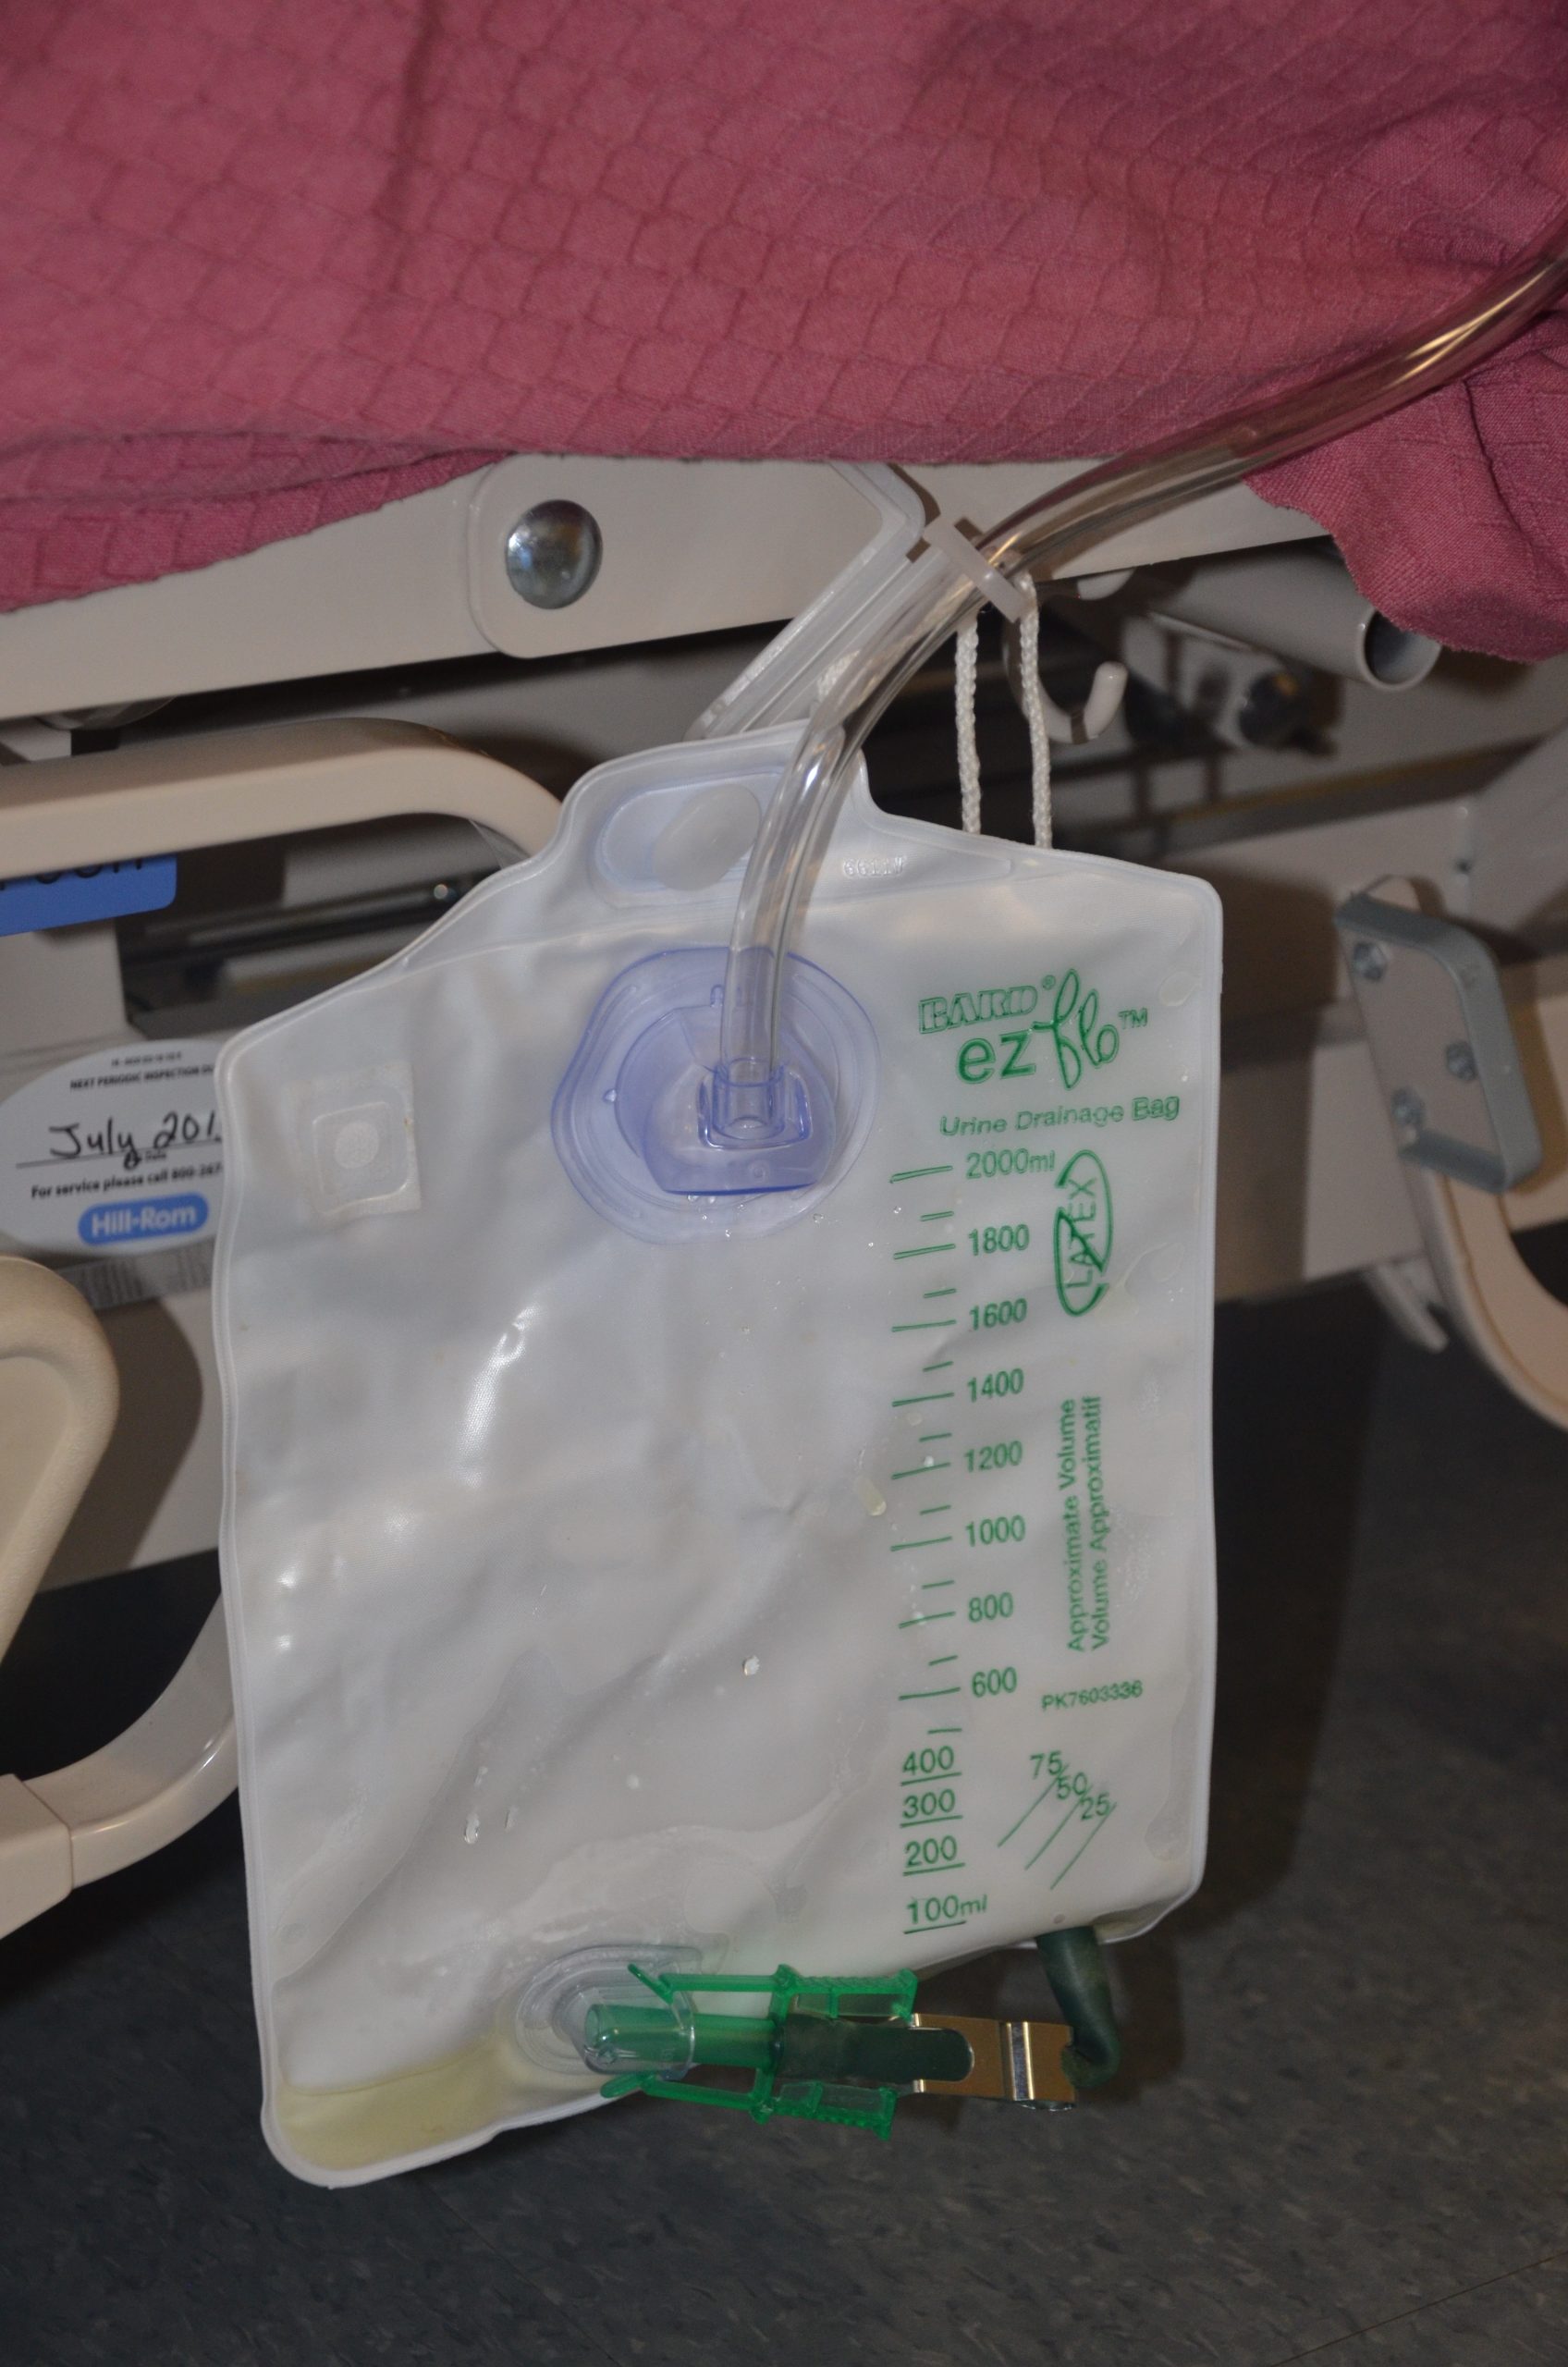
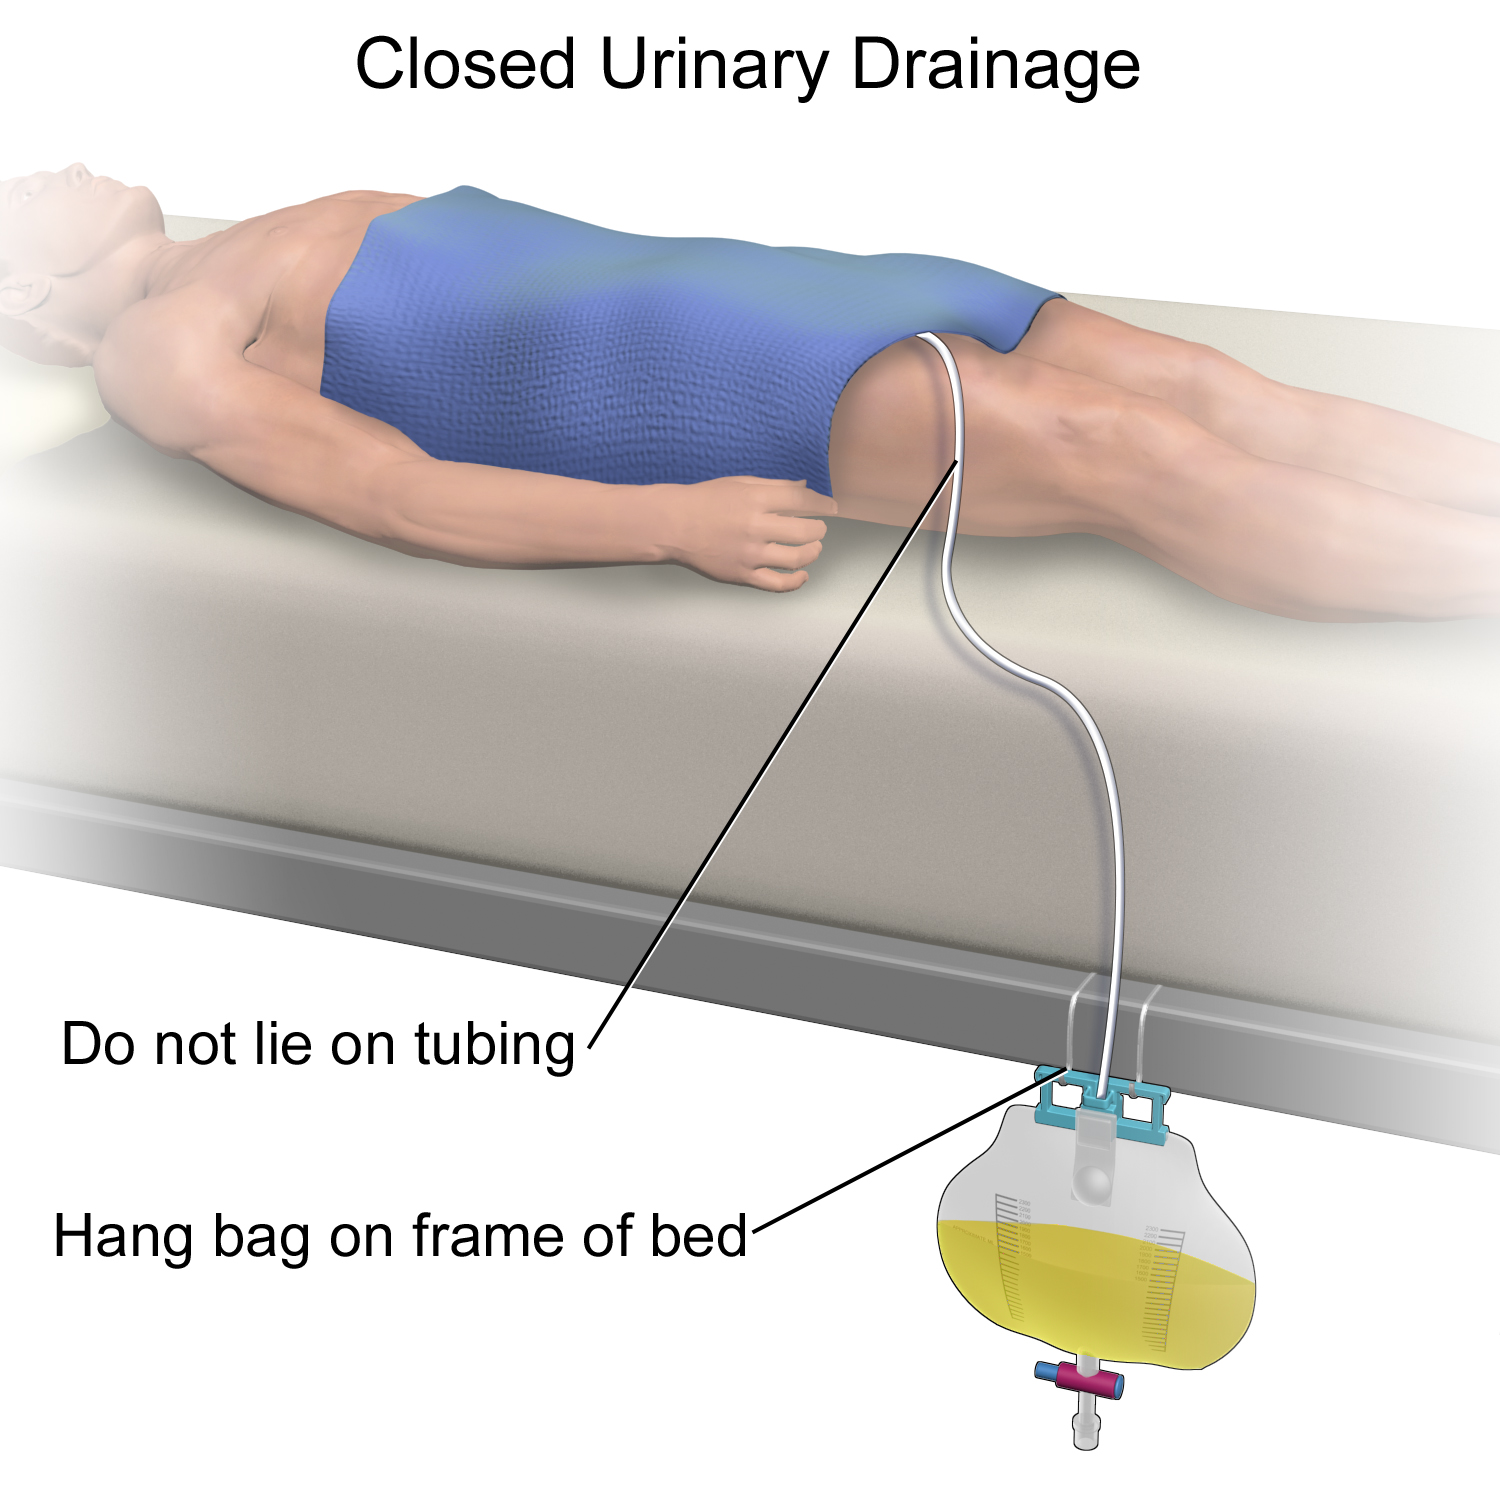
There are two common types of bags that may be attached to an indwelling catheter. During inpatient or long-term care, larger collection bags that can hold up to two liters of fluid are used. See Figure 21.4[21] for an image of a typical collection bag attached to an indwelling catheter. These bags should be emptied when they are half to two-thirds full to prevent traction on the urethra from the bag. Additionally, the collection bag should always be placed below the level of the patient’s bladder so that urine flows out of the bladder and urine does not inadvertently flow back into the bladder. Ensure the tubing is not coiled, kinked, or compressed so that urine can flow unobstructed into the bag. Slack should be maintained in the tubing to prevent injury to the patient's urethra. To prevent the development of a urinary tract infection, the bag should not be permitted to touch the floor.
See Figure 21.5[22] for an illustration of the placement of the urine collection bag when the patient is lying in bed.
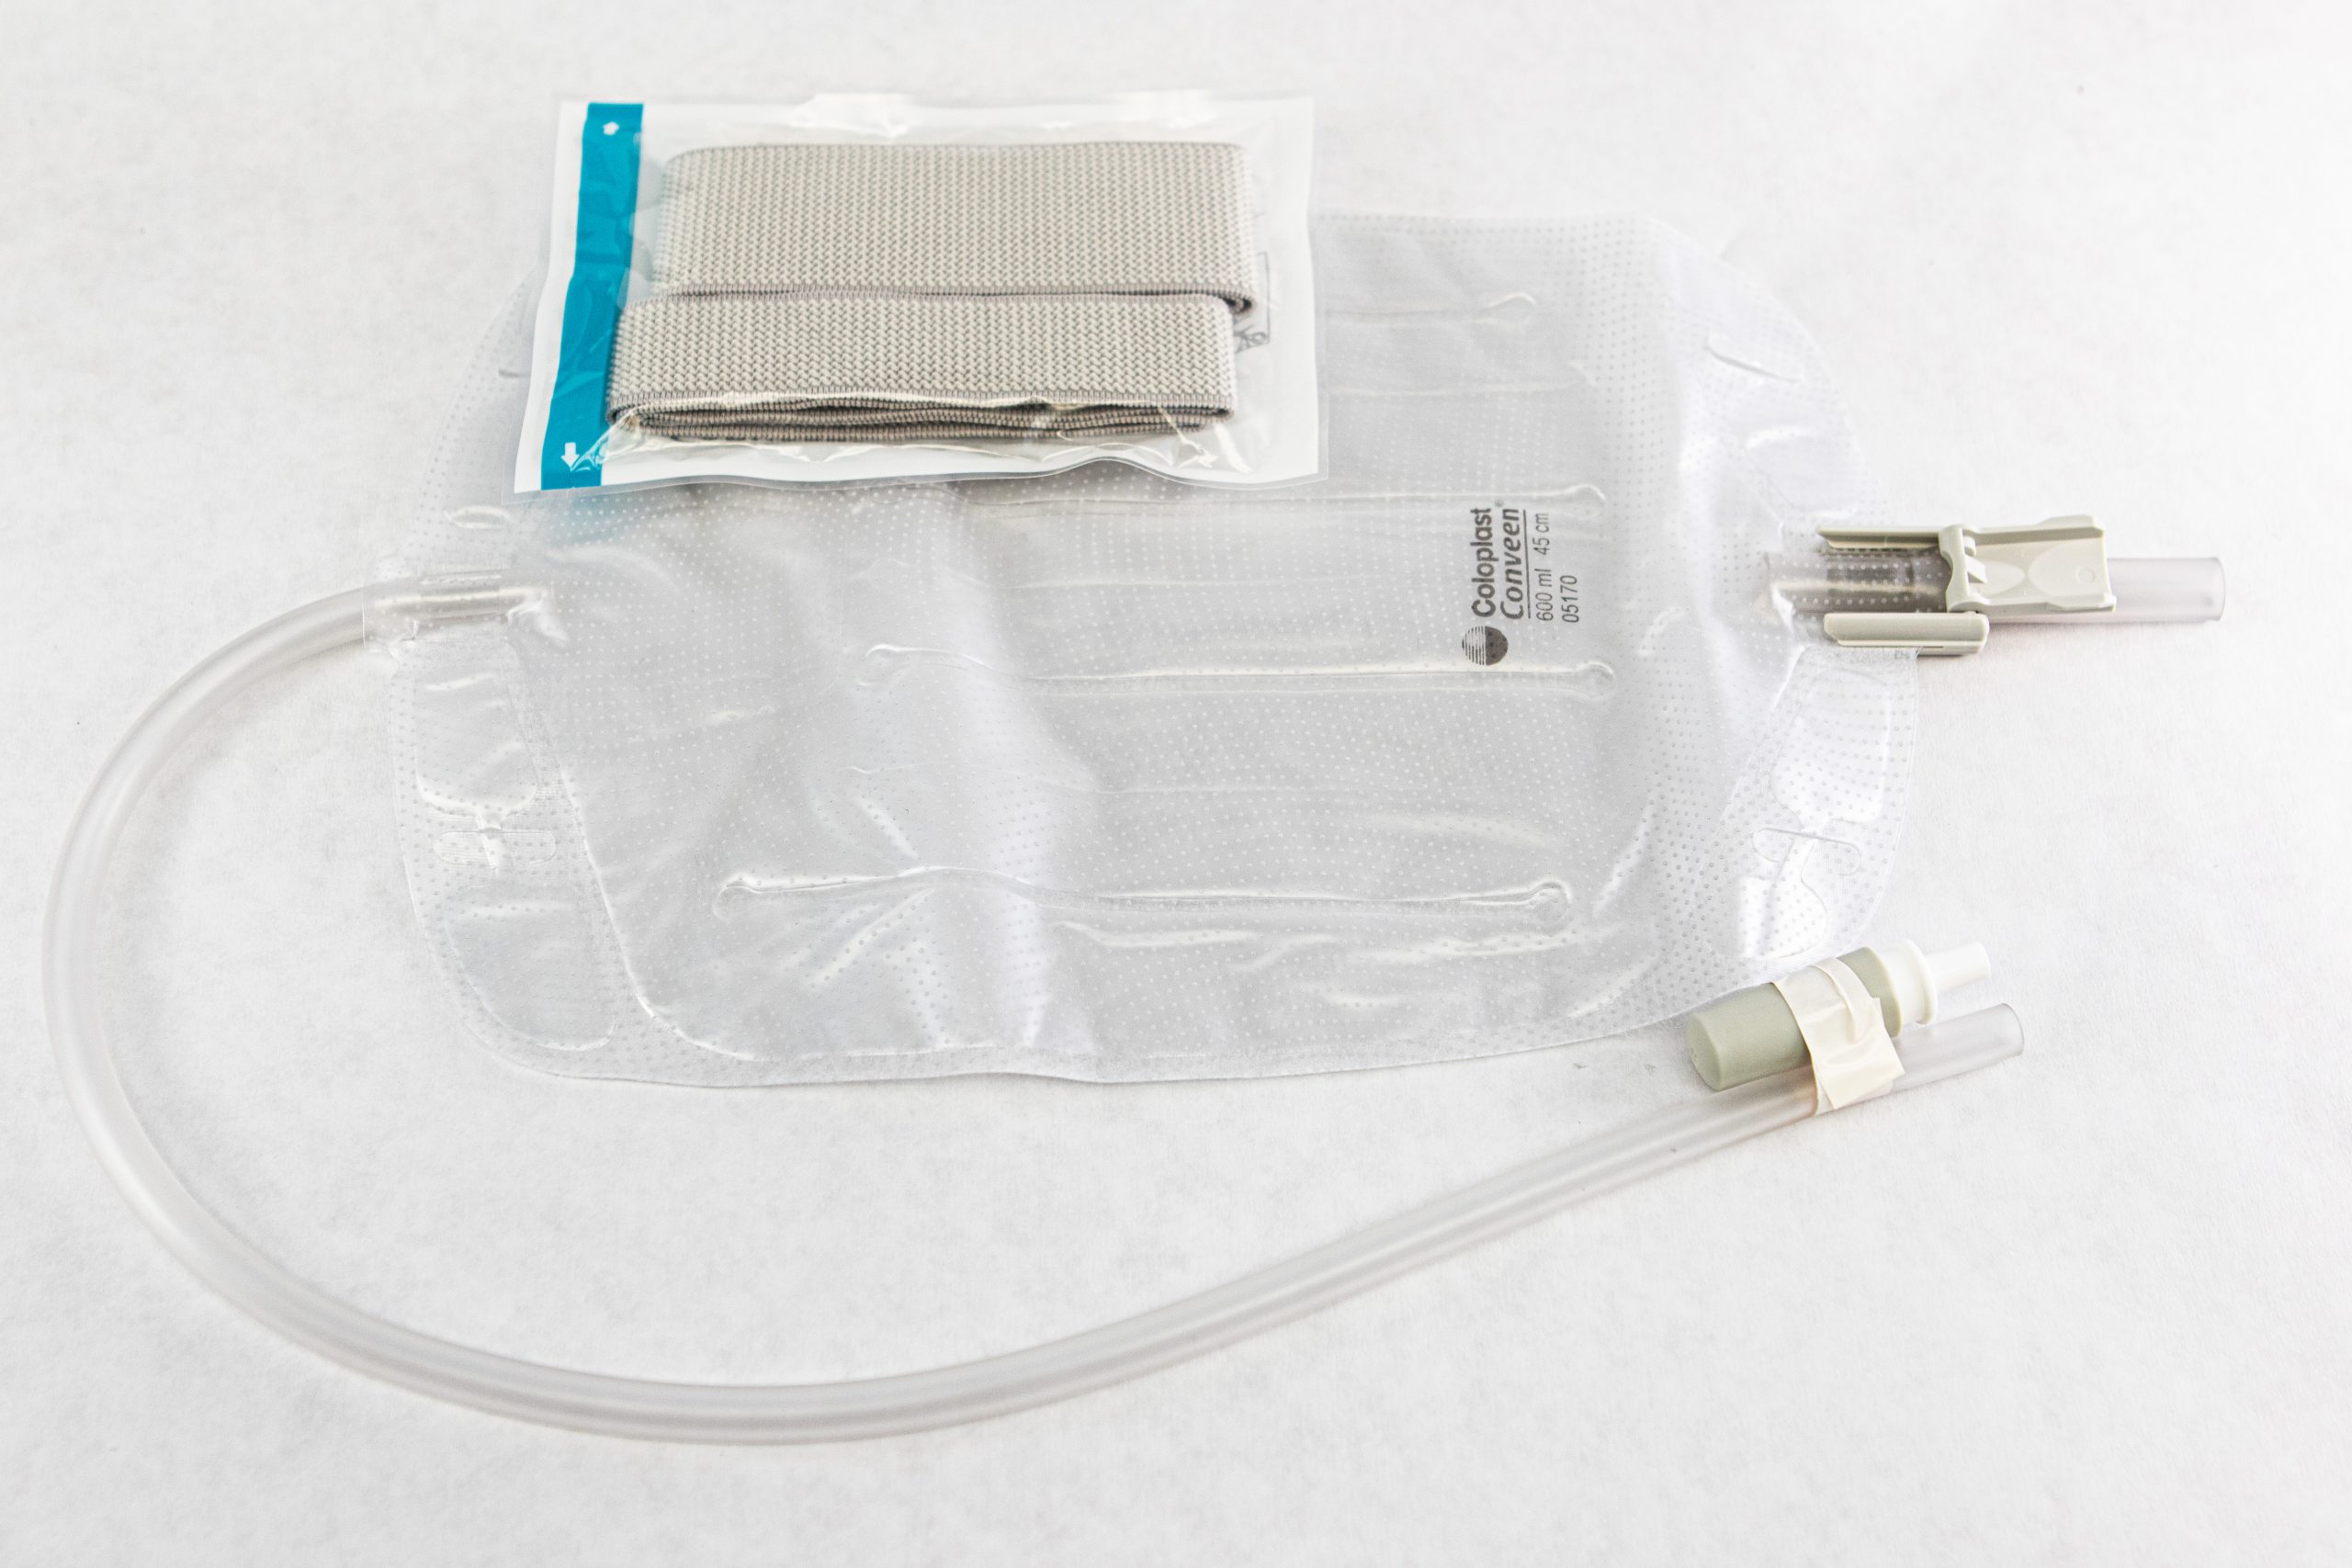
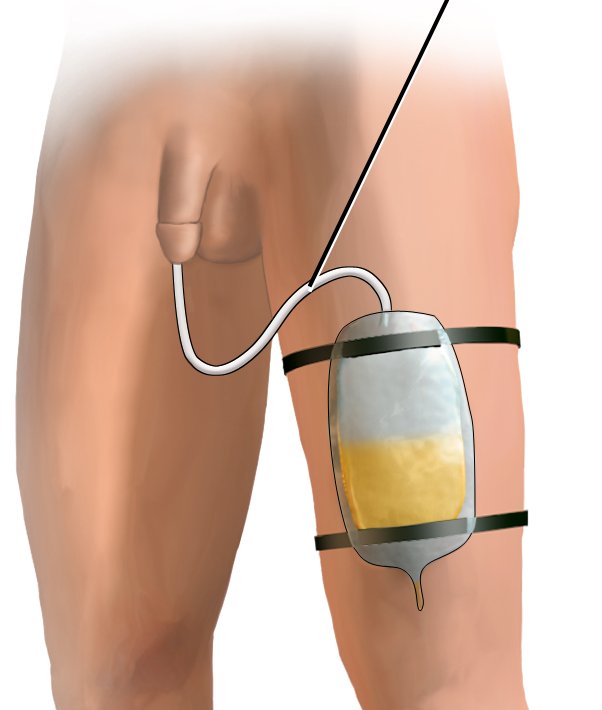
A second type of urine collection bag is a leg bag. Leg bags provide discretion when the patient is in public because they can be worn under clothing. However, leg bags are small and must be emptied more frequently than those used during inpatient care. Figure 21.6[23] for an image of leg bag and Figure 21.7[24] for an illustration of an indwelling catheter attached to a leg bag.
Straight Catheter
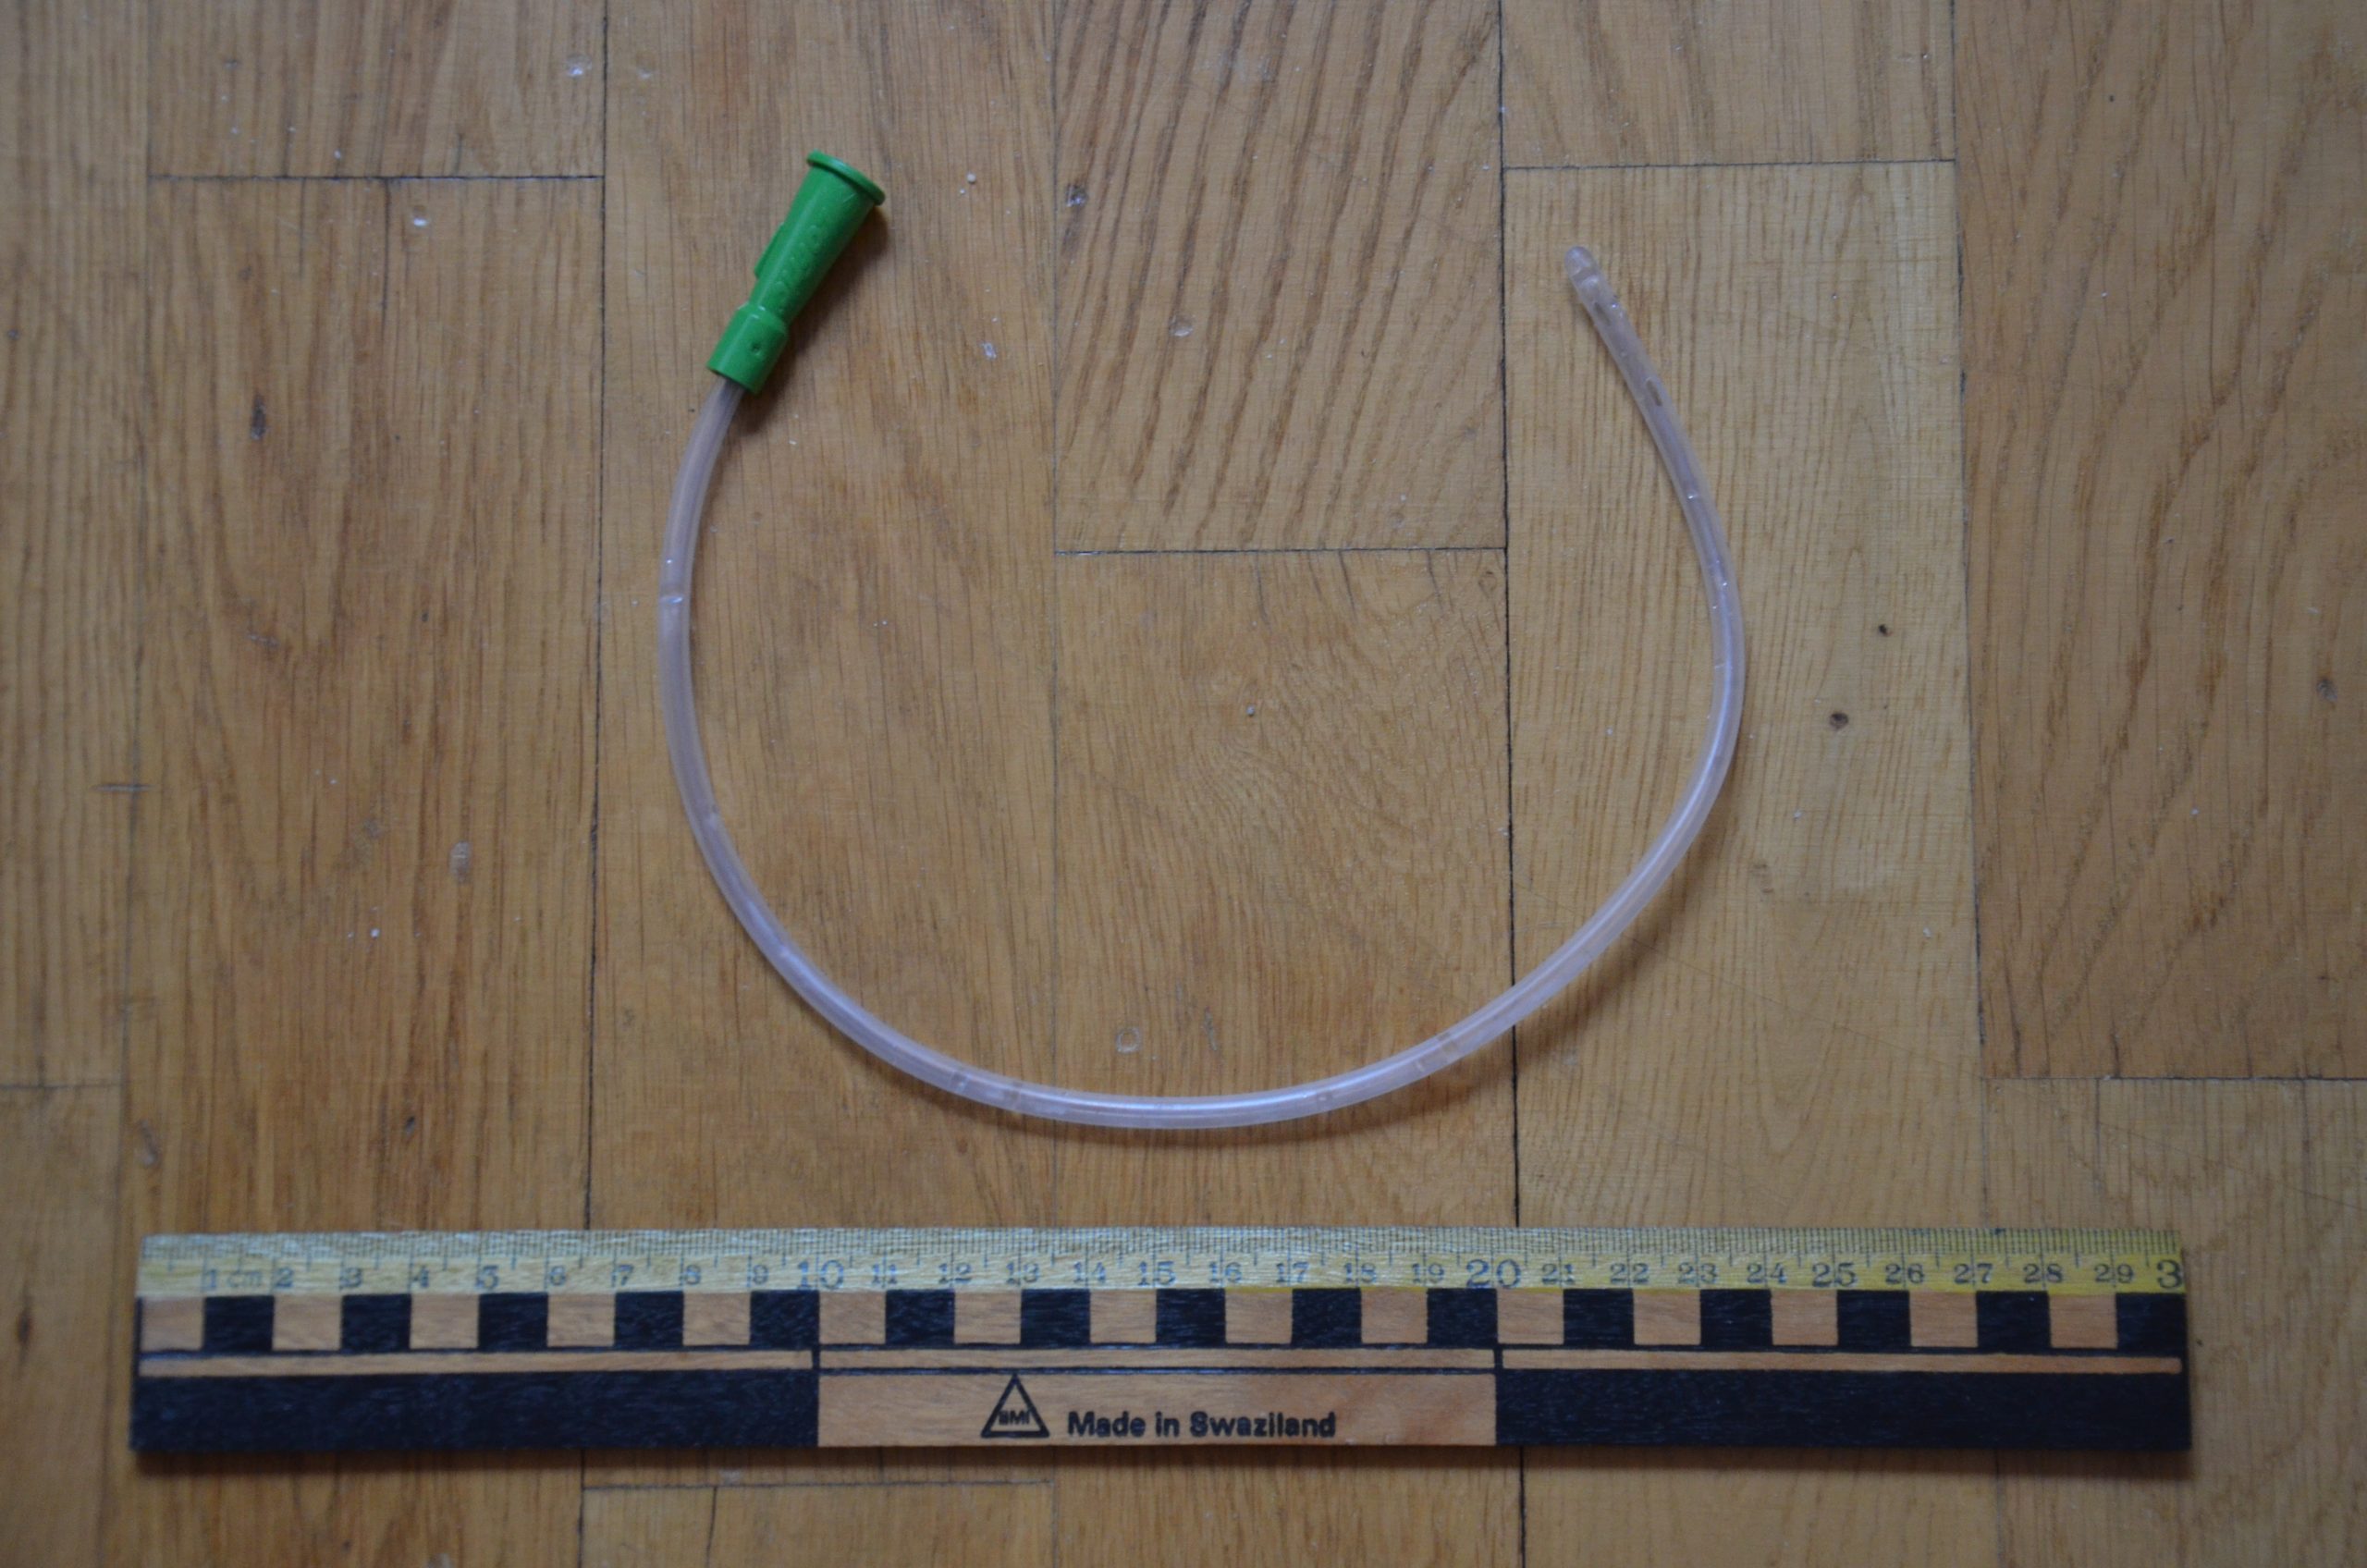
A straight catheter is used for intermittent urinary catheterization. The catheter is inserted to allow for the flow of urine and then immediately removed, so a balloon is not required at the insertion tip. See Figure 21.8[25] for an image of a straight catheter. Intermittent catheterization is used for the relief of urinary retention. It may be performed once, such as after surgery when a patient is experiencing urinary retention due to the effects of anesthesia, or performed several times a day to manage chronic urinary retention. Some patients may also independently perform self-catheterization at home to manage chronic urinary retention caused by various medical conditions. In some situations, a straight catheter is also used to obtain a sterile urine specimen for culture when a patient is unable to void into a sterile specimen cup. According to the Centers for Disease Control and Prevention (CDC), intermittent catheterization is preferred to indwelling urethral catheters whenever feasible because of decreased risk of developing a urinary tract infection.[26]
Other Types of Urinary Catheters
Coude Catheter Tip
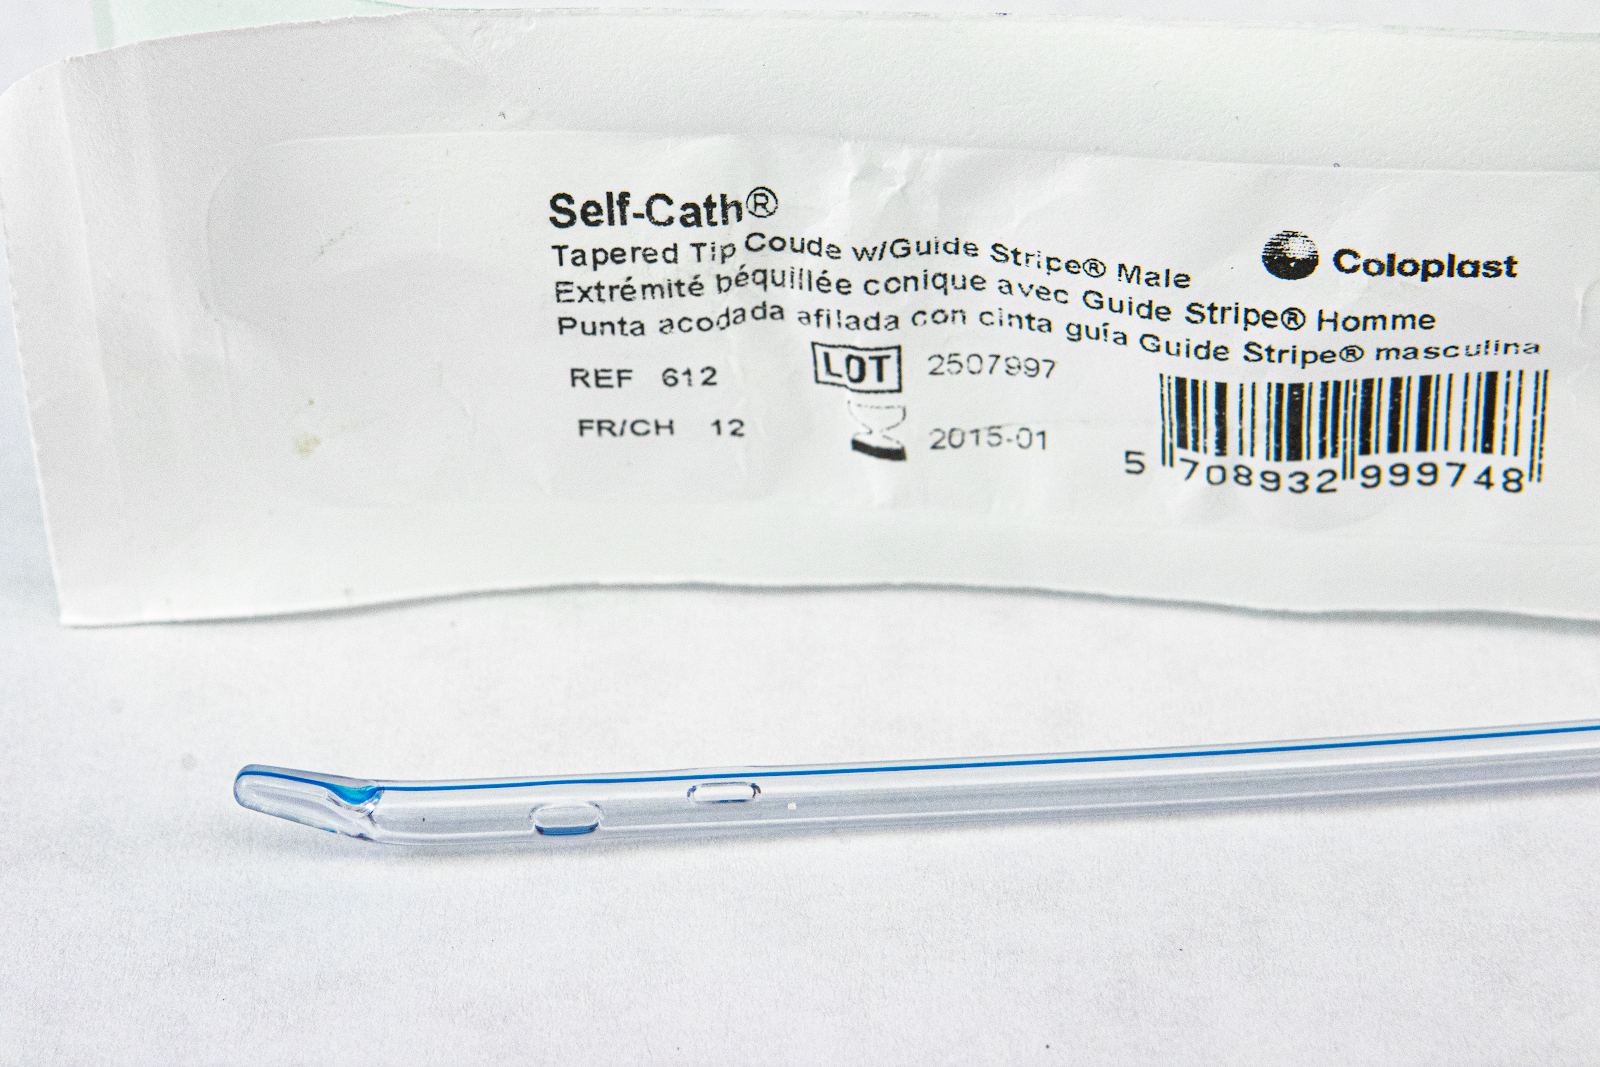
Coude catheter tips are curved to follow the natural curve of the urethra during catheterization. They are often used when catheterizing male patients with enlarged prostate glands. See Figure 21.9[27] for an example of a urinary catheter with a coude tip. During insertion, the tip of the coude catheter must be pointed anteriorly or it can cause damage to the urethra. A thin line embedded in the catheter provides information regarding orientation during the procedure; maintain the line upwards to keep it pointed anteriorly.
Irrigation Catheter
Irrigation catheters are typically used after prostate surgery to flush the surgical area. These catheters are larger in size to allow for irrigation of the bladder to help prevent the formation of blood clots and to flush them out. See Figure 21.10[28] for an image comparing a larger 20 French catheter (typically used for irrigation) to a 14 French catheter (typically used for indwelling catheters).

Suprapubic Catheters
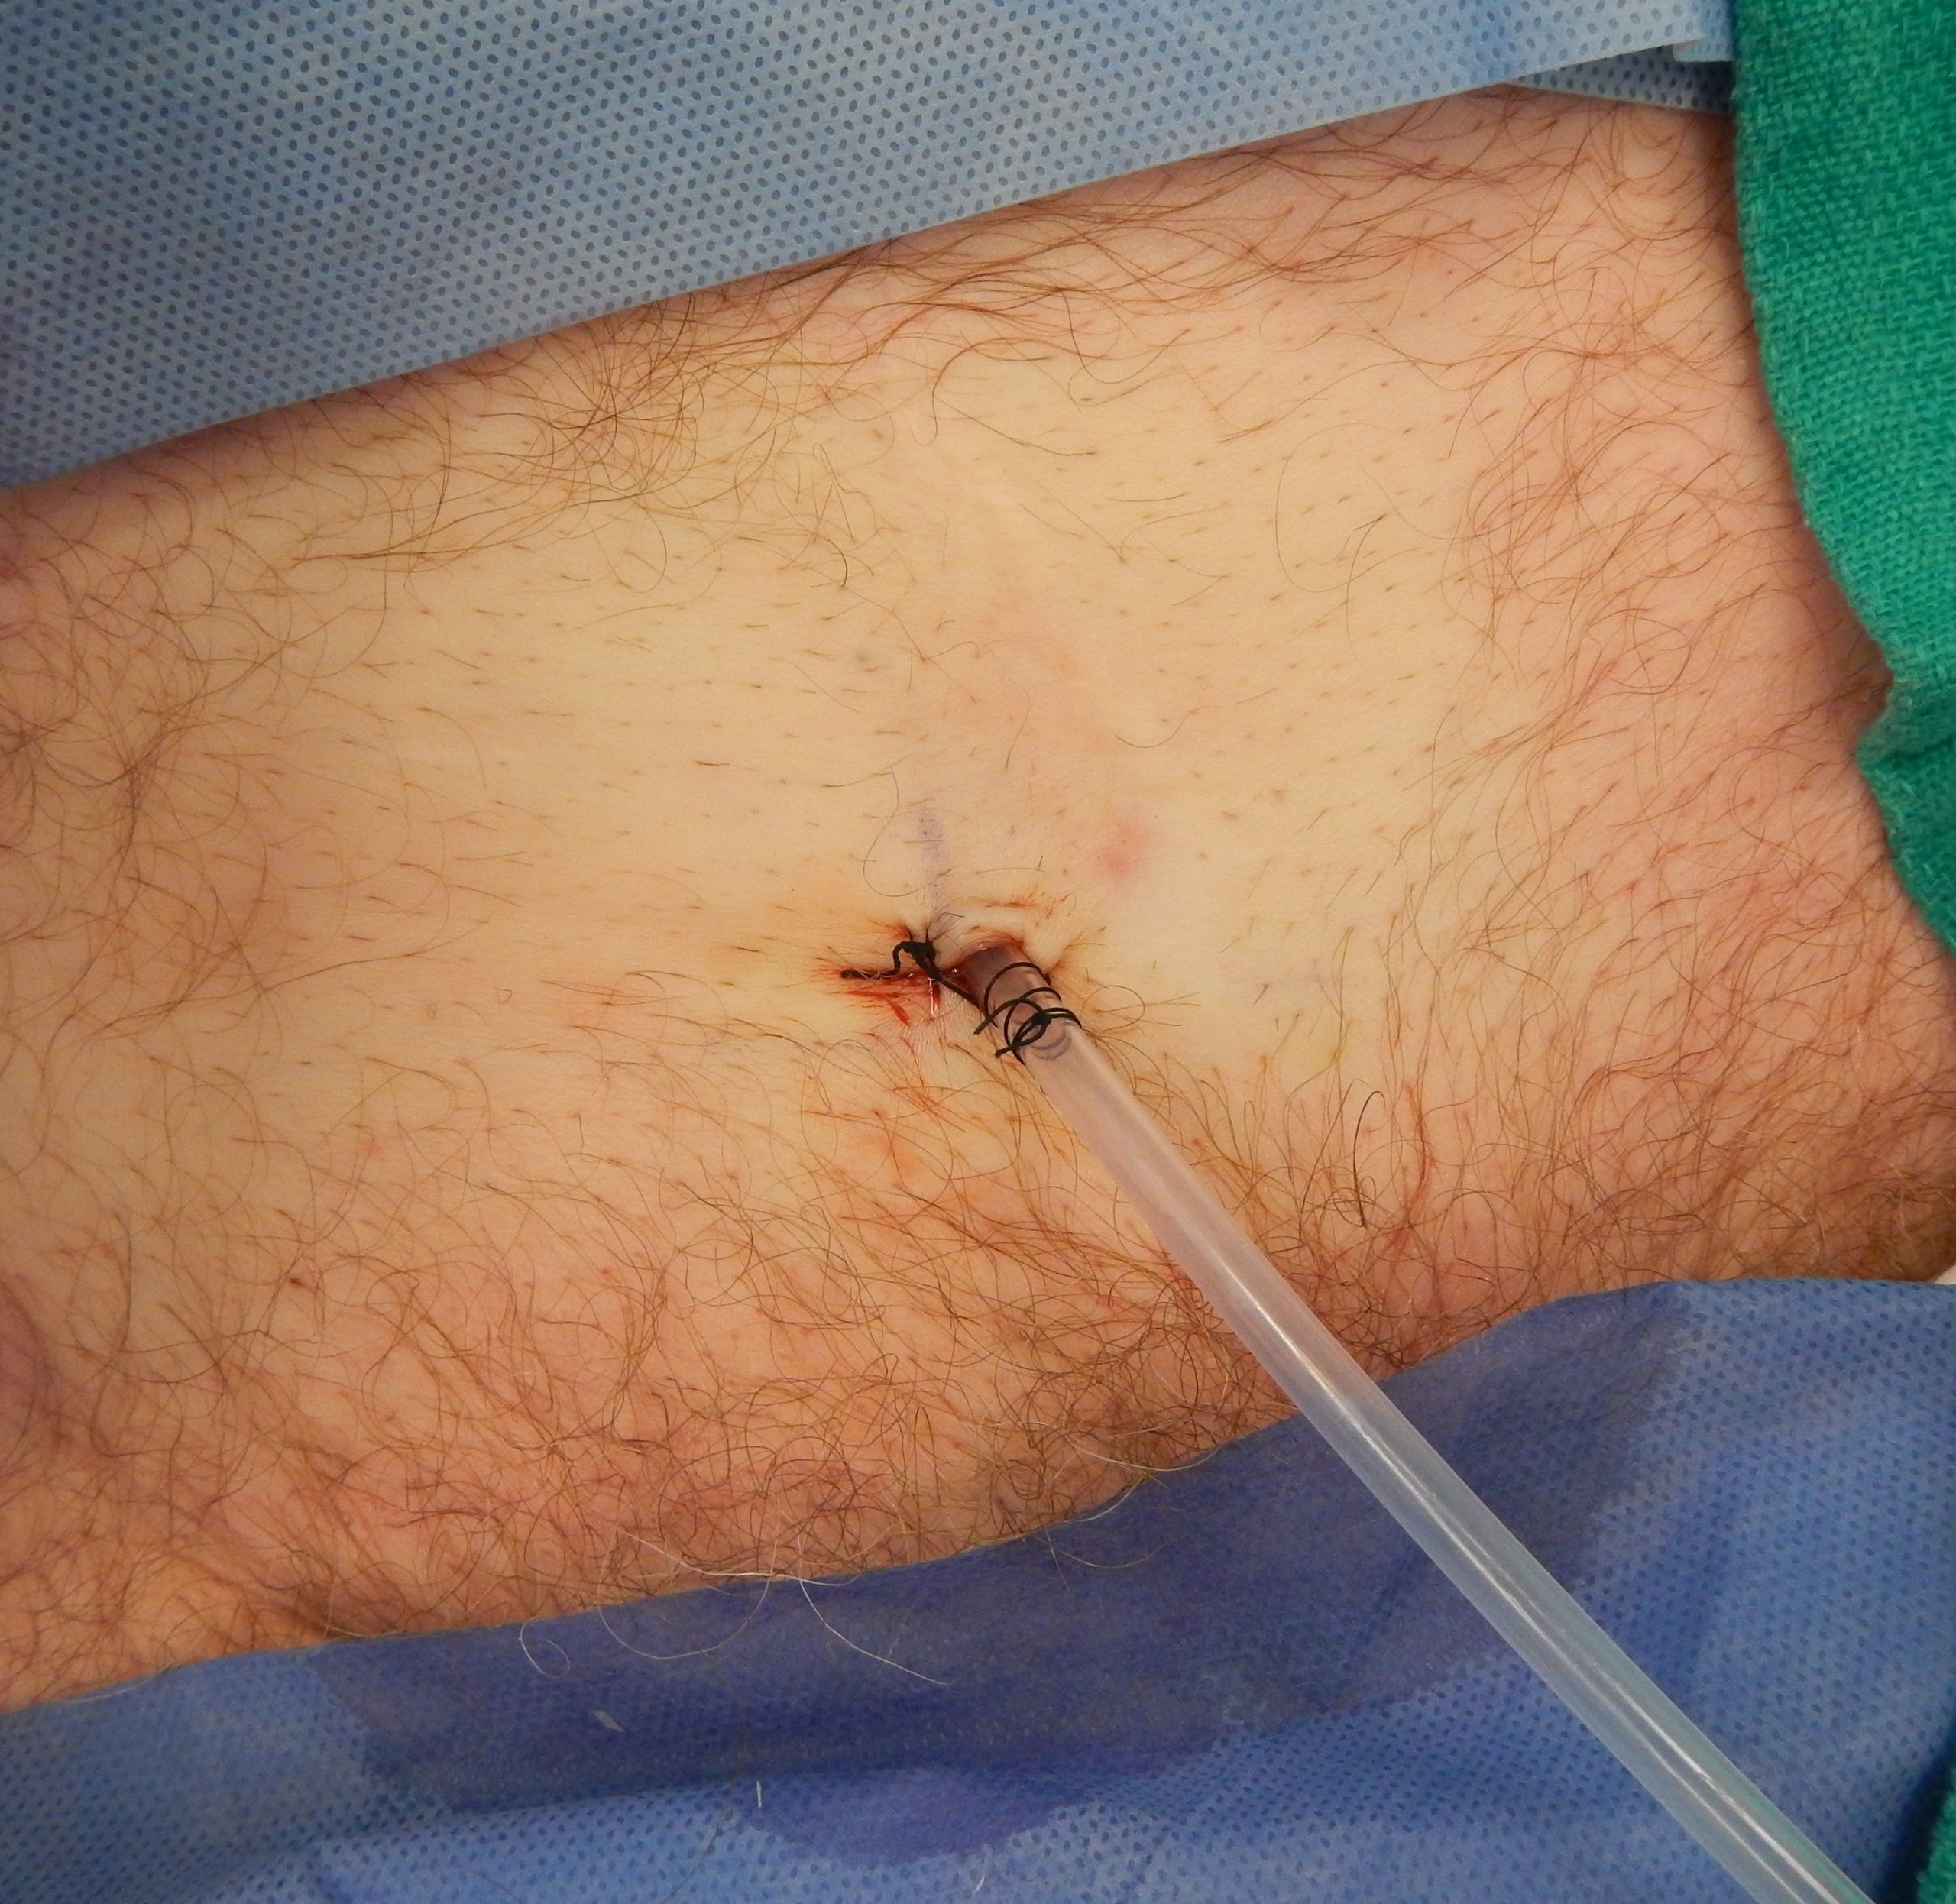
Suprapubic catheters are surgically inserted through the abdominal wall into the bladder. This type of catheter is typically inserted when there is a blockage within the urethra that does not allow the use of a straight or indwelling catheter. Suprapubic catheters may be used for a short period of time for acute medical conditions or may be used permanently for chronic conditions. See Figure 21.11[29] for an image of a suprapubic catheter. The insertion site of a suprapubic catheter must be cleaned regularly according to agency policy with appropriate steps to prevent skin breakdown.
Male Condom Catheter
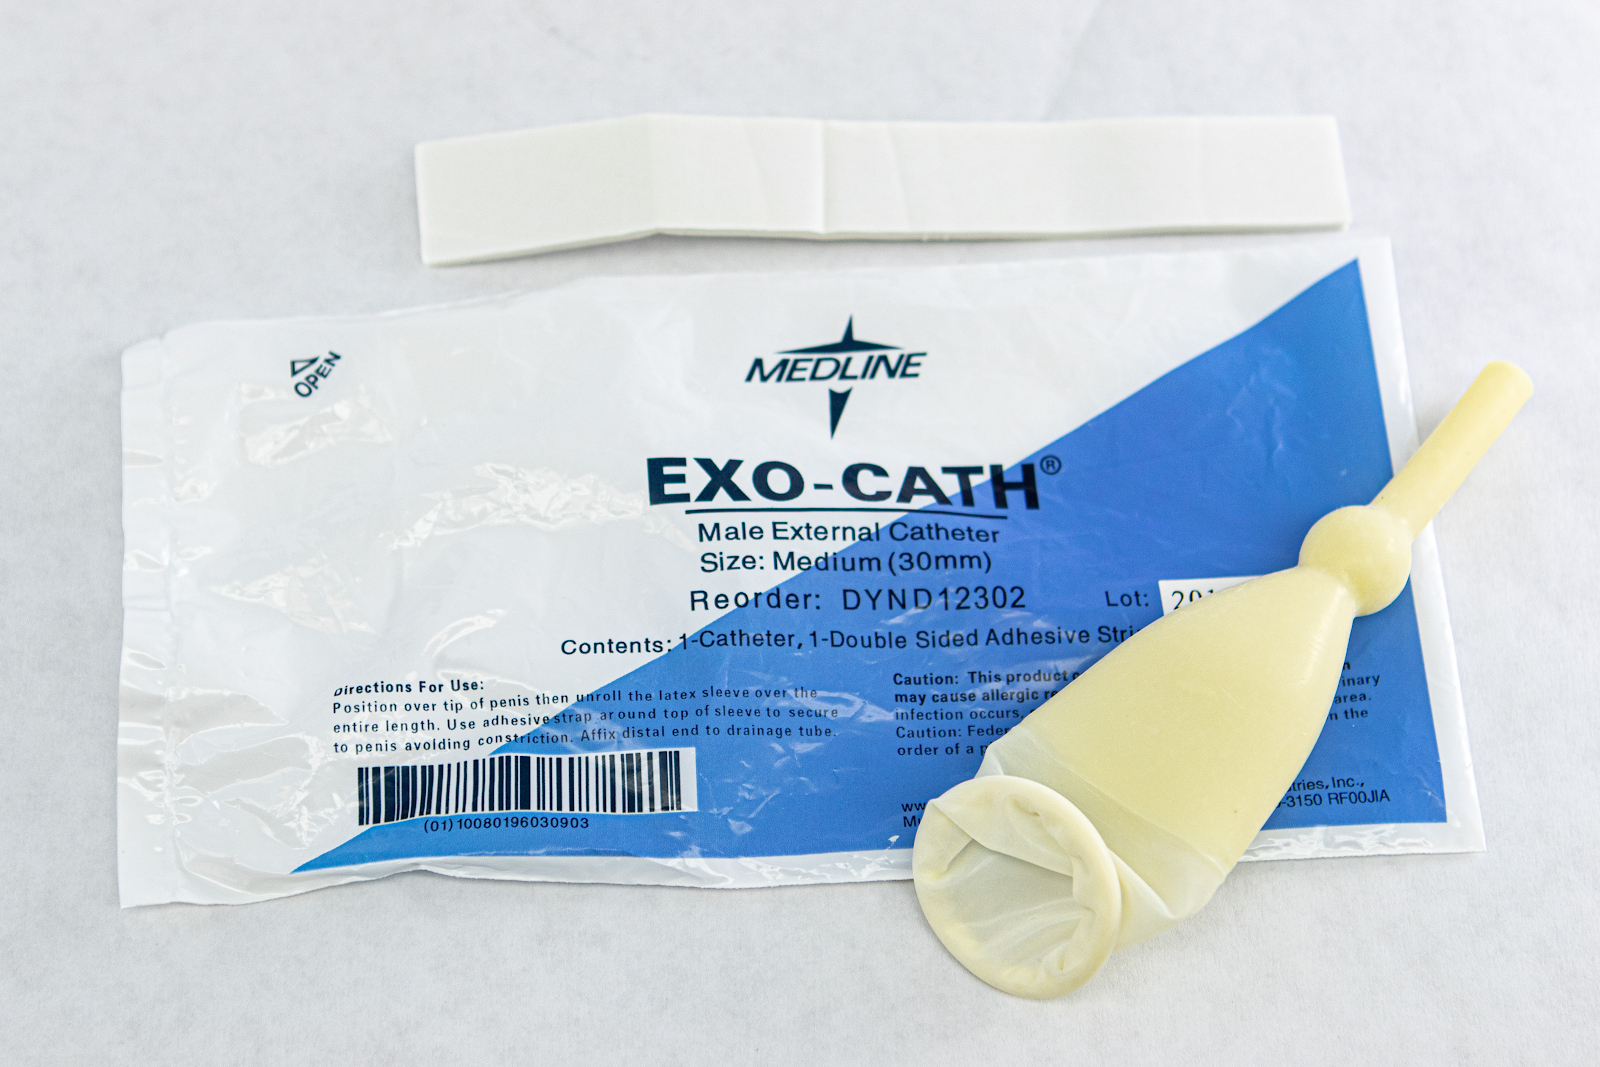
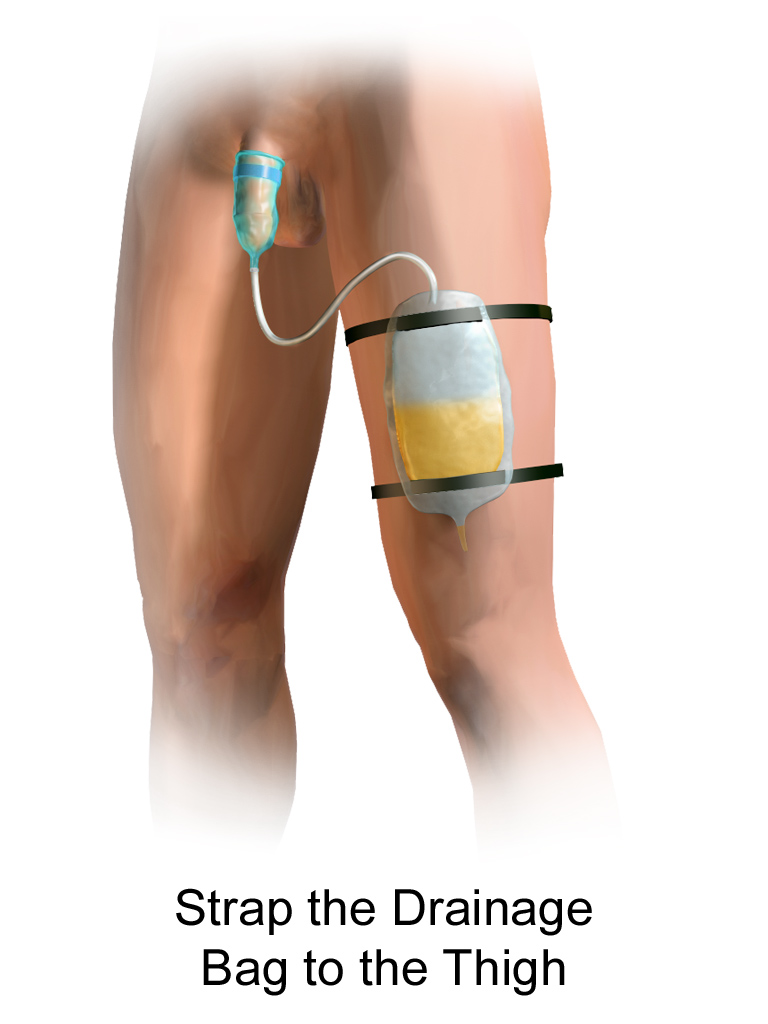
A condom catheter is a noninvasive device used for males with incontinence. It is placed over the penis and connected to a drainage bag. This device protects and promotes healing of the skin around the perineal area and inner legs and is used as an alternative to an indwelling urinary catheter. See Figure 21.12[30] for an image of a condom catheter and Figure 21.13[31] for an illustration of a condom catheter attached to a leg bag.
Female External Urinary Catheter
Female external urinary catheters (FEUC) have been recently introduced into practice to reduce the incidence of catheter-associated urinary tract infection (CAUTI) in women.[32] The external female catheter device is made of a purewick material that is placed externally over the female’s urinary meatus. The wicking material is attached to a tube that is hooked to a low-suction device. When the wick becomes saturated with urine, it is suctioned into a drainage canister. Preliminary studies have found that utilizing the FEUC device reduced the risk for CAUTI.[33],[34]
View these supplementary YouTube videos on female external urinary catheters:
Students demonstrate use of PureWick female external catheter[35]
How to use the use the PureWick - a female external catheter[36]
It is the nurse’s responsibility to assess for a patient’s continued need for an indwelling catheter daily and to advocate for removal when appropriate.[37] Prolonged use of indwelling catheters increases the risk of developing CAUTIs. For patients who require an indwelling catheter for operative purposes, the catheter is typically removed within 24 hours or less. Some agencies have a protocol for the removal of indwelling catheters, whereas others require a prescription from a provider. For additional instructions about how to remove an indwelling catheter, see the "Checklist for Foley Removal."
When removing an indwelling urinary catheter, it is considered a standard of practice to document the time and track the time of the first void. This information is also communicated during handoff reports. If the patient is unable to void within 4-6 hours and/or complains of bladder fullness, the nurse determines if incomplete bladder emptying is occurring according to agency policy. The ANA has made the following recommendations to assess for incomplete bladder emptying:
- The patient should be prompted to urinate.
- If urination volume is less than 180 mL, the nurse should perform a bladder scan to determine the post-void residual. A bladder scan is a bedside test performed by nurses that uses ultrasonic waves to determine the amount of fluid in the bladder.
- If a bladder scanner is not available, a straight urinary catheterization is performed.[38]
When a urinary catheter is removed, instruct the patient on the following guidelines:
- Increase or maintain fluid intake (unless contraindicated).
- Void when able with the goal to urinate within six hours after removal of the catheter. Inform the nurse of the void so that the amount can be measured and documented.
- Be aware that there may be a mild burning sensation during the first void.
- Report any burning, discomfort, frequency, or small amounts of urine when voiding.
- Report an inability to void, bladder tenderness, or distension.
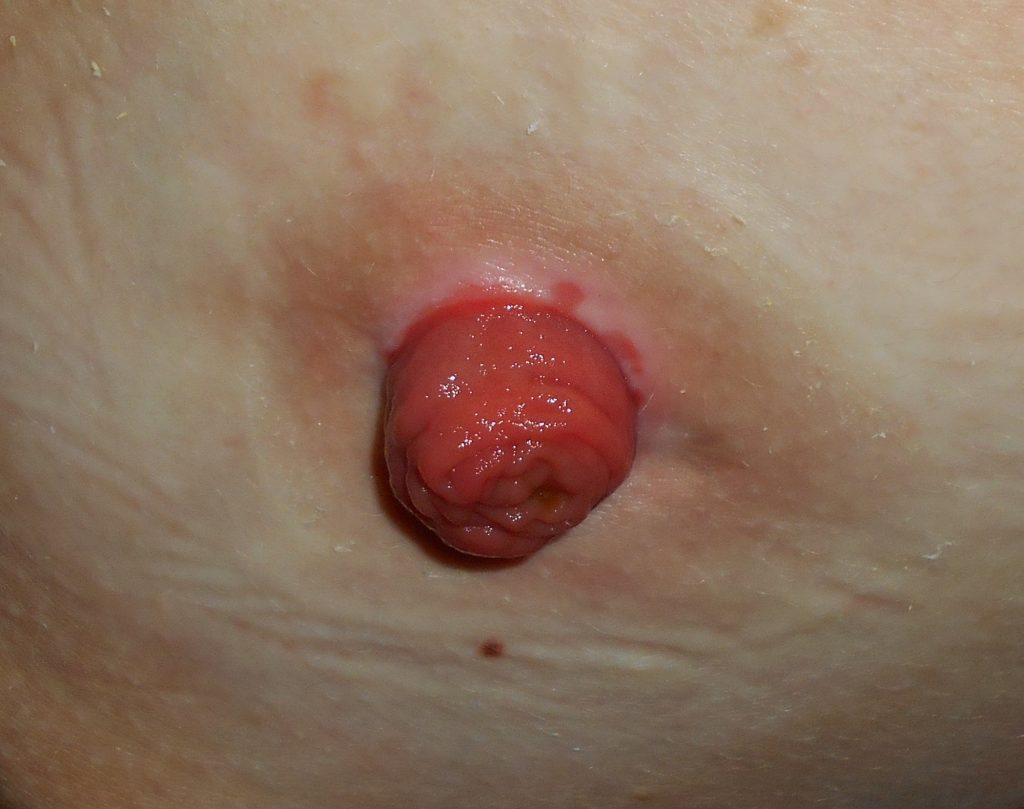
An ostomy is the surgical procedure that creates an opening (stoma) from an area inside the body to the outside of the body. In ostomies related to elimination, a stoma is an opening on the abdomen that is connected to the gastrointestinal or urinary system to allow waste (i.e., urine or feces) to be collected in a pouch. See Figure 21.14[39] for an image of a stoma. A stoma can be permanent, such as when an organ is removed, or temporary, such as when an organ requires time to heal. Ostomies are created for patients with conditions such as cancer of the bowel or bladder, inflammatory bowel diseases, or perforation of the colon.
There are several different kinds of ostomies related to elimination. Common types of ostomies include the following:
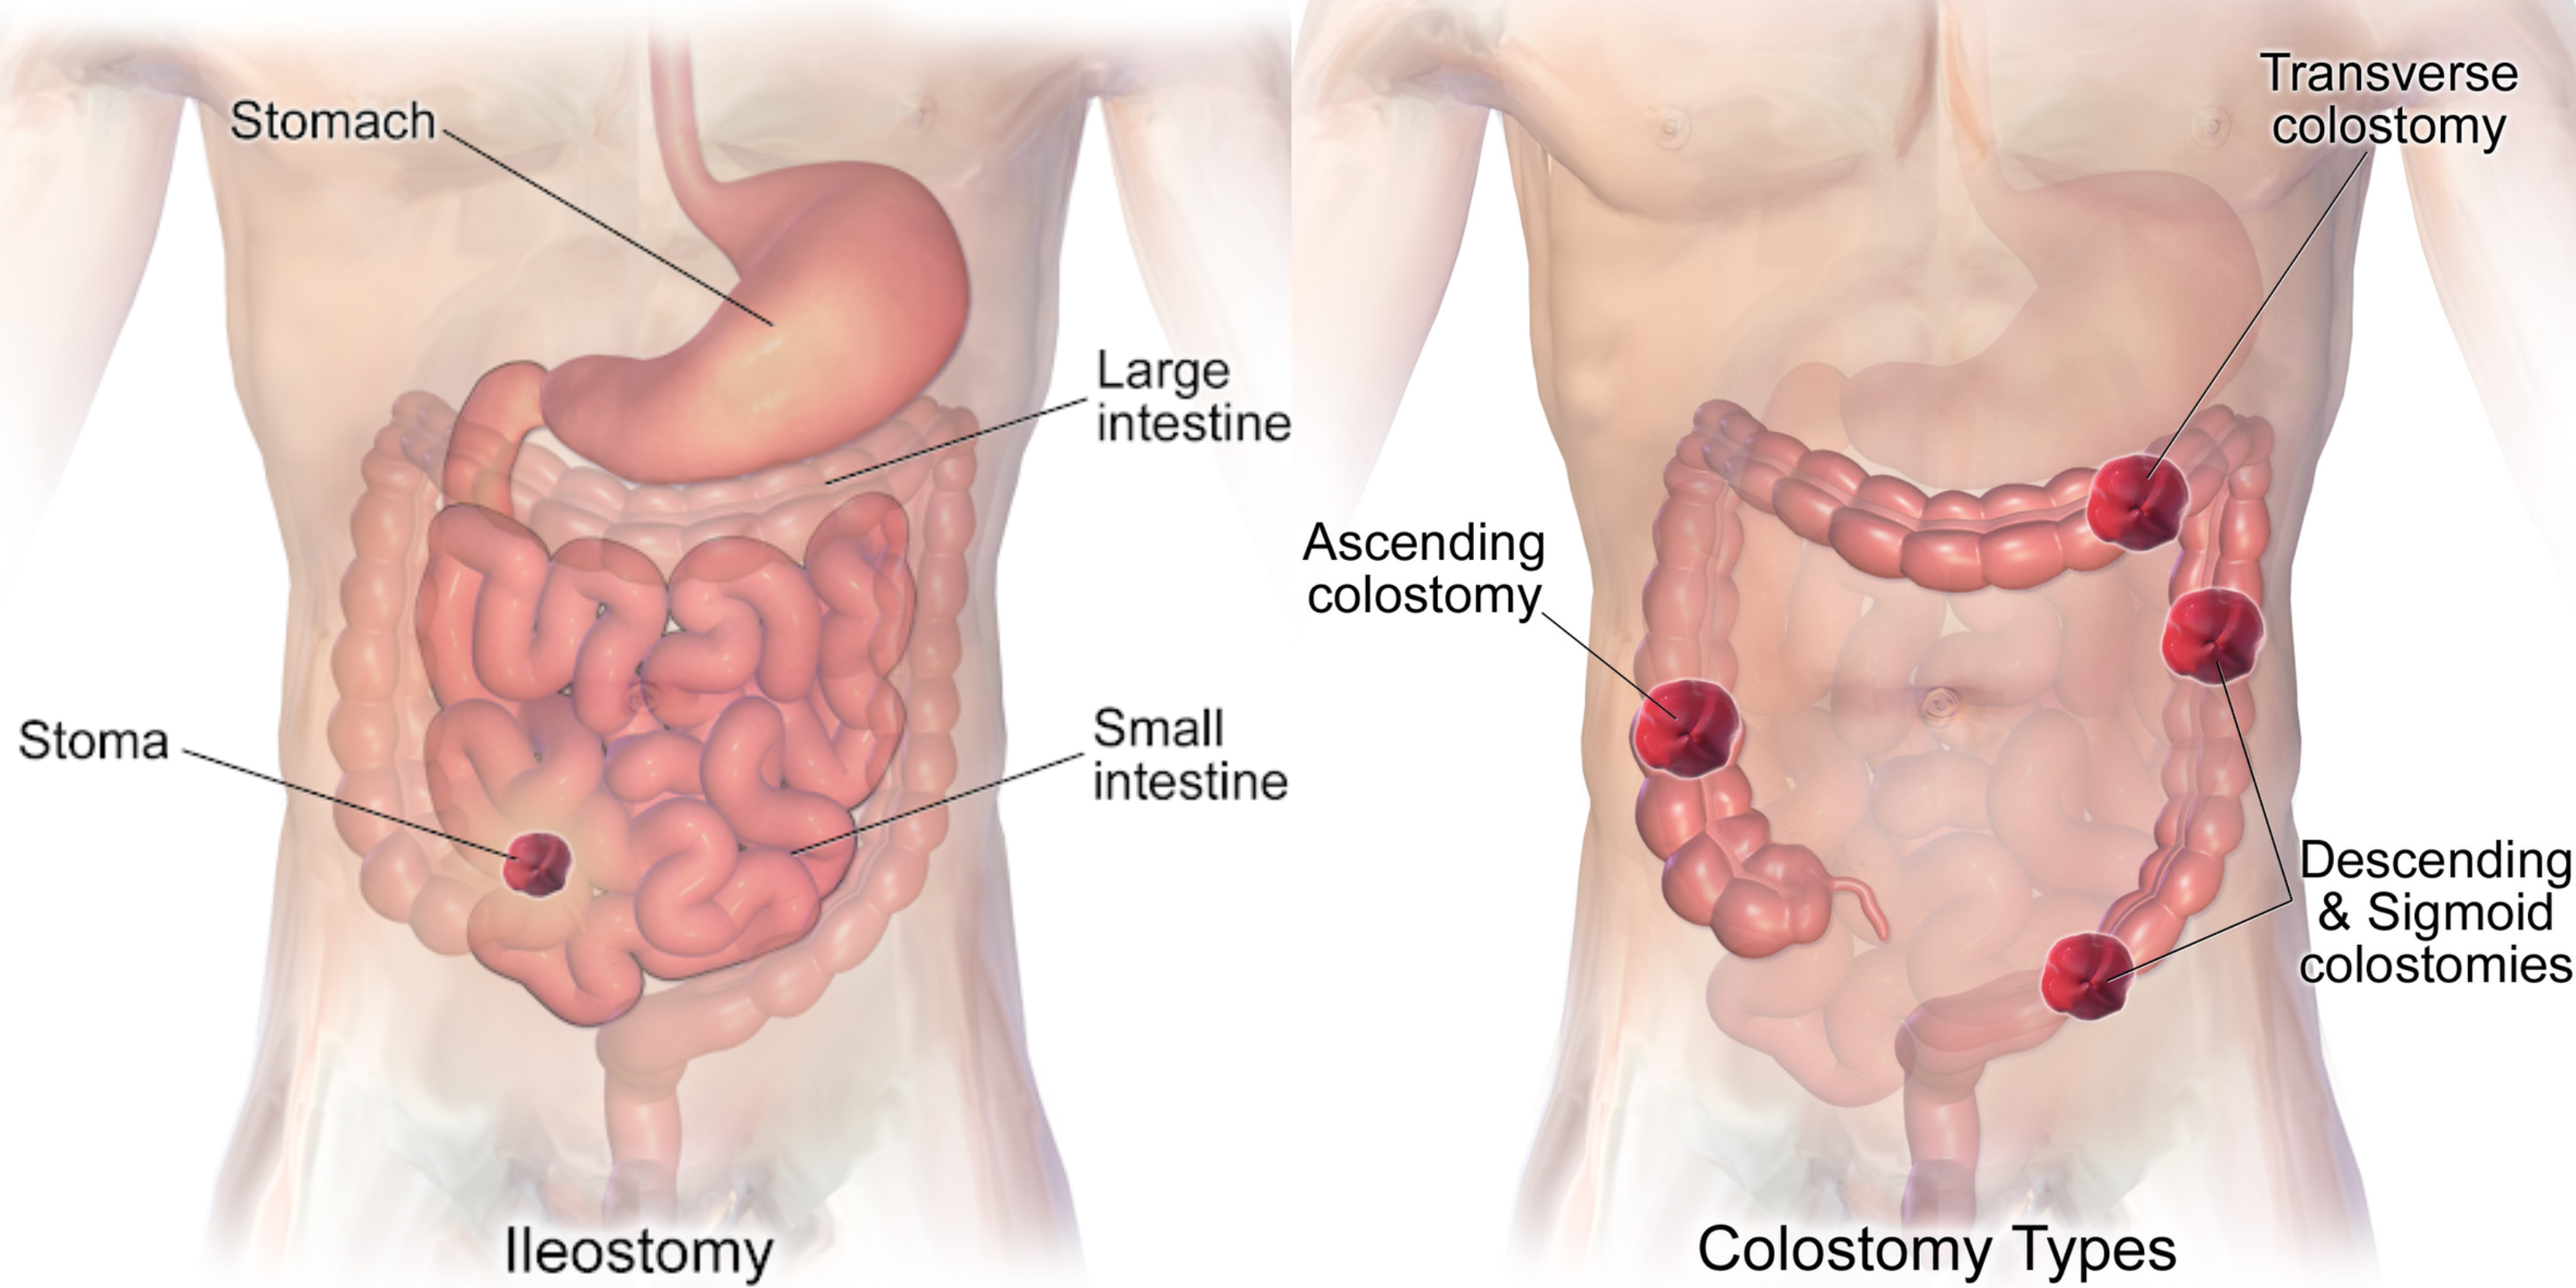
- Ileostomy: The lower end of the small intestine (ileum) is attached to a stoma to bypass the colon, rectum, and anus.
- Colostomy: The colon is attached to a stoma to bypass the rectum and the anus.
- Urostomy: The ureters (tubes that carry urine from the kidney to the bladder) are attached to a stoma to bypass the bladder.[40]
See Figure 21.15[41] comparing the anatomical locations of ileostomies and various sites of colostomies. It is important for the nurse to understand the site of a patient’s colostomy because the site impacts the characteristics of the waste. For example, due to the natural digestive process of the colon and absorption of water, waste from an ileostomy or a colostomy placed in the anterior ascending colon will be watery compared to waste from an ostomy placed in the descending colon.
The tissue of a stoma is very delicate. Immediately after surgery, a stoma is swollen, but it will shrink in size over several weeks. A healthy, healed stoma appears moist and dark red or pink in color. Stomas that are swollen; dry; have malodorous discharge; or are bluish, purple, black, or pale should be reported to the provider. The skin surrounding a stoma can easily become irritated from the pouch adhesive or leakage of fluid from the stoma, so the nurse must perform interventions to prevent skin breakdown. Any identified signs of skin breakdown should be reported to the provider.[42]
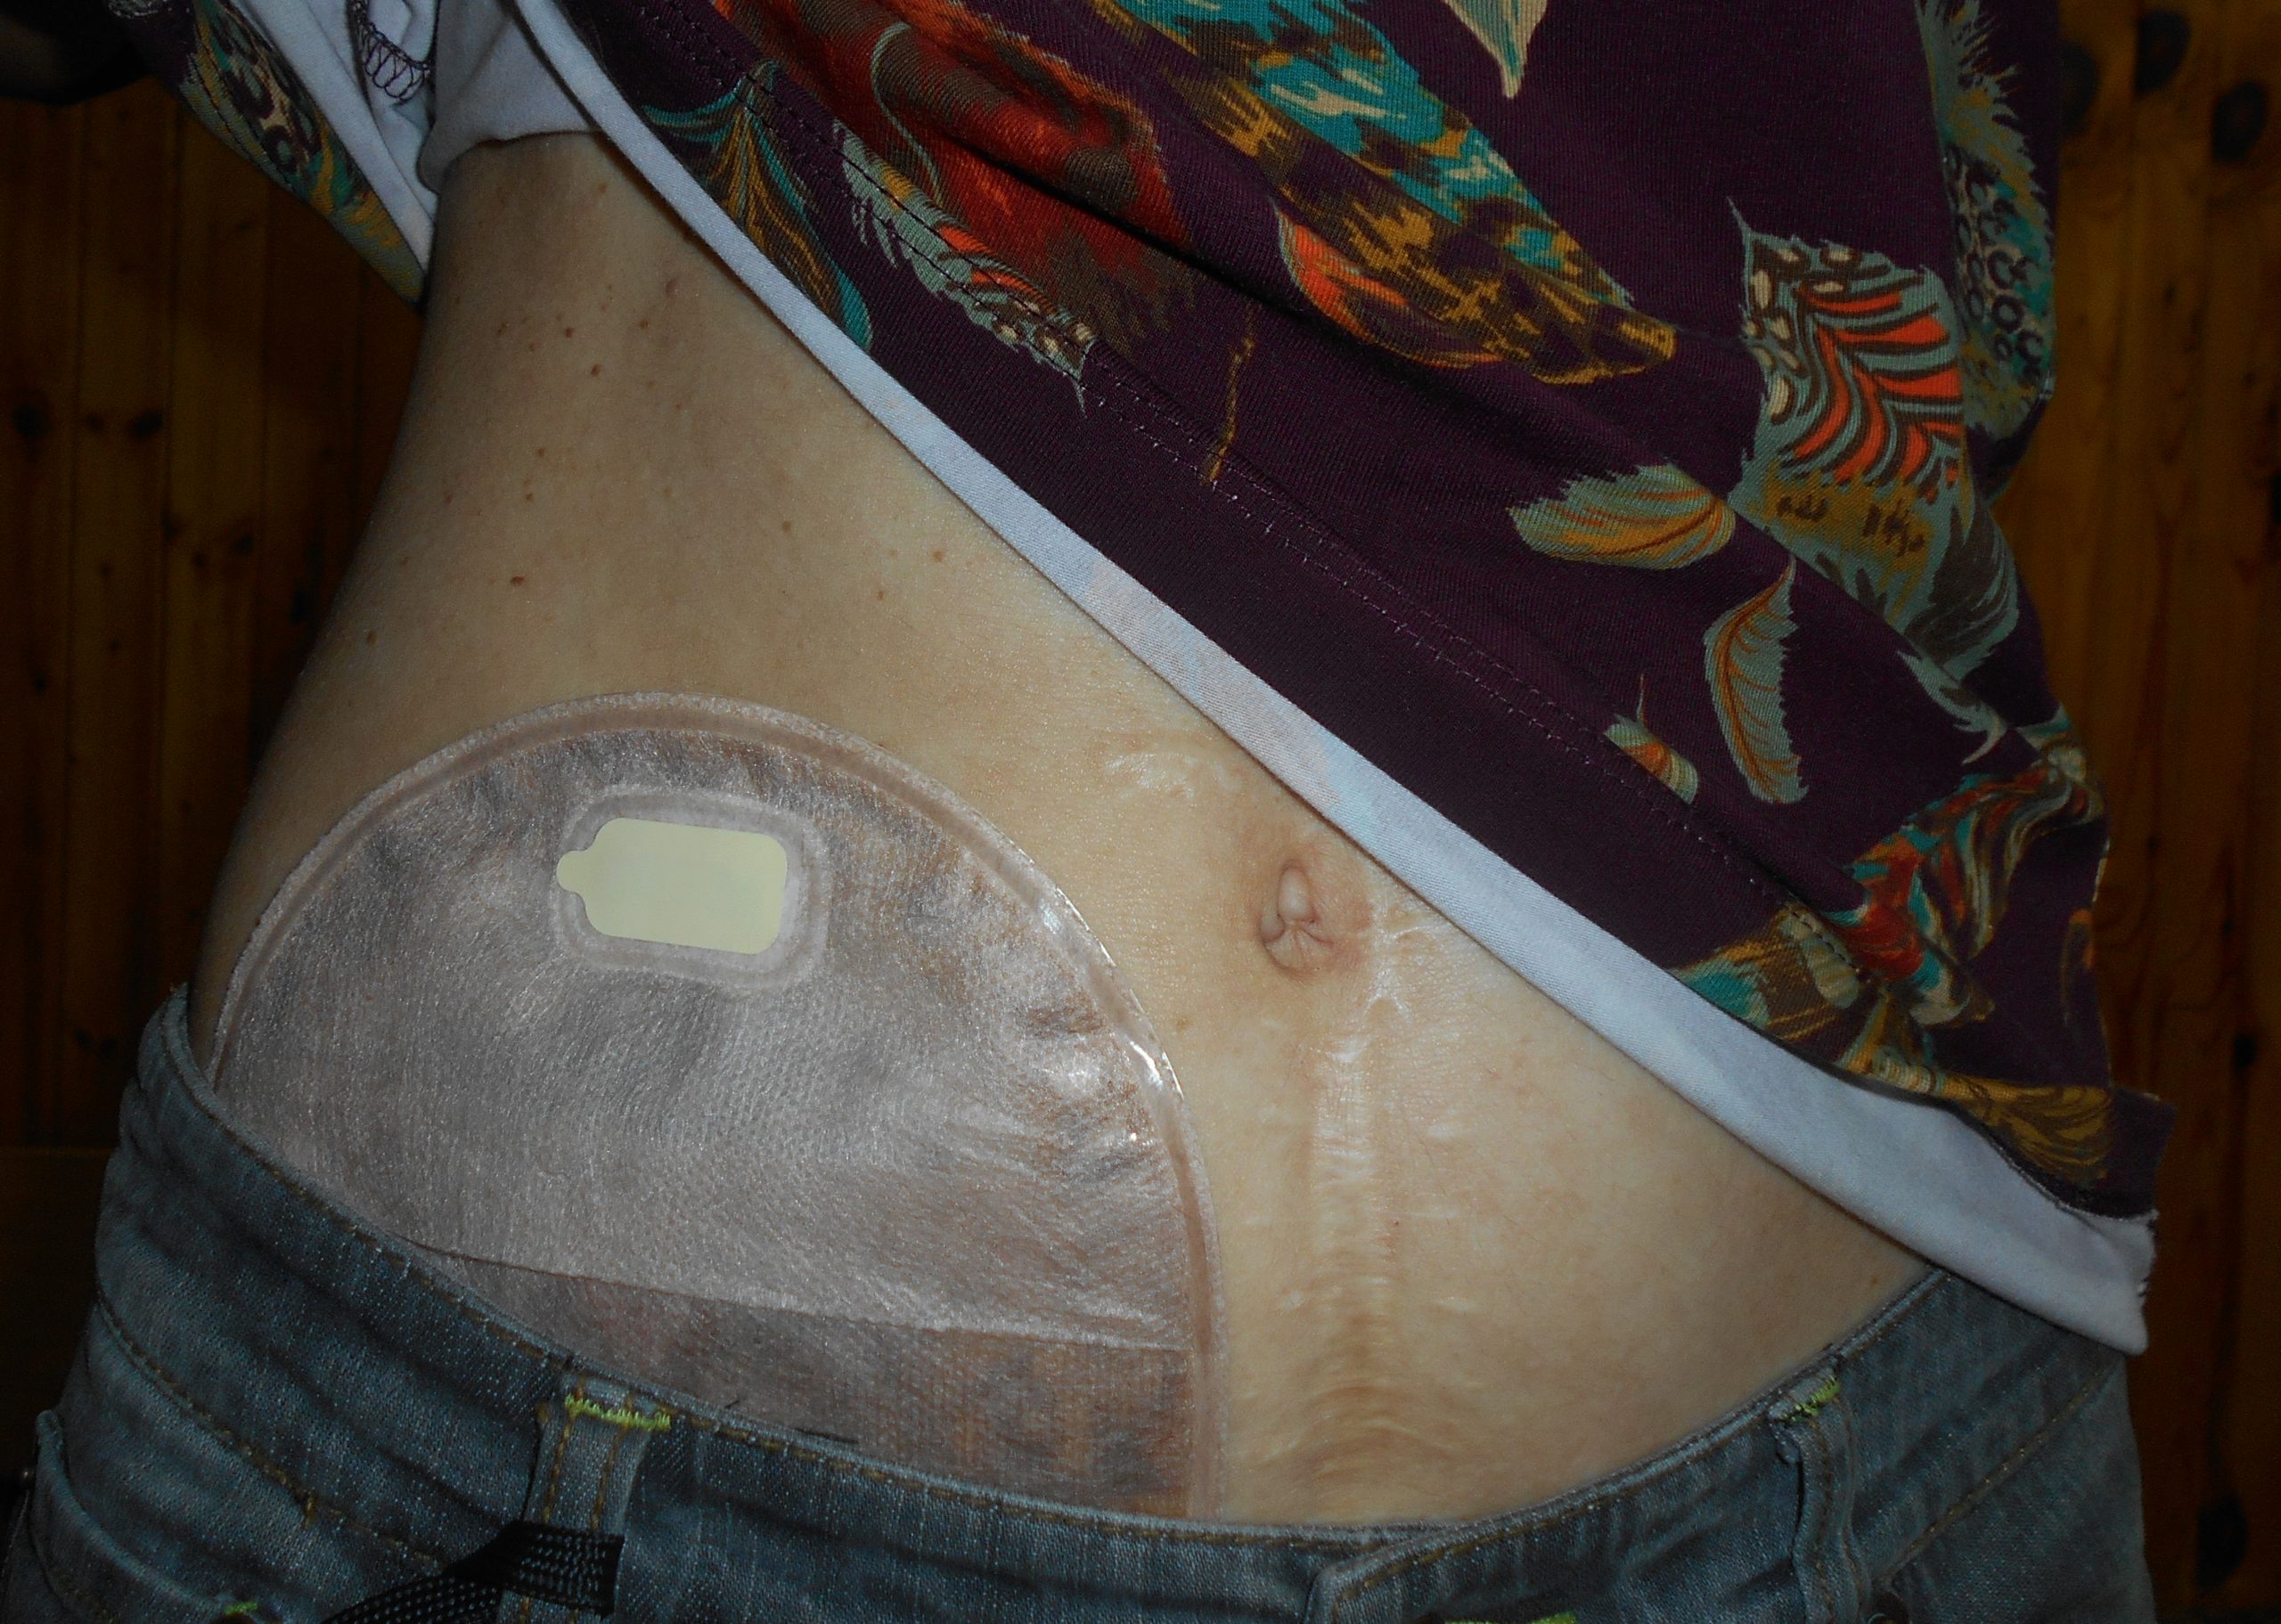
Stoma appliances are supplied as a one- or two-piece set. A two-piece set consists of an ostomy barrier (also called a wafer) and a pouch. The ostomy barrier is the part of the appliance that sticks to the skin with a hole that is fitted around the stoma. The pouch collects the waste and must be emptied regularly. It attaches to the ostomy barrier in a clicking motion to secure the two parts, similar to how a plastic storage container cover snaps to a container to create a seal. The pouching system must be completely sealed to prevent leaking of the waste and to protect the surrounding peristomal skin. The pouch has an end with an opening where the waste is drained and is closed using a plastic clip or VelcroTM strip.[43] In a one-piece stoma appliance set, the ostomy barrier and the pouch are one piece. See Figure 21.16[44] for an image of a stoma with an ostomy barrier in place. See Figure 21.17[45] for an image of a patient with an ileostomy appliance with a pouch attached.
Individuals with colostomies, ileostomies, and urostomies have no sensation and no control over the output of the stoma. Depending on the type of system, the ostomy appliance can last from four to seven days, but the pouch must be changed if there is leaking, odor, excessive skin exposure, or itching or burning under the skin barrier. Patients with pouches can swim and take showers with the pouching system on.[46]

When changing an ostomy appliance, the ostomy barrier is cut to fit closely around the stoma without impinging on it. See the "Checklist for Ostomy Appliance Change" for detailed instructions. The nurse measures the stoma with a template and then cuts and fits the ostomy barrier to a size that is 2 mm larger than the stoma.[47] See Figure 21.18[48] for an image of a nurse measuring and cutting the ostomy barrier to fit around a stoma.

After the skin barrier is applied to the skin, the pouch is snapped to the barrier. See Figure 21.19[49] for an image of applying the pouch.
Physical and Emotional Assessment
Patients may have other medical conditions that affect their ability to manage their ostomy care. Conditions such as arthritis, vision changes, Parkinson’s disease, or post-stroke complications can hinder a patient’s coordination and ability to manage the ostomy. In addition, the emotional burden of coping with an ostomy may be devastating for some patients and may affect their self-esteem, body image, quality of life, and ability to be intimate. It is common for patients with ostomies to struggle with body image and their altered pattern of elimination. Nurses can promote healthy coping by ensuring the patient has appropriate referrals to a wound/ostomy nurse specialist, a social worker, and support groups. Nurses should also be aware of their nonverbal cues when assisting a patient with their appliance changes. It is vital not to show signs of disgust at the appearance of the ostomy or at the odor that may be present when changing an appliance or pouching system.[50]
View a supplementary YouTube video on Changing an Ostomy Pouch[51]
Urostomy Care
A urostomy is similar to a colostomy, but it is an artificial opening for passing urine. Urostomies are surgically created due to medical conditions such as bladder cancer, removal of the bladder, trauma, spinal cord injuries, or congenital abnormalities.
A urostomy patient has no voluntary control of urine, so the pouching system must be emptied regularly. Many patients empty their urostomy bag every two to four hours or when the pouch becomes one-third full. The pouch may also be attached to a drainage bag for overnight drainage. Patients with a urostomy are at risk for urinary tract infections (UTIs), so it is important to educate them regarding the signs and symptoms of an infection.
Localized damage to the skin or underlying soft tissue, usually over a bony prominence, as a result of intense and prolonged pressure in combination with shear.
When preparing to insert an indwelling urinary catheter, it is important to use the nursing process to plan and provide care to the patient. Begin by assessing the appropriateness of inserting an indwelling catheter according to CDC criteria as discussed in the “Preventing CAUTI” section of this chapter. Determine if alternative measures can be used to facilitate elimination and address any concerns with the prescribing provider before proceeding with the provider order.
Subjective Assessment
In addition to verifying the appropriateness of the insertion of an indwelling catheter according to CDC recommendations, it is also important to assess for any conditions that may interfere with the insertion of a urinary catheter when feasible. See suggested interview questions prior to inserting an indwelling catheter and their rationale in Table 21.8a.
Table 21.8a Suggested Interview Questions Prior to Urinary Catheterization
| Interview Questions | Rationale |
|---|---|
| Do you have any history of urinary problems such as frequent urinary tract infections, urinary tract surgeries, or bladder cancer?
For males: Do you have any history of prostate enlargement or prostate problems? For females: Have you had any gynecological surgeries? |
Previous medical conditions and surgeries may interfere with urinary catheter placement. Information about a male patient’s prostate will assist in determining the size and type of catheter used. (Recall that using a catheter with a coude tip is helpful when a male patient has an enlarged prostate.) If a patient has a history of previous urinary tract infections, they may be at higher risk of developing CAUTI. |
| Have you ever had a urinary catheter placed in the past? If so, were there any problems with placement or did you experience any problems while the catheter was in place? | Questioning the patient about placement and prior catheterizations assists the nurse in identifying any problems with catheterization or if the patient has had the procedure before, they may know what to expect. |
| Do you have any questions about this procedure? How do you feel about undergoing catheterization? | The nurse should encourage patient involvement with their care and identify any fears or anxiety. Nurses can decrease or eliminate these fears and anxieties with additional information or reassurance. |
| Do you take any medications that increase urination such as diuretics or any medications that decrease urgency or frequency? If so, please describe. | Identifying medications that increase or decrease urine output is important to consider when monitoring urine output after the catheter is in place. |
| Have you had any orthopedic surgeries that may affect your ability to bend your knees or hips? Are you able to tolerate lying flat for a short period of time? | The patient may not be able to tolerate the positioning required for catheter insertion. If so, additional assistance from other staff may be required for patient comfort and safety. |
Cultural Considerations
When inserting urinary catheters, be aware of and respect cultural beliefs related to privacy, family involvement, and the request for a same-gender nurse. Inserting a urinary catheter requires visualization and manipulation of anatomical areas that are considered private by most patients. These procedures can cause emotional distress, especially if the patient has experienced any history of abuse or trauma.
Objective Assessment
In addition to performing a subjective assessment, there are several objective assessments to complete prior to insertion. See Table 21.8b for a list of objective assessments and their rationale.
Table 21.8b Objective Assessment
| Objective Data Collection | Rationale |
|---|---|
| Review the patient’s medical record for any documented medical conditions the patient may not have reported, such as urethral strictures, structural problems with the bladder or urethra, or frequent urinary tract infections. | Any type of obstruction or scar tissue within these areas may prevent the catheter from advancing into the bladder. |
| Analyze the patient's weight and most recent electrolyte values. | Weight is used to determine a patient's fluid status, especially if they have fluid overload. Electrolyte levels are also affected by fluid balance and the use of diuretic medications. Establish a baseline to use to evaluate outcomes after placing the urinary catheter. |
| Determine the patient's level of consciousness, ability to cooperate, developmental level, and age. | Evaluate the patient’s ability to follow directions and cooperate during the procedure and seek additional assistance during the procedure if needed. This data will impact how to explain the procedure to the patient. |
| Perform physical assessment of the bladder and perineum. Palpate the bladder for signs of fullness and discomfort. (Bladder emptying may also be assessed using a bladder scanner per agency policy). Inspect the perineum for erythema, discharge, drainage, skin ulcerations, or odor. Note the position of anatomical landmarks. For example, in females identify the urethra versus the vaginal opening. | A full bladder produces discomfort and urgency to void, especially on palpation. These symptoms should be relieved with the placement of a urinary catheter.
Identify any abnormal physical signs in the perineal area that may interfere with comfort during insertion. Determining the urethral opening improves accuracy and ease of insertion. |
| When examining the perineal area, note the approximate diameter of the urinary meatus. Choose the smallest, appropriately sized diameter catheter. | An appropriately sized catheter is important to avoid unnecessary discomfort or trauma to the urinary tissue. Catheters that are 14 French diameter are typically used in adults. |
Life Span Considerations
Children
It is often helpful to explain the catheterization procedure using a doll or toy. According to agency policy, a parent, caregiver, or other adult should be present in the room during the procedure. Asking a younger child to blow into a straw can help relax the pelvic muscles during catheterization.
Older Adults
The urethral meatus of older women may be difficult to identify due to atrophy of the urogenital tissue. The risk of developing a urinary tract infection may also be increased due to chronic disease and incontinence.
Expected Outcomes/Planning
Expected patient outcomes following urinary catheterization should be planned and then evaluated and documented after the procedure is completed. See Table 21.8c for sample expected outcomes related to urinary catheterization.
Table 21.8c Expected Outcomes of Urinary Catheterization
| Expected Outcomes | Rationale |
|---|---|
| The patient’s bladder is nondistended and not palpable. | Verifies appropriate bladder emptying. |
| The patient reports no abdominal or bladder discomfort or pressure. | Verifies correct catheter placement by allowing urine flow and relieving discomfort or pressure. |
| Urine output is at least 30 mL/hr. | Verifies correct catheter placement and appropriate kidney functioning. If urine output is less than 30 mL/hour, check tubing for kinking and obstruction, and notify the provider if there is no improvement after manipulating the tubing. |
| Patient verbalizes understanding of the purpose of the catheter and signs of a urinary tract infection to report. | Verifies the patient's understanding of the procedure and signs of complications. |
Implementation
When inserting an indwelling urinary catheter, the expected finding is that the catheter is inserted accurately and without discomfort, and immediate flow of clear, yellow urine into the collection bag occurs. However, unexpected events and findings can occur. See Table 21.8d for examples of unexpected findings and suggested follow-up actions.
Table 21.8d Unexpected Findings and Follow-Up Actions
| Unexpected Findings | Follow-Up Action |
|---|---|
| Urine flow does not occur when catheterizing a female patient. | The catheter may have entered the vagina and not the urethral meatus. Leave the catheter in the vagina as a landmark to avoid incorrect reinsertion. Obtain a new catheter kit and cleanse the urinary meatus again before reinsertion. If reinsertion is successful into the bladder, remove the catheter that is in vagina after the second attempt. |
| Sterile field is broken during the procedure. | If supplies or the catheter become contaminated, obtain a new catheter kit and restart the procedure. |
| Patient reports continued bladder pain or discomfort although urinary flow indicates correct catheter placement. | Ensure there is no tension pulling at the catheter. It may be helpful to deflate the balloon and advance the catheter another 2-3 inches to ensure it is in the bladder and not the urethra. If these actions do not resolve the discomfort, notify the provider because it is possible the patient is experiencing bladder spasms. Continue to monitor urine output for clarity, color, and amount and for signs of urinary tract infection. |
| The nurse is unable to advance the catheter on a male patient with an enlarged prostate. | Do not force advancement because this may cause further damage. Ask the patient to take deep breaths and try again. If a second attempt is unsuccessful, obtain a coude catheter and attempt to reinsert. If unsuccessful with a coude catheter, notify the provider. |
| Urine is cloudy, concentrated, malodorous, dark amber in color, or contains sediment, blood, or pus. | Notify the health care provider of signs and symptoms of a possible urinary tract infection. Obtain a urine specimen as prescribed. |
Evaluation
Evaluate the success of the expected outcomes established prior to the procedure.

