
19 Playing in Positions
Introduction
Skillful sight-reading involves knowing the many locations where one specific note can be played on the guitar. There are many ways to develop this skill. I will share two different approaches in this unit. The first is to play chromatic scales and the second is to play in high positions on the guitar neck. Before we begin, let’s take a moment to think about the guitar’s unique construction.
Notations
One Note; Multiple Locations
A distinct pitch (represented by a note) can potentially be played in multiple locations of the guitar. There are many possibilities. For example, some pitches can be played in five different locations, whereas other pitches can only be played in one location. Some examples are below.
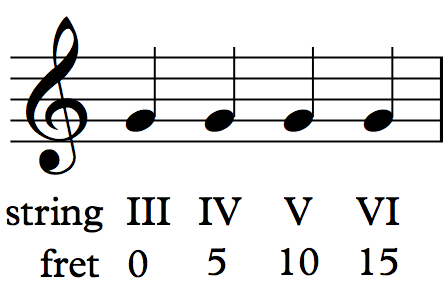
Five Locations

This ‘E’ can be played five locations.
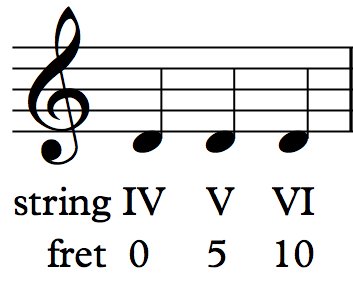
Four Locations
This ‘G’ can be played in four locations.
Three Locations
This ‘D’ can be played in three locations.
Two Locations
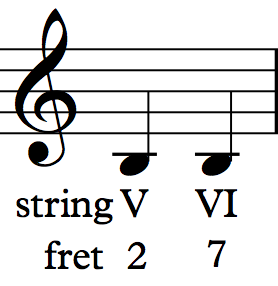
This ‘B’ can be played in two locations.
One Location

This ‘F’ can be played in only one location.
Chromatic Scales
The chromatic scale will help you identify the name of any note on the guitar. It has a fancy name but it’s actually quite simple. A chromatic scale occurs when adjacent frets are played in either an ascending or descending order. Consult the chart below to know how pitches follow one another, fret by fret.

The easiest way to produce a chromatic scale is to start with an open string and play up the neck, one fret at a time. Make sure to look at the correct notation for each note and say its name as you go. Ascend the chromatic scale using the sharp enharmonic of the pitch, as in the first example below. Then, ascend the chromatic scale using the flat version of the enharmonic, as in the second example below. Do this on every one of the guitar’s six strings, starting with the name of the open string. View this graphic if you need extra help or want to double check your work.
Ascending String V in Sharps

Ascending String V in Flats

Playing in Positions
A position is way of expressing where fretting fingers are placed in relation to frets. In first position, for example, the first finger corresponds with fret one, the second finger with fret two, the third finger with fret three and the fourth finger with fret four. However, in second position, every finger is moved up by one fret so that the first finger corresponds with fret two, the second finger with fret three, the third finger with fret four, and the fourth finger with fret five. Note that the name of the position comes from the fret number that corresponds with the first finger. The majority of the previous play-along exercises are designed for playing in first or second positions. You will now encounter some exercises to be played in higher positions.
Bear in mind that positions are flexible. For example, you may have to shift your hand out of position to reach a really high note. Or, you may have to slightly extend a finger out of position, either up or down a fret. For the most part, playing in a position allows us to play with more speed and accuracy. Further, higher positions create an opportunity for us to sight-read familiar notes in new locations.
Fifth Position

The task above is designed for fifth position, meaning your first finger corresponds to fret five, the second finger to fret six, etc. Notice the asterisk below. You will need to briefly extend your fourth finger out of fifth position to reach that note. The sharp and flat notes have been omitted from the graphic below to make it easier to view. However, if you refer to the chromatic scale you will be able to play the sharp or flat notes in fifth position. Practice this like a scale. Start on string VI and continue to play across the adjacent strings. Look at the notation and say the name of each pitch as you play.
Seventh Position

The task above is designed for seventh position, meaning your first finger corresponds to fret seven, the second finger to fret eight, etc. Practice this like a scale. Start on string VI and continue to play across the adjacent strings. Look at the notation and say the name of each pitch as you play.
Ninth Position

The task above is designed for ninth position, meaning your first finger corresponds to fret nine, the second finger to fret ten, etc. Practice this like a scale. Start on string VI and continue to play across the adjacent strings. Look at the notation and say the name of each pitch as you play.
Twelfth Position

The task above is designed for twelfth position, meaning your first finger corresponds to fret twelve, the second finger to fret thirteen, etc. Practice this like a scale. Start on string VI and continue to play across the adjacent strings. Look at the notation and say the name of each pitch as you play. This may be too awkward to play on some acoustic guitars. In this case, I suggest you play only the notes on the first three (treble) strings.
Let’s Play |
Sight-Reading Tip
Sight-reading is truly a study in time. It demands that we respond to the past, root ourselves in the present, and catch a glimpse of the future, all at once! This is why flexible and controlled eye movement is essential. In fact, recent studies of eye movement during sight-reading prove that the eyes of skilled readers regularly jump from the present note being played, to a future note a few measures ahead and back to the present[1]. If you want to develop flexible and controlled eye movement consider each item listed below.
- Place scores at eye level.
- Make sure all notation is legible.
- Spread all the pages of a score out before playing.
- If a score has more pages than you can spread out then plan a page turn in a place that does not disrupt the forward progress of visual and mental processing.
Checklist for Sight-Reading
- Count the beats out loud (including the &).
- Keep going (even if you make a mistake).
- Maintain your best playing posture.
- Look at the score, not your hands.
- Play with the feel of the meter.
- Play patterns instead of individual notes (AKA chunk).
- Cultivate a calm demeanor.
- Have fun!
Let’s Play Rhythms |
Attitude Tip
The secret of getting ahead is getting started. –Mark Twain
Exercise 19.1: Score
Exercise 19.1: Audio
Exercise 19.2: Score
Exercise 19.2: Audio
Exercise 19.3: Score
Exercise 19.3: Audio
Let’s Play Patterns |
Attitude Tip
It’s not the size of the dog in the fight, it’s the size of the fight in the dog. –Mark Twain
Exercise 19.4 is designed to play entirely in fifth position.
Exercise 19.4: Score
Exercise 19.4: Audio
Exercise 19.5 is designed to play entirely in fifth position. Notice the key signature.
Exercise 19.5: Score
Exercise 19.5: Audio
Exercise 19.6 is designed to play entirely in seventh position.
Exercise 19.6: Score
Exercise 19.6: Audio
Exercise 19.7 is designed to play entirely in seventh position. Notice the key signature.
Exercise 19.7: Score
Exercise 19.7: Audio
Exercise 19.8 is designed to play in ninth position. Take note of the key signature.
Exercise 19.8: Score
Exercise 19.8: Audio
Exercise 19.9 is designed to play in twelfth position. Take note of the key signature.
Exercise 19.9: Score
Exercise 19.9: Audio
Let’s Play Duets |
Attitude Tip
Everybody’s a work in progress. I’m a work in progress. I mean, I’ve never arrived…I’m still learning all the time. –Renée Fleming
Exercise 19.10 is designed to play mostly in seventh position. At the end, however, you will play harmonics.
Exercise 19.10: Score
Exercise 19.10: Audio
Play the following piece in fifth position.
Allegretto by C.P.E. Bach: Score
Allegretto: Audio
Play the following exercise in ninth position. Take note of the key signature.
Old French Song by Peter Tchaikovsky: Score
Old French Song: Audio
Play the next exercise in ninth position. Take note of the key signature.
Italian Song by Peter Tchaikovsky: Score
Italian Song: Audio
Play the next exercise in twelfth position. Take note of the key signature.
The Tip-Top Polka: Score
The Tip-Top Polka: Audio
Let’s Play Compositions |
This composition is under the Creative Commons Attribution-NonCommercial 4.0 International License (CC BY-NC 4.0).
Attitude Tip
Ever Tried. Ever Failed. No matter. Try Again. Fail again. Fail better. –Samuel Beckett
The box containing the numbers ‘4+3+2+1’ is a reference to groupings of eighth-notes. The composer omitted the changing time signatures because it is easier to simply count in an eighth-note pulse, being aware of the groupings as you go. The count-in consists of four eighth-notes.
Drawing 6 by Walter Marsh: Score
Drawing 6: Audio
Congratulations!
You have completed this unit! If you kept up with the beat and accurately played approximately 70% of the pitches and rhythms, you are ready for the next unit. Feel free to repeat the exercises. However, do not play them so often that you memorize them. Once you memorize the notation, you are no longer developing the skill of sight-reading.
- Madell, Jaime & Herbert, Sylvie. "Eye Movements and Music Reading: Where Do We Look Next?" Music Perception: An Interdisciplinary Journal. Vol. 26. No. 2. December, 2008. ↵
