
Active Learning Kit by Center for Teaching, Learning, and Engagement, Glendale Community College is licensed under a Creative Commons Attribution 4.0 International License, except where otherwise noted.
Active Learning Kit by Center for Teaching, Learning, and Engagement, Glendale Community College is licensed under a Creative Commons Attribution 4.0 International License, except where otherwise noted.
In 2019, Glendale Community College’s Center for Teaching, Learning, and Engagement (CTLE) bought supplies and created several “Active Learning Kits” full of items and accompanying ideas for in-class active learning activities. Faculty could stop by the CTLE, grab an item and an idea sheet, use them in class and then return them for someone else to use. These kits were popular with faculty and well-used.
Then came the COVID-19 pandemic in 2020, and with it, the Great Pivot to Remote Teaching. We worked hard during the Spring to help our faculty successfully transition to a remote, synchronous teaching modality, which we refer to as Live Online. And during the Fall, we adapted our Active Learning Kit for the Live Online teaching environment. We proudly present our Active Learning Kit: Engaging Ideas for Live Online Instruction.
Some of the activities, web apps, and tools described in this book may not be fully accessible to students with disabilities. If you have a student in your class who requires an accommodation, please evaluate our suggestions with those needs in mind. Also, please understand that the hyperlinks we provide to web apps and technical guides are subject to change. We hope you will use the Make a Suggestion page to tell us about any broken links so we can find a replacement and keep this book updated and useful.
Inside, you’ll find many ideas you can use to enliven your synchronous class meetings with active learning activities. We have organized them into two parts:
In each chapter of this book, you will find the following sections:
The Description section briefly describes the web app or videoconference tool feature.
![]() Get to Know You
Get to Know You
![]() Organization
Organization
![]() Engagement
Engagement
![]() Assessment
Assessment
Different broad Uses of the web app or videoconference tool feature are listed in a yellow sidebar (see the example to the right). You’ll find specific ideas for each listed use in the Teaching Ideas section.
The Teaching Ideas section is a bulleted list of active learning ideas for using the web app or videoconference tool feature. These ideas loosely flow by use type in the order shown in the Uses sidebar.

Technical Guides
The How to Use section provides a basic overview of how to use the web app or videoconference tool feature.
In the Web Apps part of this book, the Tools section lists apps and, their hyperlinks, specific information about the app. In the Videoconference Tool Features part of this book, the Tools section lists specifics about the feature in Google Meet, Webex Meetings, and Zoom. We also provide Technical Guides (see the example to the right) for each tool.
To navigate the book, select the Contents menu, and click the + (plus) next to one of the two parts to expand the chapter list. Select a chapter to start reading. You can also use the Previous and Next links in the footer area when reading this book on the web, or flip through as you normally would in your reading app if you’ve downloaded the eBook.
![]() Get to Know You
Get to Know You
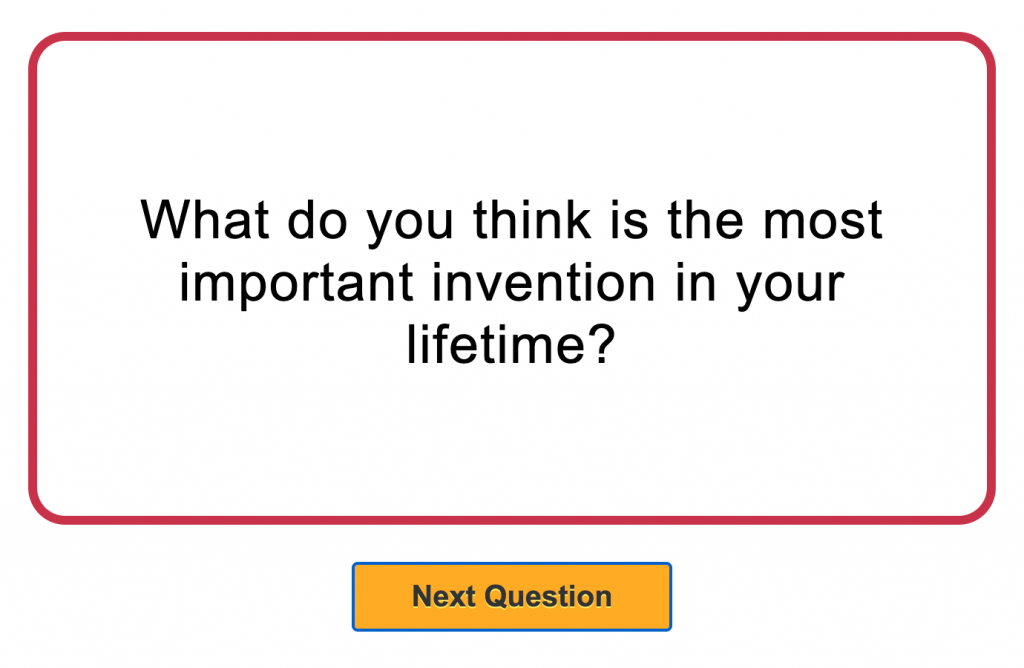
A Conversation Generator can be used to help students and faculty get to know one another. You can generate a single random question at a time or a list of randomly generated questions.
Load a Conversation Generator and share your screen. Or, provide the link to students via chat before sending them into breakout groups. For each group, designate one student who will copy the link, share their screen, and direct questions for their group.
The Random Question Generator by ESL Games is part of a collection of games and activities designed for teaching English to adults. This tool draws one question at a time at random from a list of 500 questions taken from the book 50 Conversation Classes by Andrew Berlin. The Random Question Generator user interface displays a single question and a button to generate a new question.
The Random Questions List Generator by Random Word Generator allows you to generate a list of random questions. Use this option if you prefer to curate your list of questions in advance. Choose the number of questions you want and click the generate button. Copy/paste your list of questions to a reference document and edit them if necessary. If you number your list of questions, you can roll dice to randomly choose which question to answer.
![]() Get to Know You
Get to Know You
![]() Engagement
Engagement
![]() Assessment
Assessment
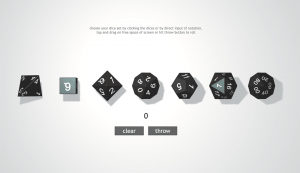
You can introduce an element of chance and specific odds into your course activities with three-dimensional (3D) dice. Rolling one or multiple dice creates an element of suspense and gameplay in any activity.
Load 3D Dice in your web browser. Select the number and type of die or dice to roll. Share your screen and “throw” the dice. Or, provide the link to students via chat before sending them into breakout groups. For each group, designate one student who will copy the link, share their screen, and roll for their group.
3D Dice Roller by Anton Nataro rolls three-dimensional multi-sided dice of up to seven types. You can choose how many of each type to roll. The results are randomly generated using atmospheric noise from random.org. You can choose from single play or multiplayer mode (multiplayer requires login with Facebook or Google). In multiplayer mode, each roll is shown to all participants along with a line of text displaying the player’s results. Multiplayer mode is a good way for the instructor to monitor multiple groups’ or students’ rolls during breakout sessions.
If seven types of dice are more than you need, Classroom Dice by TeacherLed is a good alternative. It lets you roll up to three 6-sided dice, and each die is a different color. Consider assigning one of the available die colors to up to 3 student groups. Then, a numeric selection can be made for each group in a single role.
![]() Get to Know You
Get to Know You
![]() Organization
Organization
![]() Engagement
Engagement
![]() Assessment
Assessment
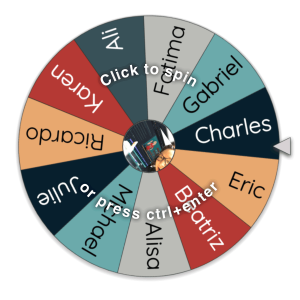
A Spinner is a roulette-style wheel similar to those used for giveaways. Add names or items to the spinner and have students or the instructor spin to make a random selection.
Load the Spinner in your web browser. Label it with student names or terms. Share your screen and spin to play. Or, provide the link to students via chat before sending them into breakout groups. For each group, designate one student who will copy the link, share their screen, and spin for their group.
Wheel of Names is an ad-supported Spinner, but ads are unobtrusive. With a free account, you can create and save multiple spinners with unique URLs for sharing with students. You must accept browser cookies on first use. This Spinner offers many options for customization, and sign in with Google is supported. You can import from a Google Sheet (if signed in with a Google account) or import usernames from a Twitter query. This spinner also supports multiple languages.
Spin Wheel is another Spinner by Random Name Picker. This spinner is ad-supported, with a low-cost premium membership option that removes ads and unlocks customizations and the ability to save different spinners.
Picker Wheel is a Spinner designed to help make a random decision. Up to 4 item lists can be saved, and the spinner can be embedded in a web page (including a Canvas page) or a PowerPoint slide (Google Slides is not supported). Settings are stored in your browser cache, so the site will remember your settings as long as you are using the same computer and web browser.
Random Picker Wheel is a minimalist Spinner by Tools Unite. There are few customizations available, but soon as you update the wheel, a new share URL is generated, so you can make and share multiple spinners with your students.
![]() Engagement
Engagement
![]() Assessment
Assessment
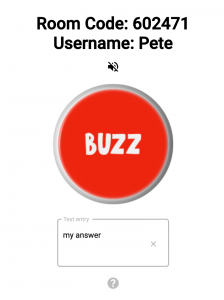
Answer Buzzers are online multiplayer buzzers with buzz buttons that play a sound when clicked. The instructor hosts a “game room” that students join as players. Students’ buzzes are recorded in the order they occur.
Host a buzzer room and share its link with your students. After the students join your room, have them buzz when they know the correct answer to your question. Optionally, share your screen so students can observe the buzzes live.
Cosmobuzz is a free web app that allows a host and multiple players to connect to a buzzer-room. Players see a screen with a clickable buzzer and a text entry field for typing in an answer. Players’ responses are displayed and numbered according to the order in which they buzz. The room host has controls to reset players’ buzzers and text fields. The host can also lock players’ buzzers or record only the first buzz.
BuzzIn.live is a web app with a free tier that allows a host and up to 8 players to connect to a buzzer-room. Free features include buzz ordering, buzzer locking, a timer, and latency correction to compensate for slower internet connections. The host has controls to clear players’ buzzers, set a countdown timer, and lock players’ buzzers.
![]() Get to Know You
Get to Know You
![]() Engagement
Engagement
![]() Assessment
Assessment
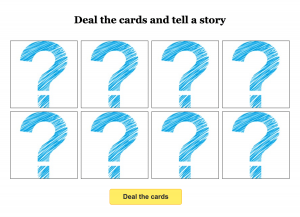
Story Cards are a set of 8 card tiles that fill with random images when you deal the cards. They can be used to have students create a story using as many of the pictures as possible.
Note: Some ideas adapted from ELT Experiences‘ teaching ideas for Story Cubes (Sketchley, n.d.).
Load Story Cards in your web browser and share your screen. Use the button to deal a set of cards. Or, provide the link to students via chat before sending them into breakout groups. For each group, designate one student who will copy the link, share their screen, and deal Story Cards for their group.
Story Cards by ESL Games is part of a collection of games and activities designed for teaching English to adults.
![]() Get to Know You
Get to Know You
![]() Engagement
Engagement
![]() Assessment
Assessment
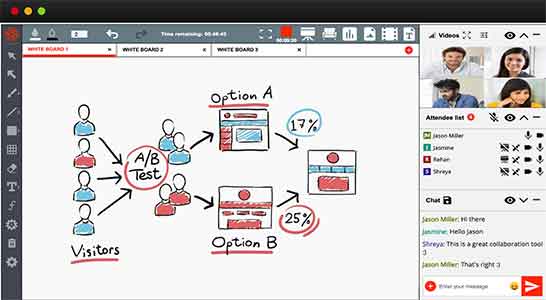
A Collaborative Whiteboard is a whiteboard you and your students can use synchronously together over the Internet, allowing your class to answer questions, write out problems, and draw things.
Use the Collaborative Whiteboard for a draw-with-me presentation. Draw a simplistic version of a concept or process (biological or geological, for example). As you explain, give students an opportunity to help visualize the process by adding shapes, motions, spatial relationships, etc. on the board. Have them add important facts through annotations and captions. When the drawing is complete, have students save a screenshot that can be used for study, reference, and communication. Or save the completed drawing yourself and share it with students via Canvas.

Prior to the class meeting, create your Collaborative Whiteboard and set it up for student access. During the class meeting, have students contribute to the whiteboard. Highlight and call attention to specific items on the board as students add content. It’s helpful to practice using Collaborative Whiteboard tools before using them with your students so you can help them through any difficulty on their first use of the tools.
Jamboard is a whiteboard app available with G-Suite for Education. Its icon resembles the letter “J” created from orange and yellow simple shapes. Use its interactive canvas to doodle, drop images, add notes, and insert assets directly from the web while collaborating with students. Each whiteboard document is called a jam, and can hold multiple additional boards, called frames. Annotation features include drawing tools, simple shapes, text boxes, sticky notes, image insertion, and a laser pointer. Documents are saved to Google Drive, and share settings can be edited similarly to other G-Suite files. In your videoconferencing tool, paste the unique share link (URL) into chat so that students can open it and interact.
This video provides a quick tutorial on using Jamboard, and 5 collaborative whiteboard activity ideas:

A YouTube element has been excluded from this version of the text. You can view it online here: https://open.maricopa.edu/activelearning/?p=137
Technical Guides
If you use Webex Meetings for your synchronous class sessions, you can use the built-in whiteboard and annotation features. While you are hosting a meeting, select Share Screen, and choose Share on the New Whiteboard tile. Enable Webex Meetings’ annotation tools for your participants, and lead students through your activity. You can also enable the annotation tools while sharing something other than a whiteboard, such as a slide deck or an open application.
This video provides a quick tutorial on how to share a whiteboard and use annotation tools in Webex Meetings:

A YouTube element has been excluded from this version of the text. You can view it online here: https://open.maricopa.edu/activelearning/?p=137
Technical Guides
If you use Zoom for your synchronous class sessions, you can use the built-in whiteboard and annotation features. While you are hosting a meeting, select Share Screen, and choose Share Whiteboard. Enable Zoom’s annotation tools for your participants, and lead students through your activity. You can also enable the annotation tools while sharing something other than a whiteboard, such as a slide deck or an open application.
This video provides a quick tutorial on how to share a whiteboard and use annotation tools in Zoom:

A YouTube element has been excluded from this version of the text. You can view it online here: https://open.maricopa.edu/activelearning/?p=137
![]() Engagement
Engagement
![]() Assessment
Assessment
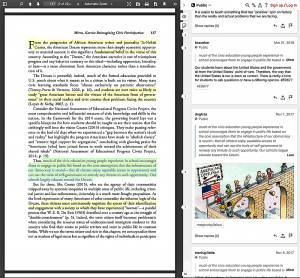
Annotation Tools allow you and your students to collaboratively highlight and comment on digital text (similar to using a highlighter marker and writing in the margins).
Locate and prepare digital text to be highlighted and annotated. Depending on the Annotation Tool you choose, you may need to pre-share the digital text with students, or set permissions so that the text is accessible to anyone with the link. Set students up for success by providing instructions for them to register for any necessary accounts, and remind them to sign in. Save the hyperlinks to edit documents or join groups you set up. Gather all hyperlinks in advance so you can paste them into your videoconference chat for students at the appropriate time. Demonstrate how to use the tool during an early class session and give students a low-stakes opportunity to practice with you. Provide clear guidance for what you expect students to do with the Annotation Tool. Share your view of group or class annotations using the share content feature of your videoconferencing tool.
Technical Guides
Hypothesis is a free online Annotation Tool and web browser extension that allows you to annotate and save digital text (web pages, PDFs, eBooks) both individually and collaboratively. You can create a private group for each class and have students join so they can read and annotate together. Hypothesis can be integrated into the Canvas LMS.
Users can make four types of annotations:
This video provides a quick demonstration of how to use Hypothesis:

A YouTube element has been excluded from this version of the text. You can view it online here: https://open.maricopa.edu/activelearning/?p=177
Technical Guides
Included with G-Suite for Education, Google Docs is an online word processing app you can use to access, create, and edit documents. Google Docs can be shared and edited or annotated collaboratively. Share a Doc with students and assign them Commenter or Editor roles. Use the text background color formatting option to highlight text. Use the Comment feature to add and reply to annotations. Use the Suggesting feature to recommend revisions to text, and to apply recommended edits. To use on a mobile device, install the appropriate free app:
This video provides a quick demonstration of how to share a Doc, choose user editing permissions, get the link to share your Doc, use coauthoring features, and use comments:

A YouTube element has been excluded from this version of the text. You can view it online here: https://open.maricopa.edu/activelearning/?p=177
![]() Organization
Organization
![]() Engagement
Engagement
![]() Assessment
Assessment
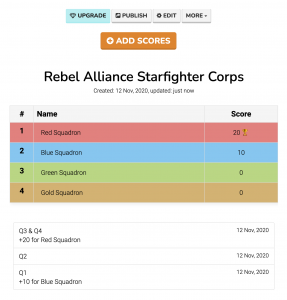
A Scoreboard allows you to keep score on a leaderboard in your web browser. It displays the names and current scores of players or teams, and tracks points as you add or remove them. Use it to add an element of gameplay to any course activity.
Note: The Teaching Ideas in this chapter are intended for in-class activities, not to post grades or create an academic record.
 “While you are at Hogwarts, your triumphs will earn your House points, while any rule-breaking will lose House points. At the end of the year, the House with the most points is awarded the House Cup, a great honour.” — Minerva McGonagall to first-year students in Harry Potter and the Philosopher’s Stone by J.K. Rowling
Prepare Scoreboard(s) with student or team names prior to the start of class. During preparation, you may set up and save multiple scoreboards and edit scoring increments. You can reset scores at any time, and export final results to a spreadsheet. Each scoreboard generates two unique hyperlinks, one editable (for the scorekeeper) and one that is view-only (for players). Save these hyperlinks so you can copy/paste them into your browser or your videoconference chat during class.
During gameplay, launch the scorekeeper’s editable hyperlink to award points. You can optionally log the reason points are added or removed. Either share your scoreboard view with students or paste the view-only scoreboard hyperlink into chat for students to open before you send them into breakout groups.
After gameplay ends, save the results by making note, taking a screenshot, or exporting the results as a spreadsheet.
Technical Guides
KeepTheScore by Caspar von Wrede is a web-based scorekeeping app that lets you track points for up to 150 players. You can make and save multiple scoreboards. You can reset scoreboards to use again for a new game, or use them to track scores over a longer period. You do not need an account to use the app. The app uses your browser cookies to store your scoreboards and their settings, and remembers you over multiple visits. But if you use a different browser, different computer, or clear your browser cookies, you’ll lose any settings that were stored. As a best practice, always save the hyperlinks to scoreboards you want to revisit by clicking the Publish button to reveal them.
![]() Get to Know You
Get to Know You
![]() Organization
Organization
![]() Engagement
Engagement
![]() Assessment
Assessment
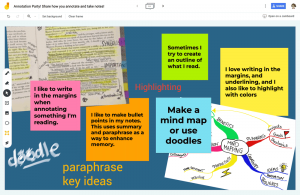
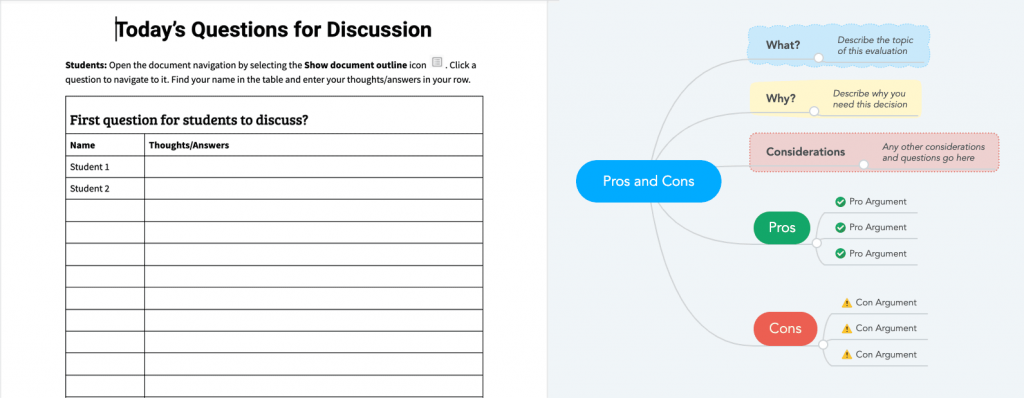
A Worksheet is a document prepared before class and shared with students prior to or during class. The document may be highly or minimally structured to aid students. It can be used individually or collaboratively during class to complete an assigned activity.
Before your class meets, create a Worksheet in your tool of choice. Add as much structure as you need for the intended activity. Provide empty space or blank lines where students can start adding content so students can begin working without writing over each other. Include labeled spaces, instructions, and prompts to help students know what to do. Set the worksheet’s permissions so that your students can edit it directly, show them how to make their own copy, or use the Google LTI tool so students can make and submit their copy directly in Canvas. Consider making a starter worksheet that you can begin with any time you want to reuse the activity; then duplicate it, edit if needed and share the duplicate version with students instead of sharing your original. Provide students the link to your worksheet during your class meeting, and walk them through creating their own copy if necessary, and give them your instructions and expectations on how to use the worksheet during class.
Technical Guides
Included with G-Suite for Education, Google Docs is an online word processing app you can use to access, create, and edit documents. Google Docs can be shared and edited collaboratively, and they are great for creating Worksheets for your students. Create a Worksheet in a Doc and set the Share permissions so that anyone with the link can view the Doc. Provide this link to your students and have them choose File > Make a Copy. Alternately, you can share your Doc with specific students based on breakout groups you plan to assign. To use on a mobile device, install the appropriate free app:
This video provides a quick demonstration of how to share a Doc, choose user editing permissions, get the link to share your Doc, use coauthoring features, and use comments:
A YouTube element has been excluded from this version of the text. You can view it online here: https://open.maricopa.edu/activelearning/?p=231
Technical Guides
MindMeister is an online, collaborative mind mapping tool that can help students collect ideas and facts on a given topic and make connections between concepts, ideas, and information. Each user can store up to 3 mind maps on the free basic plan, and finished maps can be captured via screenshots. Create a new blank map or start with a business, education, or productivity template. Add a root topic and any additional item prompts. Use the Share button to set permissions so anyone with the link can edit, and copy the share link to send to your students. Alternatively, you can share your map with specific students based on breakout groups you plan to assign.
This video provides a quick demonstration of how to use the mind map editor:

A YouTube element has been excluded from this version of the text. You can view it online here: https://open.maricopa.edu/activelearning/?p=231
Videoconference tools such as Google Meet, Webex Meetings, and Zoom — the three tools featured in this guide — can be used as simply as possible to facilitate class sessions online, but their features also allow you to orchestrate some complex interactions. The purpose of this section is to provide sample activities that leverage videoconference tool features and provide some ideas about how they can work in concert to increase active learning in the Live Online classroom.
Note: We created this guide to help faculty at Glendale Community College enhance their synchronous class sessions. Google Meet, Webex Meetings, and Zoom are the current videoconference tools supported at our institution. We have omitted discussion of any features of these tools which are not available at our institution.
Some of these activities require students to switch between apps or use videoconference tool features they may have never used before. Therefore, keeping your students’ perspectives in mind will give you the best opportunity for a worthwhile experience. For example, when students only have a smartphone to attend Live Online class meetings, they will have more difficulty switching between or accessing apps outside of the videoconference. As well, students may be interrupted frequently if they are at home caring for a family member. They may also prefer to maintain the privacy of their surroundings by turning their video off. Given these possible circumstances, it’s important to set expectations with your students while simultaneously recognizing that some leniency may be in order.

Keep your videoconference tool updated
Many of the activities in this section will only work with a recent version of the videoconference client (for desktop computers) or videoconference app (for mobile). Therefore, at the beginning of your course, recommend your students upgrade to the most recent version of the desktop client or mobile app for the videoconference tool used for class meetings. Also, many of the activities in this book will not work if students or instructors access the videoconference tool through a web browser instead of the desktop client (if available) or mobile app.
For your convenience, here are download links for you to use or share with your students:
![]() Get to Know You
Get to Know You
![]() Organization
Organization
![]() Engagement
Engagement
![]() Assessment
Assessment
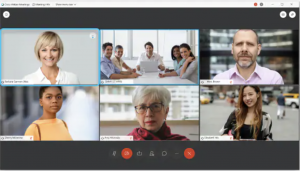
All videoconferencing tools provide the ability to show video, requiring only a webcam or front-facing smartphone camera. Seeing each others’ faces is a way to build community and connection in Live Online class meetings. This chapter suggests ways to use participant video thumbnails for active learning.
Technical Guides
Have students show their video and choose a grid layout so you can see everyone’s video thumbnail image. Give instructions on how to participate in your chosen activity. On-camera responses are a quick way to communicate with the instructor without interrupting an explanation or mini-lecture.
The control to show or hide video is available to all users in the toolbar at the bottom of Google Meet, Webex Meetings, and Zoom videoconference meetings.
![]() Get to Know You
Get to Know You
![]() Organization
Organization
![]() Engagement
Engagement
![]() Assessment
Assessment
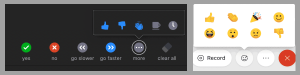
Participant Status: Videoconference tools have a limited number of status icons that users can add next to their name in the participants panel.
Reactions: Users in a Webex Meetings or Zoom videoconference can select from a limited number of emoji and have one displayed on their video thumbnail for a short time.
Both participant status icons and reaction emoji provide a way to communicate without interrupting a meeting and can be used for active learning during a class session. One advantage of these videoconference tool features is they can be used even if participants want to leave their video turned off.
Inform your students how you want them to use their participant status and/or reactions for the current activity and then lead them through it. Consider starting with low-stakes practice to make sure everyone understands what to do.
Technical Guides
Google Meet only offers a Hand raise ![]() participant status button at the bottom of the screen. The People tab displays a Raised hands section when any attendee raises their hand. The meeting moderator can lower individual raised hands or all of them.
participant status button at the bottom of the screen. The People tab displays a Raised hands section when any attendee raises their hand. The meeting moderator can lower individual raised hands or all of them.
Reactions are not available.
Webex Meetings offers a Raise hand toggle in the Participants panel. To raise or lower their hand, users must open the Participants panel, hover over their name, and click the hand icon to the right of their name. Users can click Sort by Raised hands in the Participants panel to see attendees in the order in which hands were raised. The host or cohost can lower individual raised hands or all of them.
Reactions are available from a Reactions menu on the controls at the bottom of the meeting window. Users can choose from 8 emojis: thumbs up, thumbs down, happy face, sad face, laughing face, surprised face, applause, and celebrate. When a user clicks an emoji, the reaction animates in the lower right-hand corner of the user’s video thumbnail. If the user’s video thumbnail is not in others’ view, the user’s name and reaction appear in the lower-left corner of the meeting window. Reactions appear for a few seconds and then disappear automatically.
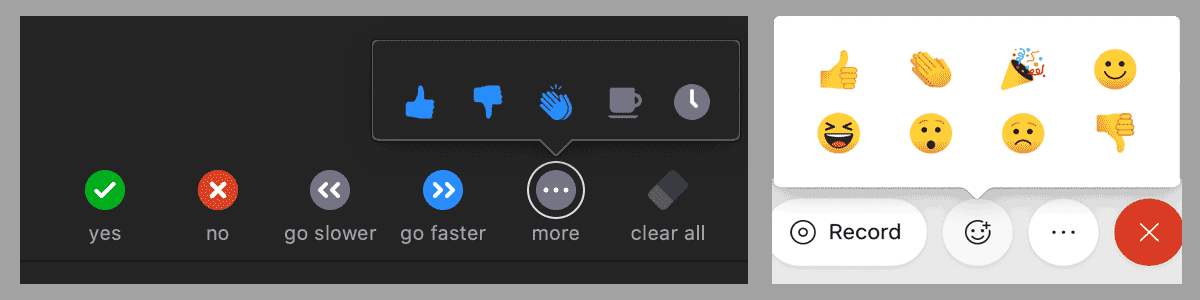
Zoom offers Nonverbal feedback in the participants list. Users can choose from 10 different feedback icons: raise hand, yes, no, go slower, go faster, agree, disagree, clap, need a break, and away. The selected icon appears next to the user’s name in the participants list. Hosts also see a number above each feedback icon showing how many participants have clicked that icon. Hosts can lower a raised hand, and can clear all nonverbal feedback icons. Participants are displayed in your participant panel in the order that they raised their hands (those who raised their hand first are displayed at the top).
Reactions are available from a Reactions menu on the controls at the bottom of the meeting window. Users can choose from 6 emojis: clapping hands, thumbs up, heart, tears of joy, open mouth, and celebrate. The chosen reaction displays on the user’s video thumbnail for 5 seconds. Users can select the skin tone for their reactions in Settings.
![]() Get to Know You
Get to Know You
![]() Engagement
Engagement
![]() Assessment
Assessment
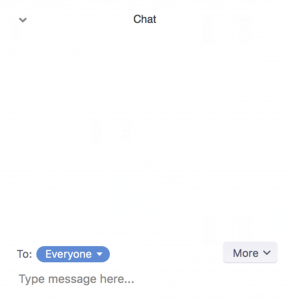
All videoconferencing tools feature an in-meeting Chat panel which allows users to send chat messages to other users within a meeting. Chatting is a way to ask questions or contribute to the meeting without interrupting the active speaker. This chapter suggests ways to use the Chat panel for active learning.
When your Chat panel is open, it will appear docked to the right of your meeting window, or it may appear as a floating panel. To open your Chat panel during a meeting, select the chat bubble icon in your meeting window. Type your message and press the enter/return keyboard to send the message to all meeting participants. Each attendee can only see chat messages exchanged after joining the meeting. Messages sent before you join are not displayed and all messages disappear when you leave the meeting.
Keep the Chat panel open and monitor it every few minutes so as not to miss any messages from your students. You can also consider asking or assigning a student to help you keep an eye out for questions posted in the Chat.
Technical Guides
With the Chat panel open, type your message where the “Send a message to everyone” prompt appears.
In the Chat panel or the meeting Host controls, you can turn off the Send chat messages option during a meeting so that only the host can send chat messages. This may be useful if you want students to hold comments and questions until the end of a presentation or activity.
Google Meet does not have the ability to save the Chat panel contents, but you can select it and copy/paste to a document before leaving the meeting, or scroll to a specific Chat section and take a screenshot of it.
With the Chat panel open, type your message where the “Enter chat message here” prompt appears. You also have the option to select a participant name from a drop-down menu to send a private message to that person.
In the Participants section of your menu bar, select Assign Privileges and view the Communicate tab to select whether participants can chat publicly and/or privately.
You can save the chat panel contents at any time during your meeting.
With the Chat panel open, type your message where the “Type message here” prompt appears. You also have the option to select a participant name from a drop-down menu to send a private message to that person.
In the Chat panel, select More (…) to select whether participants can chat publicly and/or privately.
You can save the chat panel contents at any time during your meeting.
![]() Get to Know You
Get to Know You
![]() Organization
Organization
![]() Engagement
Engagement
![]() Assessment
Assessment
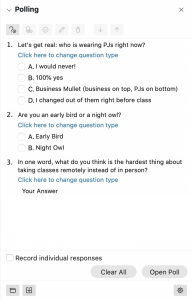
Some videoconferencing tools have a polling feature that allows you to create and conduct a poll during your meeting and gather responses from your attendees. Polls are frequently used to break the ice at the beginning of a class session (e.g., “How would you label your mood today – choose all that apply,”), but they can also serve as an organizational tool, a shared jumping-off point for discussions, or a quick formative assessment.
The general process to use the Poll feature in Webex Meetings and Zoom is to enable or add the feature for your specific meeting, create your Poll, and launch your Poll. Both tools allow you to download your Poll results prior to ending your meeting. The Technical Guides provide details for all steps. Specific information for each of the videoconferencing tools is highlighted below.
Technical Guides
You can create a poll during your class meeting, possibly while students are in breakout groups or working on something else. You can also create a poll in advance, save it on your computer, and then bring it into your class meeting at the right time. Polls must be created during a meeting, but you can open a meeting with only yourself to create and save polls in advance of your class session. The available question types are:
You can define correct answers for both multiple-choice question types. Polls have a timer option, an anonymous answers option, an option to view and share the poll results with attendees, and an option to save poll results to your computer as a text file.
This video demonstrates the use of polls in Webex Meetings:

A YouTube element has been excluded from this version of the text. You can view it online here: https://open.maricopa.edu/activelearning/?p=321
You can create a poll during your class meeting, possibly while students are in breakout groups or working on something else. You can also create a poll in advance on the Zoom web portal’s meeting management page, and then launch it during your class meeting at the right time. The available question types are:
Polls have a timer option, an anonymous answers option, an option to view and share the poll results with attendees, and an option to save poll results to your computer as a CSV file.
This video demonstrates the use of polls in Zoom:
 Polling in Zoom")
A YouTube element has been excluded from this version of the text. You can view it online here: https://open.maricopa.edu/activelearning/?p=321

![]() Get to Know You
Get to Know You
![]() Organization
Organization
![]() Engagement
Engagement
![]() Assessment
Assessment
Video conferencing tools have a Virtual Background feature that allows users to replace their physical environment and display an image as their background during a videoconference. There is usually an option to blur the physical background instead of replacing it. The main purpose of a Virtual Background is to limit visual distractions in a user’s video and to provide privacy. But this feature can also be used for active learning.
Make sure students know how to change the Virtual Background in your videoconferencing tool in advance of your activity. Consider posting the information in your Learning Management System. You can also provide the link to the tool’s technical guide in chat. Provide clear instructions and expectations for your specific activity, and give students a few moments to change their Virtual Background.
Virtual backgrounds and inclusivity: A Virtual Background works by using the camera to detect the difference between a well-lit subject and a comparatively shaded background, so there is an algorithmic bias that sometimes hides dark hair and skin. Also, the feature requires a newer operating system and CPU (central processing unit) on the user’s computer or mobile device. Users with older equipment may not be able to display a Virtual Background. Evaluate these variables for your specific group of students and plan an alternative way to participate (such as sharing their image choice on-screen or linked in chat) if necessary.
Technical Guides
Google Meet comes with a predefined selection of available virtual background images. Users of G Suite for Education can’t upload their own image but can choose from the existing selections. Adapt the Teaching Ideas above accordingly.
Webex Meetings comes with a predefined selection of available virtual background images. Users can also upload an image of their choice from their device. The .jpg and .png file formats are supported.
Zoom comes with a predefined selection of available virtual background images. Users can also upload an image or video of their choice from their device. The .gif, .jpg, and .png image file formats are supported, and .mov or .mp4 video file formats are supported.
![]() Organization
Organization
![]() Engagement
Engagement
![]() Assessment
Assessment
Some videoconference tools come with annotation tools for shared content. Meeting participants can simultaneously annotate when screen sharing is on, regardless of what’s being shared.
Both you and your students can simultaneously annotate when screen sharing is on. The annotation tools include, among others, a basic drawing tool, shapes, text, and limited symbols. Presenters can enable or disable the annotate toolbar for meeting participants. Annotations can be saved via the videoconferencing tool or by taking a screenshot. Annotation tools must be deactivated to switch back to using your mouse pointer. It’s helpful to practice using annotation tools before using them with your students so you can help them through any difficulty on their first use of the tools.
Technical Guides
You can share your screen and annotate whatever is visible on it. You can also upload a document or add a whiteboard to the meeting to annotate with participants. The meeting host can assign annotation privileges to all participants or specific participants. Annotations can be saved as .ucf files to reuse and continue annotating in another Webex Meeting. They can also be saved in .pdf format for opening in other applications, printing, or sharing. Tools include an arrow pointer, laser pointer, lines, arrowheads, squares, ovals, check and X marks, limited color choices, and an eraser.
You can share your screen and annotate whatever is visible on it. You can also add a whiteboard to the meeting to annotate with participants. The presenter can allow or prevent participants from annotating on the shared screen and can show or hide participants’ names when they are annotating. Annotations can be saved as .png or .pdf files for opening in other applications, printing, or sharing. Tools include lines, arrows, shapes, text, spotlight, arrow pointer, limited color choices, and an eraser.
![]() Get to Know You
Get to Know You
![]() Organization
Organization
![]() Engagement
Engagement
![]() Assessment
Assessment
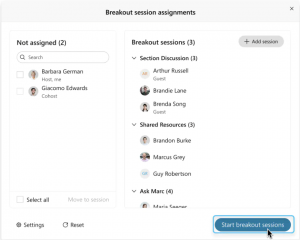
Breakout Groups allow you to split a videoconference meeting into several separate sessions. This videoconference feature is the equivalent of splitting students in a face-to-face classroom into small groups. Breakout Groups are useful for splitting a large group into smaller groups that can talk or collaborate.
Prepare by making sure breakouts are enabled in your tool of choice. Also, prepare any materials you want your students to work with during their breakouts, such as Worksheets, Collaborative Whiteboards, or other web apps. Either pre-assign groups before your class meeting starts, or assign students to Breakout Groups during the live meeting. Give students clear expectations of how much time they have and what to do while in their breakout session. Consider having students within each group assume a role (notetaker, leader, presenter, timekeeper, reporter, etc.). Provide them with any necessary links or materials, and then launch the Breakout Groups. As the groups run, you can move among the different groups to provide help or feedback. When time is up, end the Breakout Groups and debrief back in the main class meeting.
Technical Guides
Breakout Groups are known as Breakout Sessions in Webex Meetings.
Hosts and cohosts can create breakout sessions, assign participants manually or automatically, start and end sessions, and switch between sessions at any time. They can also rename, add, or delete sessions, move attendees between sessions, and broadcast a message into ongoing sessions. Sessions can be set to end automatically after a certain amount of time. A countdown timer to the session’s end can be set to between 10 seconds – 2 minutes.
Attendees can share content and use collaboration tools such as chat within their groups. If enabled, they can enter and leave their assigned session freely. They can also ask for help during the sessions, and the host/cohosts receive a notice. Attendees receive a warning when their session is about to end.
Each breakout session is a separate audio and video conference. Each user’s audio switches to the breakout session when they join and switches back to the main meeting automatically when breakout sessions end. If you are recording, the recording stays with the main meeting. Breakout sessions cannot be recorded. See all features available in Webex Meetings breakout sessions for additional information.
This video provides a brief but thorough overview of Breakout Sessions:

A YouTube element has been excluded from this version of the text. You can view it online here: https://open.maricopa.edu/activelearning/?p=357
Technical Guides
Breakout Groups are known as Breakout Rooms in Zoom.
Hosts and cohosts can create breakout rooms, assign participants manually or automatically, enable self-select, and start the rooms. They can also rename, add, or delete rooms, move attendees between rooms, and broadcast a message into ongoing rooms. Breakout rooms can be set to end automatically after a certain amount of time. A countdown timer to the session’s end can be set to between 30 seconds – 2 minutes.
Attendees can share content and use collaboration tools such as chat within their groups. If self-select is enabled, they can view the list of rooms to enter and leave freely. They can also ask for help during the sessions, and the host/cohosts receive a notice. Attendees receive a warning when their session is about to end.
If you are recording to the cloud, the recording stays with the main meeting. If local recording is used, the recording will follow the participant who is recording, and multiple participants can record locally. Attendees must request and the host must enable permission to record a breakout room.
This video provides a brief but thorough overview of Breakout Rooms:

A YouTube element has been excluded from this version of the text. You can view it online here: https://open.maricopa.edu/activelearning/?p=357
An interactive or media element has been excluded from this version of the text. You can view it online here: https://open.maricopa.edu/activelearning/?p=248
This book wouldn’t have been possible without Meghan Kennedy, Instructional Designer and Co-Director of the Center for Teaching, Learning, and Engagement (CTLE) at Glendale Community College, AZ. Meghan wrote the booklet full of ideas (Kennedy, 2019) that accompanies the physical Active Learning Kits available to GCC faculty through the CTLE. She was generous in giving me time and space to work on this project when I had the idea to adapt her work for the Live Online environment.
I am deeply grateful to those who gave me detailed and constructive comments on one or more chapters, including Meghan Kennedy and Debbie Baker. They gave freely of their limited time to push me to clarify concepts and provided excellent suggestions for additions to the text.
I’m also immensely grateful to Dr. Maria Andersen, who realized immediately when pandemic lockdowns started that faculty all over the world would need help shifting to remote teaching. She distilled a decade of experience teaching remotely and synchronously online into a webinar, “Best Practices for Remote Teaching with Dr. Maria Andersen,” which I attended on March 12, 2020. I leaned heavily on what I learned from her, not only in writing the Worksheets, Chat, Video Thumbnails, and Breakout Groups chapters of this book, but also in training GCC’s faculty during our rapid pivot to remote teaching. In particular, Dr. Andersen named and described the 3-2-1-Go chat method that revealed to me, as she puts it, the “pedagogical superpowers” of videoconference chat (Coursetune, 2020).
I want to acknowledge the Digital Education Programs and Initiatives team at Indiana University, who made creating this book exponentially easier and faster by publishing their own work, Zoom to the Next Level: Active Learning in the Virtual Classroom, as an Open Educational Resource (OER) licensed under Creative Commons. The Videoconference Tool Features part of this book is a derivative work based on their original book. All I needed to do was document the same features in Google Meet and Webex Meetings that they thoughtfully outlined for active learning in Zoom.
Finally, I want to thank the Residential and Adjunct Faculty of Glendale Community College. You are my reason for creating this work, and because you can use it, it will exist for any other teacher who needs a few ideas for their next synchronous online teaching session. I hope to have made something useful and beneficial for teachers and their students.
Thank you, one and all.
Coursetune. (2020, March 12). Webinar: Best Practices for Remote Teaching with
Dr. Maria Andersen [Video]. Vimeo. https://vimeo.com/397528374
Digital Education Programs and Initiatives – Indiana University. (n.d.). Zoom to
the next level: Active learning in the virtual classroom [Pressbooks].
Indiana University Knowledge Base. https://iu.pressbooks.pub/activezoom/
Kennedy, M. (2019). Active learning kit [PDF]. Center for Teaching, Learning,
and Engagement, Glendale Community College. https://drive.google.com/file/d/1R4EtqH2nyyp-N3mChNhRRZS74voCyMiC/view?usp=sharing
Sketchley, M. (n.d.). Story cubes: Ten teaching ideas. ELT Experiences.
https://eltexperiences.com/story-cubes-ten-teaching-ideas/
Random Question Generator User Interface (screenshot) © Cheryl Colan is licensed under a Public Domain license
3D Dice Roller © Cheryl Colan (screenshot) is licensed under a Public Domain license
Wheel of Names © Cheryl Colan (screenshot, center photo, color scheme) is licensed under a CC BY (Attribution) license
Cosmobuzz © Cheryl Colan (screenshot) is licensed under a Public Domain license
Story Cards © Cheryl Colan (screenshot) is licensed under a Public Domain license
Hypothesis screenshot © Cheryl Colan (screenshot) is licensed under a Public Domain license
Document and Mind Map Template Examples © Cheryl Colan is licensed under a Public Domain license
Information Icon © Adapted from Happy by Ale Atroz from the Noun Project adapted by Cheryl Colan is licensed under a CC BY (Attribution) license
Webex Meetings Grid View © Cisco Webex Help Center, All Rights Reserved
Zoom Chat Panel © Zoom Support, All Rights Reserved
Webex Meetings Polls Panel (screenshot) © Cheryl Colan is licensed under a Public Domain license
Zoom background © Revved Design, All Rights Reserved