
17 Breakout Groups
Uses
![]() Get to Know You
Get to Know You
![]() Organization
Organization
![]() Engagement
Engagement
![]() Assessment
Assessment
Description
Breakout Groups allow you to split a videoconference meeting into several separate sessions. This videoconference feature is the equivalent of splitting students in a face-to-face classroom into small groups. Breakout Groups are useful for splitting a large group into smaller groups that can talk or collaborate.
Teaching Ideas
- Affinity grouping helps students identify similarities between each other, work collaboratively, and defend a position. It has the flexibility of being serious or fun, depending on your prompt. Determine a prompt (e.g., “The best season of the year is…”) and create breakout groups according to the “options” in your prompt (e.g., “spring, summer, fall, winter”). Give students the prompt and have them choose the breakout group that best answers the prompt for them. Inform students they will have 5 minutes to discuss why their choice is the “best” or “most accurate.” Have one student in each breakout group be the recorder – they can share their screen in their group and use a collaborative whiteboard or worksheet to capture their group’s ideas (Coursetune, 2020). Close the breakout groups and ask each group to report out to the whole class and share the recorder’s screens. Consider sharing the number of students in the different breakout groups and having a discussion about the implications of that breakdown.
- Use Breakout Groups for a Think-Pair-Share activity. Ask students an open-ended question. This is most effective if your prompt is specific (e.g., “What did you agree with or disagree with regarding [a particular concept]?” or “Compare and contrast concept A with concept B?”). Give them 3 minutes to individually jot down a few notes to organize their thoughts. Send students to Breakout Groups in groups of 2 or 3 to discuss their responses. Give them 5-7 minutes depending on the complexity of the prompt. Consider visiting some of the breakout rooms to fuel the discussion or bring in different points of view. Close the Breakout Groups and bring the class back together to summarize their discussion and explore further as a class.
- Let your students choose what elements of a subject to discuss by creating topic-specific Breakout Groups and asking students to join the topic that most interests them. Name your breakouts according to the discussion topics. Tell students they will be having 2-4 discussions (consecutively, not synchronously). Each discussion will take place in a different breakout group. Students will get to choose which discussion they join, and after 5-7 minutes, you will close the groups to bring everyone back, then reopen them for students to choose a new discussion. Either allow students to enter/leave groups on their own or as you open the groups, or have students declare their discussion choice and assign them to the corresponding group. After a few rounds of discussion, debrief by discussing each topic as a class. Students who took part in that topic can summarize their small-group discussion to kick off the whole class discussion.
- Use Breakout Groups to facilitate group work on problem-solving activities that can be completed within a class period or two. Before class: provide students with the “problem” and any necessary background reading. In Canvas, assign a short paragraph or quiz to analyze the problem or propose initial solutions. Use complete/incomplete grading to incentivize preparation and encourage unconventional approaches. During class: summarize and/or contextualize the problem. Provide an explicit list of deliverables (e.g., an executive summary, diagram, or project plan), and delivery format (e.g. Google Docs, Google Slides, etc.). Consider giving some general guidance about an approach to follow and creating a plan describing everyone’s roles, responsibilities, and due dates. Send students into Breakout Groups to discuss their hypotheses and determine a course of action. Visit each of the different breakout groups to ask questions and redirect as necessary. Bring the entire class back together after 10-15 minutes and have groups report out on the process/plan they are following to “solve” the problem and redirect as necessary. or have groups present their “solution” and deliverables. Follow up in Canvas: Assign groups to refine their deliverables and submit them.
- Use Breakout Groups for peer review in conjunction with an annotation tool, or to debrief after using the Canvas Peer-Review function on an assignment. Tell students how long they have in their Breakout Groups, and that time should be spent equally on everyone’s papers — suggest they designate a timekeeper. Give examples of effective and ineffective feedback if students are unfamiliar with this process. Students can clarify their comments and workshop some solutions to help improve each other’s writing. After the small-group discussions, debrief the exercise: what common issues did people see; what extra help do they need to improve their next draft? Instructors can identify themes and provide immediate instruction on common issues to help students for their next version.
- Use Breakout Groups to facilitate a class session that is dedicated to practice/feedback prior to a final presentation. During the session, you could break students into groups of three or four, and have each group critique each other’s presentations. Provide students guidance on how to evaluate the presentations: what they should look for and how to give effective feedback. They should use the grading rubric for the final presentation. Students each present, followed by five or so minutes of feedback as time allows. Remind students that they will have to keep close track of time in order for everyone to get a turn to present and receive feedback. You can move from group to group to observe and offer your own feedback. Broadcast messages into the Breakout Group periodically to remind students when to wrap up feedback and start the next practice presentation. Bring the class back together to debrief. Consider following up in Canvas: create a short assignment that asks each student to create a summary or list of how they intend to improve their presentation based on the feedback they received during the session.
How to Use
Prepare by making sure breakouts are enabled in your tool of choice. Also, prepare any materials you want your students to work with during their breakouts, such as Worksheets, Collaborative Whiteboards, or other web apps. Either pre-assign groups before your class meeting starts, or assign students to Breakout Groups during the live meeting. Give students clear expectations of how much time they have and what to do while in their breakout session. Consider having students within each group assume a role (notetaker, leader, presenter, timekeeper, reporter, etc.). Provide them with any necessary links or materials, and then launch the Breakout Groups. As the groups run, you can move among the different groups to provide help or feedback. When time is up, end the Breakout Groups and debrief back in the main class meeting.
Tools

Technical Guides
- Webex Meetings: Breakout Sessions
- Webex Meetings: Create Breakout Sessions
- Webex Meetings: Change Breakout Sessions
- Webex Meetings: Add, Rename, or Delete a Breakout Session
- Webex Meetings: Broadcast a Message to Breakout Sessions
- Webex Meetings: Join or Leave a Breakout Session
- Webex Meetings: Best Practices for Participating in Breakout Sessions
Webex Meetings
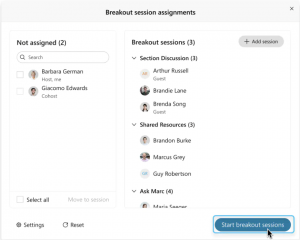
Breakout Groups are known as Breakout Sessions in Webex Meetings.
Hosts and cohosts can create breakout sessions, assign participants manually or automatically, start and end sessions, and switch between sessions at any time. They can also rename, add, or delete sessions, move attendees between sessions, and broadcast a message into ongoing sessions. Sessions can be set to end automatically after a certain amount of time. A countdown timer to the session’s end can be set to between 10 seconds – 2 minutes.
Attendees can share content and use collaboration tools such as chat within their groups. If enabled, they can enter and leave their assigned session freely. They can also ask for help during the sessions, and the host/cohosts receive a notice. Attendees receive a warning when their session is about to end.
Each breakout session is a separate audio and video conference. Each user’s audio switches to the breakout session when they join and switches back to the main meeting automatically when breakout sessions end. If you are recording, the recording stays with the main meeting. Breakout sessions cannot be recorded. See all features available in Webex Meetings breakout sessions for additional information.
This video provides a brief but thorough overview of Breakout Sessions:
Technical Guides
Zoom
Breakout Groups are known as Breakout Rooms in Zoom.
Hosts and cohosts can create breakout rooms, assign participants manually or automatically, enable self-select, and start the rooms. They can also rename, add, or delete rooms, move attendees between rooms, and broadcast a message into ongoing rooms. Breakout rooms can be set to end automatically after a certain amount of time. A countdown timer to the session’s end can be set to between 30 seconds – 2 minutes.
Attendees can share content and use collaboration tools such as chat within their groups. If self-select is enabled, they can view the list of rooms to enter and leave freely. They can also ask for help during the sessions, and the host/cohosts receive a notice. Attendees receive a warning when their session is about to end.
If you are recording to the cloud, the recording stays with the main meeting. If local recording is used, the recording will follow the participant who is recording, and multiple participants can record locally. Attendees must request and the host must enable permission to record a breakout room.
This video provides a brief but thorough overview of Breakout Rooms:
https://youtu.be/jbPpdyn16sY
