
STREAK PLATE
LEARNING OBJECTIVES
Aseptically transfer bacteria from one form of culture medium to another
Perform the streak plate technique resulting in isolated, individual colonies
Describe bacterial colony morphology using the proper terminology
Properly make a bacterial smear for staining
MCCCD OFFICIAL COURSE COMPETENCIES
Utilize aseptic technique for safe handling of microorganisms
Apply various laboratory techniques to identify types of microorganisms
Identify structural characteristics of the major groups of microorganisms
Compare and contrast prokaryotic cell and eukaryotic cell
Compare and contrast the physiology and biochemistry of the various groups of microorganisms
MATERIALS
Cultures:
Escherichia coli slant culture – 2 students will share the culture. The culture will be used for two lab sections.
Staphylococcus epidermidis broth culture – 2 students will share the culture. The culture will be used for two lab sections.
Escherichia coli and Staphylococcus epidermidis mixed broth culture – 2 students will share the culture. The culture will be used for two lab sections.
Media:
3 Sterile trypticase soy agar plates (TSA) per student
Equipment:
1 sterile swab per student
Inoculating loop
Test tube rack
bacticinerator
Day Two – permanent marking pen or wax pencil
Day Two – 2 microscope slides per student
Day Two – deionized water in a dropper bottle
BACTERIA ALBUM LINK
When microbiologists study microorganisms, they often work with pure cultures. A pure culture contains a single species of microorganism. When samples are taken from the environment or from a patient, they usually contain a variety of microorganisms. Mixed cultures contain more than one species of microorganism.
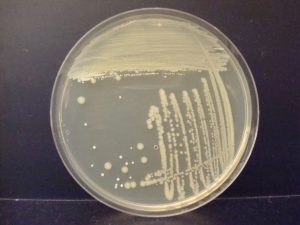
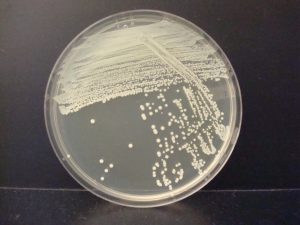
The streak plate is a common technique used to produce pure cultures from a mixed sample. The goal of the streak plate is to spread individual microorganisms so far apart on the surface of solid medium that they do not touch one another. When we spread bacterial cells on plated media to achieve separation of the cells, each cell reproduces many times and gives rise to a colony. A colony is a visible mass of microorganisms all originating from a single cell. Since all the cells in a colony are identical to each other, a colony is a pure culture. At least a million bacteria must be present in a colony for the unaided human eye to see the colony!
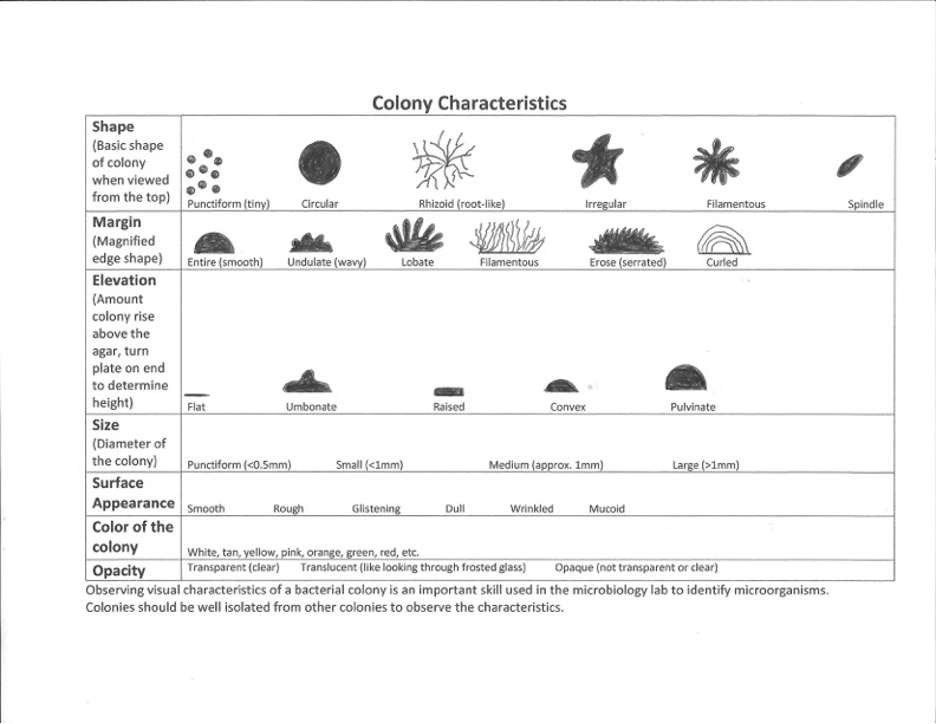
Bacteria produce colonies with different colony characteristics (visual appearance of colonies on an agar plate) such as size, shape, color, elevation, and margin. There is a chart below and in the worksheet with the proper colony characteristic terms. It is important to observe a well-isolated colony (>5 mm from the adjacent colony) when studying the characteristics of a colony. Crowded colonies rapidly deplete the nutrients available in the media and thus do not grow as large or exhibit the typical characteristics of those unencumbered by dense growth.
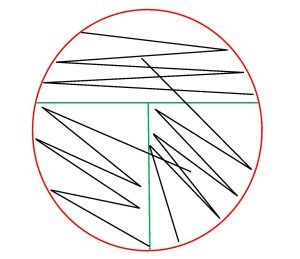
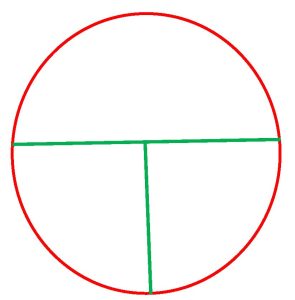
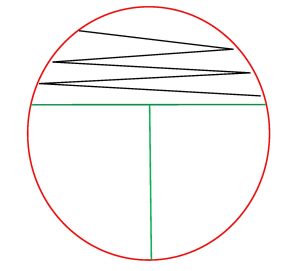
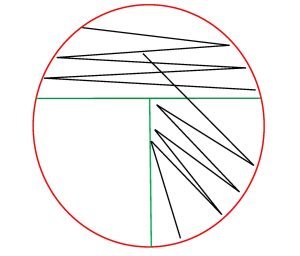
In a streak plate, an agar plate is divided into three sections.
For a mixed culture streak plate an inoculum is inoculated with a sterile swab in a zigzag pattern onto the first (and largest section) section of the agar plate. Then a sterile inoculating loop is used to pull a small amount of the inoculum from the first section into the second section of the streak plate. Then a sterile inoculating loop is used to pull a small amount of inoculum from the second section into the third section of the streak plate. The plate is then incubated.
Incubate agar plates upside down (lid side down) so that any condensation that forms will not drop onto the media surface and interfere with colony formation.
For a pure culture streak plate an inoculum is inoculated with a sterile loop in a zigzag pattern onto the first (and largest section) section of the agar plate. Then a sterile inoculating loop is used to pull a small amount of the inoculum from the first section into the second section of the streak plate. Then a sterile inoculating loop is used to pull a small amount of inoculum from the second section into the third section of the streak plate. The plate is then incubated.
When you observe growth on a streak plate, the first section often has thick, continuous growth with no colonies. The second and/or third sections will have less growth and isolated, individual colonies.
This exercise will introduce you to the streak plate technique used to obtain isolated, individual colonies. Your skill at streaking plates will improve with practice. You will use your incubated streak plates to make smears of organisms on glass slides to be used in a future lab exercise.
PRE-ASSESSMENT
Streak plate PROCEDURE
STREAK PLATE TIPS
- Cool your inoculating loop completely before you use it. Hot loops will kill microbes and potentially can create aerosols when the hot loop touches the agar.
- Hold the inoculating loop like a pencil instead of a hammer. The motion of moving the inoculating loop comes from the action of your fingers and wrist, rather than from the elbow.
- Rest your inoculating loop flat at a 45-degree angle, rather than perpendicular to the agar. This helps avoid digging into the agar which inhibits good isolation.
- Reflect light on the surface of the agar to see where you have already streaked the agar. As you finish streaking each section, this will enable you to better position your subsequent streaking.
- Keep the lid on the Petri plate when you are not actually streaking the agar surface. This minimizes the chance of contamination.
- Use a small amount of inoculum (such as a pinpoint amount) for the primary streak. If you use too large an inoculum, you will not have sufficient area on the plate to achieve the dilution needed for separation of one cell from another.
FOR THIS EXERCISE YOU WILL MAKE 3 STREAK PLATES: Make a mixed culture streak plate using the mixed broth culture of E. coli and S. epidermidis. Make a pure culture streak plate using the pure E. coli broth culture. Make a pure culture streak plate using the pure S. epidermidis slant culture.
Labeling the plate:
Step 1. Label the BOTTOM (the half that contains the media) of the Trypticase soy agar plate using a permanent marker or wax pencil with your name or initials and the organism(s) you are transferring to that plate. DO NOT LABEL THE LID.
Step 2. Divide the plate into 3 sections by drawing a “T” on the bottom of the plate where the media is.
Obtaining the sample:
Step 3. If the bacteria are growing in a broth culture, suspend them by gently taping the test tube until the bacteria swirl up from the bottom of the tube.
Step 4. If the broth contains a MIXED CULTURE (more than one bacterial type), use a sterile cotton-tipped swab to obtain the original inoculum. Peel the paper cover from the wooden end of the swab. Handle ONLY the wooden end of the swab to maintain the sterility of the cotton end.
NOTE: When using a PURE CULTURE, use the inoculating loop to obtain the inoculum instead of a sterile cotton-tipped swab.
Step 5. Holding the tube in your non-dominant hand, remove the cap of the bacterial culture with your little finger on your dominant hand. Dip the cotton end of the swab into the broth and then slightly press the swab against the inside of the tube to expel any excess broth. Recap the bacterial culture tube and place it in a test tube rack.
Step 6. Using your non-dominant hand, open the lid of the plate just enough to fit the swab in.
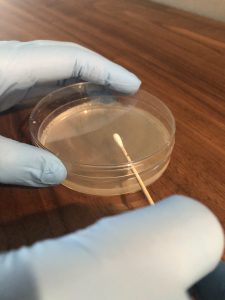
Step 7. Inoculate the first section of the plate by touching the swab down on the surface of the agar and drawing a zig-zag streak to fill that first area of the plate. Replace the Petri plate lid. Dispose of the swab in the autoclave trash.
Step 8. Use an inoculating loop to complete the rest of the procedure.
Step 9. Sterilize your inoculating loop in the bacticinerator and allow it to cool.
Step 10. Open the lid of the plate just enough to fit the loop in. Place the loop in the center of the first section and gently drag the loop one time into the second section. Lightly drag the tip of the loop from side to side in a back-and-forth motion to spread the inoculum to fill the second section. Replace the Petri plate lid.
Step 11. Sterilize the loop in the bacticinerator and allow it to cool.
Step 12. Open the lid of the plate just enough to fit the loop in. Place the loop in the center of the second section and gently drag the loop one time into the third section. Lightly drag the tip of the loop from side to side in a back-and-forth motion to spread the inoculum to fill the third section. Replace the Petri Plate lid.
Step 13. Sterilize the loop in the bacticinerator and allow it to cool.
Step 14. Stack the agar plate upside down (lid side down) in the class tray to be incubated. Always invert your plates when you incubate them to prevent condensation from dropping onto the agar surface and preventing the growth of isolated colonies.
AFTER INCUBATION
Step 1. Record your streak plate observations and colony characteristics on the streak plate worksheet.
Step 2. Use the making bacterial smears directions below to properly make bacterial smears of E. coli, and Staphylococcus. You will use the smears in the simple stain lab exercise.
Make bacterial smears of E. coli and s. epidermidis
To make the smears you will use an isolated colony of S. epidermidis and E. coli from your streak plates
A smear is a thin film of bacteria and deionized water on a microscope slide. We will use the heat of the slide warmer to dry the smear. The heat of the slide warmer will kill the bacteria on the slide. The heat of the slide warmer will adhere the bacteria to the slide, so they are no rinsed off the slide during the stain procedure. Clean two glass slides with a microscope wipe. Dispose of the microscope wipe in the regular trash. Using a permanent marker or wax pencil, label the top right corner of one slide with an “E” for E. coli, one slide “S” for S. epidermidis.
MAKE THE “S” SMEAR
Step 1. Add a small drop of deionized water to the center of the “S” slide.
Step 2. Use your streak plates for the inoculum (sample). Sterilize the inoculating loop and allow it to cool. Lift the lid of the streak plate just enough to insert the sterilized loop. Insert the inoculating loop and obtain a pinpoint amount of an isolated colony of S. epidermidis. Gently spread the inoculum in the drop of deionized water. Sterilize the inoculating loop and allow it to cool.
Step 3. Dry the “S” slide on the slide warmer. Do not take your eyes of the slide! As soon as the slide is dry remove it from the warmer. The slide warmer will dry the slide, adhere the bacteria to the slide so they don’t wash off when you stain, and kill the bacteria.
MAKE THE “E” SMEAR
Step 1. Add a small drop of deionized water to the center of the “E” slide.
Step 2. Use your streak plates for the inoculum (sample). Sterilize the inoculating loop and allow it to cool. Lift the lid of the streak plate just enough to insert the sterilized loop. Insert the inoculating loop and obtain a pinpoint amount of an isolated colony of E.coli. Gently spread the inoculum in the drop of deionized water. Sterilize the inoculating loop and allow it to cool.
Step 3. Dry the “E” slide on the slide warmer. Do not take your eyes of the slide! As soon as the slide is dry remove it from the warmer. The slide warmer will dry the slide, adhere the bacteria to the slide so they don’t wash off when you stain, and kill the bacteria.
Step 4. Store the smears in the slide box in your plastic container.
Step 5. Dispose of the streak plates in the biohazard trash.
POST TEST
DISCOVERIES IN MICROBIOLOGY
 MARY HNATUSKO HUNT
In the 1940’s American bacteriologist Mary Hnatusko Hunt worked at a USDA research lab in Peoria Illinois. She visited the Illinois Fruit and Vegetable Company on Main Street in Peoria. She noticed the owner removing a moldy grapefruit from a display. She asked the owner if he could set aside moldy items for her to pick up on a regular basis, he agreed. At some point, Mary told him it was no longer necessary to save moldy fruit and vegetables for her. Several years later, Mary came to the store to inform the owner that a cantaloupe he provided was the source of penicillin. Mary helped isolate and test many strains of Penicillium.
