
GRAM STAIN
LEARNING OBJECTIVES
Properly make a bacterial smear for staining
Properly perform the Gram stain
Recognize morphology of bacteria
Differentiate gram-positive and gram-negative cell envelopes
Explain the importance of the Gram stain in a clinical environment
Explain the function of each reagent used in a Gram stain and its correlation with cell envelope structure
MCCCD OFFICIAL COURSE COMPETENCIES
Utilize aseptic technique for safe handling of microorganisms
Apply various laboratory techniques to identify types of microorganisms
Identify structural characteristics of the major groups of microorganisms
Compare and contrast prokaryotic cell and eukaryotic cell
Compare and contrast the physiology and biochemistry of the various groups of microorganisms
MATERIALS
“E” slide and “S” slide prepared in the streak plate lab exercise
Cultures Day Two:
Lactobacillus fermentum (gram-positive bacilli, green dot) slant culture 12/2 lab sections (2 students will share the culture)
Moraxella catarrhalis (gram-negative cocci, yellow dot) slant culture 12/2 lab sections (2 students will share the culture)
Equipment:
Microscope slides
Deionized water in a dropper bottle
Inoculating loop
Bibulous paper
Lens wipes
Stain container
Slide warmer
Bacticinerator
Microscope
Immersion oil
Stains:
Crystal violet (primary stain)
Iodine (mordant)
Acetone-alcohol (decolorizer)
Safranin (secondary or counterstain)
BACTERIA ALBUM
In a simple stain, the bacteria are stained with one stain so the bacteria will all be the same color. In a differential stain two positively charged stains are used. Certain types of bacteria will stain contrasting colors depending on their properties and characteristics.
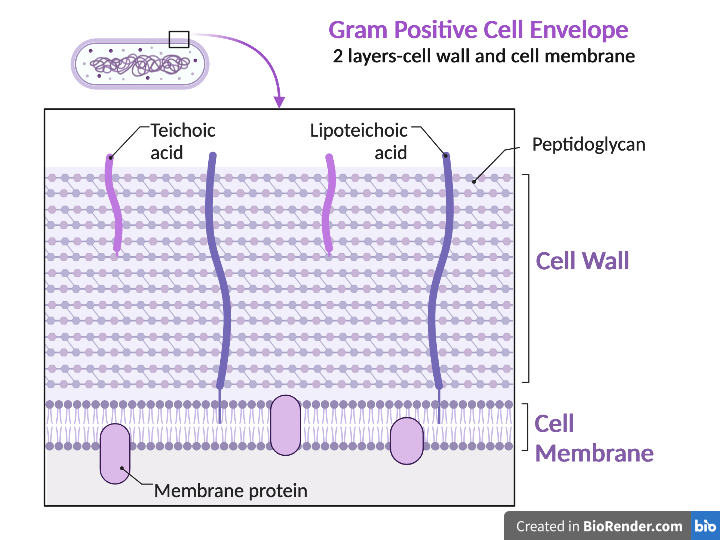
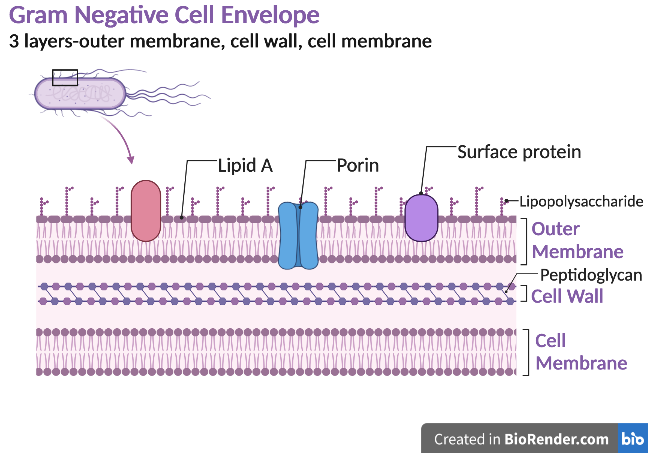
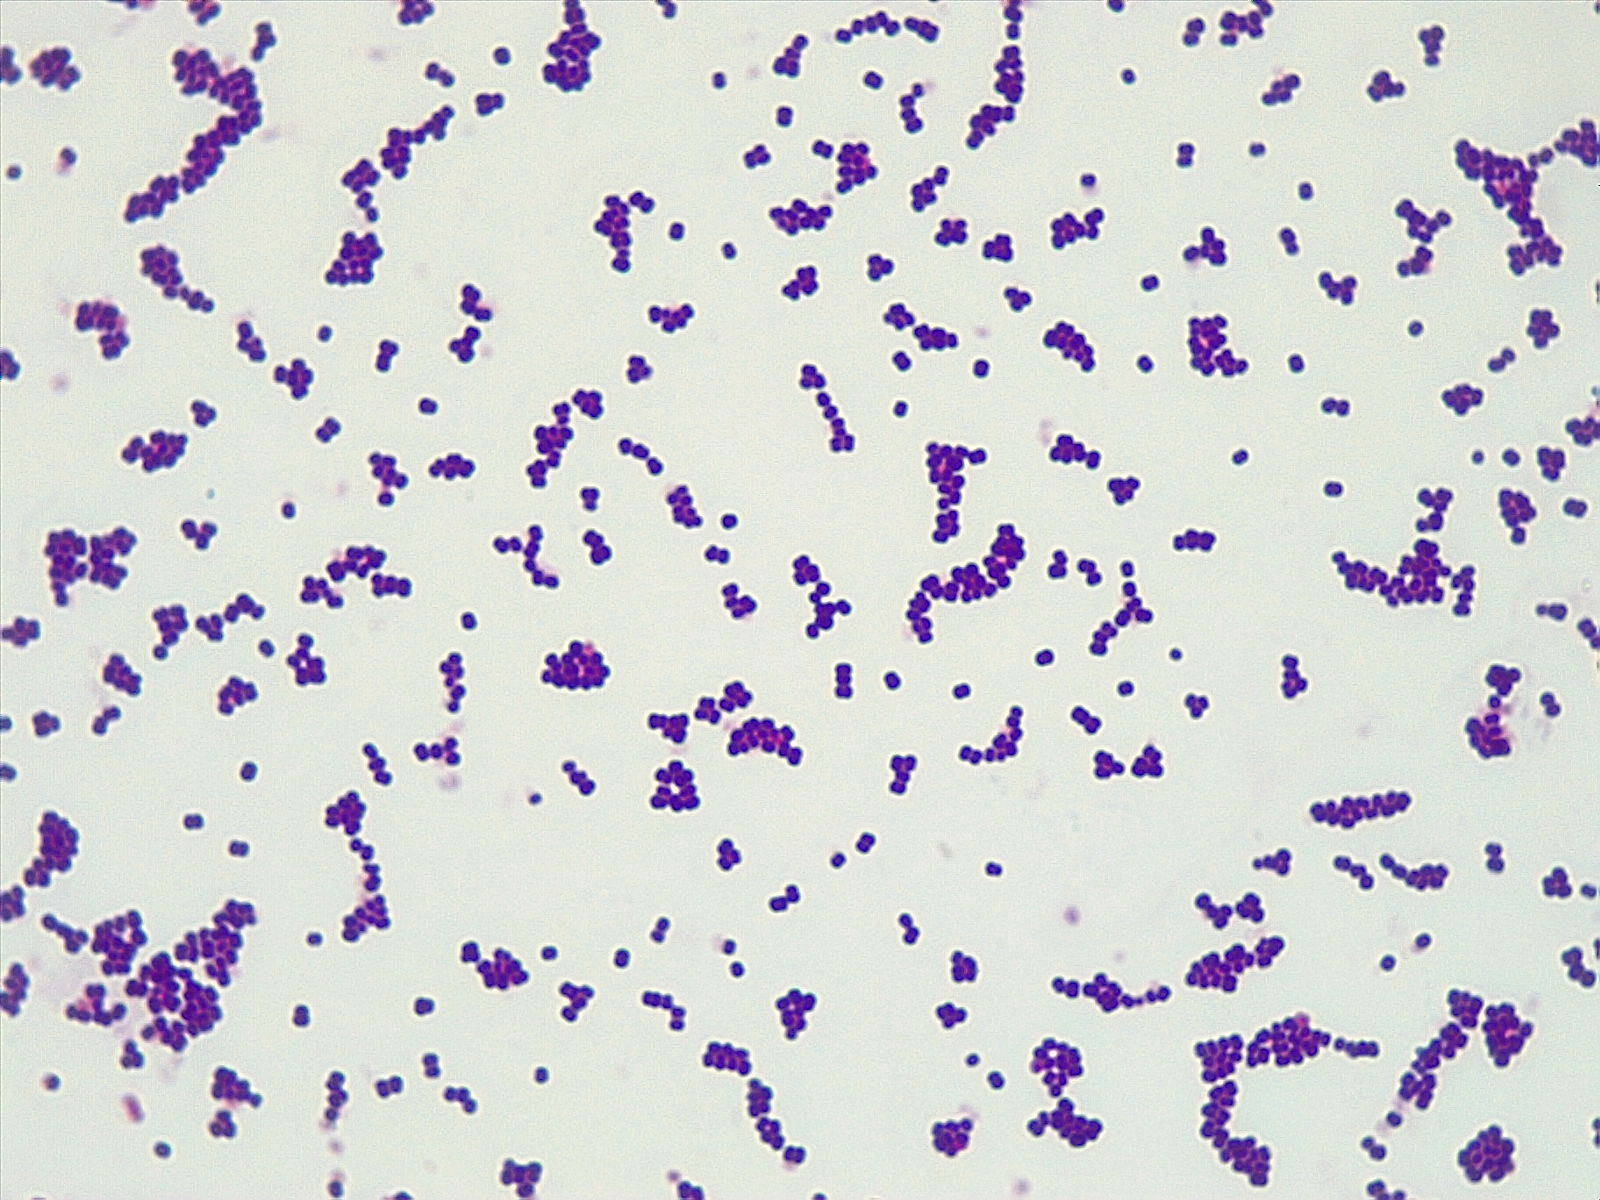
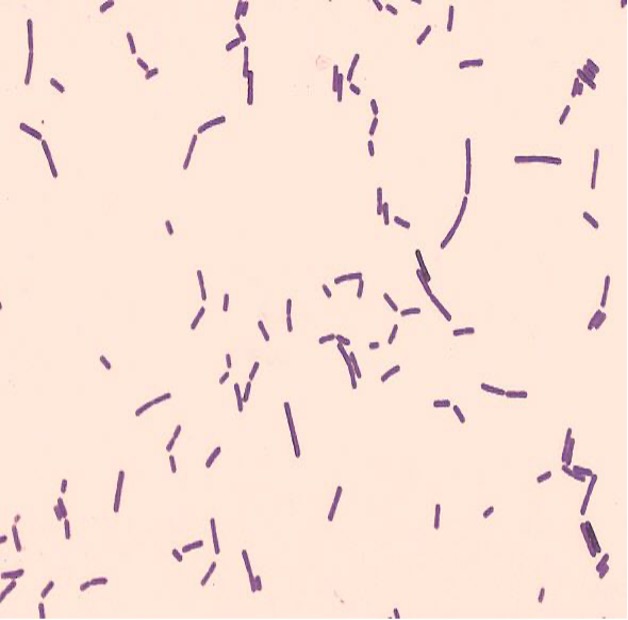
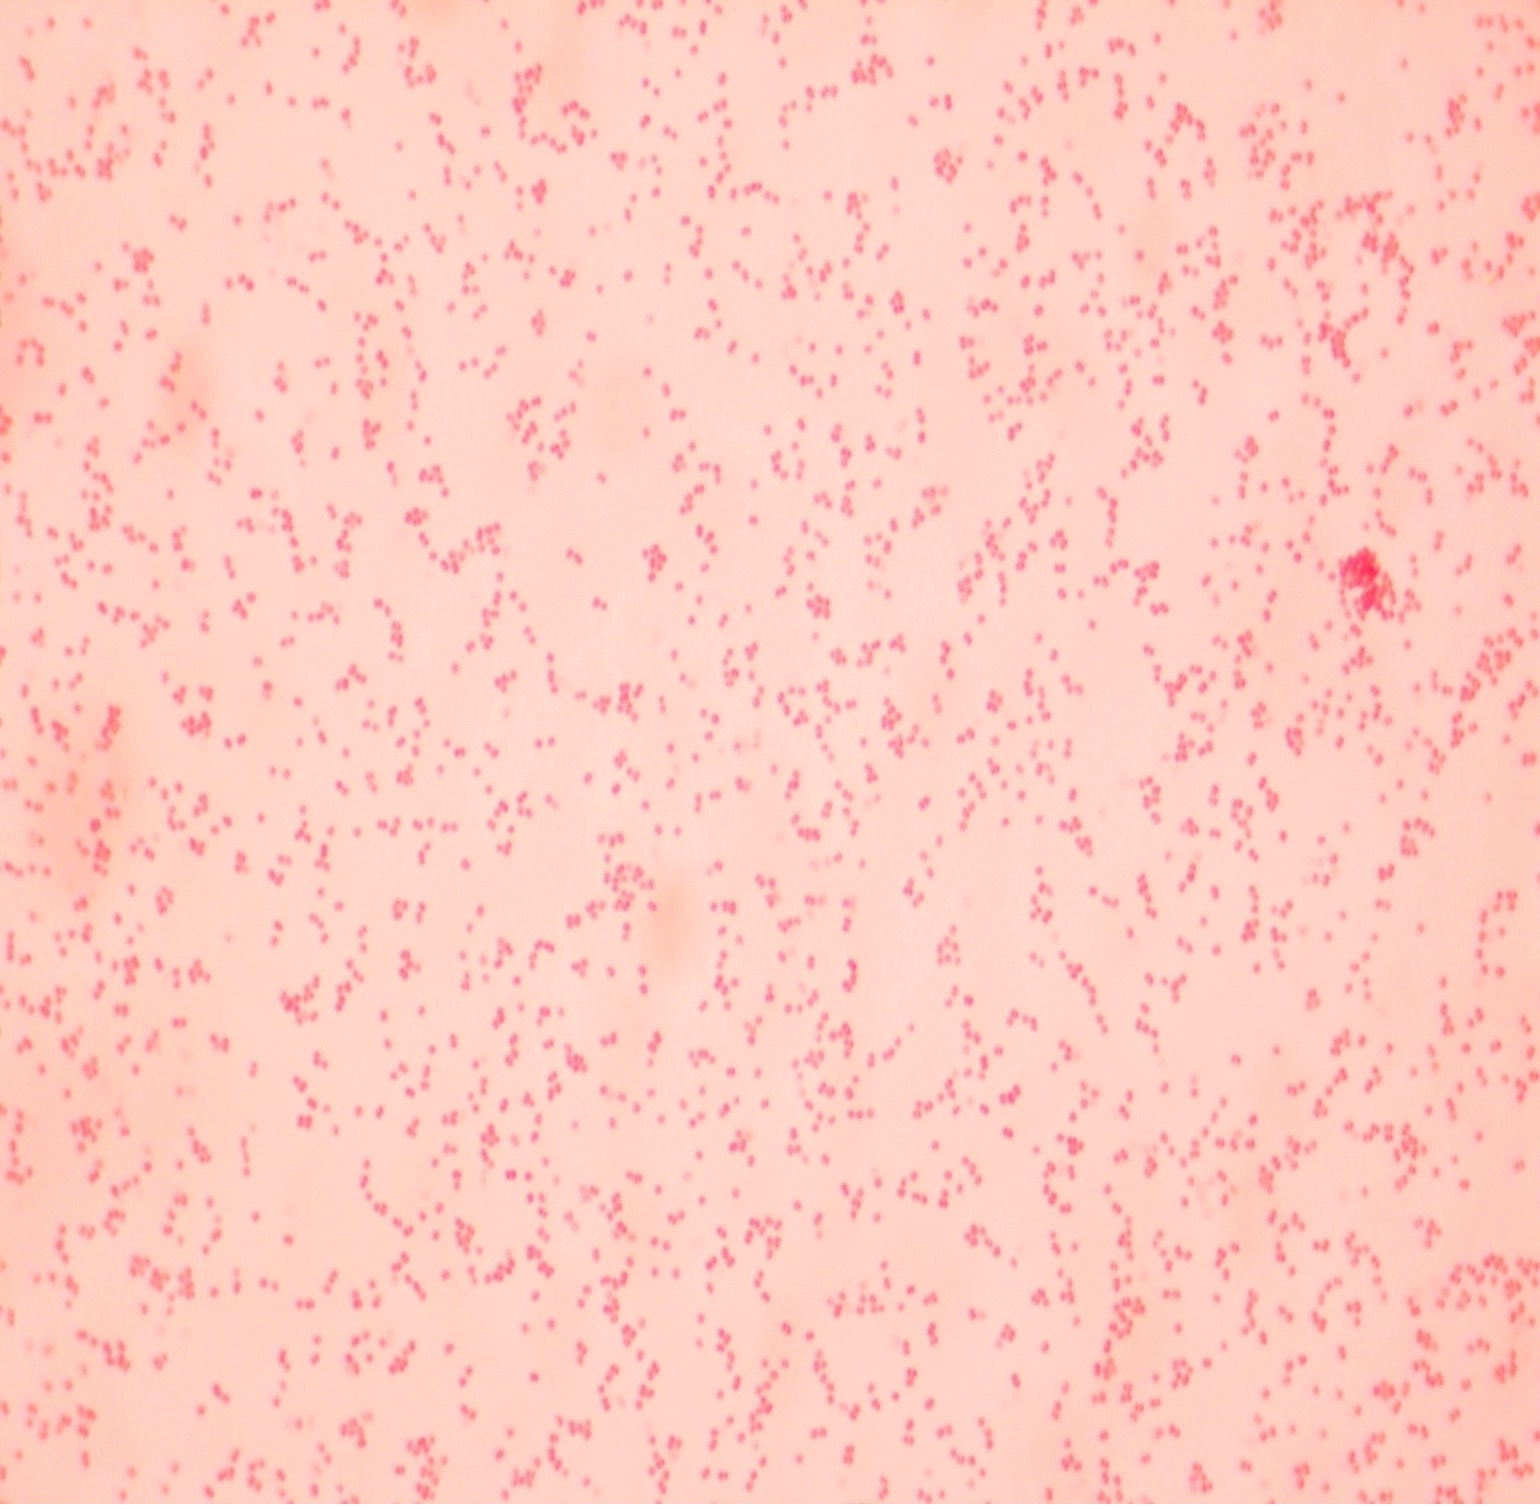
The Gram stain, developed by Christian Gram in 1884, is the most widely used differential stain in microbiology. Most bacteria are divided into two major groups- gram-positive bacteria and gram-negative bacteria based on the cell envelope composition.
Gram-positive bacteria have a cell envelope composed of two layers, a cell wall and a cell membrane. The gram-positive cell wall is composed of hundreds of layers of peptidoglycan. The peptidoglycan layers are linked together by teichoic acids and lipoteichoic acids which anchor the peptidoglycan layers to the underlying cell membrane. The cell membrane lies underneath the thick cell wall.
Gram-negative bacteria have a cell envelope composed of three layers, an outer membrane, a cell wall, and a cell membrane. The outer membrane contains lipopolysaccharides in addition to phospholipids and proteins. The cell wall of gram-negative bacteria is composed of just a few layers of peptidoglycan and does not contain teichoic acids. The cell membrane lies underneath the thin cell wall.
The Gram stain uses four stains. Crystal violet, the primary stain, enters the peptidoglycan of all bacteria giving them a purple color. The next stain is Gram’s iodine, the mordant, which combines with the Crystal violet to make a bigger complex in the peptidoglycan wall. The next step is the most critical. Acetone-alcohol is used as a decolorizer which will dissolve the lipids in the outer membrane of gram-negative cell walls. The Crystal violet/iodine complexes then leak out of the thin gram-negative cell wall. Since gram-positive cell walls lack outer membranes, they do not decolorize and thus are able to retain the Crystal violet stain. The counter or secondary stain, safranin, is used to stain the gram-negative cell walls since they lost the primary stain during decolorization.
The Gram stain has proven to be very useful in the identification of bacteria and in predicting which antibiotics are most likely to be effective. There are some problems with the technique, however. If the procedure is not performed properly, the results may be erroneous. Thus, you will need to practice the technique until your results are satisfactory.
Gram stain reagents:
Crystal violet – primary stain
Gram’s Iodine – mordant that combines with crystal violet in the cell
Acetone-alcohol (75% ethanol :25% acetone) – decolorizer
Safranin – secondary stain or counterstain
Gram staining requires practice. It is an art as much as a science. If your results do not come out as they should, adjust your procedure to correct the problem for future stains. Your instructor can help you decide how to modify your technique to get the correct results.
PRE-ASSESSMENT
DAY ONE
Gram Stain the “E” and “S” Slides
Step 1. Add a few drops of crystal violet (primary stain) to the smear. Wait 1 minute. Rinse with deionized water. Shake excess water off the smear.
Step 2. Add a few drops Gram’s iodine (mordant) to the smear. Wait 1 minute. Rinse with deionized water. Shake excess water off the smear.
Step 3. Decolorize one smear at a time and watch it closely. The thickness of the smear will dictate how long you will need to decolorize. Add a few drops of 25% acetone and 75% ethanol (decolorizer) to the smear and rock the slide for 2-5 seconds. Rinse with deionized water. Shake excess water off the smear.
Step 4. Add a few drops of safranin (counterstain) to the smear. Wait 1 minute. Rinse with deionized water. Shake excess water off the smear.
Step 5. Gently blot the excess water from the slide using bibulous paper.
Observe stained slides
Step 1. Review how to set up your microscope properly in the microscope exercise. Bacteria on the stained smear will need to be magnified 1000X to be able to discern its gram stain reaction, morphology and bacterial arrangement.
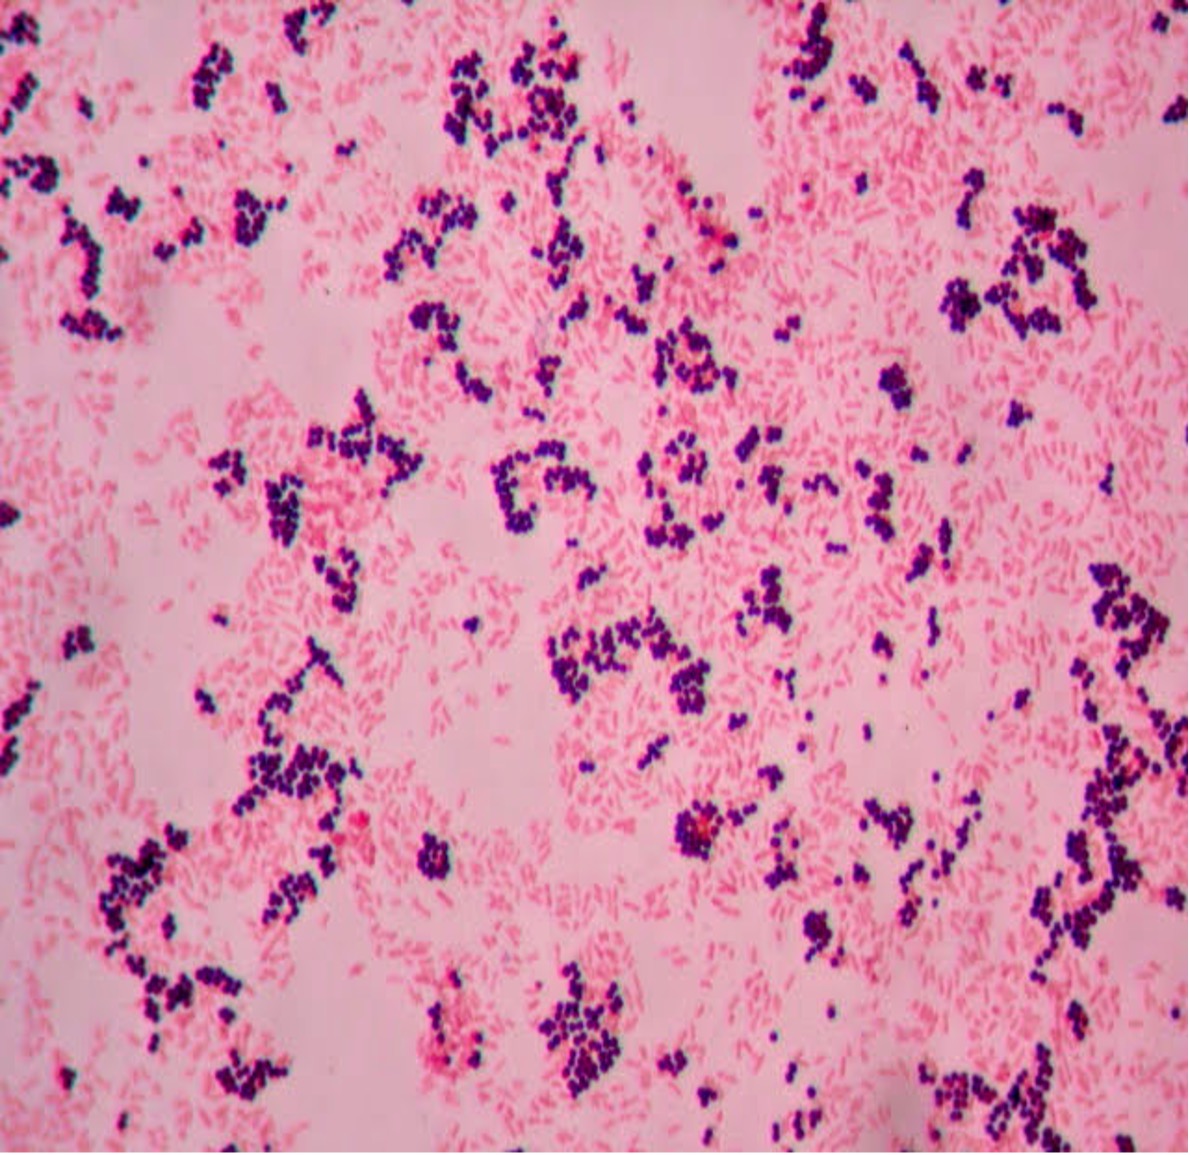
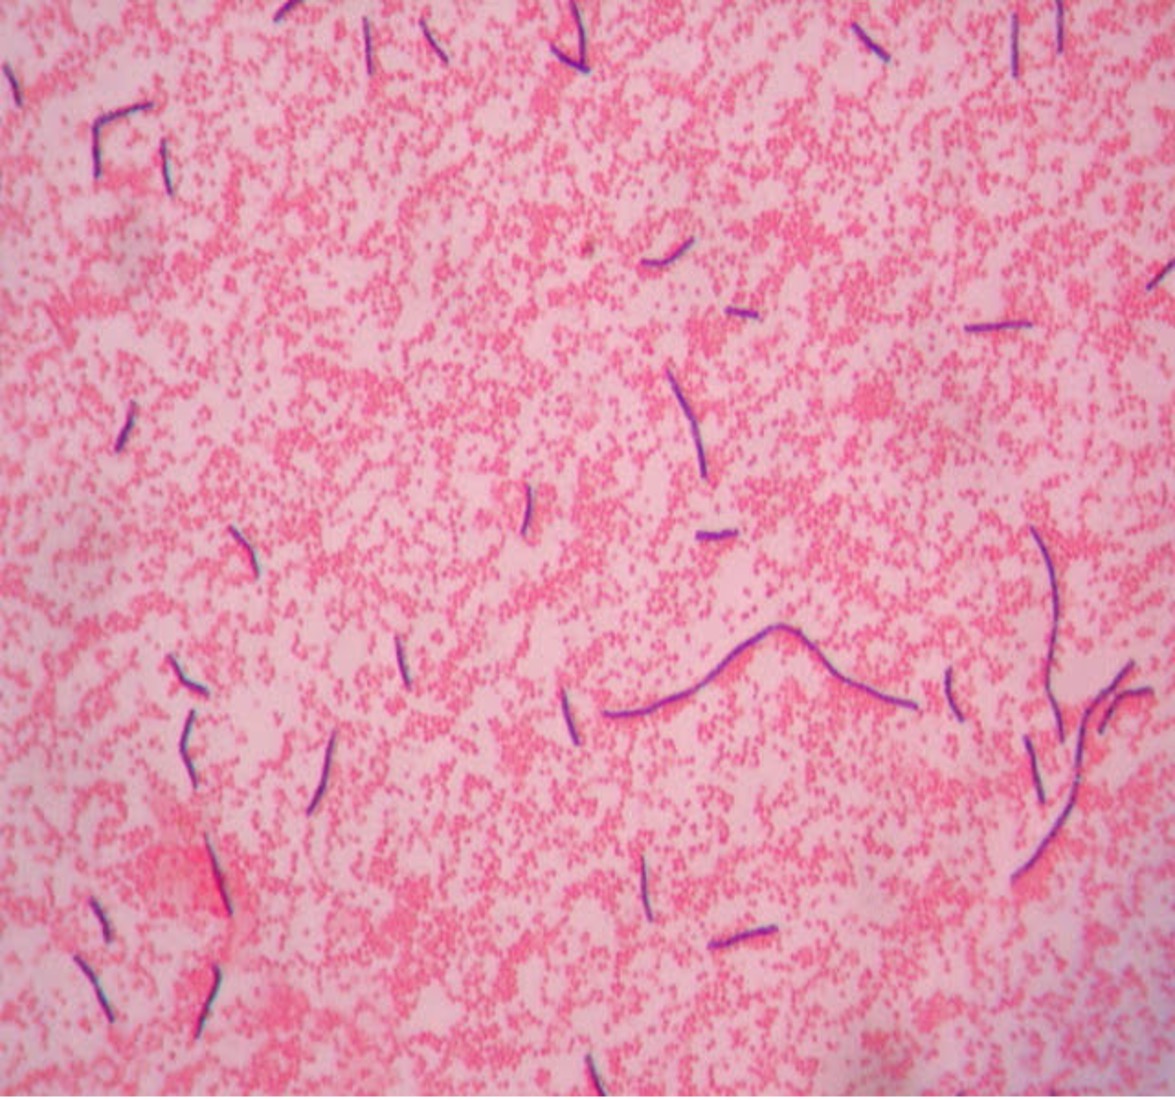
Step 2. If your gram stain technique was perfect, you will see S. epidermidis is gram-positive and will stain purple and E. coli is gram-negative and will stain pink. Also note the morphology of the bacteria you view. E. coli are bacilli (rod) shaped, while S. epidermidis are cocci (round).
Step 3. Draw the Gram stained bacteria you have observed at 1000X total magnification in the Gram stain worksheet.
Step 4. If your Gram stains did not result in the correct coloration for your bacteria, you need to modify your technique and repeat the procedure.
Step 5. After you have observed the Gram stained slides, dispose of the slides in the used slide basin.
Hints:
The most likely error is that you did not decolorize for the proper amount of time. If the gram-positive bacteria that should be purple come out pink, you decolorized too long (overdecolorized). If the bacteria that should be pink came out purple, you did not decolorize long enough (underdecolorized). Practice the Gram stain procedure until you can perform it with confidence.
DAY TWO PROCEDURE
Make a bacterial smear of lactobacillus fermentum and moraxella catarrhalis
Clean two glass slides with a lens wipe. Dispose of the lens wipe in the regular trash. Using a permanent marker, label the top right corner of one slide with an “L” for L. fermentum and the other slide with a “M” for M. catarrhalis. This label will help you determine which side has the bacteria on it.
MAKE THE “L” SMEAR
Step 1. Add a small drop of deionized water to the center of the “L” slide.
Step 2. Sterilize the inoculating loop and allow it to cool. Remove the lid from the L. fermentum agar slant. Insert the sterilized inoculating loop and obtain a pinpoint amount of inoculum. Replace the lid. Gently spread the inoculum in the drop of deionized water. Sterilize the inoculating loop and allow it to cool.
Step 3. Dry the “L” slide on the slide warmer. Do not take your eyes of the slide! As soon as the slide is dry remove it from the warmer. The slide warmer will dry the slide, adhere the bacteria to the slide so they don’t wash off when you stain, and kill the bacteria.
MAKE THE “M” SMEAR
Step 1. Add a small drop of deionized water to the center of the “M” slide.
Step 2. Sterilize the inoculating loop and allow it to cool. Remove the lid from the M. catarrhalis agar slant. Insert the sterilized inoculating loop and obtain a pinpoint amount of inoculum. Replace the lid. Gently spread the inoculum in the drop of deionized water. Sterilize the inoculating loop and allow it to cool.
Step 3. Dry the “M” slide on the slide warmer. Do not take your eyes of the slide! As soon as the slide is dry remove it from the warmer. The slide warmer will dry the slide, adhere the bacteria to the slide so they don’t wash off when you stain, and kill the bacteria.
Gram Stain Procedure
Step 1. Add a few drops of crystal violet (primary stain) to the smear. Wait 1 minute. Rinse with deionized water. Shake excess water off the smear.
Step 2. Add a few drops Gram’s iodine (mordant) to the smear. Wait 1 minute. Rinse with deionized water. Shake excess water off the smear.
Step 3. Decolorize one smear at a time and watch it closely. The thickness of the smear will dictate how long you will need to decolorize. Add a few drops of 25% acetone and 75% ethanol (decolorizer) to the smear and rock the slide for 2-5 seconds. Rinse with deionized water. Shake excess water off the smear.
Step 4. Add a few drops of safranin (counterstain) to the smear. Wait 1 minute. Rinse with deionized water. Shake excess water off the smear.
Step 5. Gently blot the excess water from the slide using bibulous paper.
Observe stained slides
Step 1. Review how to set up your microscope properly in the microscope exercise. Bacteria on the stained smear will need to be magnified 1000X to be able to discern its gram stain reaction, morphology and bacterial arrangement.
Step 2. If your gram stain technique was perfect, you will see L fermentum is gram-positive and will stain purple and M. catarrhalis is gram-negative and will stain pink. Also note the morphology of the bacteria you view. L. fermentum are bacilli (rod) shaped, while M. catarrhalis are cocci (round).
Step 3. Draw the Gram stained organisms you have observed at 1000X total magnification in the Gram stain worksheet.
Step 4. If your Gram stains did not result in the correct coloration for your bacteria, you need to modify your technique and repeat the procedure.
Step 5. After you have observed the Gram stained slides, dispose of the slides in the used slide basin.
Hints:
The most likely error is that you did not decolorize for the proper amount of time. If the gram-positive bacteria that should be purple come out pink, you decolorized too long (overdecolorized). If the bacteria that should be pink came out purple, you did not decolorize long enough (underdecolorized). Practice the Gram stain procedure until you can perform it with confidence.
POST TEST
DISCOVERIES IN MICROBIOLOGY
DR. LOUIS PASTEUR
 French chemist and microbiologist, Dr. Pasteur developed a rabies vaccine that contained weakened rabies virus from a rabid rabbit. He injected a 60-year-old man who left the hospital after one injection. A 10-year-old girl was given one injection but died of rabies before another injection could be given. In 1885, 9-year-old Joseph Meister’s mother brought him to Pasteur after he was bitten by a rabid dog. Pasteur knew the boy would die from rabies if he did nothing. Pasteur injected Joseph with the vaccine every day for a total of thirteen days. Each successive injection contained less-weakened (stronger) virus. Meister never developed rabies, so the vaccination was a success. Later in life, Meister worked as caretaker of Pasteur’s tomb in Paris. The CDC recommends rabies vaccination for veterinarians, animal handlers, veterinary students, rabies laboratory workers, and spelunkers. With no previous exposure to rabies, the CDC recommends three doses of the rabies vaccine. With exposure to rabies, the CDC recommends four doses of the rabies vaccine and an injection of rabies immune globulin for an unvaccinated person, two doses of the rabies vaccine for a vaccinated person.
