
7 ASEPTIC TRANSFER AND ISOLATION TECHNIQUES
LEARNING OBJECTIVES
Aseptically transfer bacteria to liquid and solid media
Perform streak plate technique resulting in isolated colonies
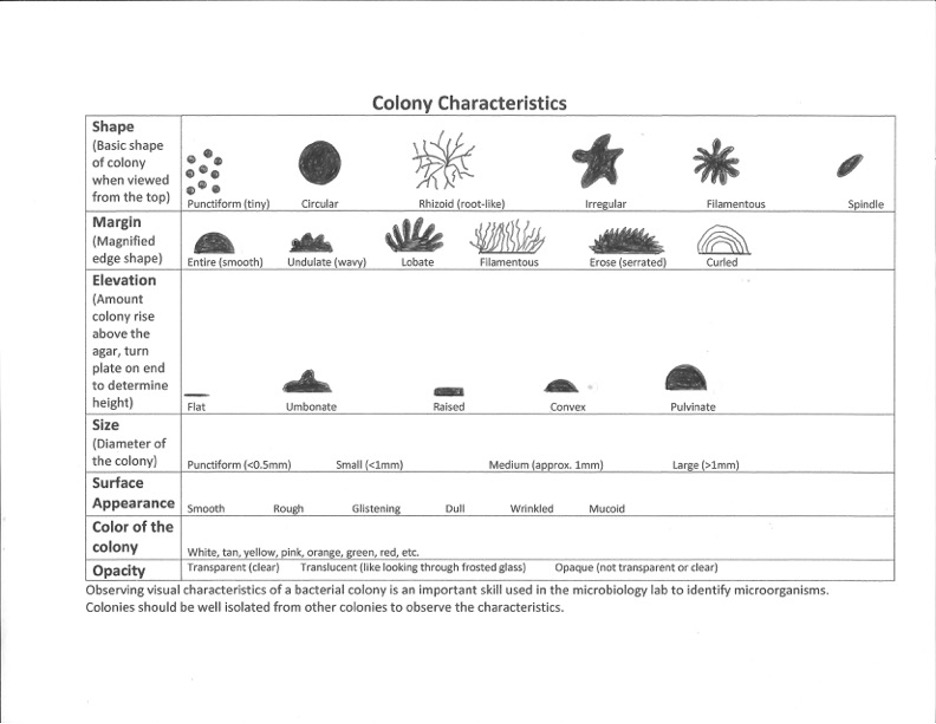
Describe bacterial colony morphology
Properly make a bacterial smear for staining
MCCCD OFFICIAL COURSE COMPETENCIES
Utilize aseptic technique for safe handling of microorganisms
Apply various laboratory techniques to identify types of microorganisms
Identify structural characteristics of the major groups of microorganisms
Compare and contrast prokaryotic cell and eukaryotic cell
Compare and contrast the physiology and biochemistry of the various groups of microorganisms
MATERIALS
Stock Cultures:
Slant culture of Escherichia coli
Broth culture of Staphylococcus epidermidis
Mixed Broth culture of Escherichia coli and Staphylococcus epidermidis
Media:
1 Sterile trypticase soy agar slant (TSA)
1 Sterile trypticase soy broth (TSB)
2 Sterile trypticase soy agar plates (TSA)
Equipment:
1 Sterile cotton-tipped swab
Inoculating loop
Test tube rack
Bacticinerator
Permanent marking pen
Labeling tape
Glass microscope slides
Deionized water bottle
BACTERIA ALBUM LINK
Microorganisms are ubiquitous, meaning they are everywhere. Therefore, it is essential to handle microbes in such a manner to prevent contaminating laboratory media and to prevent infecting ourselves or classmates. Bacteria may unwittingly be introduced from the surface of our skin, from coughing or sneezing onto media, from using an inoculating loop that has been insufficiently sterilized, from swabs that are not sterile, or exposing the media to the air. Aseptic techniques (procedures used to avoid contamination) have been devised to prevent these contaminating microbes from entering our cultures. If you always use aseptic technique in the laboratory, you should have only the desired organism growing on your cultures, and you should not contaminate yourself or others around you as you work.
Since specimens taken from the human body, animals, soil, water or food seldom contain just one species of microbe, it is essential that we separate each individual type of microbe to observe its cultural, morphological, and physiological characteristics, as well as determine the effect of that microbe on its environment.
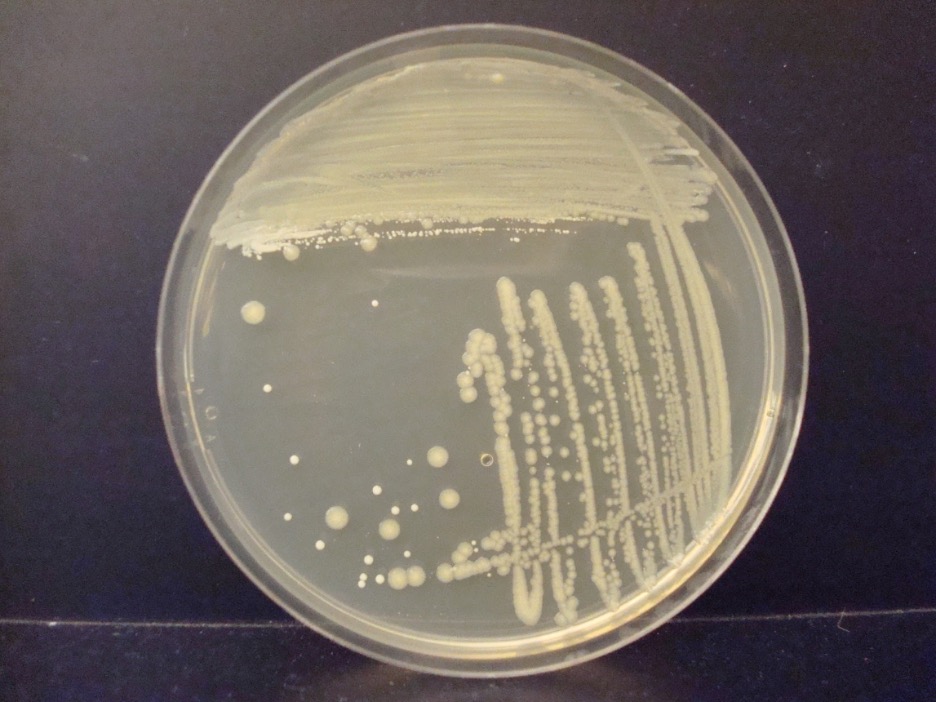
If the culture contains a single species of microbe, it is called a pure culture, whereas the isolation of more than one species of microbe is called a mixed culture. When we spread bacterial cells on plated media to achieve separation of the cells, each cell reproduces many times and gives rise to a colony. Since all the cells in a colony descend from a single parent that reproduced asexually, they are expected to be identical to each other. At least a million bacteria must be present in a colony for the unaided human eye to see the colony!
Colonies come in a variety of types. It is important to observe a well-isolated colony (>5 mm. from the adjacent colony) when studying the characteristics of a colony such as the form, elevation, margin, size, or color. Crowded colonies rapidly deplete the nutrients available in the media and thus do not grow as large or exhibit the typical characteristics of those unencumbered by dense growth.
Nutrient material suitable for the cultivation of microorganisms is called media. Media can be in liquid form, known as broth or a solid form called agar, referring to the solidifying ingredient. In this lab, you will be using a basic nutrient media called Trypticase Soy Agar or TSA. TSA contains all the nutrients necessary for successful isolation of the most frequently cultured types of bacteria. This means it contains a readily utilizable carbohydrate source (such as glucose), vitamins (often provided by beef or yeast extracts), and mineral salts. It does not contain any inhibitory substance.
In this exercise, you will transfer a sampling of a pure culture (single strain of bacteria to new, sterile media. This sampling of a bacterial culture is called the inoculum. During your next lab period, you will observe the media you inoculated for visible growth and your broth culture for turbidity or cloudiness which indicates growth. You will also transfer a sampling of a pure culture to a sterile agar slant. This exercise will introduce you to the “streak plate for isolation” technique used to obtain isolated colonies. Your skill at streaking plates will improve with practice. The ultimate test of your technique is the ability to isolate different species of organisms on an agar plate that have been mixed together in a broth. This approximates the situation you would encounter taking clinical specimens from humans, animals or contaminated food or water. You will then use these cultures to makes smears of organisms on glass slides to be used in the Gram stain exercise.
PRE-ASSESSMENT
PROCEDURE
Aseptic transfer – from a slant culture of E. coli to a sterile broth
FOR THIS EXERCISE: Use stock culture of E. coli
1. Label a test tube of sterile trypticase soy broth (TSB) with your name and the name of the bacteria you are transferring to that tube (E. coli). DO NOT write directly on the tube. Write on labeling tape that you will find at each workbench.
2. Sterilize your inoculating loop by inserting the loop end into the Bacticinerator for a slow count of three (until the loop is red hot). The handle of the inoculating loop should not be inside the cylinder. NEVER LEAVE THE LOOP IN THE BACTICINERATOR.
3. Allow the loop to cool for approximately 5-8 seconds (sing the happy birthday song quickly twice) while holding the loop in your hand. Do not wave it in the air or let it touch anything to avoid contamination from the environment. Do not touch the loop to see if it is cool.
4. Remove the cap from the slant culture with the little finger of the hand holding the inoculating loop. Continue to hold the cap in your little finger as you work so you do not contaminate the cap.
5. Touch your cool inoculating loop to the growth on the slant culture. Obtain only a pinpoint amount of inoculum on your loop.
6. Replace the cap on the slant culture and place it back in the test tube rack.
7. Pick up your labeled test tube of trypticase soy broth. Remove the cap with your little finger. Touch the inside of the glass with your inoculating loop where it will be covered up with the broth media. Slide the inoculating loop against the glass to dislodge the bacteria.
8. Replace the cap to the test tube. Sterilize your inoculating loop.
9. Place your inoculated broth culture in the class test tube rack to be incubated.
Aseptic transfer – from a broth culture of Staphylococcus to sterile agar slant
FOR THIS EXERCISE: Use stock culture of Staphylococcus
1. Label a sterile Trypticase soy agar slant (TSA) with your name and the name of the bacteria you are transferring to that tube (Staphylococcus).
2. Sterilize your inoculating loop by inserting the loop end into the Bacticinerator for a slow count of 3 (until the loop is red hot).
3. Allow the loop to cool for 5-8 seconds while holding the loop in your hand.
4. Suspend the bacteria in the broth culture by gently shaking the tube side to side until the bacteria swirl up from the bottom of the tube.
NOTE: The caps are NOT leak proof! Keep the tube upright to avoid a spill.
5. Remove the cap from the broth culture with the little finger of the hand holding the inoculating loop. Continue to hold the cap in your little finger as you work so you do not contaminate the cap.
6. Immerse your inoculating loop in the broth culture so that you obtain a loopful of liquid.
7. Replace the cap on the broth culture and place it back in the test tube rack.
8. Pick up your labeled slant agar tube. Remove the cap with your little finger. Streak the surface of the slant with your loopful of broth. Do NOT push too hard into the agar or it will tear up the gelatin‑like surface.
9. Replace the cap to the slant agar. Sterilize your inoculating loop.
10. Place your inoculated agar slant in the class test tube rack to be incubated.
Aseptic transfer – Streak for Isolation
FOR THIS EXERCISE: Use mixed broth culture of E. coli and Staphylococcus epidermidis; Then repeat procedure using the either the culture of E. coli or the culture of Staphylococcus epidermidis
Labeling the plate:
1. Label the BOTTOM (media side) of the Trypticase soy agar plate with your name and the organism you are transferring to that plate. DO NOT LABEL THE LID. Since these agar plates are disposable, you may write directly on the plate with a permanent marking pen or wax pencil.
2. Divide the plate into 3 sections by drawing a “T” on the plate.
Obtaining the sample:
3. If the bacteria are growing in a broth culture, suspend them by gently shaking the tube side to side until the bacteria swirl up from the bottom of the tube.
4. If the broth contains a MIXED CULTURE (more than one bacterial type), use a sterile cotton-tipped swab to obtain the original inoculum. Peel the paper cover from the wooden end of the swab. Handle ONLY the wooden end of the swab to maintain the sterility of the cotton end.
NOTE: When using a PURE CULTURE, use the inoculating loop to obtain the inoculum instead of a sterile cotton-tipped swab.
5. Remove the cap of the bacterial culture with your little finger. Put the cotton end of the swab into the broth and then slightly press the swab against the inside of the tube to expel any excess broth.
6. Recap the bacterial culture tube and place it in a test tube rack.
7. Lift one side of the lid of the Petri plate up just enough to fit the swab in, swab the inoculum onto the largest section of the agar.
8. Dispose of the swab in the autoclave bag.
9. Use an inoculating loop to complete the rest of the procedure.
10. Sterilize your inoculating loop in the Bacticinerator and allow it to cool thoroughly.
11. Place the loop in the center of the first section and gently drag the loop one time into the second section.
12. Lightly drag the tip of the loop from side to side in a back-and-forth motion to spread the inoculum to fill the second section.
13. Replace the lid and sterilize the loop in the Bacticinerator.
14. Lift the lid of your Petri plate. Place the loop in the center of the second section and gently drag the loop one time into the third section. Lightly drag the tip of the loop from side to side in a back-and-forth motion to spread the inoculum to fill the third section.
15. Replace the Petri Plate lid and sterilize the loop in the Bacticinerator.
16. Stack the agar plate upside down (lid side down) in the class tray to be incubated. Always invert your plates when you incubate them to prevent condensation from dropping onto the agar surface and ruining the isolated colonies.
Streak for Isolation Technique

Streak for Isolation Steps
Use this circle to represent your Petri dish. Practice the steps to streak bacteria onto a plate for isolation using your writing utensil to represent the inoculating loop. Ask your instructor to check your work before streaking the bacteria onto the agar.

Streak for Isolation Tips
1. Cool your inoculating loop completely before you use it. Hot loops will kill microbes and potentially can create aerosols when the hot loop touches the agar.
2. Hold the inoculating loop like a pencil instead of a hammer. The motion of moving the inoculating loop comes from the action of your fingers and wrist, rather than from the elbow.
3. Rest your inoculating loop flat at a 45-degree angle, rather than perpendicular to the agar. This helps avoid digging into the agar which inhibits good isolation.
4. Reflect light on the surface of the agar to see where you have already streaked the agar. As you finish streaking each section, this will enable you to better position your subsequent streaking.
5. Keep the lid on the Petri plate when you are not actually streaking the agar surface. This minimizes the chance of contamination.
6. Use a small amount of inoculum (such as a pinpoint amount) for the primary streak. If you use too large an inoculum, you will not have sufficient area on the plate to achieve the dilution needed for separation of one cell from another.
AFTER INCUBATION
1. Record your colony characteristics on the worksheet.
2. Use the following directions to properly make bacterial smears of E. coli and Staphylococcus.
CLEAN UP
1. Remove the label from the test tubes and put the tubes in the discard rack.
2. Return the agar plates to the class plate tray to use during the next lab.
Making a bacterial smear
FOR THIS EXERCISE: Use an isolated colony of Staphylococcus and E. coli from your streak plates.
1. Obtain a clean glass slide for each bacterium. Using a permanent marker, label each slide on the top right corner with an “E” for E. coli and “S” for Staphylococcus and “M” for mixed. The mixed slide will include Staphylococcus and E. coli. The mixed slide will contrast the Gram-positive and Gram-negative colors and cocci and bacilli morphology. This label will help you determine which side has the bacteria on it.
2. You will use the streak plates for the inoculum. Sterilize the inoculating loop between each transfer. Remove the lid of the agar plate, insert the inoculating loop and obtain a pinpoint amount of an isolated colony of Staphylococcus for the “S” slide, E. coli for the “E” slide, or both Staphylococcus and E.coli for the mixed slide and place it in the center of the slide.
3. Add a small drop of deionized water to the center of the slide.
4. Sterilize the inoculating loop.
5. Gently spread the inoculum in a circle in the drop of water. The smear should be slightly hazy.
6. Sterilize the loop.
7. Allow the slide to air dry or use the slide warmer. If you use the slide warmer do not take your eyes of the slide! As soon as the slide is dry remove it from the warmer. The slide warmer will dry the slide, adhere the bacteria to the slide so they don’t wash off when you stain, and kill the bacteria.
8. If you air dried the slide, If you air dried the smear, you need to heat fix the smear. Heat fixing will adhere the bacteria to the slide and kill the bacteria. Gently applying heat to the smear by holding it in front of the Bacticinerator for 5 seconds. If you forget to adhere the bacteria to the slide, the smear may wash off when you stain it.
9. If necessary, store the slide(s) in a slide box or wrapped in a paper towel in your lab drawer until the next lab period.
POST TEST
DISCOVERIES IN MICROBIOLOGY
FANNY HESSE
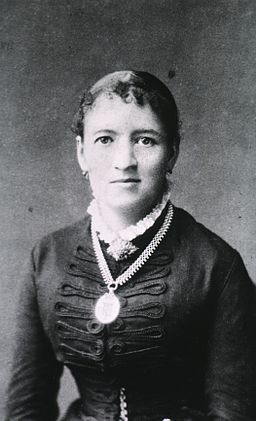 U.S. born Fanny Hesse worked as an unpaid illustrator for her husband, Walther Hesse, who was a laboratory technician for German microbiologist Robert Koch. One day in 1881, while eating lunch, Walter asked Fanny about the jellies and puddings that she made and how they managed to stay gelled even in warm weather. Fannie told him about how she learned about the seaweed product, agar-agar, from a Dutch neighbor of hers while she was growing up in New York City. Her neighbor had emigrated from Indonesia, where it was the local custom to use agar in their cooking. Fannie suggested that they try this out in their laboratory. Solid media allowed Koch to isolate the bacteria that caused tuberculosis, but Hesse never received credit for her contribution.
