8 GRAM STAIN
LEARNING OBJECTIVES
Properly make a bacterial smear for staining
Properly perform the Gram staining technique
Recognize morphology of bacteria
Differentiate Gram-positive and Gram-negative cell envelopes
Explain the importance of Gram stains in a clinical environment
Explain the function of each reagent used in a Gram stain and its correlation with cell envelope structure
MCCCD OFFICIAL COURSE COMPETENCIES
Utilize aseptic technique for safe handling of microorganisms
Apply various laboratory techniques to identify types of microorganisms
Identify structural characteristics of the major groups of microorganisms
Compare and contrast prokaryotic cell and eukaryotic cell
Compare and contrast the physiology and biochemistry of the various groups of microorganisms
MATERIALS
Stock cultures:
Slant culture of Bacillus subtilis subspecies spizizienii
Slant culture of Neisseria sicca
Slant culture of Staphylococcus epidermidis
Slant culture of Escherichia coli
Equipment:
Glass microscope slides
Water dropper bottle
Inoculating loop
Bibulous paper
Cotton swabs
Microscope
Immersion oil
Stains:
Crystal Violet
Gram’s Iodine
Acetone-alcohol
Safranin
Unstained bacteria are nearly transparent. To see them with the microscope we often use chemical compounds called stains. To understand how staining works, it will be helpful to know a little about the physical and chemical nature of stains. Stains are generally salts in which one of the ions is colored. A salt is a compound composed of a positively charged ion and a negatively charged ion. For example, the stain methylene blue is the salt methylene blue chloride which will dissociate in water into a positively charged methylene blue ion which is blue in color and a negatively charged chloride ion which is colorless.
Stains may be divided into two groups: basic and acidic. If the color portion of the stain resides in the positive ion, it is called a basic stain. Some examples of basic stains include methylene blue, crystal violet, and safranin. If the color portion of the stain is in the negative ion, it is called an acidic stain. Some examples of acidic stains include nigrosin, congo red and eosin.
Because of its chemical nature, the cytoplasm of all bacterial cells has a slight negative charge when growing in a medium of near neutral pH. Therefore, when using a basic stain (positively charged), the positively charged color portion of the stain combines with the negatively charged bacterial cytoplasm and the organism becomes directly stained. An acidic stain (negatively charged), due to its chemical nature, reacts differently. Since the color portion of the stain is on the negative ion, it will not readily combine with the negatively charged bacterial cytoplasm. Instead, it forms a deposit around the organism, leaving the organism itself colorless. Since the organism is seen indirectly, this type of staining is called a negative stain.
In a “simple” stain, the bacteria are stained with one dye and subsequently, the bacteria will all be the same color. This contrasts with “differential” stains in which two stains are used. Certain types of bacteria will stain contrasting colors depending on their properties and characteristics. Bacterial morphology (shape) can be seen with both types of stains.
A good stained smear should be somewhat difficult to see with the naked eye. If there is a dark spot of color visible, it means that the bacteria are stacked too densely for adequate evaluation. This is a common mistake made by students learning to make bacterial smears.
The staining procedures you perform may be done in stages. A heat-fixed slide can be stained immediately or kept for months. If you wish to keep heat-fixed, unstained slides for further work, you can wrap the slides in a paper towel or put them in a slide box and store them in your lab drawer.
The Gram stain, developed by Christian Gram in 1884, is the most widely used differential stain in bacteriology. Most bacteria are divided into two major groups- Gram-positive bacteria and Gram-negative bacteria based on the cell envelope composition.
Gram-positive bacteria have a cell envelope composed of two layers, a cell wall and a cell membrane. The Gram-positive cell wall is composed of hundreds of layers of peptidoglycan. The peptidoglycan layers are linked together by teichoic acids and lipoteichoic acids which anchor the peptidoglycan layers to the underlying cell membrane.
Gram-negative bacteria have a cell envelope composed of three layers, an outer membrane, a cell wall, and a cell membrane. The outer membrane contains lipopolysaccharides in addition to phospholipids and proteins. The cell wall of Gram-negative bacteria is composed of just a few layers of peptidoglycan and does not contain teichoic acids. The cell membrane lies underneath the thin cell wall.
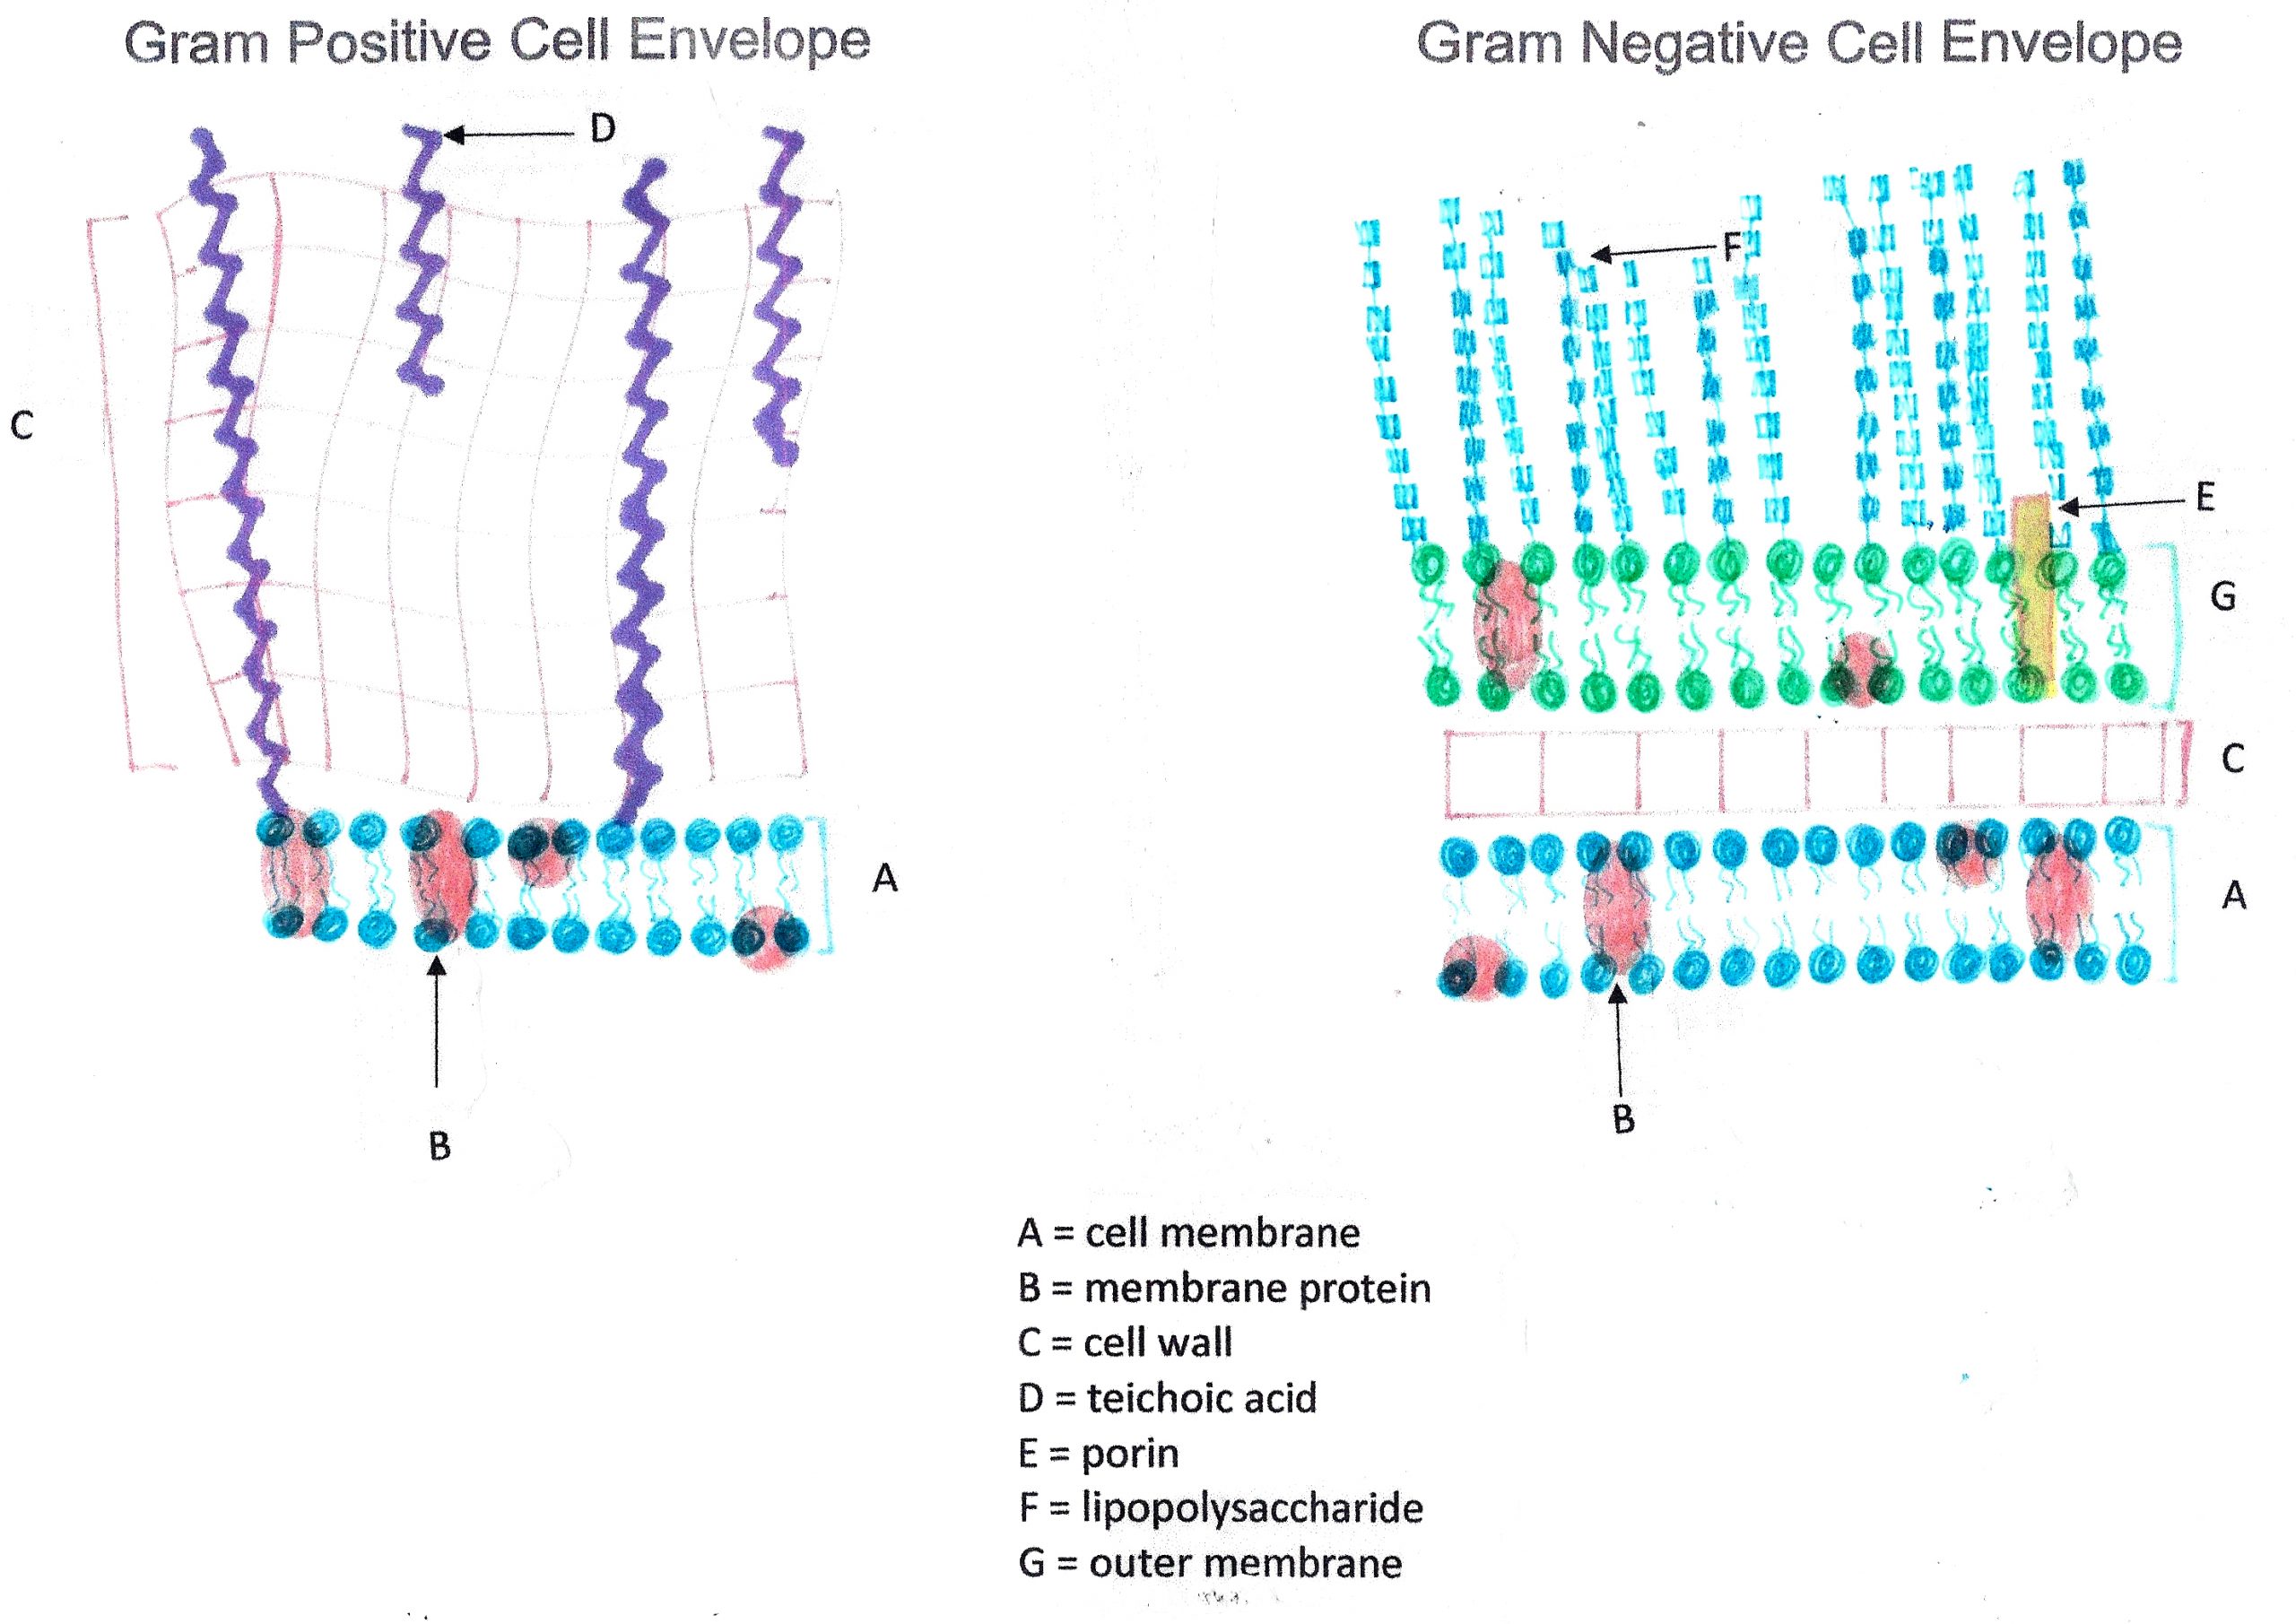
The Gram stain uses four stains. Crystal violet, the primary stain, enters the peptidoglycan of all bacteria giving them a purple color. The next stain is Gram’s iodine, the mordant, which combines with the Crystal violet to make a bigger complex in the peptidoglycan wall. The next step is the most critical. Acetone-alcohol is used as a decolorizer which will dissolve the lipids in the outer membrane of Gram-negative cell walls. The Crystal violet/iodine complexes then leak out of the thin Gram-negative cell wall. Since Gram positive cell walls lack outer membranes, they do not decolorize and thus are able to retain the Crystal violet stain. The counter or secondary stain, safranin, is used to stain the Gram-negative cell walls since they lost the primary stain during decolorization.
The Gram stain has proven to be very useful in the identification of bacteria and in predicting which antibiotics are most likely to be effective. There are some problems with the technique, however. If the procedure is not performed properly, the results may be erroneous. Thus, you will need to practice the technique until your results are satisfactory. There are some bacteria, such as Mycobacterium tuberculosis or Legionella pneumophila usually do not stain with the Gram stain at all. Nevertheless, this technique has become one that microbiologists rely heavily upon.
Gram stain reagents:
Crystal violet–primary stain
Gram’s Iodine–mordant that combines with crystal violet in the cell
Acetone- alcohol (75% ethanol :25% acetone) –the decolorizer
Safranin–counterstain or secondary stain
Gram staining requires practice. It is an art as much as a science. If your results do not come out as they should, adjust your procedure to correct the problem for future stains. Your instructor can help you decide how to modify your technique to get the correct results.
Factors to control to obtain a proper Gram stain result:
1. Use immaculately clean slides. The slide should be clean so that a drop of water spreads out on it. Water that beads up on the slide indicates the presence of an oil film that will cause bacteria to clump. If there is oil on the slide, clean the slide with glass cleaner before making your smear.
2. Smear preparation. Beginning students tend to make the smears too thick by putting too much inoculum on the slide. This will make it harder to properly decolorize the bacteria. Always put water on the slide before or after adding bacteria when using a culture from an agar slant or plate. The amount of inoculum from a solid media should be a “pinpoint” amount. You should just barely touch the organisms you want to stain with your loop. NOTE: You do not need to put water on the slide when making smears from a liquid media.
3. Allow the smear to air dry. This means the slide must sit until it has no longer appears moist. Alternatively, you may use a slide warmer to dry your smear. The slide warmer will dry the slide, adhere the bacteria to the slide, and kill the bacteria. When using the slide warmer, do not take your eyes of the smear! As soon as the slide is dry, remove it from the slide warmer. If too much heat is used, the cell wall of the organisms may be distorted or rupture and release the crystal violet dye when it should retain it. Extreme overheating may cause the entire cell to lyse, and you will see nothing under the microscope.
4, If you air dried the smear, you need to heat fix the smear. Heat fixing will adhere the bacteria to the slide and kill the bacteria. Gently applying heat to the smear by holding it in front of the Bacticinerator for 5 seconds. If you forget to adhere the bacteria to the slide, the smear may wash off when you stain it.
5. Freshness and concentration of reagents. Reagents must be fresh, and concentrations must be accurate.
6. Failure to drain slides before adding next reagent. After you wash a slide with water and before you add the next reagent, you must be sure to tilt the slide to allow excess water to drain off it. If you leave a bubble of water over the bacteria, the reagent you add may never reach the bacteria or it will be greatly diluted by the water present on the slide.
7. Age of the bacterial culture. Older Gram-positive organisms lose their ability to retain the violet dye as they move out of the exponential growth phase.
8. Timing of the decolorizing step. This is the most critical stage of the procedure. If the decolorizer is left on too long, Gram-positive organisms will appear Gram-negative. If the decolorizer is not left on long enough, Gram-negative organisms will appear Gram-positive. The thickness of the smear will dictate how long you will need to decolorize. It is impossible to give an exact time. You must decolorize one smear at a time and watch it closely. When the color begins to lift off the smear, you should wash off the decolorizer.
PRE-ASSESSMENT
PROCEDURE
Making a bacterial smear
For this Exercise: Use Staphylococcus epidermidis, Escherichia coli, and mixed slides from the Gram stain lab and use stock cultures of Neisseria sicca and Lactobacillus fermentans.
1. Obtain a clean glass slide for each bacterium. Using a wax pencil, label each slide on the top right corner with an “N” for Neisseria and “L” for Lactobacillus. This label will help you determine which side has the bacteria on it.
2. Add a small drop of deionized water to the center of the slide (If you add to much it will take too long for our smears to airdry).
3. Sterilize the inoculating loop and let it cool.
4. Remove the lid of the agar slant (Aseptic Technique: Hold with little fingers of hand holding loop), insert the inoculating loop and obtain a pinpoint amount of inoculum.
5. Gently spread the inoculum in a circle in the drop of water.
6. Sterilize the loop.
7. Allow the slide to air dry.
8. If you air dried the slide, you need to heat fix the smear. Heat fixing will adhere the bacteria to the slide and kill the bacteria. Gently applying heat to the bottom surface of the slide with the smear by holding it in front of the Bacticinerator for 5 seconds. If you forget to adhere the bacteria to the slide, the smear may wash off when you stain it.
Gram Stain Procedure
1.Add crystal violet (primary stain) on the slide where the organisms have been placed. Allow stain to remain on the smear for 1 minute. Rinse the smear with deionized water. Shake excess water off the smear.
2. Add Gram’s iodine (mordant) on the slide where the organisms have been placed. Leave for 1 minute. Rinse with deionized water. Shake excess water off the smear.
3. Add the decolorizer of 25% acetone and 75% ethanol on the slide and rock the slide for 2-3 seconds. As soon as you see the colors “lift up” out of the smear, tilt the slide at a 45-degree angle and rinse the smear with deionized water. Shake excess water off the smear.
4. Add safranin (counterstain) on the area of the slide where the organisms have been placed for 1 minute. Rinse with deionized water.
5. Gently blot the excess water from the slide using bibulous paper (or paper towel).
Observe stained slides
1. Review how to set up your microscope properly in the microscope exercise. Bacteria on the stained smear will need to be magnified 1000X to be able to discern its gram stain reaction, morphology and cellular arrangement.
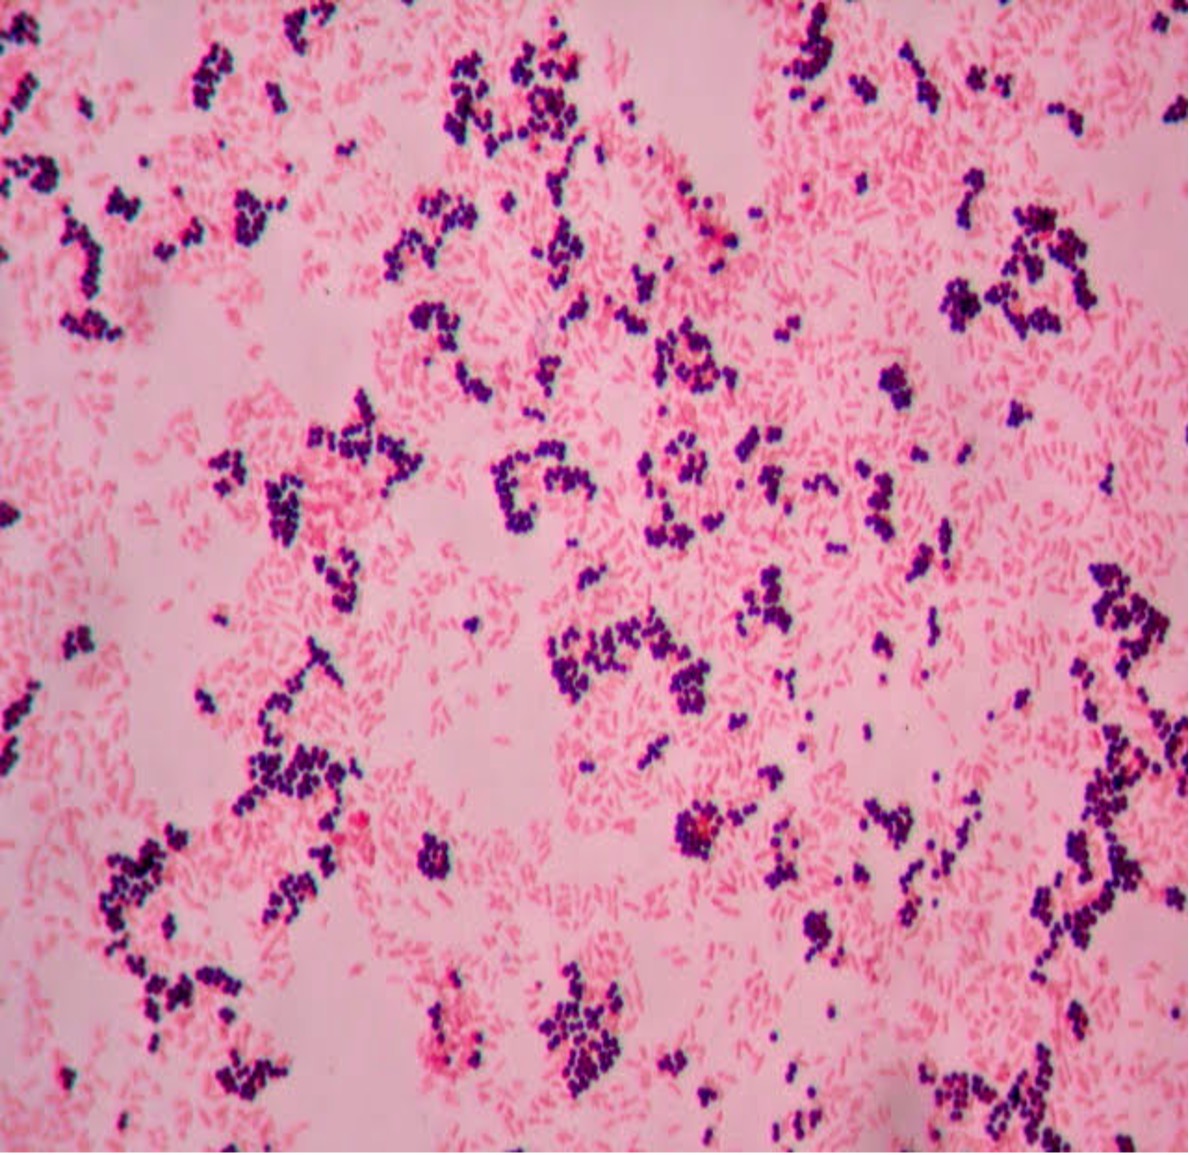
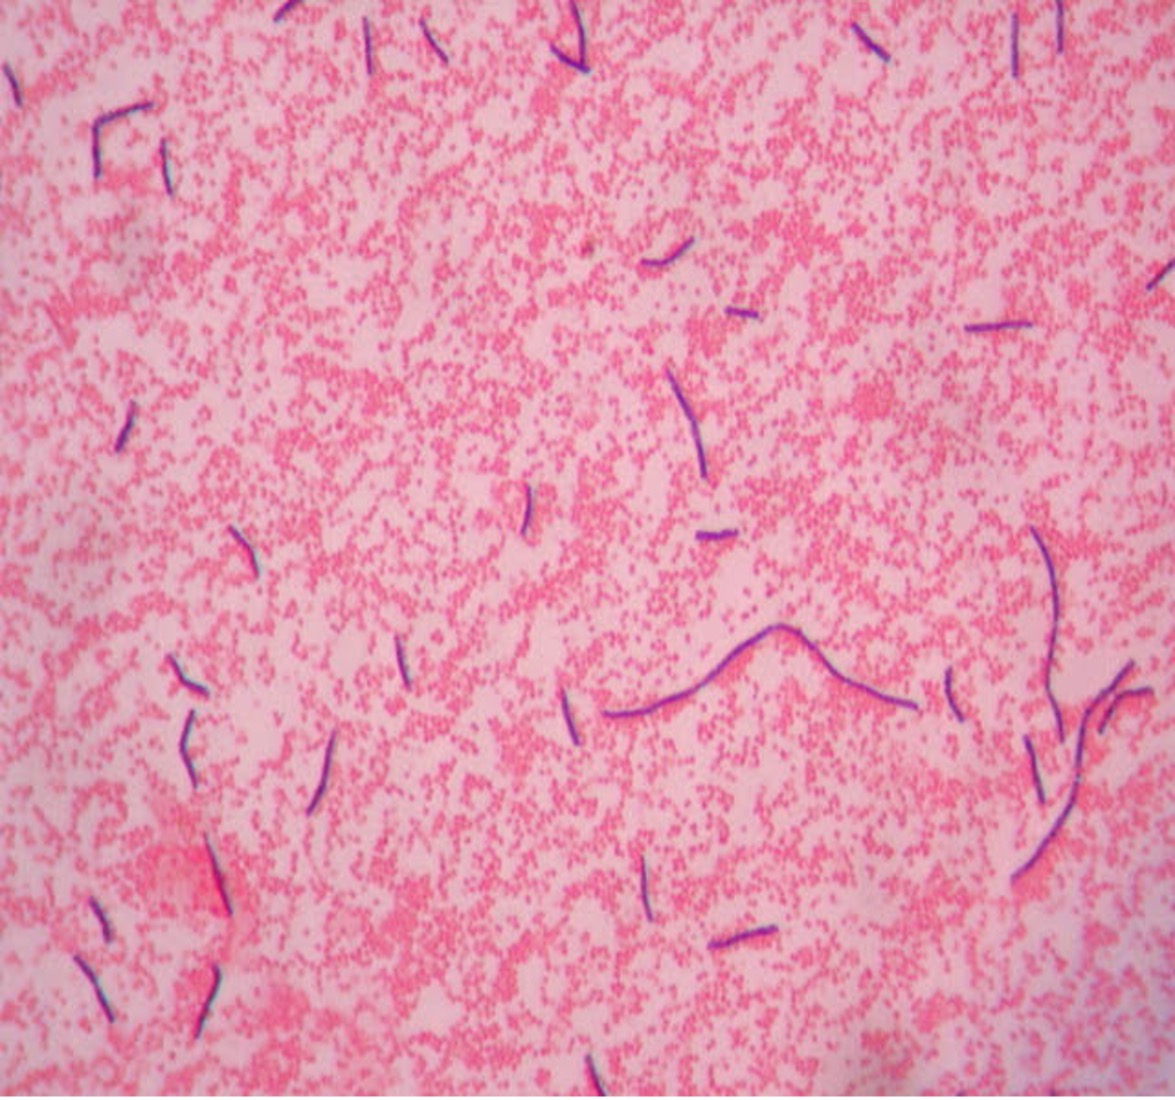
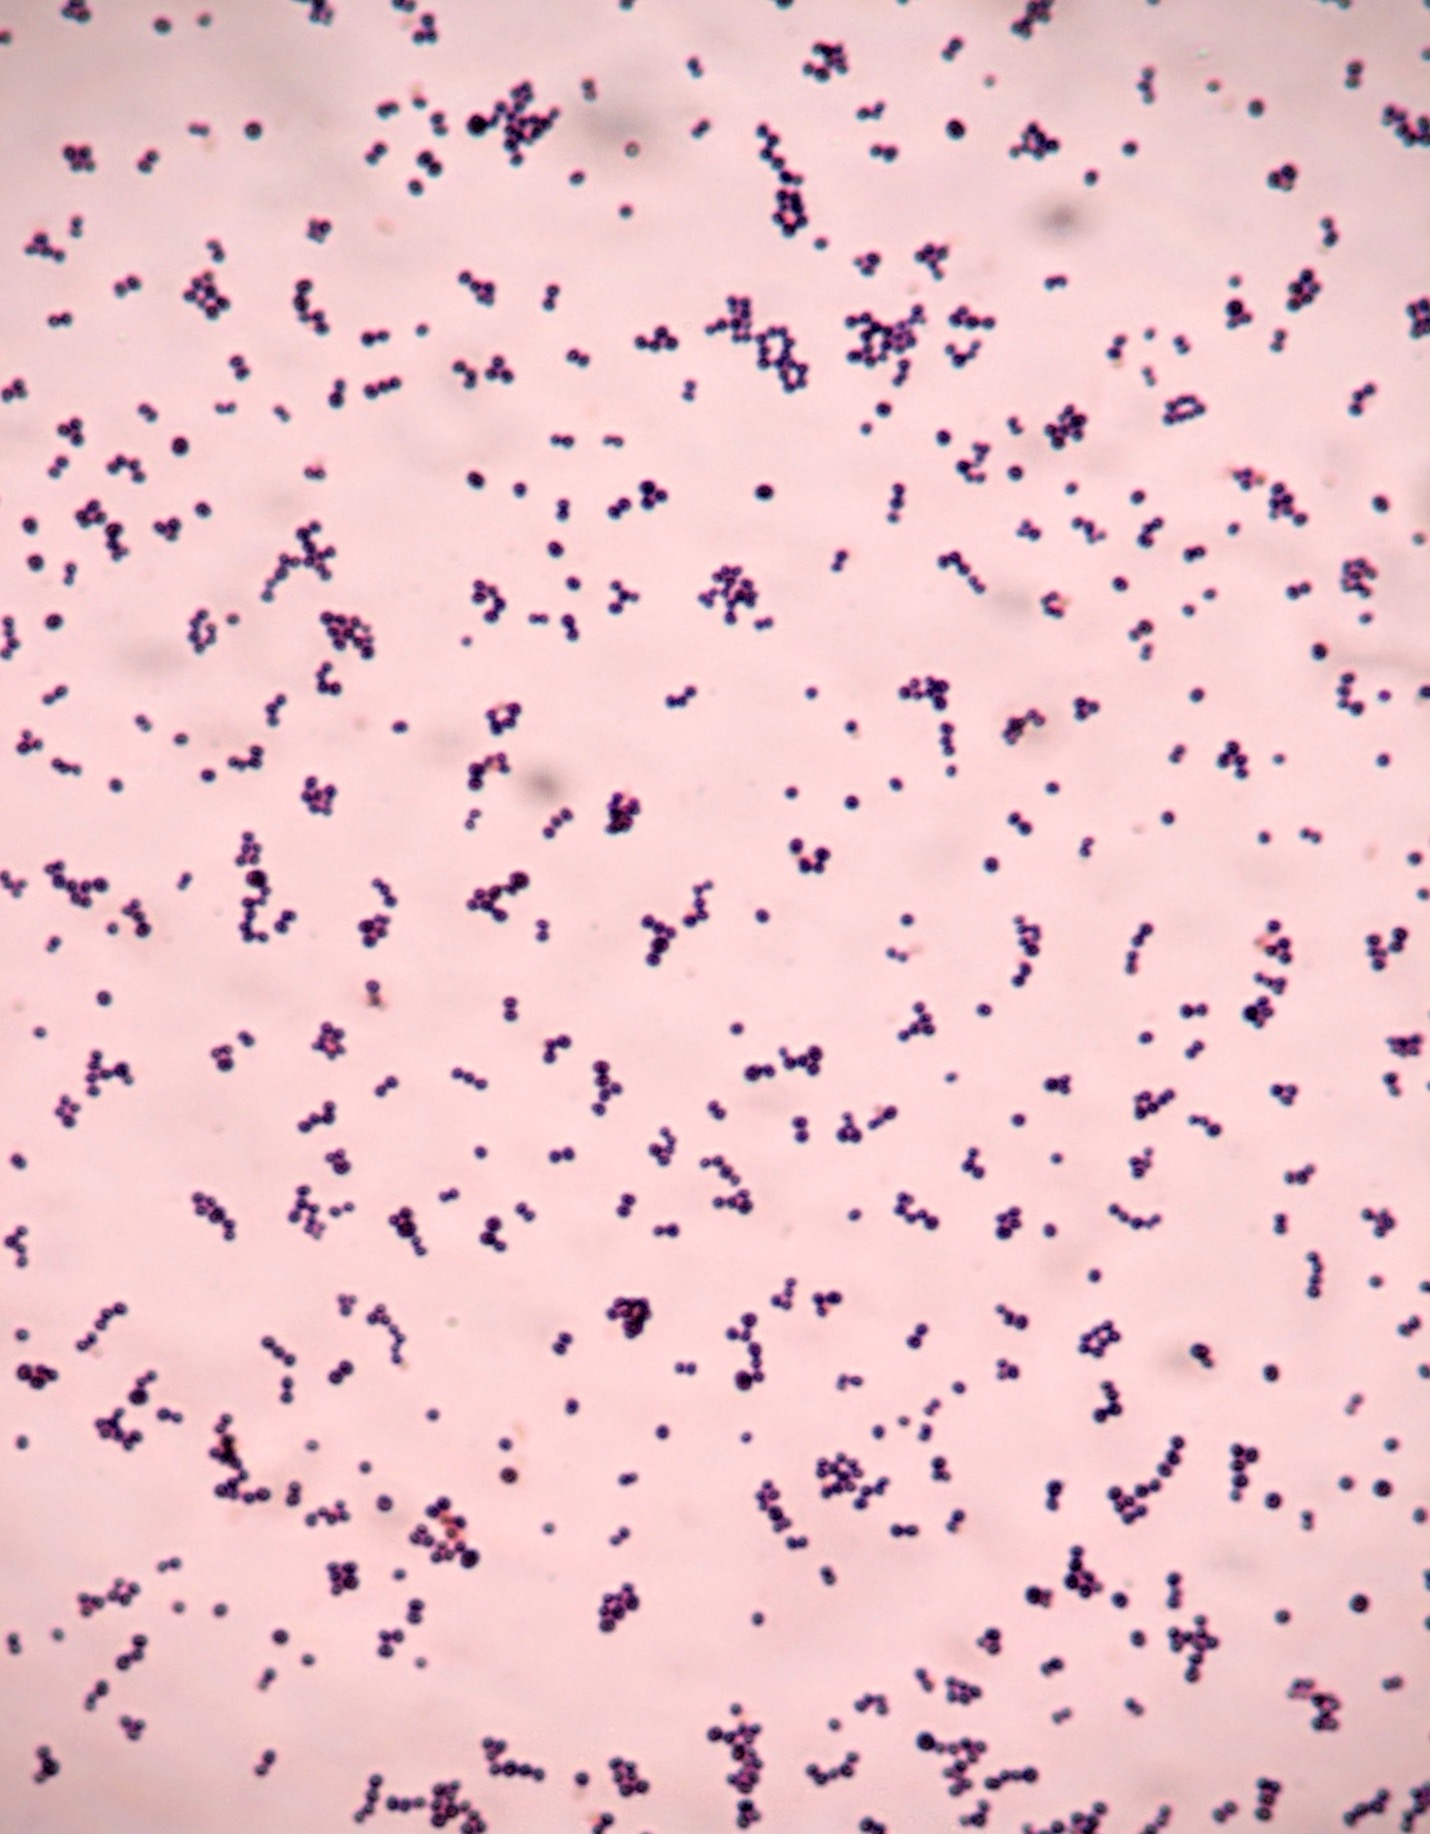
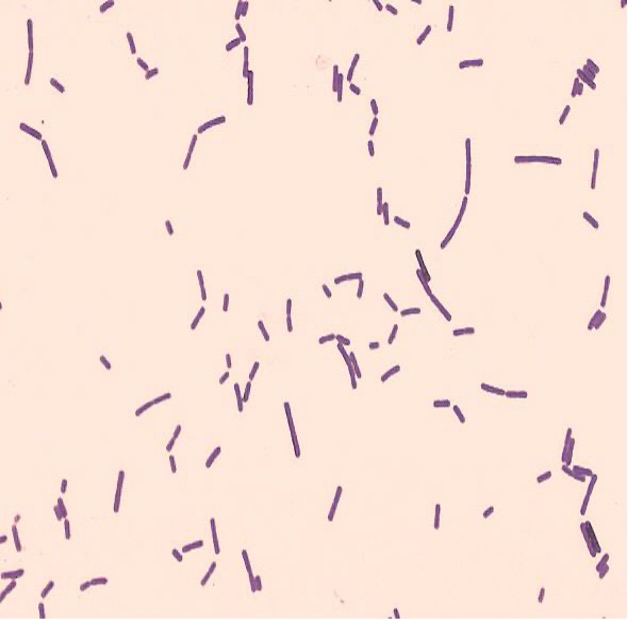
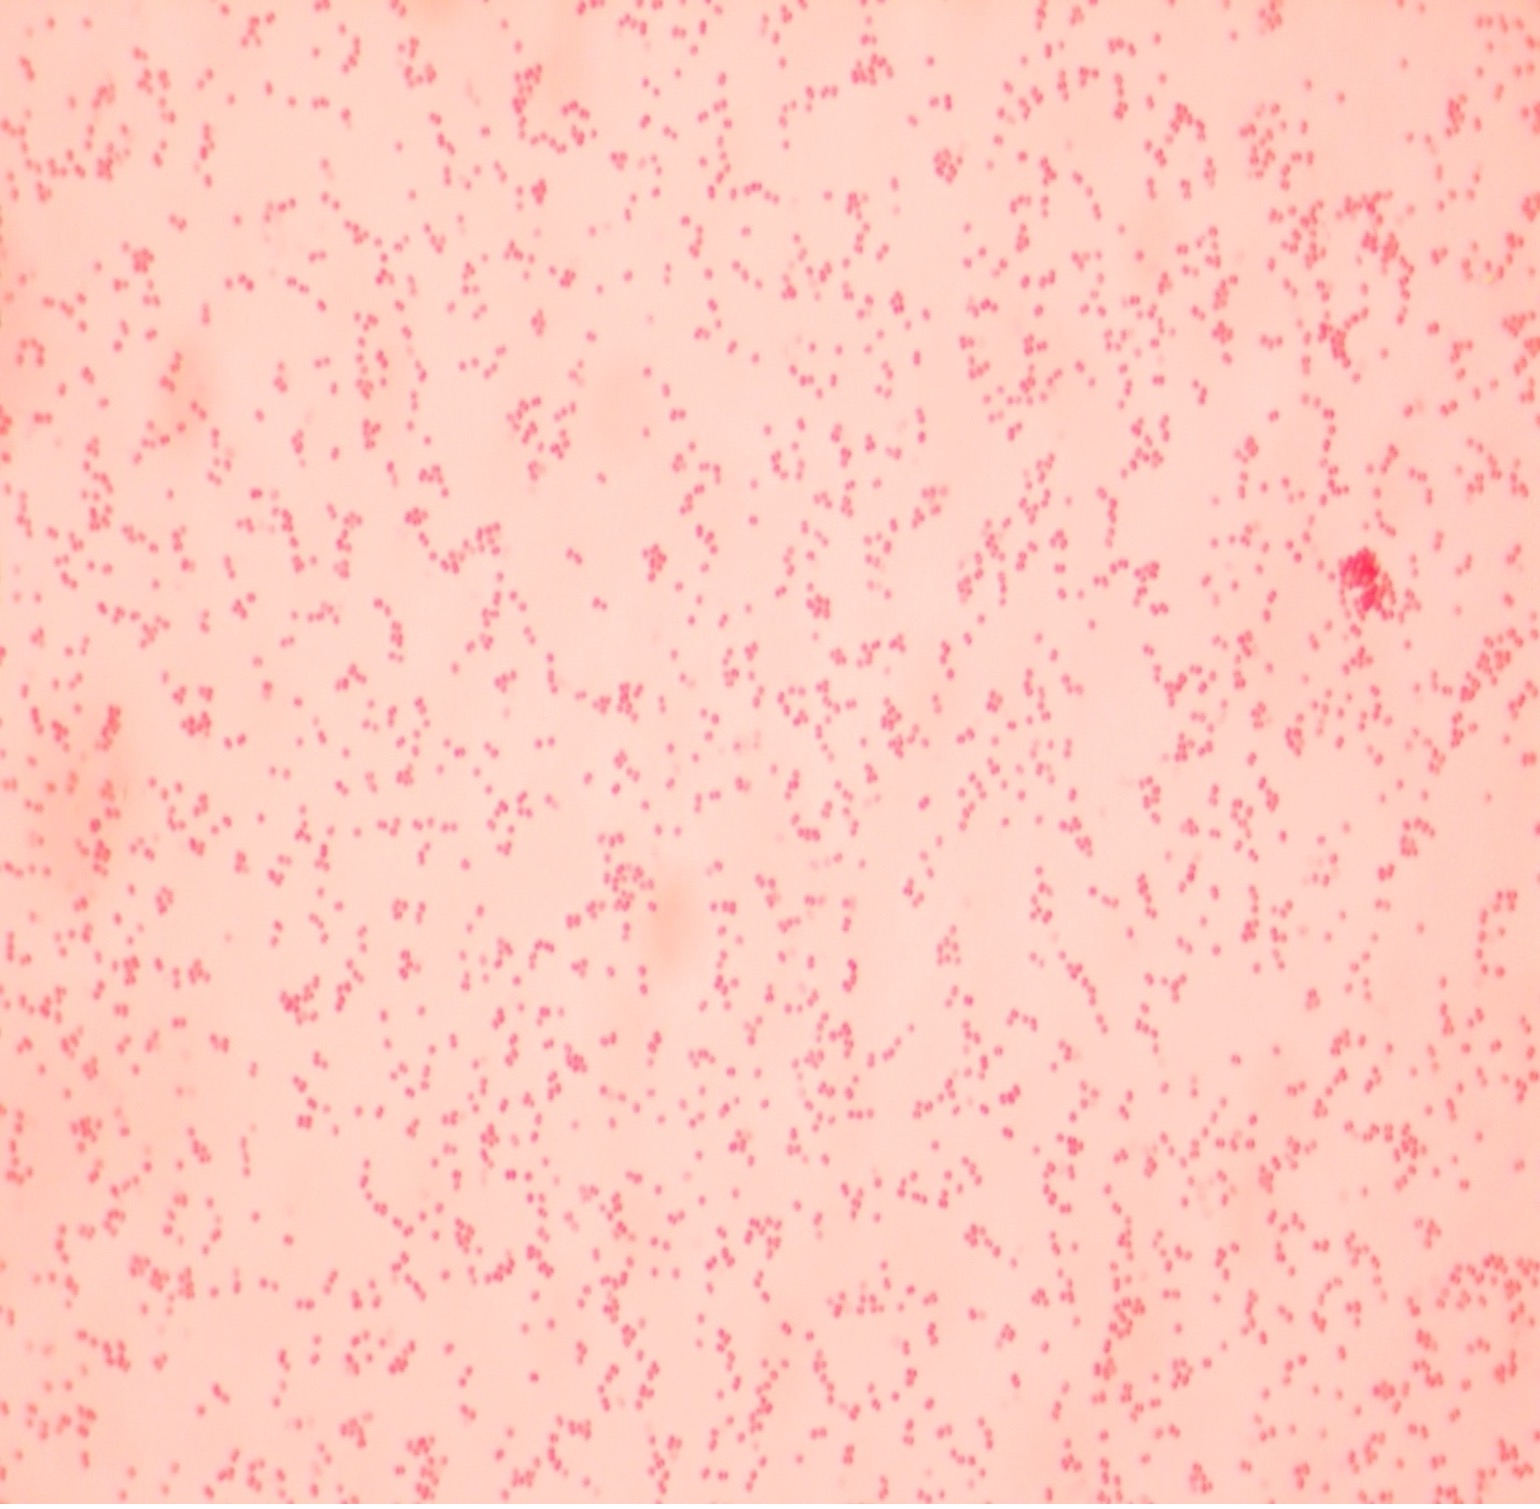
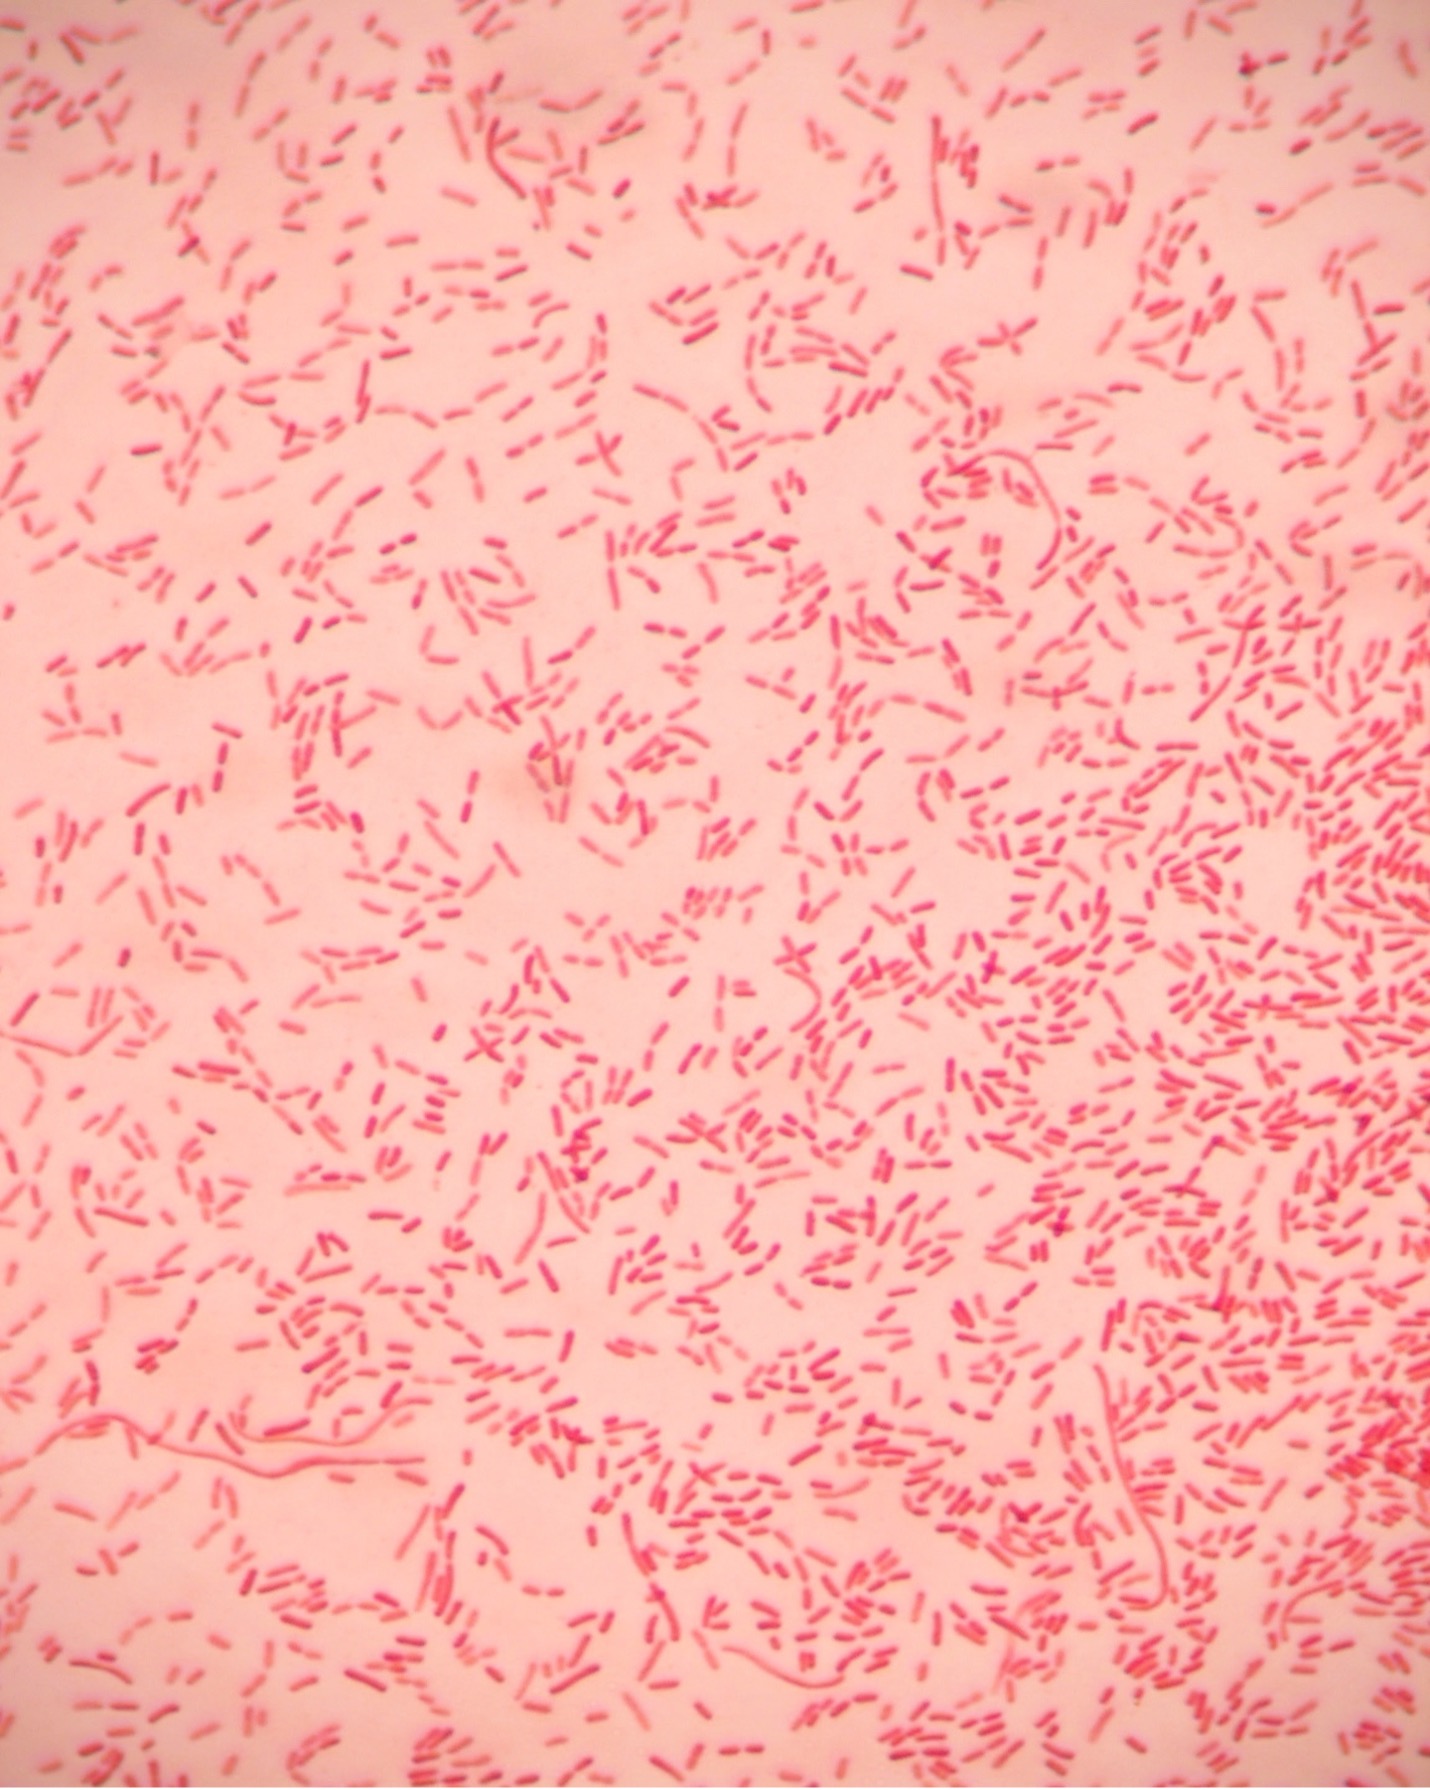
2. If your gram stain technique was perfect, you will see Bacillus and Staphylococcus are Gram-positive and will stain purple and Neisseria and Escherichia are Gram-negative and will stain pink. Also note the morphology of the organisms you view. Bacillus and Escherichia are both bacilli (rod) shaped, while Staphylococcus and Neisseria are cocci (spherical).
3. Draw the Gram-stained organisms you have observed at 1000X total magnification in the worksheet.
4. If your Gram stains did not result in the correct coloration for your bacteria, you need to modify your technique and repeat the procedure with the set of duplicate slides that you saved but have not stained.
5. After you have observed the Gram-stained slides, dispose of the slides in the used slide basin.
Hints:
The most likely error is that you did not decolorize for the proper amount of time. If the Gram-positive bacteria that should be purple come out pink, you decolorized too long (overdecolorized). If the bacteria that should be pink came out purple, you did not decolorize long enough (underdecolorized). Practice the Gram stain procedure until you can perform it with confidence.
POST TEST
DISCOVERIES IN MICROBIOLOGY
DR. LOUIS PASTEUR
 French chemist and microbiologist, Dr. Pasteur developed a rabies vaccine that contained weakened rabies virus from a rabid rabbit. He injected a 60-year-old man who left the hospital after one injection. A 10-year-old girl was given one injection but died of rabies before another injection could be given. In 1885, 9-year-old Joseph Meister’s mother brought him to Pasteur after he was bitten by a rabid dog. Pasteur knew the boy would die from rabies if he did nothing. Pasteur injected Joseph with the vaccine every day for a total of thirteen days. Each successive injection contained less-weakened (stronger) virus. Meister never developed rabies, so the vaccination was a success. Later in life, Meister worked as caretaker of Pasteur’s tomb in Paris. The CDC recommends rabies vaccination for veterinarians, animal handlers, veterinary students, rabies laboratory workers, and spelunkers. With no previous exposure to rabies, the CDC recommends three doses of the rabies vaccine. With exposure to rabies, the CDC recommends four doses of the rabies vaccine and an injection of rabies immune globulin for an unvaccinated person, two doses of the rabies vaccine for a vaccinated person.

