
SELECTIVE AND DIFFERENTIAL MEDIA
LEARNING OBJECTIVES
Explain how media can be selective and/or differential.
Observe and interpret selective and differential media.
MCCCD OFFICIAL COURSE COMPETENCIES
Describe the modes of bacterial and viral reproduction and proliferation.
Utilize aseptic technique for safe handling of microorganisms.
Apply various laboratory techniques to identify types of microorganisms.
Identify structural characteristics of the major groups of microorganisms.
Compare and contrast prokaryotic cell and eukaryotic cell.
Compare and contrast the physiology and biochemistry of the various groups of microorganisms.
INCUBATION TIMES
Incubation of Selective and Differential Media 3 days
PHOTO REQUIREMENTS
Take a photo with your photo ID during the lab exercises when you see this icon.

Paste these photos into the Streak Plate Questions Document.
INTRODUCTION
Samples obtained in healthcare and research are most often a mix of many types of microorganisms. Selective and differential media is used to identify and isolate microorganisms. Selective media contains substances that allow some microorganisms to grow but prevent the growth of other organisms. Differential media contains substances that help distinguish microorganisms that grow on the media either by changes that occur in the media or by changes that occur in the appearance of the microorganism. Although selective and differential media can be used separately, these techniques are often used in conjunction. Many differential media can function as selective media and vice versa.
Most species of Staphylococcus are harmless to humans like Staphylococcus epidermidis (S. epidermidis) the predominant resident flora colonizing skin. Some Staphylococcus species can be potentially pathogenic, the most common being Staphylococcus aureus (S. aureus). S. aureus can be found on the skin and in the nose about 33% of U.S. adults. Widespread use of antibiotics over the past several decades have led to the development of antibiotic-resistant strains of S. aureus. Less than 2% of the population, 5% of patients in U.S. hospitals, and an estimated 4% of healthcare workers carry a strain of S. aureus resistant to multiple antibiotics (methicillin resistant S. aureus or MRSA resistant to beta-lactam antibiotics). Swab based nasal screening is commonly used to identify carriers of MRSA who could potentially transmit the bacteria to others.
S. aureus usually does not cause disease. However, if there is a break in the skin from a wound or surgery, or if the immune system is weakened, S. aureus can cause skin infections, pneumonia, bloodstream infections, or infections at a surgical site. In healthcare setting these infections can be serious or fatal. S. aureus is transmitted by direct contact with an infected wound, or by sharing personal items. In healthcare settings it is most often transmitted by contaminated hands; therefore, proper hand washing with soap and water is an effective, simple, and inexpensive means of reducing the prevalence of MRSA.
In addition to good hand hygiene there are other ways to prevent MRSA infections. Keep cuts and surgical wounds clean and covered with a bandage until they heal. Don’t share personal items such as razors, towels, and washcloths. Shower after athletic games/practices/going to the gym. In a healthcare setting, hospital rooms and medical equipment must be carefully cleaned. Use contact precautions when carrying for patients with MRSA including use of personal protective equipment (PPE) for healthcare providers and visitors and removing the PPE before leaving the patient’s room. MRSA patients must have a single room or share a room with a patient who also has MRSA. MRSA patient stays in their room as much as possible.
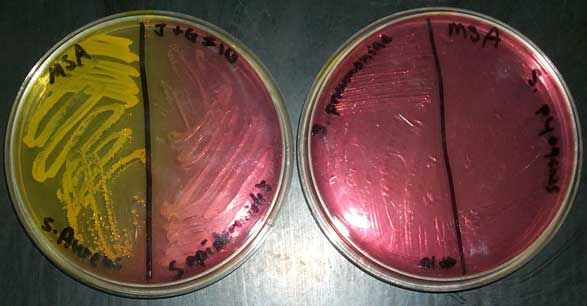
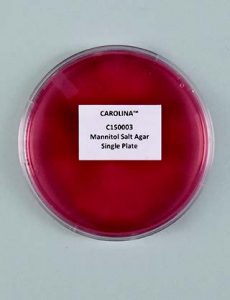
MANNITOL SALT AGAR (MSA) is both a selective and differential media. MSA selects for gram positive bacteria because it contains 7.5% sodium chloride, nearly ten times the usual concentration seen in most media. The high salt (hypertonic) environment causes most bacteria (especially Gram negative bacteria) to shrivel. Staphylococcus species have adapted to the high-salt environment of human skin caused by the production of sweat. Therefore, this media can be used to select for Staphylococcus. Organisms from other genera may grow, but their growth is typically very weak.
MSA also contains the sugar mannitol. It is the mannitol in the MSA agar that allows us to differentiate species of Staphylococcus. If an organism can ferment mannitol, an acidic byproduct is produced that will cause phenol red (a pH indicator) in the media to turn yellow. Most pathogenic Staphylococci, such as S. aureus, will ferment mannitol. Most non-pathogenic Staphylococci, such as Staphylococcus epidermidis will not ferment mannitol so there will be no color change in the media (red).
In the late 1890’s, Alfred MacConkey was working for the Royal Commission on Sewage Disposal. This group was charged with protecting the public from waterborne disease through developing best practices for treatment of sewage. To evaluate the efficacy of various sewage treatment regimens, the commission’s work involved determining whether treated water remained contaminated by feces.
Part of MacConkey’s role on the commission was to survey drinking water sources for the presence of Gram-negative enteric organisms. These bacteria are normal inhabitants of the gastrointestinal tract of humans and are also found in other mammals, reptiles, and birds. Although they do not always cause disease themselves, their presence is an indicator of fecal contamination and therefore, the potential presence of other fecal-oral transmitted pathogens.
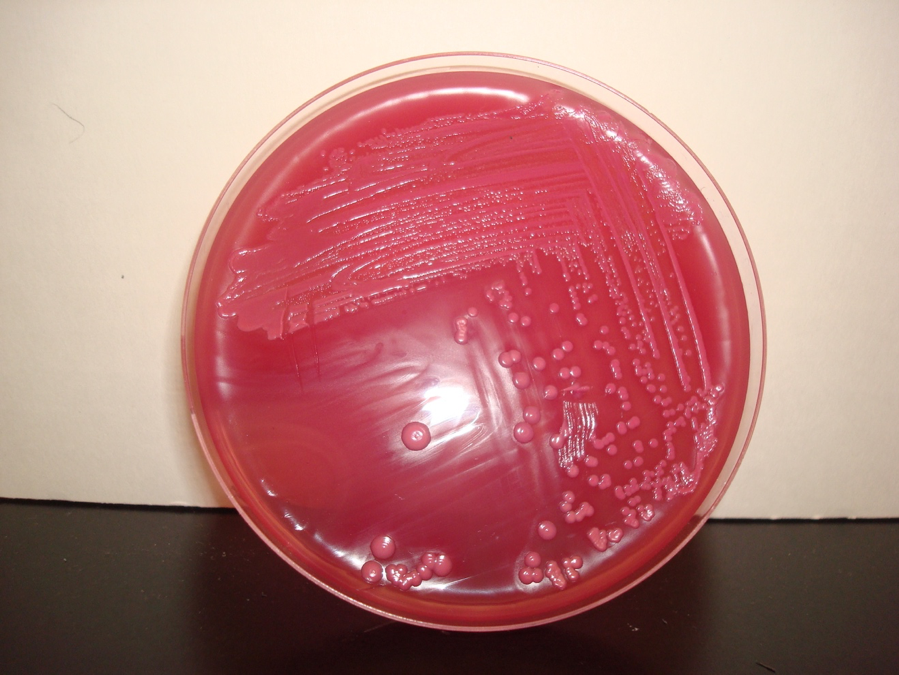
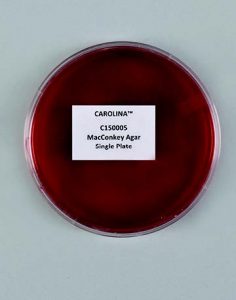
MACCONKEY AGAR is both a selective and differential medium. The bile salts and crystal violet in MacConkey agar select for Gram-negative bacteria by inhibiting the growth of Gram-positive bacteria. Lactose in the media allows for differentiation. Organisms that ferment lactose and thereby produce acid will produce pink colonies. Organisms that do not ferment lactose will produce colorless colonies.
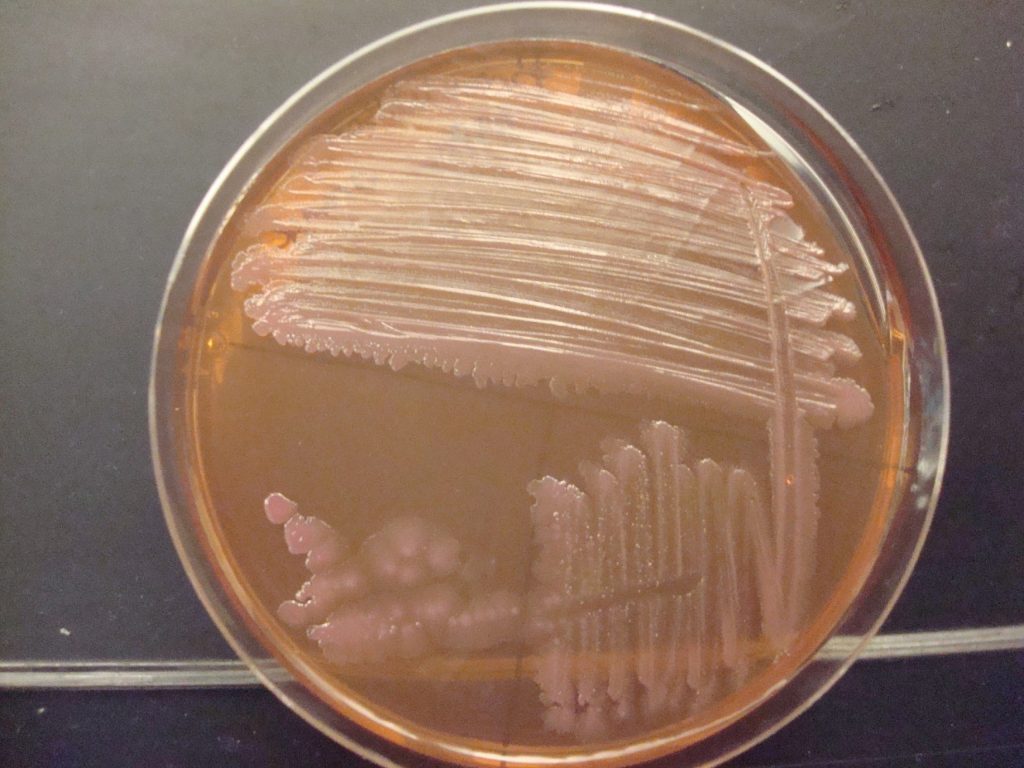
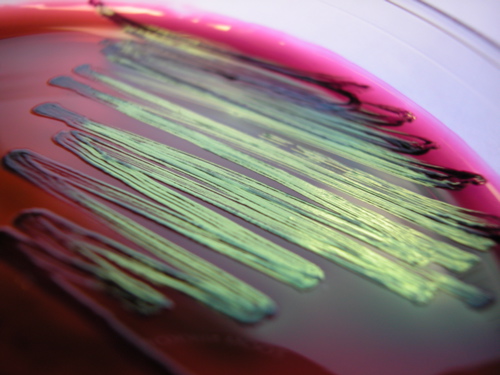
LEVINE EMB AGAR is both a selective and differential media. EMB agar contains lactose, sucrose, and the dyes eosin and methylene blue. The dyes select for Gram-negative bacteria by inhibiting the growth of Gram-positive bacteria. EMB is differential for lactose fermentation. Species able to rapidly ferment lactose produce acid that cause a significant drop in pH. This causes the dyes in the medium to precipitate, leading to dark purple growth, sometimes having a green metallic sheen when viewed from a slight angle. Weak lactose fermenters may appear less purple with no sheen. Bacteria that do not ferment lactose will appear colorless or the same color as the medium.

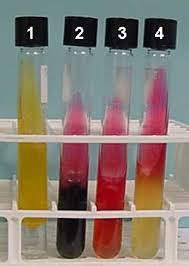
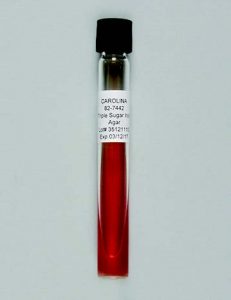
Most organisms have the ability to ferment carbohydrates, particularly sugars. An organism can ferment some sugars, while it cannot ferment the others. Which sugars an organism can ferment and which sugars it cannot ferment aid in its identification. TRIPLE SUGAR IRON AGAR (TSI) is a differential medium that it is used to differentiate intestinal bacteria based on the ability to reduce sulfur and ferment the sugars glucose, lactose, and sucrose. TSI contains 0.1% glucose, 1% lactose, 1% sucrose, proteins, as well as ferrous sulfate, thiosulfate, and a pH indicator, phenol red. The pH indicator will change color under different pH conditions. The slant shape of this medium provides an aerobic environment (slant) and an anaerobic environment (butt or bottom of the tube).
Organisms that ferment any of the three sugars present in the medium produce acid that will turn the medium yellow. Fermentation of sugar often produces gas as a by-product. If the fermentation produced gas, bubbles or cracks in the medium may be visible, or the entire slant may be raised above the bottom of the test tube. Bacteria use glucose as their preferred energy source, but as the glucose is depleted, bacteria that are unable to ferment either lactose or sucrose will need to break down proteins in the medium for energy. This will result in the production of ammonia, which will raise the pH around the bacteria, as indicated by a red color. Some bacteria use anaerobic energy production with thiosulfate in the medium as the final member of the electron transport chain. Thiosulfate is reduced to hydrogen sulfide, which then reacts with the ferrous sulfate to form ferrous sulfide (a visible black precipitate). If the precipitate is formed, it can mask any acid/alkaline results. Sulfur reduction requires an acidic environment, so if the black precipitate is present, some fermentation took place. If the butt of the slant is obscured by the precipitate, look at the top of the slant to determine if the organism could ferment only glucose (red), or if it could ferment either lactose and/or sucrose (yellow).
INTERPRETATION OF TSI
IF THE BACTERIA ONLY FERMENTS GLUCOSE ONLY THE BUTT TURNS YELLOW- the bacterium rapidly ferments glucose and produces a small amount of acid, initially giving an acid (yellow) slant and an acid (yellow) butt. After a longer incubation, the glucose will be consumed, and the bacteria cannot ferment lactose and sucrose. The proteins in the medium will be used to produce ATP via aerobic energy production in the slant. This causes the release of ammonia, increasing the pH, turning the phenol red from yellow to red in the slant. The butt stays yellow because the butt has comparatively more glucose than the slant because it has more media than the slant (more media means more glucose) so more acid is produced.
IF THE BACTERIA ONLY FERMENTS LACTOSE OR SUCROSE- a large amount of acid is produced, which turns the phenol red indicator yellow both in the butt and in the slant.
IF THE BACTERIA CANNOT FERMENT GLUCOSE, LACTOSE, OR SUCROSE- the bacteria may use protein to produce ATP. The proteins in the medium may be used to produce ATP via aerobic and/or anaerobic energy production. This causes the release of ammonia, increasing the pH, turning the phenol red to red. If the bacteria uses protein to produce ATP both aerobically and anaerobically, the slant and butt will be red. If protein is used to produce ATP aerobically, the slant will be red and the butt will not show any change.
GAS PRODUCTION- if the fermentation produced gas, bubbles or cracks in the medium may be visible, or the entire slant may be raised above the bottom of the test tube.
H2S PRODUCTION- some bacteria use anaerobic energy production with thiosulfate in the medium as the final member of the electron transport chain. Thiosulfate is reduced to hydrogen sulfide, which then reacts with the ferrous sulfate to form ferrous sulfide (a visible black precipitate). If the precipitate is formed, it can mask any acid/alkaline results. Sulfur reduction requires an acidic environment, so if the black precipitate is present, some fermentation took place. If the butt of the slant is obscured by the precipitate, look at the top of the slant to determine if the organism could ferment only glucose (red), or if it could ferment either lactose and/or sucrose (yellow).
TSI RESULTS CHART
A=acid production from fermentation of sugar, visible by color change to yellow
K=alkaline product accumulation from using protein to produce ATP, visible by color change to red
G=gas production from sugar fermentation, visible by bubbles, cracks, or the entire slant may be raised above the bottom of the test tube
H2S=hydrogen sulfide production, visible by black precipitate in the agar. If the precipitate is formed, it can mask any acid/alkaline results. Sulfur reduction requires an acidic environment, so if the black precipitate is present, some fermentation took place. If the butt of the slant is obscured by the precipitate, look at the top of the slant to determine if the organism could ferment only glucose (red), or if it could ferment either lactose and/or sucrose (yellow).
| RESULTS (SLANT/BUTT) |
SYMBOL | INTERPRETATION |
| Red/Yellow | K/A | Fermentation of glucose only; Protein used for aerobic energy production in the slant |
| Yellow/Yellow | A/A | Fermentation of glucose, plus fermentation of lactose and/or sucrose |
| Red/Red | K/K | No fermentation; Protein used for aerobic energy production in the slant and anaerobic energy production in the butt |
| Red/No Color Change | K/NC | No fermentation; Protein used for aerobic energy production in the slant |
| Yellow/Yellow with Bubbles | A/A, G | Fermentation of glucose, plus fermentation of lactose and/or sucrose, with gas production |
| Red/Yellow with Bubbles | K/A, G | Fermentation of glucose only, with gas production; Protein used for aerobic energy production in the slant |
| Red/yellow with Bubbles and Black Precipitate | K/A,G, H2S | Fermentation of glucose only, with gas production; Protein used for aerobic energy production in the slant; H2S produced |
| Red/Yellow with Black Precipitate | K/A, H2S | Fermentation of glucose only; H2S produced |
| Yellow/Yellow with Black Precipitate | A/A, H2S | Fermentation of glucose, plus fermentation of lactose and/or sucrose; H2S produced |
| No Change/No Change | N/C. N/C | No growth |
SAFETY
This investigation requires safety goggles, gloves, a lab apron, and proper attire. Read all the instructions for this laboratory exercise before beginning. Follow the instructions closely and observe established laboratory safety practices as outlined in the Safety exercise. Email your instructor with any questions.
 Isopropyl alcohol is flammable. Keep containers of isopropyl alcohol away from any heat or flame sources.
 Chlorine bleach is a corrosive material. Use these materials near a source of running water that can be used as a safety eye wash or safety shower if any corrosive material comes in contact with skin or eyes. Do not use bleach in an area without proper ventilation.
SELECTIVE AND DIFFERENTIAL MEDIA PROCEDURE
| PROPER ATTIRE AND REQUIRED PERSONAL PROTECTIVE EQUIPMENT (PPE) |
| Laboratory safety apron (from the lab kit). Wear a long-sleeve shirt under the lab apron.
|
| Safety goggles (from the lab kit)
|
| Disposable gloves (from the lab kit)
|
| Closed-toe shoes that are solid, not made of cloth, not perforated (no ballet flats). To reduce exposure of your body, wear long pants, no skin can be showing, so you may have to wear socks with your shoes. A skirt can be worn but it must fit close to the body and again no skin can be showing. Long hair should be fastened and dangling jewelry or loose hanging garments or sleeves should not be worn. They may contaminate microbial cultures. Avoid loose or dangling clothing or jewelry that could catch on objects or interfere with the lab exercise. |
| REQUIRED SUPPLIES FROM THE LAB KIT |
| Grease pencil
|
| Tube rack
|
|
Sterile inoculating loops (9) Do not remove the loops from the package!
|
| Mannitol Salt Agar Plate (1) (stored in the refrigerator) Do not remove the lid!
DO NOT USE A TRYPTIC SOY AGAR PLATE! Allow media that have been stored in the refrigerator to sit at room temperature for 60 minutes prior to use
|
| Levine EMB Agar Plate (1) (stored in the refrigerator) Do not remove the lid!
DO NOT USE A TRYPTIC SOY AGAR PLATE! Allow media that have been stored in the refrigerator to sit at room temperature for 60 minutes prior to use
|
| MacConkey Agar Plate (1) (stored in the refrigerator) Do not remove the lid!
DO NOT USE A TRYPTIC SOY AGAR PLATE! Allow media that have been stored in the refrigerator to sit at room temperature for 60 minutes prior to use
|
| Triple Sugar Iron Agar Slants (3) (stored in the refrigerator) Do not remove the caps!
DO NOT USE A TRYPTIC SOY AGAR SLANT! Allow media that have been stored in the refrigerator to sit at room temperature for 60 minutes prior to use
|


| REQUIRED SUPPLIES YOU PROVIDE |
| E.coli stock slant or stock plate (stored in the refrigerator) |
| S. epidermidis stocks slant or stock plate (stored in the refrigerator) |
| Bleach |
| Isopropyl alcohol |
| Paper towels |
| Small disposable plastic container (plastic cup or empty water bottle) filled half way with isopropyl alcohol for disinfect inoculating tools (for lab use only)
|
| Large disposable plastic container filled half way with 10% bleach solution for disinfecting cultures (for lab use only)
Prepare after 3 day incubation
|
| Resealable plastic bag (sandwich or quart size) |
| Timer or stopwatch, or resealable plastic bag to protect your cell phone if using it as a timer |
| Cell phone or digital camera to take digital photos |
| Fine tip permanent marker to be used instead of grease pencil (optional) |
mannitol salt agar plate procedure
Selective and Differential Plates Video Guide
Read all instructions carefully before you start the experiment. Wear proper attire when performing laboratory experiments. Allow media that have been stored in the refrigerator to sit at room temperature for 60 minutes prior to use. Read each step carefully and watch any accompanying video. Think about what you are going to do before you do it. Once you begin, move with purpose and focus.
1. Wash your hands thoroughly with soap and water. Dry your hands with paper towel. Put on your PPE (gloves, safety goggles, apron).
2. Prepare your surface disinfectant. Add 180 ml of tap water to the 250 ml beaker. Now add 20 ml of bleach to the 250 ml beaker. Your surface disinfectant (10% bleach solution) is now ready to use.
3. Disinfect the work surface, tube rack, and grease pencil or permanent marker with surface disinfectant by applying 10% bleach solution with a paper towel, allowing it to remain damp for 2 minutes, and then wiping away any remaining disinfectant with a dry paper towel. Throw the used paper towels in the trash.
4. Prepare for inoculating tool disinfection by filling a small, disposable, plastic container (8 ounce or larger plastic cup or empty water bottle) half full with isopropyl alcohol. Prepare for culture disinfection by filling a large, disposable, plastic container two thirds of the way with surface disinfectant (10% bleach solution).
5. Place the mannitol salt agar lid side down on your work surface. Using the grease pencil or permanent marker, divide the mannitol salt agar in half by drawing a line down the center of the plate. Make sure you draw on the outside of the bottom of the plate (not the lid). Turn the plate right lid side up.

6. Label the bottom of the mannitol salt agar plate with S. epi and the date. Label the other half of the mannitol salt agar plate with E. coli and the date.
7. Remove a sterile loop from its packaging. Aseptically obtain a loop of inoculum from the S. epidermidis stock slant or plate culture.
If you are obtaining an inoculum (sample) from your S. epidermidis tryptic soy stock slant:
Remove the cap from your S. epidermidis tryptic soy slant stock. Remember do not set the cap down. Hold it in the pinky of your dominant hand while holding the tube in your non-dominant hand.
Holding the tube at an angle, insert the inoculating loop to obtain an inoculum (a sample) about the size of a pinhead of your S. epidermidis tryptic soy slant stock, then withdraw the loop. Do not set the loop down. Replace the cap of your tryptic soy slant stock and set it aside in the tube rack.
If you are obtaining an inoculum (sample) from your S. epidermidis tryptic soy stock plate:
Lift the lid of the tryptic soy agar plate slightly. Do not remove the lid completely, and do not set the lid down. Use the lid as a shield to protect the agar from contamination by airborne microorganisms.
Insert the inoculating loop to obtain an inoculum (sample) about the size of a pinhead of your S. epidermidis tryptic soy agar stock plate. Withdraw the loop, do not set the loop down. Replace the lid. Set the plate aside.
8. Use the inoculum to inoculate the half of the mannitol salt agar plate labeled S. epi. Touch the loop gently to the surface of the agar taking care not to gouge the agar. Drag the loop back and forth over the surface of the agar on the S. epi half of the plate in a zigzag pattern.
9. Place the used inoculating loop in the inoculating tools disposal cup/bottle. Allow the used loops in the inoculating tools disposal cup/bottle to soak for at least 30 minutes before discarding it in the trash. Used alcohol can be poured down the drain. Allow the water to run for at least 30 seconds to dilute the alcohol.

10. Remove a sterile loop from its packaging. Aseptically obtain a loop of inoculum from the E. coli stock slant or plate culture.
If you are obtaining an inoculum (sample) from your E. coli tryptic soy stock slant:
Remove the cap from your E. coli tryptic soy slant stock. Remember do not set the cap down. Hold it in the pinky of your dominant hand while holding the tube in your non-dominant hand.
Holding the tube at an angle, insert the inoculating loop to obtain an inoculum (a sample) about the size of a pinhead of your E. coli tryptic soy slant stock, then withdraw the loop. Do not set the loop down. Replace the cap of your tryptic soy slant stock and set it aside in the tube rack.
If you are obtaining an inoculum (sample) from your E. coli tryptic soy stock plate:
Lift the lid of the tryptic soy agar plate slightly. Do not remove the lid completely, and do not set the lid down. Use the lid as a shield to protect the agar from contamination by airborne microorganisms.
Insert the inoculating loop to obtain an inoculum (sample) about the size of a pinhead of your Escherichia coli tryptic soy agar stock plate. Withdraw the loop, do not set the loop down. Replace the lid. Set the plate aside.
11. Use the inoculum to inoculate the half of the mannitol salt agar plate labeled E. coli. Touch the loop gently to the surface of the agar taking care not to gouge the agar. Drag the loop back and forth over the surface of the agar on the E. coli half of the plate in a zigzag pattern.
12. Place the used inoculating loop in the inoculating tools disposal cup/bottle. Allow the used loops in the inoculating tools disposal cup/bottle to soak for at least 30 minutes before discarding it in the trash. Used alcohol can be poured down the drain. Allow the water to run for at least 30 seconds to dilute the alcohol.
13. . Take a photo with your photo ID of the mannitol salt agar plate. This photo will be pasted into the Selective and Differential Media Questions Document.
macconkey agar plate procedure
1. Place the MacConkey agar plate lid side down on your work surface. Using the grease pencil or permanent marker, divide the MacConkey agar in half by drawing a line down the center of the plate. Make sure you draw on the outside of the bottom of the plate (not the lid). Turn the plate right lid side up.
2. Label the bottom of the MacConkey agar plate with S. epi and the date. Label the other half of the MacConkey agar plate with E. coli and the date.
3. Remove a sterile loop from its packaging. Aseptically obtain a loop of inoculum from the S. epidermidis stock slant or plate culture.
If you are obtaining an inoculum (sample) from your S. epidermidis tryptic soy stock slant:
Remove the cap from your Staphylococcus epidermidis tryptic soy slant stock. Remember do not set the cap down. Hold it in the pinky of your dominant hand while holding the tube in your non-dominant hand.
Holding the tube at an angle, insert the inoculating loop to obtain an inoculum (a sample) about the size of a pinhead of your S. epidermidis tryptic soy slant stock, then withdraw the loop. Do not set the loop down. Replace the cap of your tryptic soy slant stock and set it aside in the tube rack.
If you are obtaining an inoculum (sample) from your S. epidermidis tryptic soy stock plate:
Lift the lid of the tryptic soy agar plate slightly. Do not remove the lid completely, and do not set the lid down. Use the lid as a shield to protect the agar from contamination by airborne microorganisms.
Insert the inoculating loop to obtain an inoculum (sample) about the size of a pinhead of your S. epidermidis tryptic soy agar stock plate. Withdraw the loop, do not set the loop down. Replace the lid. Set the plate aside.
4. Use the inoculum to inoculate the half of the MacConkey agar plate labeled S. epi. Touch the loop gently to the surface of the agar taking care not to gouge the agar. Drag the loop back and forth over the surface of the agar on the S. epi half of the plate in a zigzag pattern.
5. Place the used inoculating loop in the inoculating tools disposal cup/bottle. Allow the used loops in the inoculating tools disposal cup/bottle to soak for at least 30 minutes before discarding it in the trash. Used alcohol can be poured down the drain. Allow the water to run for at least 30 seconds to dilute the alcohol.
6. Remove a sterile loop from its packaging. Aseptically obtain a loop of inoculum from the E. coli stock slant or plate culture.
If you are obtaining an inoculum (sample) from your E. coli tryptic soy stock slant:
Remove the cap from your E. coli tryptic soy slant stock. Remember do not set the cap down. Hold it in the pinky of your dominant hand while holding the tube in your non-dominant hand.
Holding the tube at an angle, insert the inoculating loop to obtain an inoculum (a sample) about the size of a pinhead of your E. coli tryptic soy slant stock, then withdraw the loop. Do not set the loop down. Replace the cap of your tryptic soy slant stock and set it aside in the tube rack.
If you are obtaining an inoculum (sample) from your E. coli tryptic soy stock plate:
Lift the lid of the tryptic soy agar plate slightly. Do not remove the lid completely, and do not set the lid down. Use the lid as a shield to protect the agar from contamination by airborne microorganisms.
Insert the inoculating loop to obtain an inoculum (sample) about the size of a pinhead of your E. coli tryptic soy agar stock plate. Withdraw the loop, do not set the loop down. Replace the lid. Set the plate aside.
7. Use the inoculum to inoculate the half of the MacConkey agar plate labeled E. coli. Touch the loop gently to the surface of the agar taking care not to gouge the agar. Drag the loop back and forth over the surface of the agar on the E. coli half of the plate in a zigzag pattern.
8. Place the used inoculating loop in the inoculating tools disposal cup/bottle. Allow the used loops in the inoculating tools disposal cup/bottle to soak for at least 30 minutes before discarding it in the trash. Used alcohol can be poured down the drain. Allow the water to run for at least 30 seconds to dilute the alcohol.
9. Take a photo with your photo ID of the MacConkey agar plate. This photo will be pasted into the Selective and Differential Media Questions Document.
Levine emb agar plate procedure
1. Place the EMB agar plate lid side down on your work surface. Using the grease pencil or permanent marker, divide the EMB agar in half by drawing a line down the center of the plate. Make sure you draw on the outside of the bottom of the plate (not the lid). Turn the plate right lid side up.
2. Label the bottom of the EMB agar plate with S. epi and the date. Label the other half of the EMB agar plate with E. coli and the date.
3. Remove a sterile loop from its packaging. Aseptically obtain a loop of inoculum from the S. epidermidis stock slant or plate culture.
If you are obtaining an inoculum (sample) from your S. epidermidis tryptic soy stock slant:
Remove the cap from your Staphylococcus epidermidis tryptic soy slant stock. Remember do not set the cap down. Hold it in the pinky of your dominant hand while holding the tube in your non-dominant hand.
Holding the tube at an angle, insert the inoculating loop to obtain an inoculum (a sample) about the size of a pinhead of your S. epidermidis tryptic soy slant stock, then withdraw the loop. Do not set the loop down. Replace the cap of your tryptic soy slant stock and set it aside in the tube rack.
If you are obtaining an inoculum (sample) from your S. epidermidis tryptic soy stock plate:
Lift the lid of the tryptic soy agar plate slightly. Do not remove the lid completely, and do not set the lid down. Use the lid as a shield to protect the agar from contamination by airborne microorganisms.
Insert the inoculating loop to obtain an inoculum (sample) about the size of a pinhead of your S. epidermidis tryptic soy agar stock plate. Withdraw the loop, do not set the loop down. Replace the lid. Set the plate aside.
4. Use the inoculum to inoculate the half of the EMB agar plate labeled S. epi. Touch the loop gently to the surface of the agar taking care not to gouge the agar. Drag the loop back and forth over the surface of the agar on the S. epi half of the plate in a zigzag pattern.
5. Place the used inoculating loop in the inoculating tools disposal cup/bottle. Allow the used loops in the inoculating tools disposal cup/bottle to soak for at least 30 minutes before discarding it in the trash. Used alcohol can be poured down the drain. Allow the water to run for at least 30 seconds to dilute the alcohol.
6. Remove a sterile loop from its packaging. Aseptically obtain a loop of inoculum from the E. coli stock slant or plate culture.
If you are obtaining an inoculum (sample) from your E. coli tryptic soy stock slant:
Remove the cap from your E. coli tryptic soy slant stock. Remember do not set the cap down. Hold it in the pinky of your dominant hand while holding the tube in your non-dominant hand.
Holding the tube at an angle, insert the inoculating loop to obtain an inoculum (a sample) about the size of a pinhead of your E. coli tryptic soy slant stock, then withdraw the loop. Do not set the loop down. Replace the cap of your tryptic soy slant stock and set it aside in the tube rack.
If you are obtaining an inoculum (sample) from your E. coli tryptic soy stock plate:
Lift the lid of the tryptic soy agar plate slightly. Do not remove the lid completely, and do not set the lid down. Use the lid as a shield to protect the agar from contamination by airborne microorganisms.
Insert the inoculating loop to obtain an inoculum (sample) about the size of a pinhead of your E. coli tryptic soy agar stock plate. Withdraw the loop, do not set the loop down. Replace the lid. Set the plate aside.
7. Use the inoculum to inoculate the half of the EMB agar plate labeled E. coli. Touch the loop gently to the surface of the agar taking care not to gouge the agar. Drag the loop back and forth over the surface of the agar on the E. coli half of the plate in a zigzag pattern.
8. Place the used inoculating loop in the inoculating tools disposal cup/bottle. Allow the used loops in the inoculating tools disposal cup/bottle to soak for at least 30 minutes before discarding it in the trash. Used alcohol can be poured down the drain. Allow the water to run for at least 30 seconds to dilute the alcohol.
9. Take a photo with your photo ID of the EMB agar plate. This photo will be pasted into the Selective and Differential Media Questions Document.
10. Invert the mannitol salt agar, MacConkey agar, and EMB plates (turn them lid side down) for incubation. This will prevent condensation from disrupting microbial growth. Incubate the plates for 3 days in a consistently warm location (not to exceed 37 °C or 100 °F) out of direct sunlight. Record your observations every 24 hours in the data table in the Selective and Differential Media Questions document.
triple sugar iron agar slant procedure
TSI Slants Video Guide
1. Use the grease pencil or permanent marker, label one TSI slant E. coli and the date. Label one TSI slant S. epi and the date. Label one TSI slant control and the date.
2. Remove a sterile loop from its packaging. Aseptically obtain a loop of inoculum from the S. epidermidis stock slant or plate culture.
If you are obtaining an inoculum (sample) from your S. epidermidis tryptic soy stock slant:
Remove the cap from your S. epidermidis tryptic soy slant stock. Remember do not set the cap down. Hold it in the pinky of your dominant hand while holding the tube in your non-dominant hand.
Holding the tube at an angle, insert the inoculating loop to obtain an inoculum (a sample) about the size of a pinhead of your S. epidermidis tryptic soy slant stock, then withdraw the loop. Do not set the loop down. Replace the cap of your tryptic soy slant stock and set it aside in the tube rack.
If you are obtaining an inoculum (sample) from your S. epidermidis tryptic soy stock plate:
Lift the lid of the tryptic soy agar plate slightly. Do not remove the lid completely, and do not set the lid down. Use the lid as a shield to protect the agar from contamination by airborne microorganisms.
Insert the inoculating loop to obtain an inoculum (sample) about the size of a pinhead of your S. epidermidis tryptic soy agar stock plate. Withdraw the loop, do not set the loop down. Replace the lid. Set the plate aside.
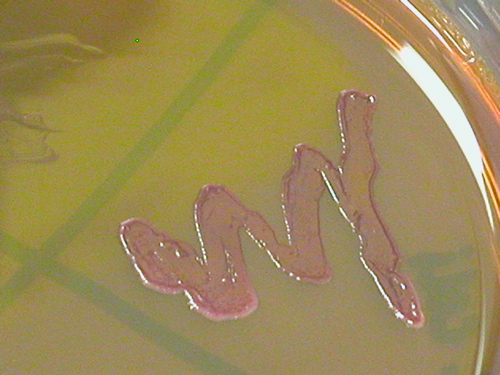
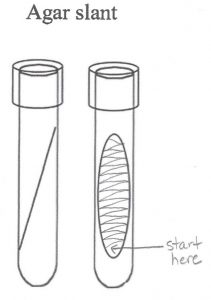
3. Obtain the TSI slant you labeled S. epi. Stab the loop through the center of the TSI slant to the very bottom of the butt of the slant. The agar will reseal itself around the stab, creating anaerobic conditions. Then, as you pull the loop out of the TSI medium, streak it back and forth across the surface of the slant (fishtail inoculation). Screw the cap of the TSI slant inoculated with S. epidermidis to the point of finger tightness, then backwards about one quarter of a turn. This will leave the cap just loose enough that air (but not contaminants) can enter the tube.
4. Place the used inoculating loop in the inoculating tools disposal cup/bottle. Allow the used loops in the inoculating tools disposal cup/bottle to soak for at least 30 minutes before discarding it in the trash. Used alcohol can be poured down the drain. Allow the water to run for at least 30 seconds to dilute the alcohol.
5. Remove a sterile loop from its packaging. Aseptically obtain a loop of inoculum from the E. coli stock slant or plate culture.
If you are obtaining an inoculum (sample) from your E. coli tryptic soy stock slant:
Remove the cap from your E. coli tryptic soy slant stock. Remember do not set the cap down. Hold it in the pinky of your dominant hand while holding the tube in your non-dominant hand.
Holding the tube at an angle, insert the inoculating loop to obtain an inoculum (a sample) about the size of a pinhead of your E. coli tryptic soy slant stock, then withdraw the loop. Do not set the loop down. Replace the cap of your tryptic soy slant stock and set it aside in the tube rack.
If you are obtaining an inoculum (sample) from your E. coli tryptic soy stock plate:
Lift the lid of the tryptic soy agar plate slightly. Do not remove the lid completely, and do not set the lid down. Use the lid as a shield to protect the agar from contamination by airborne microorganisms.
Insert the inoculating loop to obtain an inoculum (sample) about the size of a pinhead of your E. coli tryptic soy agar stock plate. Withdraw the loop, do not set the loop down. Replace the lid. Set the plate aside.
6. Obtain the TSI slant you labeled E. coli. Stab the loop through the center of the TSI slant to the very bottom of the butt of the slant. The agar will reseal itself around the stab, creating anaerobic conditions. Then, as you pull the loop out of the TSI medium, streak it back and forth across the surface of the slant (fishtail inoculation). Screw the cap of the TSI slant inoculated with E. coli to the point of finger tightness, then backwards about one quarter of a turn. This will leave the cap just loose enough that air (but not contaminants) can enter the tube.
7. Place the used inoculating loop in the inoculating tools disposal cup/bottle. Allow the used loops in the inoculating tools disposal cup/bottle to soak for at least 30 minutes before discarding it in the trash. Used alcohol can be poured down the drain. Allow the water to run for at least 30 seconds to dilute the alcohol.
8. Obtain the TSI slant you labeled control. Stab the loop through the center of the TSI slant to the very bottom of the butt of the slant. The agar will reseal itself around the stab, creating anaerobic conditions. Then, as you pull the loop out of the TSI medium, streak it back and forth across the surface of the slant (fishtail inoculation). Screw the cap of the control TSI slant to the point of finger tightness, then backwards about one quarter of a turn. This will leave the cap just loose enough that air (but not contaminants) can enter the tube.
9. Place the used inoculating loop in the inoculating tools disposal cup/bottle. Allow the used loops in the inoculating tools disposal cup/bottle to soak for at least 30 minutes before discarding it in the trash. Used alcohol can be poured down the drain. Allow the water to run for at least 30 seconds to dilute the alcohol.
10. Take a photo with your photo ID of the inoculated TSI slants. This photo will be pasted into the Selective and Differential Media Questions document.
11. Incubate the TSI slants for 3 days in a consistently warm location (not to exceed 37 °C or 100 °F) out of direct sunlight. Observe the slants every 24 hours, record your observations in the Selective and Differential Media Questions document.
12. Place your stock plate lid side down in a sealed plastic bag and store it in the refrigerator. Screw the cap of your slant stock to the point of finger tightness, then backwards about one quarter of a turn. This will leave the cap just loose enough that air (but not contaminants) can enter the tube. Store your stock slant in the 250 ml beaker or a cup in the refrigerator.
13. Disinfect your work area with 10% bleach solution. Wash your lab bench with soap and water to remove the bleach residue. wash your hands thoroughly with soap and water. Dry your hands with paper towel.
AFTER THREE DAY INCUBATION
Read all instructions carefully before you start the experiment. Wear proper attire when performing laboratory experiments.
1. After the 3 day incubation, wash your hands thoroughly with soap and water. Dry your hands with paper towels. Put on your PPE (gloves, safety goggles, apron).
2. Prepare your surface disinfectant. Add 180 ml of tap water to the 250 ml beaker. Now add 20 ml of bleach to the 250 ml beaker. Your surface disinfectant (10% bleach solution) is now ready to use.
3. Disinfect the work surface, tube rack, and grease pencil or permanent marker with surface disinfectant by applying 10% bleach solution with a paper towel, allowing it to remain damp for 2 minutes, and then wiping away any remaining disinfectant with a dry paper towel. Throw the used paper towels in the trash.
4. Take a photo with your photo ID of the mannitol salt agar plate. This photo will be pasted into the Selective and Differential Media Questions Document. Record your observations of the mannitol salt agar plate in the Selective and Differential Media Questions document.
5. Take a photo with your photo ID of the MacConkey agar plate. This photo will be pasted into the Selective and Differential Media Questions Document. Record your observations of the MacConkey agar plate in the Selective and Differential Media Questions document.
6. Take a photo with your photo ID of the EMB agar plate. This photo will be pasted into the Selective and Differential Media Questions Document. Record your observations of the EMB agar plate in the Selective and Differential Media Questions document.
7. Take a photo with your photo ID of the inoculated TSI slants. This photo will be pasted into the Selective and Differential Media Questions document. Record your observations of the TSI slants in the Selective and Differential Media Questions document.
8. This is the final lab wet of the course, so you will be disposing of all your cultures. Immerse all your cultures (including the stock slants and plates stored in the refrigerator) into the culture disinfection container and remove the cap or lid. Allow the culture to soak in the bleach for at least 24 hours. After the culture has soaked for at least 24 hours while wearing your PPE, pour the 10% bleach down the drain with the faucet running. Let the faucet continue to run for at least 30 seconds to dilute the bleach. Place the tubes and plates in a sealed plastic bag and dispose of them in the trash.
9. Disinfect your work area with 10% bleach solution. Wash your lab bench with soap and water to remove the bleach residue. wash your hands thoroughly with soap and water. Dry your hands with paper towel.
10. Dispose any other items left in your lab kit in the trash.
discoveries in microbiology
 DR. JOHN BARTLETT
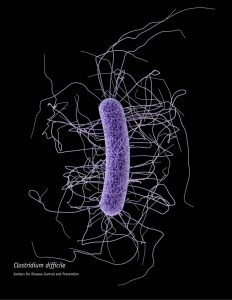
In 1975 American physician John Bartlett began trials investigating the problem of antibiotic-associated diarrhea and pseudomembranous colitis. His work led the discovery of Clostridium difficile. C. difficile is the most common cause of hospital-acquired diarrhea in the developed word. Vancomycin, isolated from Streptomyces orientalis, was discovered in 1955 by Mack H. McCormick and colleagues at Eli Lilly. Vancomycin is often used to treat C. difficile infections.