
VIRTUAL GRAM STAIN AND MICROSCOPE
LEARNING OBJECTIVES
Properly perform the Gram staining technique.
Recognize morphology of bacteria.
Differentiate Gram-positive and Gram-negative cell envelopes.
Explain the importance of Gram stains in a clinical environment.
Explain the function of each reagent used in a Gram stain and its correlation with cell envelope structure.
Identify and state the function of the parts of a compound brightfield microscope.
Properly focus a light microscope.
Observe specimens using a compound brightfield microscope.
Explain how total magnification is calculated.
MCCCD OFFICIAL COURSE COMPETENCIES
Apply various laboratory techniques to identify types of microorganisms.
Identify structural characteristics of the major groups of microorganisms.
Compare and contrast prokaryotic cell and eukaryotic cell.
Compare and contrast the physiology and biochemistry of the various groups of microorganisms.
the gram stain
Unstained bacteria are nearly transparent. To see them with the microscope we often use chemical compounds called stains. To understand how staining works, it will be helpful to know a little about the physical and chemical nature of stains. Stains are generally salts in which one of the ions is colored. A salt is a compound composed of a positively charged ion and a negatively charged ion. For example, the stain methylene blue is the salt methylene blue chloride which will dissociate in water into a positively charged methylene blue ion which is blue in color and a negatively charged chloride ion which is colorless.
Stains may be divided into two groups: basic and acidic. If the stain has a positive charge, it is called a basic stain. Some examples of basic stains include methylene blue, crystal violet, and safranin. If the stain has a negative charge, it is called an acidic stain. Some examples of acidic stains include nigrosin, congo red and eosin.
Because of its chemical nature, bacterial cells have a negative charge. Therefore, when using a basic stain (positively charged), the positively charged stain is attracted to the negatively charged bacteria and the organism becomes directly stained. An acidic stain (negatively charged), due to its chemical nature, reacts differently. A negatively charged stain will not be attracted to the negatively charged bacteria. Instead, it forms a deposit around the organism, leaving the organism itself colorless. Since the organism is seen indirectly, this type of staining is called a negative stain.
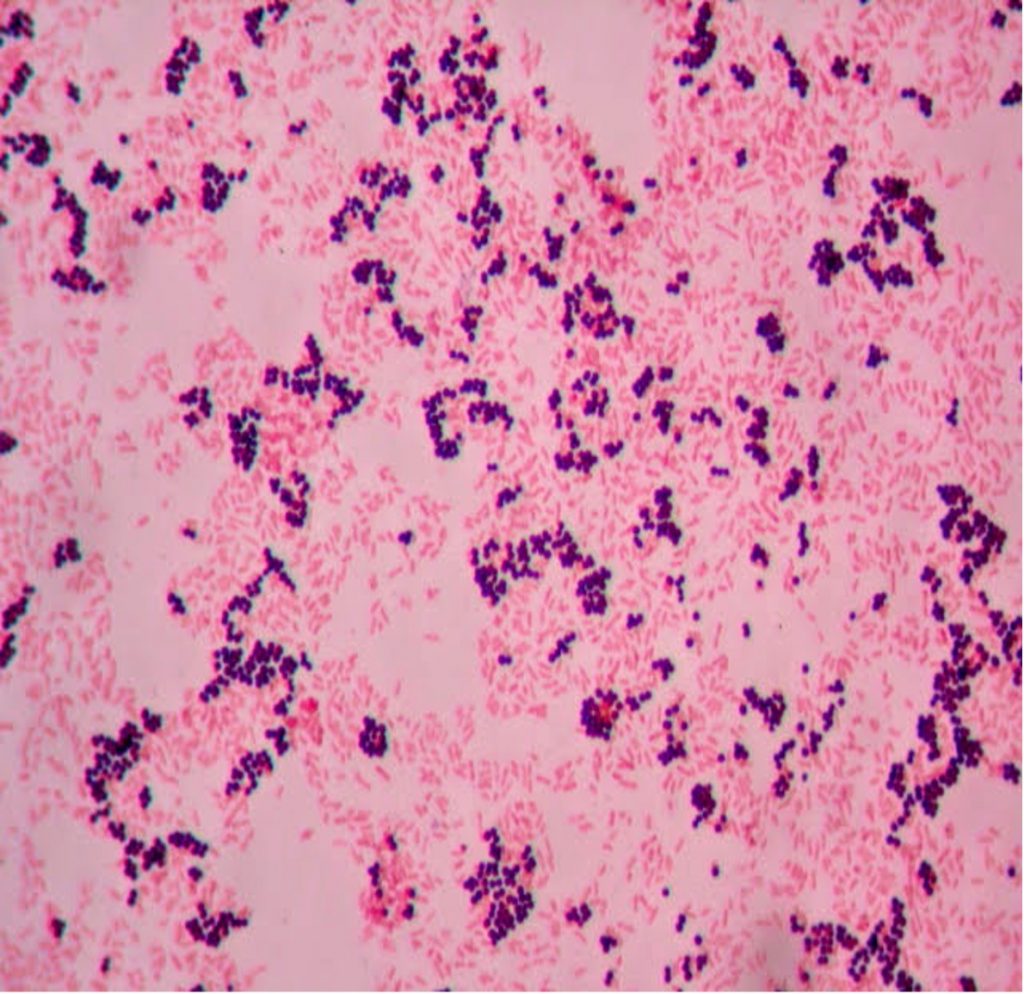
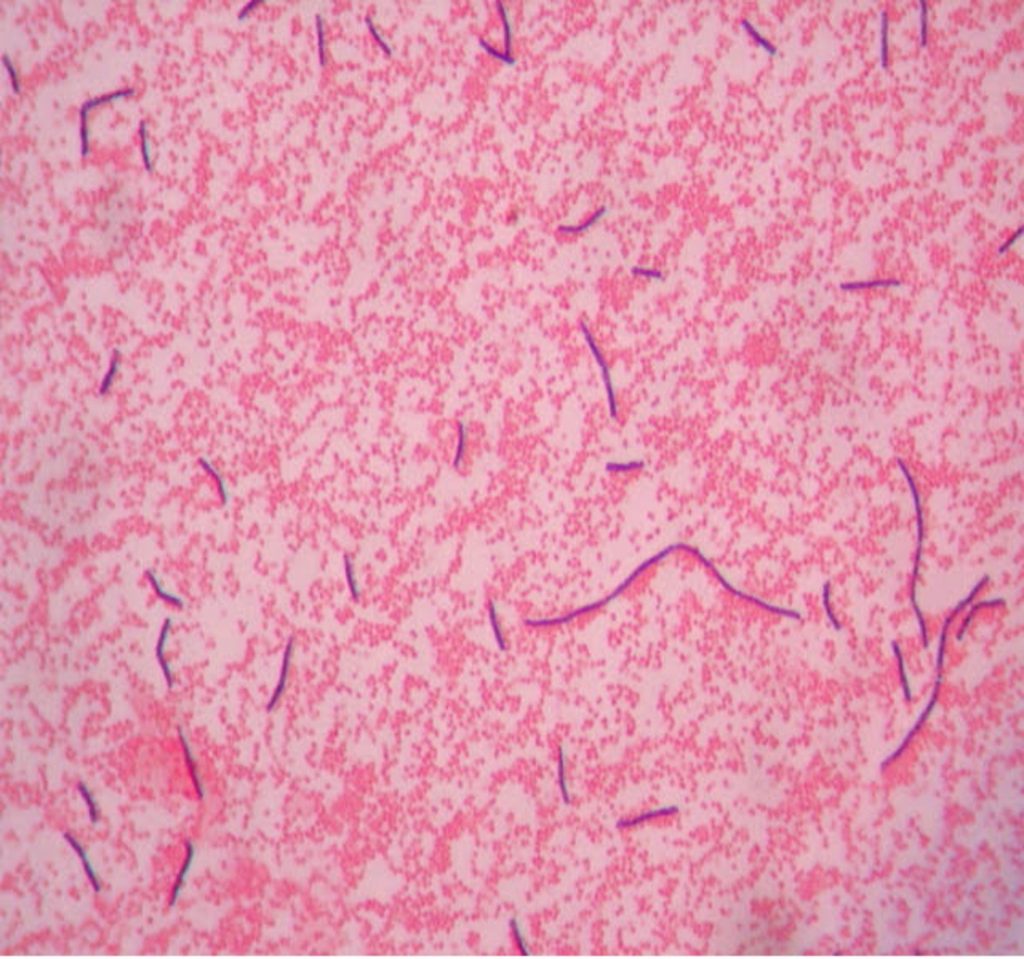
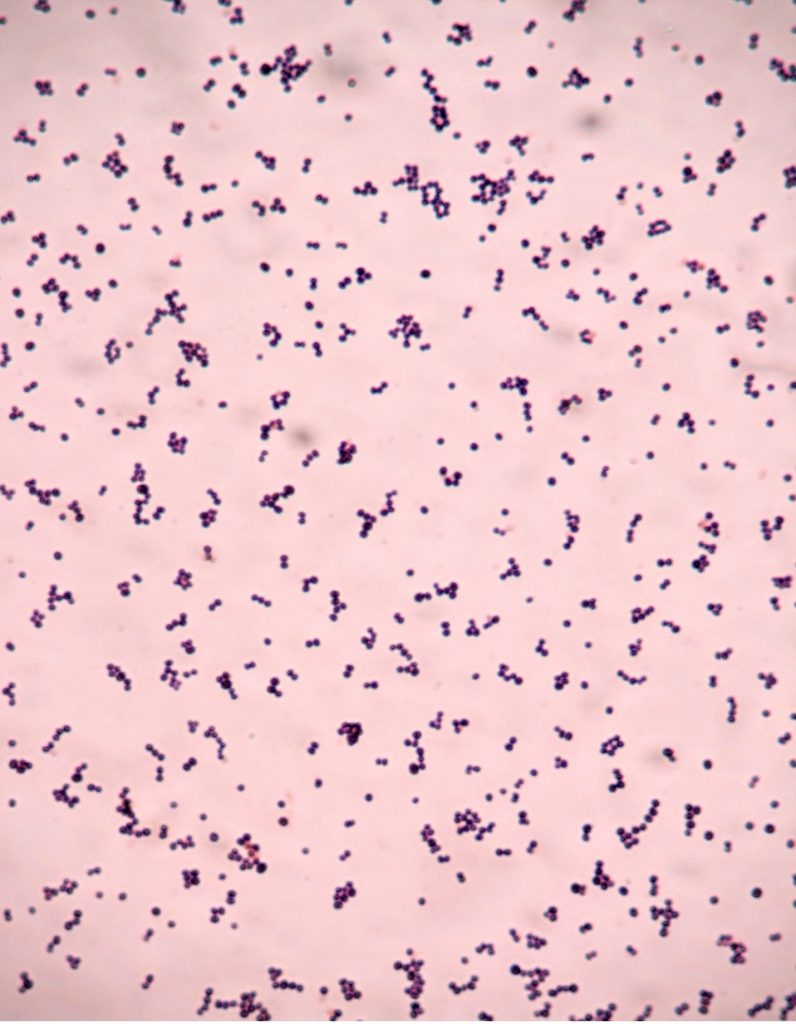
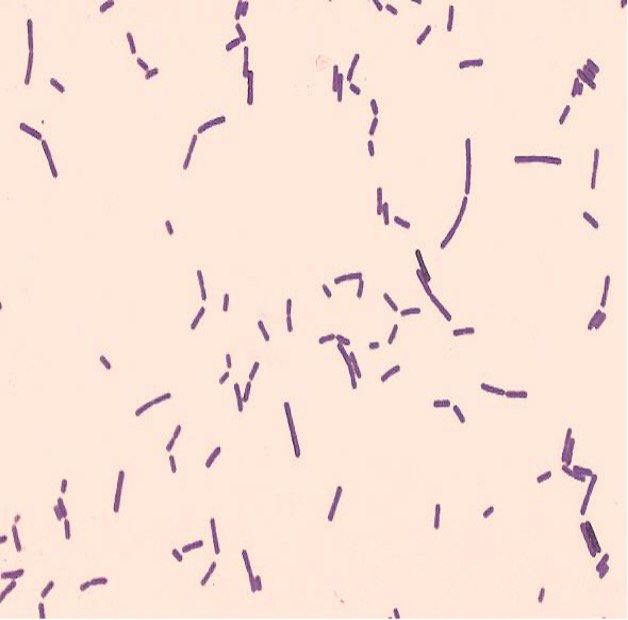
In a simple stain, the bacteria are stained with one positively charged stain, staining the bacteria the same color. In a differential stain, the bacteria are stained with two positively charged stains, staining the bacteria two colors. Simple stains provide basic information about size, morphology (shape), and arrangement. Differential stains provide information about size, shape, and arrangement, but also tells us something else about the bacteria (does the wall contain mycolic acid, are the bacteria endospore formers, the structure of the cell envelope). The Gram stain, developed by Christian Gram in 1884, is the most widely used differential stain. The Gram stain divides bacteria into two groups (Gram positive and Gram negative) based on cell envelope composition.
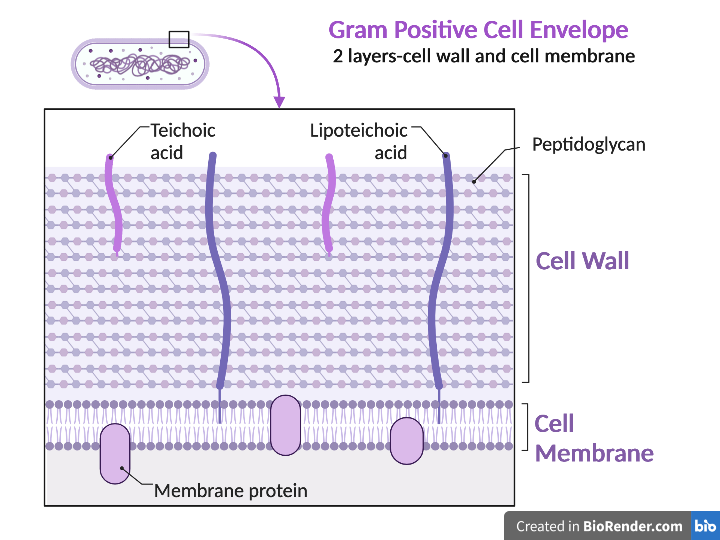
Gram positive bacteria have a cell envelope composed of two layers, a cell wall and a cell membrane. The Gram-positive cell wall is composed of hundreds of layers of peptidoglycan. The peptidoglycan layers are linked together by teichoic acids and lipoteichoic acids which anchor the peptidoglycan layers to the underlying cell membrane, respectively. The cell membrane lies underneath the thick cell wall.
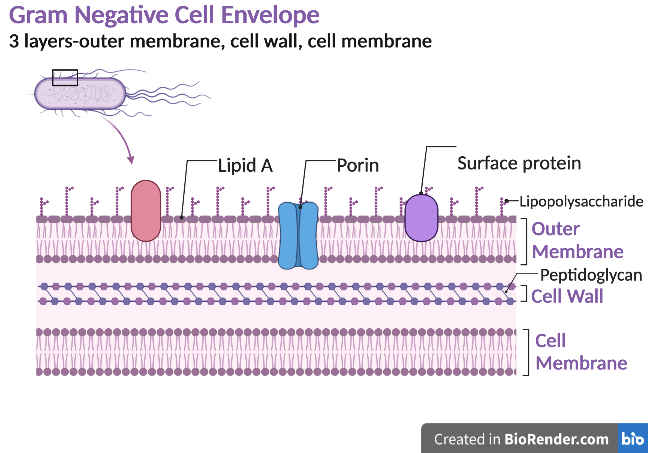
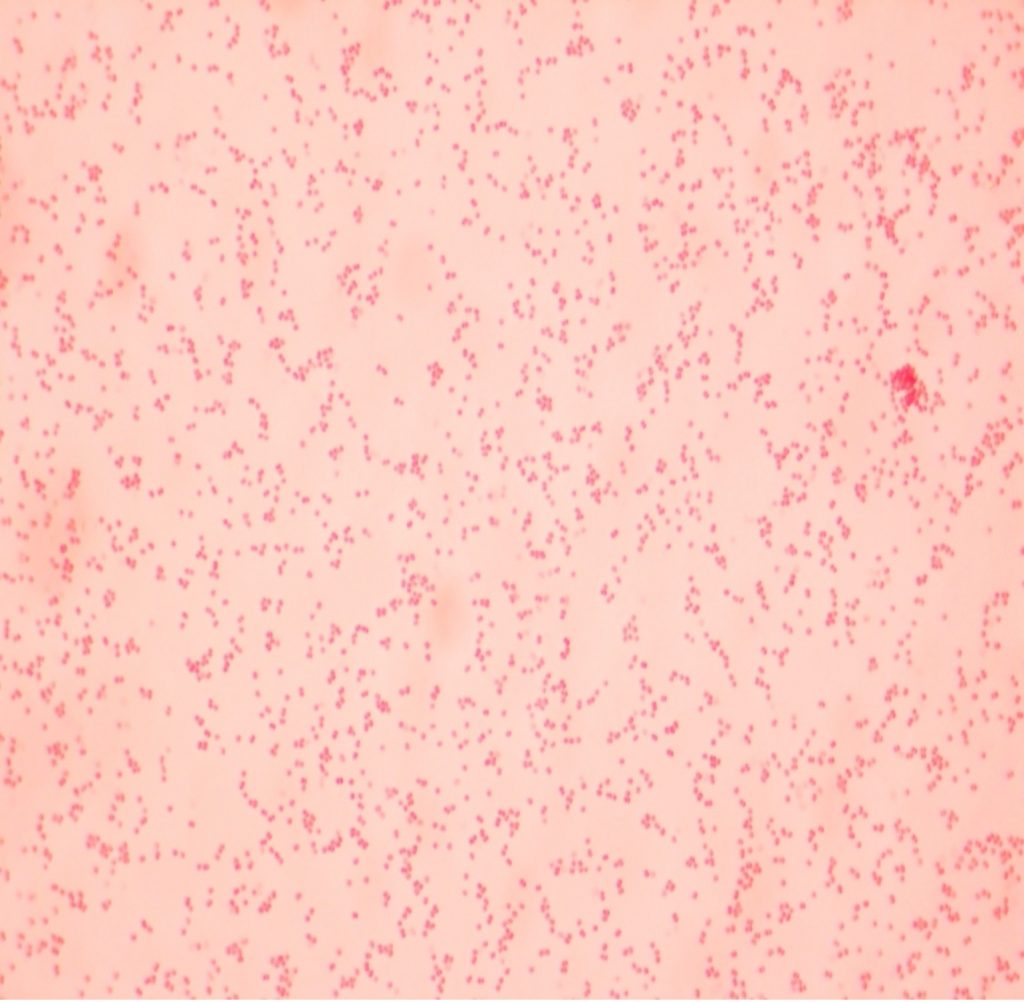
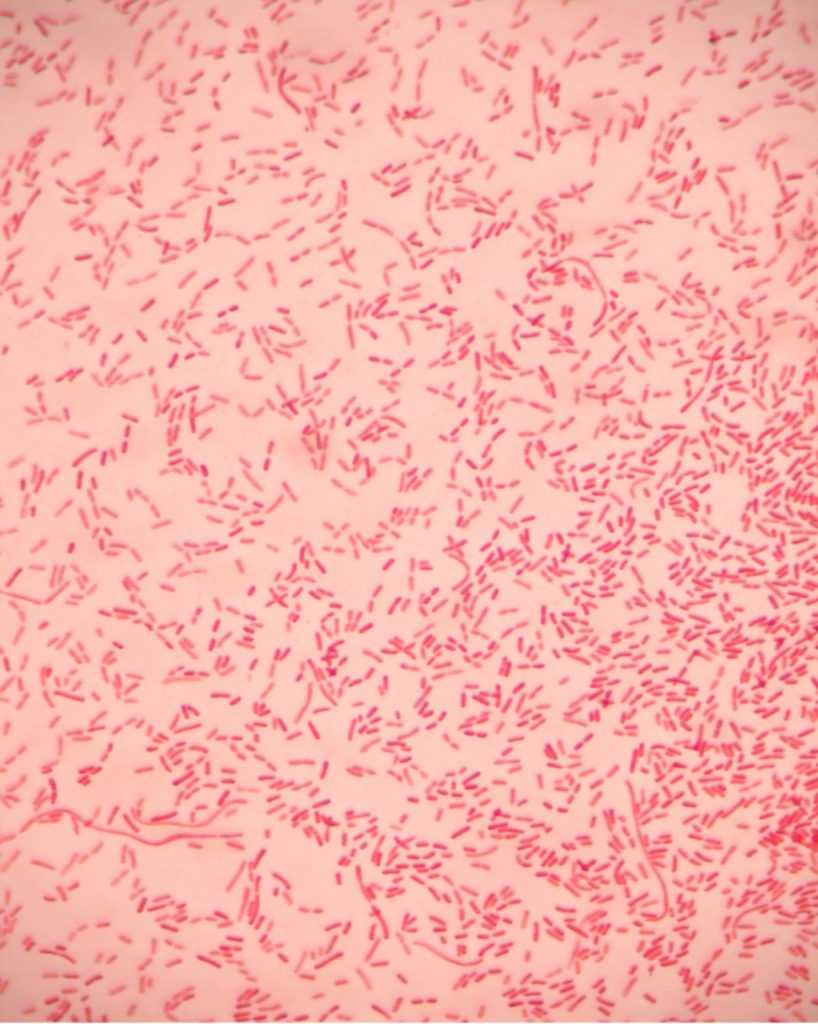
Gram negative bacteria have a cell envelope composed of three layers, an outer membrane, a cell wall, and a cell membrane. The outer membrane contains lipopolysaccharides in addition to phospholipids and proteins. The cell wall of Gram-negative bacteria is composed of just a few layers of peptidoglycan and does not contain teichoic acids. The cell membrane lies underneath the thin cell wall.
Gram stain reagents:
Crystal violet–primary stain
Gram’s Iodine–mordant that combines with crystal violet in the cell
Alcohol OR Acetone- alcohol (75% ethanol :25% acetone) –the decolorizer
Safranin–counterstain or secondary stain
The Gram stain uses four reagents. Crystal violet enters the peptidoglycan of all bacteria giving them a purple color. The next reagent is Gram’s iodine which combines with the Crystal violet to make a bigger complex in the peptidoglycan wall. The next step is the most critical. Acetone-alcohol or alcohol is used as a decolorizer which will dissolve the lipids in the outer membrane of Gram-negative cell walls. The Crystal violet-iodine complexes leak out of the thin Gram-negative cell wall. Since Gram positive cell walls lack an outer membrane, they do not decolorize and thus their thick peptidoglycan cell walls are able to retain the Crystal violet-iodine complexes. The secondary or counterstain safranin, is used to stain the Gram-negative bacteria since they lost the primary stain during decolorization. The Gram stain has proven to be very useful in the identification of bacteria and in predicting which antibiotics are most likely to be effective.
virtual gram stain exercise
Photo Requirement:  Take a photo of the slide at the end of the Gram Stain simulation that states You have completed the Gram Staining virtual lab. Paste the screenshot or photo into The Virtual Gram Stain and Microscope Questions Document.
1. Go to https://virtuallabs.nmsu.edu/stain.php
2. Below this image click Continue 
3. Listen to the information on each slide in chapter 1. Click continue after you listen to each slide.
4. Listen to the information on each slide in Chapter 2. Click continue after you listen to each slide.
5. In Chapter 3 you will prepare a slide to Gram stain. Listen to the information and perform the tasks described on each slide in Chapter 3. Click continue after each slide.
6. In Chapter 4 you will perform the Gram stain procedure with assistance. Listen to the information and perform the tasks described on each slide in Chapter 4. Click continue after each slide.
7. In Chapter 5, you will perform the Gram stain procedure without assistance. Listen to the information and perform the tasks described on each slide in Chapter 5. Click continue after each slide.
8. In Chapter 6, you will view the slides under a microscope. Listen to the information on each slide in Chapter 6. Click continue after each slide.
9. When you reach the end of the simulation, take a photo of the slide at the end of the Gram Stain simulation that states you have completed the Gram Staining virtual lab. Paste the screenshot or photo into The Virtual Gram Stain and Microscope Questions Document.
The microscope
Microorganisms are too small to see with an unaided eye and a microscope must be used to visualize them. Proper use of the microscope will be an extremely important tool in your study of microbiology. Two major types of microscopes have been developed – the compound microscope and the electron microscope. While the compound microscopes utilizes light waves from a light bulb, the electron microscope uses high energy electrons.
Several types of compound microscopes are available including phase contrast, brightfield, darkfield, and fluorescent. In this exercise, we will use a binocular brightfield microscope whose name reflects the fact that the field (background) is bright in color while the microorganisms are dark. This is the most common type of microscope used by microbiologists.
Magnification is the ability of the microscope to enlarge an object. Compound microscopes have two magnifying lenses – the objective lens and the ocular (eyepiece) lens. The function of the ocular lens is to magnify an image ten times (10X). Most brightfield microscopes have four objective lenses attached to a revolving nosepiece: the scanning objective (4x), the low power objective (10X), high-dry objective (40X), and oil immersion objective (100X).
As each objective is rotated into alignment, the specimen is magnified first by the objective lens and then the ocular lens. This magnified image is then transmitted to the human eye. Therefore, the total magnification of the specimen is calculated by multiplying the magnification of the objective lens times the magnification of the ocular lens. Total magnification = Ocular x Objective
The two factors that determine how well you will see your specimen are the magnification and the resolving power (or resolution) of your microscope.
Resolving power (or resolution) is measured by how well your microscope can show two lines lying close together as two distinct lines. This depends on the wavelength of the light (smaller wavelengths of light produce better resolution) and the numerical aperture (written on the side of the lens). The numerical aperture describes how well your lens can gather light.
As the magnification increases, field of view and light decrease. To increase the light intensity, the rheostat is turned clockwise, and the iris diaphragm opening is progressively enlarged. The condenser will concentrate the light beam onto the specimen; therefore, the light must be positioned in the center of the field of view.
The refractive index determines how much light is bent when entering a material. Immersion oil, which has the same refractive index as glass, minimizes the amount of light that is refracted or lost. The oil immersion objective must be immersed into a drop of oil to achieve a clear, distinct image
Immersion oil on any other objective lenses will result in a fuzzy, distorted image. Therefore, once you have added oil to the slide, DO NOT rotate the 40X objective through the oil. Since there is a larger working distance, the space between the objective lens and the surface of the slide, it is acceptable to switch to 4X or 10X objectives without concern that the oil on the slide will come in contact with the objective.
Microscope photo album that includes labeled microscope photos.
Let’s go through the steps for setting up and using a brightfield microscope
Setting up the Microscope
1. Turn on the light bulb by setting the main power switch, then turn the rheostat knob clockwise to make the illumination brighter.
2. While looking into the oculars, adjust the binoculars until the right and left fields coincide completely and one circle of light is seen. The distance between the right and left ocular is your “interpupillary distance”. Each time you look into a binocular microscope, adjust the oculars to this setting.
Focusing the Microscope on Low power (4X)
3. Lower the stage to its lowest position using the course focus knob.
4. Open the spring-loaded curved finger of the specimen holder and slide the specimen as far back as it will go. Gently release the curved finger so the slide is locked into place. The slide can now be moved forward/back and left/right using the X- and Y-axis mechanical stage knobs.
5. Move the mechanical stage knobs until the specimen is centered above the light shining up through the stage.
6. Rotate the revolving nosepiece until the scan (4X) objective locks into place.
7. While looking into the oculars, SLOWLY lower the stage by rotating the course adjustment knob until the specimen can be seen in the field of view.
8. SLOWLY turn the fine adjustment knob until the specimen comes into sharp, clear focus.
Increasing the Magnification to Low and High Power (10-40X)
9. Without moving the slide or the stage, carefully rotate the low power (10X) objective into place. SLOWLY turn the fine adjustment knob until the specimen comes into sharp, clear focus.
10. Carefully rotate the high-dry objective (40X) into place. The working distance between the objective and slide will decrease considerably. NEVER FORCE the objective into place.
11. SLOWLY turn the fine adjustment knob while looking through the ocular until the more magnified image becomes clear.
Your microscope is parfocal, meaning when a specimen is in focus with one objective, it will be approximately in focus with other objectives. Thus, it will take a minimal amount of refocusing to bring the image into sharp focus on high power.
To avoid cracking the slide and damaging the objective lens, NEVER USE THE COURSE ADJUSTMENT KNOB AT THIS POINT.
IF YOU ARE UNABLE TO FOCUS, GO BACK TO 10X AND REFOCUS THE SLIDE BEFORE CONTINUING.
12. Remember, as you increase magnification, the field of view and the light will decrease. To increase the light intensity, adjust the rheostat knob or iris diaphragm if necessary.
Increasing the Magnification to Oil Immersion (100X)
13. To further increase the magnification of the specimen, move the nosepiece until it is halfway between the high-dry (40X) objective and the oil immersion (100X) objective.
14. Place a drop of immersion oil directly on the specimen. Carefully rotate the oil immersion (100X) objective until it locks into place. THE OBJECTIVE LENS SHOULD BE IMMERSED IN THE DROP OF OIL.
15. Increase the light intensity by adjusting the rheostat knob or iris diaphragm.
16. Slowly turn the fine adjustment knob until the specimen becomes clear.
To avoid cracking the slide and damaging the objective lens, NEVER USE THE COURSE ADJUSTMENT KNOB AT THIS POINT.
IF YOU ARE UNABLE TO FOCUS, GO BACK TO 4X OBJECTIVE AND REFOCUS THE SLIDE BEFORE CONTINUING.
17. To change slides, rotate the 4X objective into place. DO NOT LOWER THE STAGE. Remove the slide from the mechanical stage clips and insert the next specimen. Since you did not change any settings, the next slide should be almost in focus.
Virtual Microscope Exercise
In addition to magnifying organisms, most cells are colorless so many times preparing slides also involves adding stains (dyes) to color the cells so they are more easily viewed. The slides you will practice with today are either naturally pigmented or have been stained so we can find them more easily.
Photo Requirement: As you complete the virtual microscope exercise, take a photo or screenshot under the 100X objective lens of the letter E slide, blood slide, onion root slide, and endospore stain slide. Paste the screenshots or photos into The Virtual Microscope Questions Document.
PROCEDURE 1: Introduction to the Microscope and its Parts
1. Go to http://www.ncbionetwork.org/iet/microscope/
2. Click on the Guide link (bottom of the home page).
3. Click through the six parts of the Guide (Introduction, Overview, Objective Lenses, Immersion Oil Lens, Microscope Care, Terminology), starting with the Introduction. You can use the arrows at the bottom of the Guide box to guide you through the chapters.
4. When you have completed all six sections, click Close.
5. Next click on the Learn link (bottom of the page), which will take you to an image of a microscope with question marks.
6. Starting at the top of the microscope, click on the question marks identifying the parts of the microscope.
7. Read the description of the part of the microscope.
8. Continue clicking on question marks until all turn to green check marks. You may click on any green check mark to review any part of the microscope.
9. Click on the Next button (bottom right).
10. Start on the left and click on the question mark. When the lens enlarges, click on each question mark until each turns into a green check mark. Read the descriptions.
11. Click on the Next button (bottom right).
12. Click on the Dry Slide and Oiled Slide buttons to see the difference in why immersion oil is used for the 100X objective lens.
13. Click on the Next button (bottom right).
14. Click on the Eyepiece Options and Lens Options to learn about calculating total magnification. Try all combinations and see how the Letter E slide image changes.
15. Click on the Next button (bottom right) to return to the home page.
PROCEDURE 2: How to use a Compound Microscope to View Slides
LETTER E SLIDE
1. Click on the Explore link (bottom of the home page).
2. Click on the question mark on the slide box.
3. In the Slide Catalog, click on the Sample Slides.
4. Click on the Letter E slide. It will automatically be placed on the stage of the microscope.
5. When the Microscope View window opens, make sure that the 4X circle is highlighted in blue.
NOTE: Always begin examining slides with the lowest power objective.
6. Use the slider under Coarse Focus to find the E.
NOTE: The coarse adjustment knob should only be used when you are viewing a specimen with the 4X and 10X objective lens.
7. Then use the slider under Fine Focus to make the image “crisp and clear.”
8. You can click on the E in the viewing window to move the image and visualize different parts.
9. Next click on the 10X circle. The nosepiece on the microscope will rotate automatically.
10. Click on the 40X circle and repeat step 7. You may need to use the slider under Light Adjustment for better visualization. Click on the 100X circle.
A notice to add immersion oil will open.
11. Click on the question mark on the immersion oil bottles to add oil to the microscope.
12. Repeat step 7. You may need to use the slider under Light Adjustment again for better visualization.
13. Take a screenshot or take a photo of what is visible of the letter E under the 100X objective lens.
14. When you have visualized the Letter E slide using all 4 objective lenses, click on Remove Slide (top right).
15. Read the notice about using lens paper to clean the immersion oil off the microscope and click on the question mark over the lens paper. Choose Wisely!
BLOOD SLIDE
1. Click on the question mark on the slide box.
2. In the Slide Catalog, click on the Human Slides.
3. Click on the Blood slide. It will automatically be placed on the stage of the microscope.
4. When the Microscope View window opens, make sure that the 4X circle is highlighted in blue.
5. Use the slider under Coarse Focus to find the blood.
6. Then use the slider under Fine Focus to make the image “crisp and clear.”
7. You can click on the blood in the viewing window to move the image and visualize different areas.
8. Next click on the 10X circle. The nosepiece on the microscope will rotate automatically. Repeat steps 5-6.
9. Click on the 40X circle and repeat step 6. You may need to use the slider under Light Adjustment for better visualization. Click on the 100X circle.
A notice to add immersion oil will open.
10. Click on the question mark on the immersion oil bottles to add oil to the microscope.
11. Repeat step 6. You may need to use the slider under Light Adjustment again for better visualization.
12. Take a screenshot or take a photo of the Blood under 100X objective lens.
13. When you have visualized the Blood slide using all 4 objective lenses, click on Remove Slide (top right).
14. Read the notice about using lens paper to clean the immersion oil off the microscope and click on the question mark over the lens paper.
ONION ROOT SLIDE
1. Click on the question mark on the slide box.
2. In the Slide Catalog, click on Plant slides.
3. Click on the Onion Root slide. It will automatically be placed on the stage of the microscope.
4. When the Microscope View window opens, make sure that the 4X circle is highlighted in blue.
5. Use the slider under Coarse Focus to find the onion root.
6. Then use the slider under Fine Focus to make the image “crisp and clear.”
7. You can click on the onion root in the viewing window to move the image and visualize different areas.
8. Next click on the 10X circle. The nosepiece on the microscope will rotate automatically. Repeat steps 5-6.
9. Click on the 40X circle and repeat step 6. You may need to use the slider under Light Adjustment for better visualization. Click on the 100X circle.
A notice to add immersion oil will open.
10. Click on the question mark on the immersion oil bottles to add oil to the microscope.
11. Repeat step 6. You may need to use the slider under Light Adjustment again for better visualization.
12. Take a screenshot or take a photo of the Onion Root under 100X objective lens.
13. When you have visualized the Onion Root slide using all 4 objective lenses, click on Remove Slide (top right).
14. Read the notice about using lens paper to clean the immersion oil off the microscope and click on the question mark over the lens paper.
ENDOSPORE STAIN SLIDE
1. Click on the question mark on the slide box.
2. In the Slide Catalog, click on Bacteria slides.
3. Click on the Endospore Stain slide. It will automatically be placed on the stage of the microscope.
4. When the Microscope View window opens, make sure that the 4X circle is highlighted in blue.
5. Use the slider under Coarse Focus to find the endospore stain.
6. Then use the slider under Fine Focus to make the image “crisp and clear.”
7. You can click on the endospores and bacteria in the viewing window to move the image and visualize different areas.
8. Next click on the 10X circle. The nosepiece on the microscope will rotate automatically. Repeat steps 5-6.
9. Click on the 40X circle and repeat step 6. You may need to use the slider under Light Adjustment for better visualization. Click on the 100X circle.
A notice to add immersion oil will open.
10. Click on the question mark on the immersion oil bottles to add oil to the microscope.
11. Repeat step 6. You may need to use the slider under Light Adjustment again for better visualization.
12. Take a screenshot or take a photo of the Endospore Stain under 100X objective lens.
13. When you have visualized the Endospore Stain slide using all 4 objective lenses, click on Remove Slide (top right).
14. Read the notice about using lens paper to clean the immersion oil off the microscope and click on the question mark over the lens paper.
DISCOVERIES IN MICROBIOLOGY
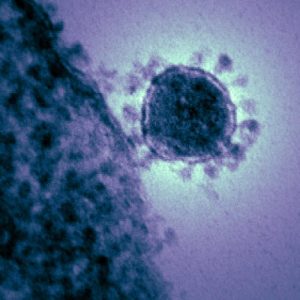 JUNE ALMEIDA
When Scottish virologist June Almeida peered into her electron microscope in 1964, she saw a round, grey dot covered in tiny spokes. She and her colleagues noted that the spikes formed a halo around the virus, much like the sun’s corona. What she saw would become known as the coronavirus. In 2019, when a strange disease first appeared in China, researchers used Almeida’s pioneering work to identify the culprit as another coronavirus, a type called SARS-CoV-2, which causes COVID-19.