
Access Practice 1

Prefer to watch and learn? Check out this video tutorial:
Complete the following Practice Activity and submit your completed project.

Since Microsoft Access is widely used in industry, and we are using Microsoft Windows, we will focus on this DBMS going forward. There are many similarities across database systems, so the skills we are learning can be translated to other systems. The following ‘Practice It’ assignments are designed to be completed using Microsoft Access in Office 365 on a PC with Windows 10 or higher. You may need to download the Professional version of Office 365 (which is free to students) to view Access.
We will use Access to analyze, design, and create a database to extract, sort, calculate, and report business data. Since Access is used for Data Analysis, it is best to use a keyboard and mouse or touchpad rather than the touchscreen.

In Access, data is stored in Tables. This is the foundation of the database. Tables can be related to one another to create a relational database, which is a robust database. Each table row contains a record, and each table column is a field.
For our first assignment in Access, we will use a database template to become familiar with database structure including tables, forms, queries and reports.
- Start Access. In the search for online templates box, type Students and then press Enter. If you receive an error message, ensure you are connected to the Internet.
- Select the Students template database. Name the database Lastname_Firstname_Access_Practice1. Click the folder icon next to the file name to save the database on your flash drive or other safe location. After you name the database, click create. Access is different from other software since you must give the file a name before you start entering information.
- It may take a few moments for the database to load. If a Welcome window opens, you can close this. If a yellow bar displays across the top of the database, select Enable Content.
- Once the database is open, take a moment to view the database window.
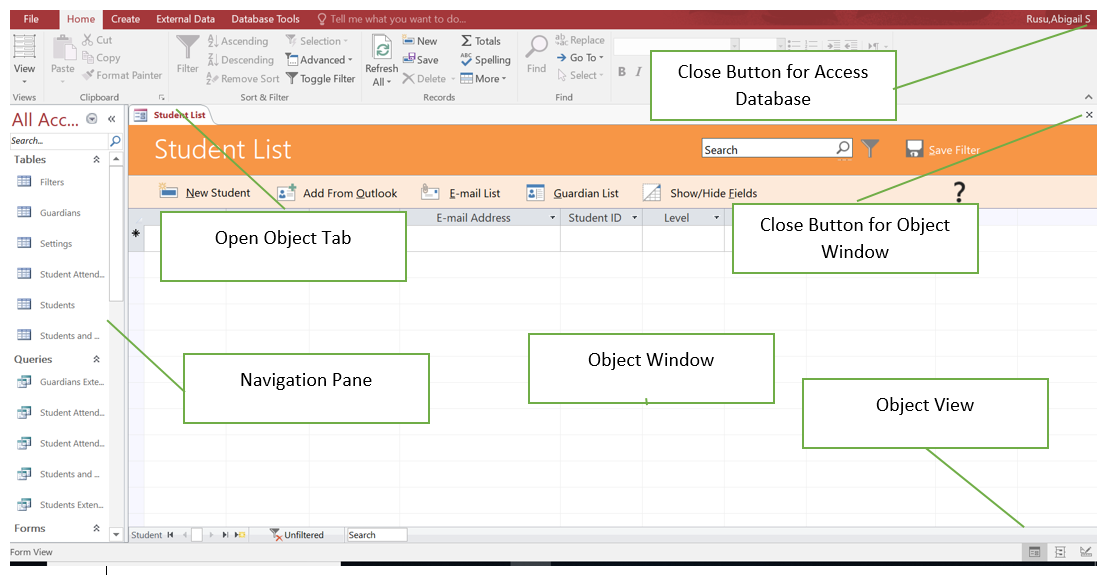
- In the navigation pane, click the shutter bar once to close the Navigation Pane. Click it again to open it. The shutter bar looks like two arrows pointing to the left on the navigation bar.
- In the Navigation pane, click the downward pointing arrow next to All Access Objects. Ensure Object Type and All Access Objects are checked.
- Notice how the Student List is the current open Access Object. On the Home Tab, in the Views Group, choose the arrow below Views. Notice how Form View is selected. Change the view to Layout View, and notice the change in the object window. Then change the view to Design View, and notice the change in the object window. Return view to Form View.
- Close the Student List from by clicking the x in the object window. Take care to not close the entire database, rather only close the open object. The database window should be empty.
- From the navigation pane, under tables, double click the Students Table. On the Home Tab, in the views Group, click the arrow under View. Notice how the table opened in datasheet view.
- The ID field name has autonumber as the data type. This means that the ID will be automatically assigned, and you do not have the option to type it in. Ensure you are on the Fields tab under table tools.
- The Last Name field has a data type of short text, so you can enter a value here. Under Last Name, type in your last name and then press tab.
- In the First Name field, type your first name and press tab. Continue to enter data for the E-mail address, and Student ID. You can make up data for these values. Notice how Level is a drop down box.
- On the Home Tab, in the Views group, change the table view to Design view. Notice the Fields Names and Data Types. These are the two required attributes to add a new field.
- Close the Students table. Notice how a warning to save did not pop up. Changes to tables in Access save automatically. Double click the students table to open it and view the data you just entered. Then, close the table.
- From the navigation pane under Queries, double click the Students Extended query to run it. The query opens in datasheet view and displays the query results. You should see the record you added on the Students table.
- On the home tab, in the Views group, change the View to Design View. Notice the Students table in the upper portion, and the query grid with fields in the bottom section.
- Close the Students Extended query.
- From the navigation pane under Forms, double click the Student List form to open it. Notice how it opens in Form View.
- You should see the record you added to the Students table.
- Under the first name field, the left of (New) enter data for First Name, Last Name, and email. You can enter any data.
- On the Home Tab, in the Views group, change the View of the Form to Layout View. Notice the changes in the Object Window. Then change the view to design view and notice the changes in the Object Window. Close the Students List object.
- From the navigation pane under Reports, double click the All Students report to run it. You should see three student records you added.
- On the Home Tab, in the Views group, change the View of the Report to Print Preview. Notice how changes to the report cannot be made in this view. Click the red X to Close Print Preview and return to Report View.
- Change the view of the report to Layout View. Notice how if a field is selected, you can move it and rearrange it within the report.
- Change the view of the report to Design view. This is also known as Developer’s view because it is the most powerful view. Anything can be modified in this view. Close the report without saving changes if prompted.
- To exit out of the database, first close any database objects that are open. It is good database practice to only have one database object open at a time. Select the File tab, and take note of where your database is saved. Then select close. Ensure your database is saved in your Access folder. Then, exit out of Access.
- Submit your entire database for grading per your instructor’s instructions.
Media Attributions
- Practice It Icon © Jessica Parsons is licensed under a CC BY (Attribution) license
- Colleagues with iPad © Jordan Nicholson/Disability:IN is licensed under a CC BY-ND (Attribution NoDerivatives) license
- Phone and laptop © WOCInTech/Nappy is licensed under a CC0 (Creative Commons Zero) license
An arrangement of information organized into rows and columns
A record in a table represents a set of related data
A single piece of information that is stored in every record and is represented by a column in a database table
An area of the Access window that displays and organizes the names of the objects in a database and allows objects to be opened for use
A way to sort objects in the navigation pane so they are grouped by type
The Access view in which you can view, modify, delete or add records in a table but you cannot change the layout or design of the form
The Access view in which you can make changes to o form or report while the data from the underlying data and source displays
The Access view that displays data organized in columns and rows similar to an Excel spreadsheet
The description that identifies a field
A data type that describes a unique sequential or random number assigned by Access as each record is entered and that is useful for data that has no distinct field that can be considered unique. This data type cannot be manually changed or typed in
Classification identifying the kind of data that can be stored in a field such as numbers, text or dates
An Access data type that describes text which can be a combination of letters and numbers that are not used in calculations, such as zip code
The Access view that displays data organized in columns and rows similar to an Excel spreadsheet
A backstage view feature that displays on the screen what a hard (printed) copy would looks like
A Report view that is the default view used when you double-click a report in the Navigation Pane
Also known as Design View. The most powerful view in Access
