
Word Practice 6

Prefer to watch and learn? Check out this video tutorial:
Complete the following Practice Activity and submit your completed project.
For Word Practice 6, we will use Word to create a newsletter for Health Sciences students at PVCC. Key skills in this practice are formatting text as columns, editing pictures, inserting screen clips, symbols and special characters.
- Start Word and open Starter_Word_Practice6. Save the file as Yourlastname_Yourfirstname_Word_Practice_6 in your Word folder.
- Using Document Info, insert the file name in the footer.
- Select the first paragraph that begins with Paradise and apply Bold text and change the font color to Blue-Gray, Text 2.
- With the title still selected, go to the Home Tab, Paragraph Group, select the arrow next to Borders and choose Borders and Shading to launch the Dialog Box. Add a Blue-Gray, Text 2Darker 25%, 2¼ pt solid line bottom border.
- Select all the text beginning with Health Sciences Newsletter down to the end of the document excluding the final paragraph.
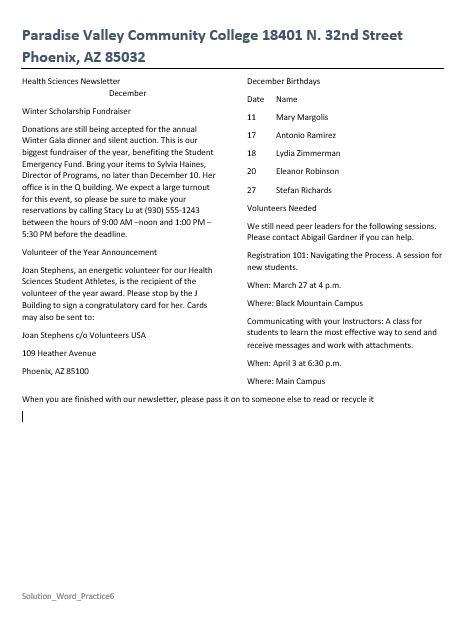
- On the Layout Tab, Page Setup Group, Set the columns to two. Compare your screen to the image below:
- With the two columns of text still selected, change the spacing after to 6 pt and Justify the text.
- Position the insertion before December Birthdays and insert a column break on the Layout tab, beaks group, and select column. This will ensure the column of December Birthdays is a new column.
- Position the insertion point at the end of the document in the empty space after the paragraph that begins with When you are finished…
- On the Insert tab, Illustrations Group, Select Pictures. Browse to where your data files are stored and insert the Health Sciences Logo named Word_Practice_6_Image1.
- With the picture selected, on the Picture Tools, Format toolbar set:
-
- The picture height to 2.0″.
- The text wrapping layout to Top and Bottom.
- The horizontal alignment to Centered, relative to Column.
- The vertical alignment to Bottom, relative to Margin.
- Select OK.
- With the picture selected, on the picture tools, Format toolbar, in the Size group, choose the arrow under Crop.
- Using the Cropping handles on the picture, crop the picture by using the far right crop handle and dragging to the left until only the circle heart logo is visible. Everything in the gray area will be cropped.
- With the image still selected, choose layout options. Use the Text Wrapping tab to change the layout text wrapping to Square. Choose more. Under options, choose Lock Anchor.
- Use the Position tab to set the horizontal alignment to Centered, relative to Page.
- With the image still selected, zoom to 200%.
- On the Picture Tools, Format Toolbar, Adjust Group, choose the arrow next to Corrections. Under Sharpen/Soften, choose Sharpen 50%.
- Under Color, choose Saturation 400% for the Color Saturation.
- Under Corrections, set the Brightness/Contrast to Brightness: +20% Contrast +20%.
- With the picture still selected, set the Zoom back to 100%.
- Resize the picture to 2.17” for the height and 2.65” for the width.
- With the picture still selected, on the Picture Tools, Format toolbar, in the Size Group, choose the arrow next to Arrange. Choose the arrow next to rotate and then choose Flip Horizontal.
- Near the top of the document in the left column, delete the word December. Position the insertion point in the blank paragraph under Health Sciences Newsletter.
- Open a new web browser window and navigate to https://www.paradisevalley.edu/degrees-certificates/health-sciences. If you can not find this page, choose a similar one from the Paradise Valley Community College web site.
- Redisplay the newsletter, and ensure the insertion point is in the paragraph below Health Sciences Newsletter. On the Insert tab, click Screenshot, and then click Screen Clipping. Drag from the upper left corner of the browser below the address bar to the lower right corner above the taskbar. Your screen clip may vary based on the resolution and web browser utilized.
- With the Screen Clip selected, resize height to .8” and the width to 3.12. If necessary, remove the lock aspect ratio by launching the Size Dialog box. In the layout Dialog Box, on the Size tab, remove the check next to Lock Aspect Ratio.
- With the picture still selected on the Picture Tools Format tab, choose Quick Styles and select the first Style: Simple Frame White.
- Near the top of the document, select the text Winter Scholarship Fundraiser and:
-
- Change the font color to Blue Gray Text 2.
- Apply Bold
- With the text still selected, launch the Font dialog box. Under effects, choose the checkbox next to small caps.
- Using Format Painter, apply the same formatting to each of the heading paragraphs. To use the Format Painter, select the text. Then select the Format Painter icon on the Home Tab, Clipboard Group. Then select the text that you would like to apply formatting to.
- In the paragraph under the heading Winter Scholarship Fundraiser, delete the comma and space between Sylvia Haines and her title and insert an em dash. This is a special character located on the Insert Tab, Symbols Group, Symbol, More Symbols, Special Characters, Em Dash.
- Select the title of the document that begins with Paradise and ends with 85032.
-
- Apply a Blue Gray Text 2, 1½ pt shadow border
- Apply a Blue Gray Text 2 Lighter 60% shading
- Center the text.
- Position the insertion point in the second column, towards the bottom of the document under Main Campus. On the Insert Tab, Text Group, Select the arrow next to Word Art. In the second row, the second column choose the Word Art Style Gradient Fill-Blue, Accent 1, Reflection.
- With the Word Art still selected use the drag and drop technique to position it centered in the column. Ensure the font size of the WordArt is 28. In the WordArt type: We appreciate you!
- On the Design Tab, Choose Page Borders. In the Page Borders Dialog Box, choose the Box Border, the style with a thick upper line and thin bottom line, Automatic color, 3pt width, to the whole document.
- In Backstage view, add newsletter, March to Keywords, course name and section number to Subject, and make sure your name displays as Author.
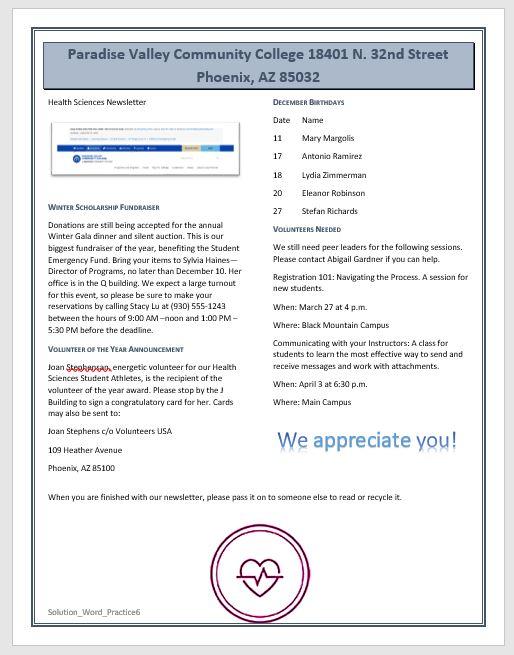
- Save the document and compare it to the image below. Make any adjustments before submitting per your instructor’s instructions.
Media Attributions
- Practice It Icon © Jessica Parsons is licensed under a CC BY (Attribution) license
A printed or electronic report containing news regarding updates for an organization or business and is sent to interested parties
A feature in word that allows you to move your image to any position on the same page as the anchor paragraph which forces the object to stay in that position
A way to enhance picture details or make pictures more appealing by removing unwanted blemishes on a picture
Intensity of the color; higher saturation makes a picture look more vivid, lower saturation makes the colors look more grey
Allows you to capture an image from your screen
An efficient way to add effects to a picture such as shape, border, and other effects
Allows you to capture an image from your screen
Allows you to copy formatting from one item and apply it to another
A punctuation symbol that indicates and explanation or emphasis
Normal characters that don't appear on standard keyboards; but once inserted into a Word doc, they look the same as keyboard characters
Gallery of text styles that you can add to your publications to create decorative effects, such as shadowed or mirrored (reflected) text
